Proctoring configuration
The proctoring configuration defines what is monitored, which incidents are detected, and how they affect the integrity score and review outcome. The page provides two pre-built configurations and allows you to create custom configurations.
Pre-built configurations
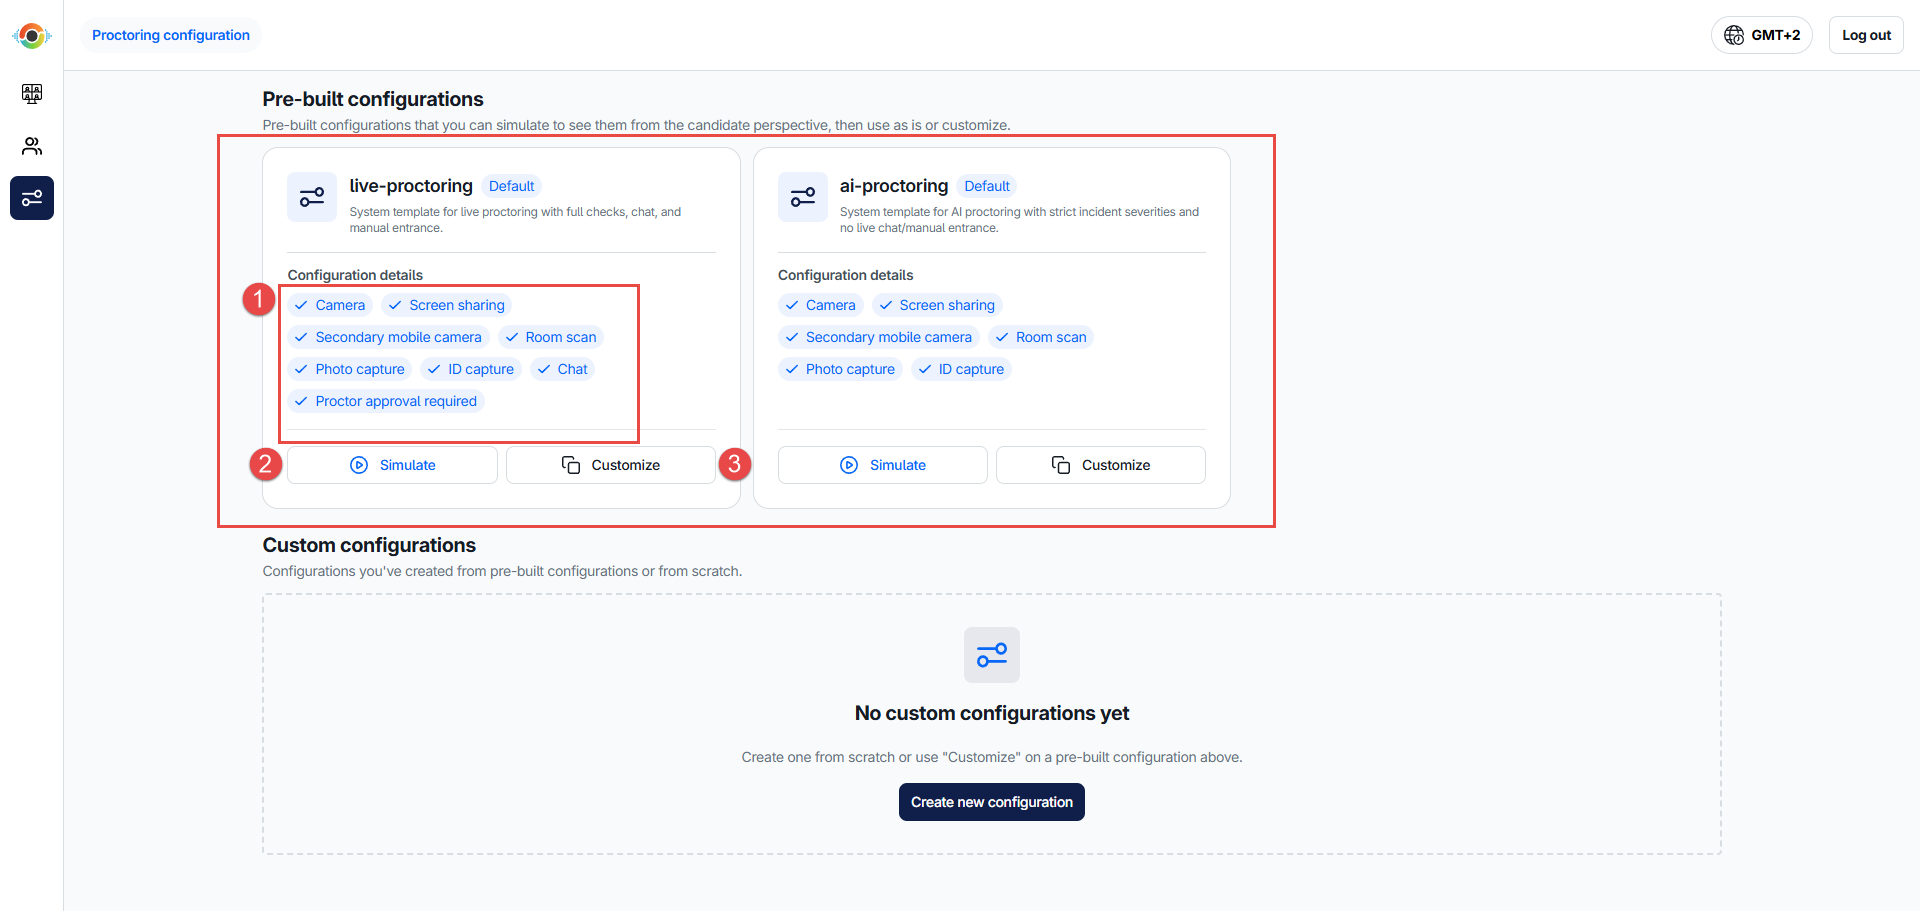
The system includes two pre-built configurations:
- Live proctoring
- AI Proctoring
For each pre-built configuration, you can:
- View configuration details to see which monitoring options and features are enabled.
- Simulate the configuration to preview the candidate experience and verify the setup.
- Click Customize to create a custom configuration based on the selected pre-built configuration. This opens a configuration wizard. When you save the configuration, a new custom configuration is created. Pre-built configurations cannot be modified directly and can only be saved as new custom configurations.
Custom configuration
If you customize a pre-built configuration, the saved version appears under Custom configuration. You can also click Create new configuration to create a configuration from scratch.
Settings
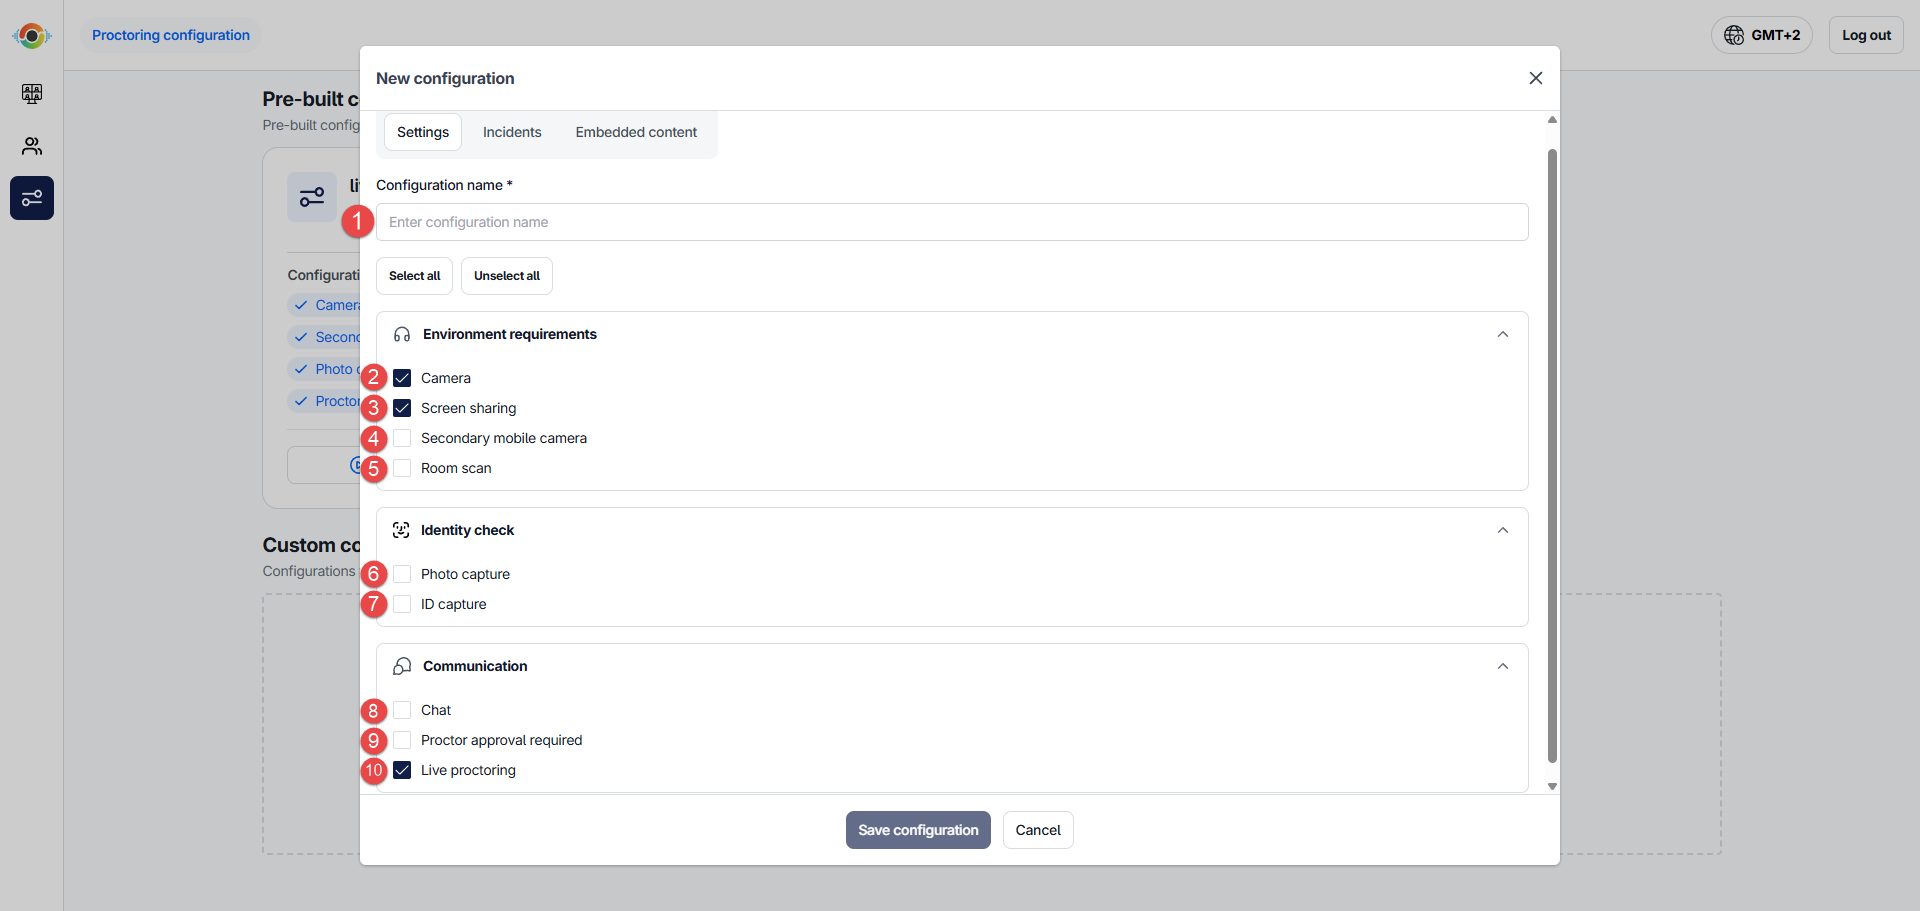
- Enter the configuration name.
- Camera – if enabled, candidates will be prompted by their browser to allow camera access for live or recorded monitoring.
- Screen sharing – candidates will be prompted to share their entire screen for live or recorded monitoring.
- Secondary mobile camera – if enabled, candidates will be required to scan a QR code and connect a mobile device, providing an additional camera view of the candidate and their surroundings for enhanced monitoring.
- Room scan – candidates will be required to scan a QR code and record a short video of their room and workspace for proctor review.
- Photo capture – candidates will be required to take a photo of their face for identity verification purposes.
- ID capture – candidates will be required to take a photo of their identification document for identity verification purposes.
- Chat – enables communication between proctors and candidates during live monitoring.
- Proctor approval required – if enabled, candidates cannot start the exam until a proctor reviews the available verification materials and grants approval.
- Live proctoring – if disabled, proctors cannot access live monitoring, and only recordings will be available for review.
Incidents
Select which incidents the system should monitor and configure how they affect the integrity score and review outcome.
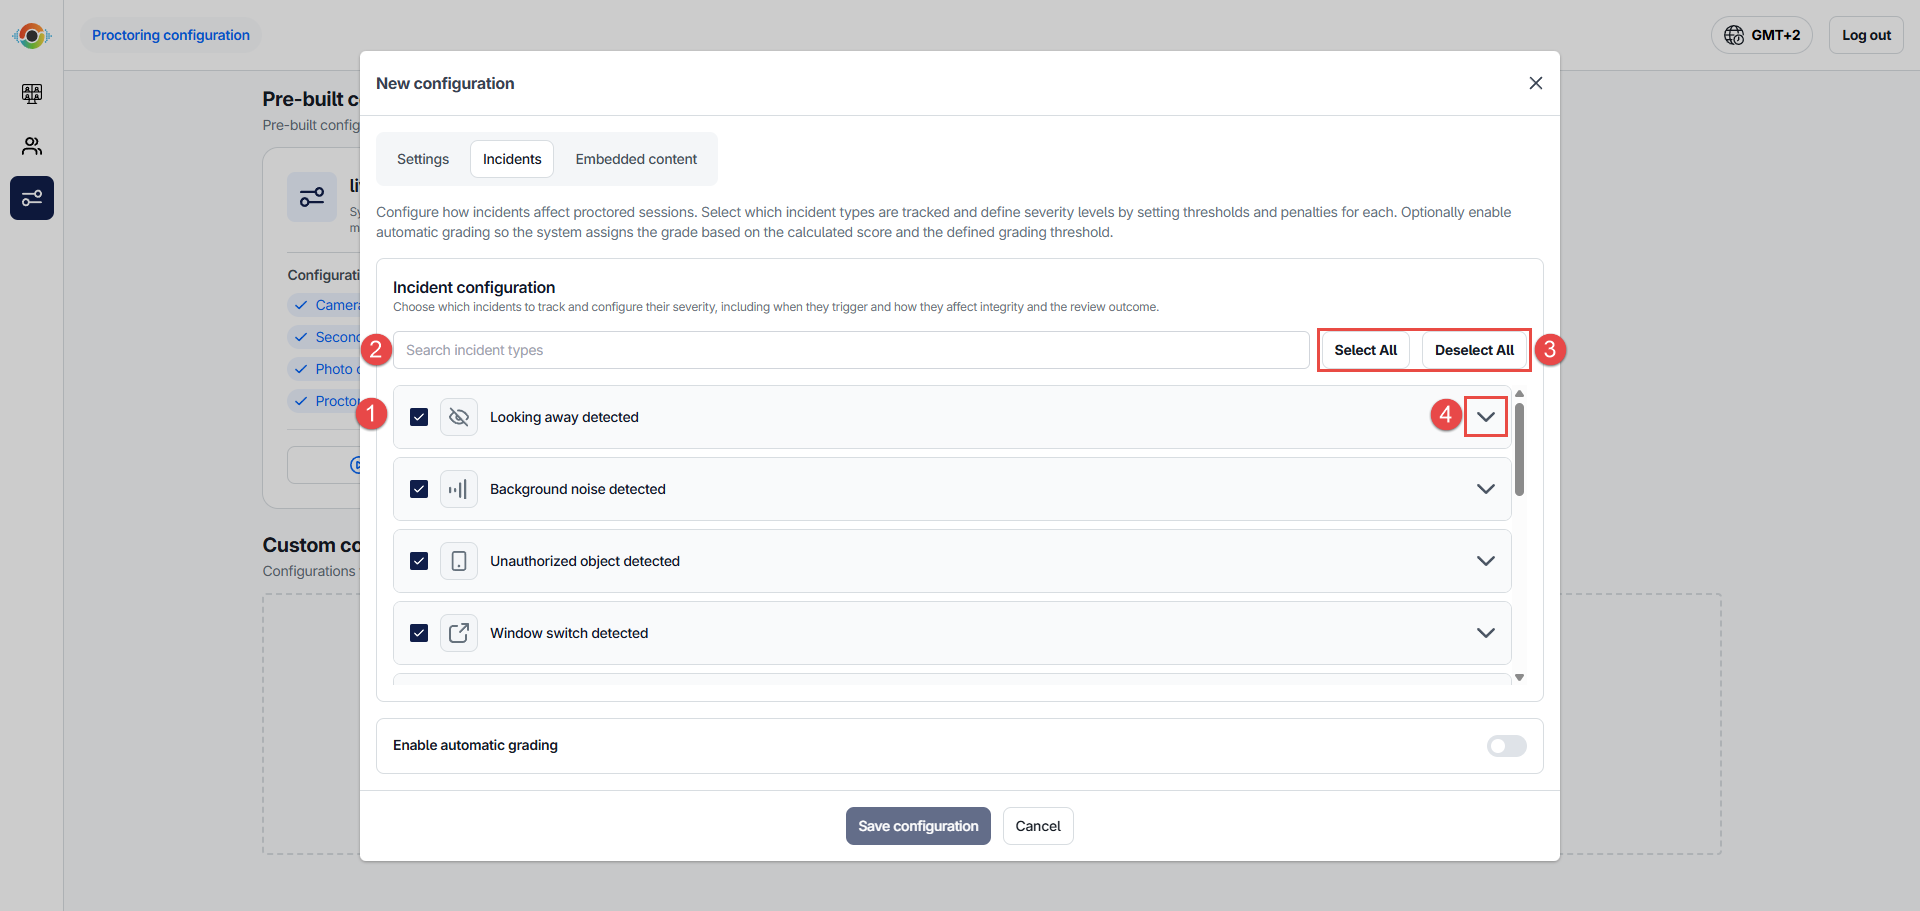
- Enable the incidents you would like the system to track by checking the checkbox.
- Use a search bar to search for a specific incident.
- Click Select all or Deselect all to select or deselect all incidents at once.
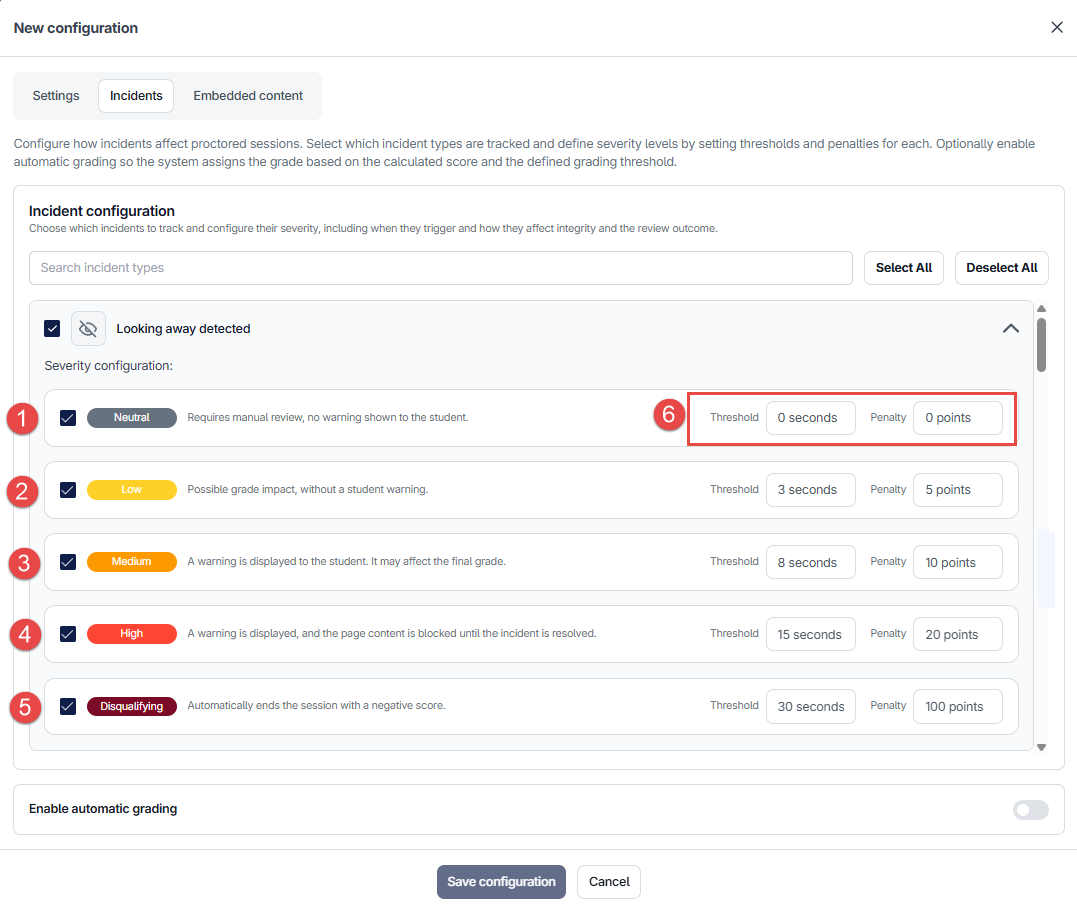
- Expand the incident to open its severity configuration.
There are five severity levels:
- Neutral – recorded for review only to reduce false positives. No warning is shown to the candidate.
- Low – recorded for review with a warning shown to the candidate. Impact on integrity score depends on the configured penalty.
- Medium – recorded for review, with a warning shown to the candidate. Impact on integrity score depends on the configured penalty.
- High – recorded for review with a warning shown to the candidate and the process blocked until the incident is resolved. Impact on integrity score depends on the configured penalty.
- Disqualifying – automatically terminates the process with a rejected outcome and informs the candidate that the process was terminated due to a disqualifying incident.
- For each severity you can define the seconds after which the incident is triggered and the penalty deducted from the initial 100 points. The incident timer resets when the behavior stops.
Automatic grading
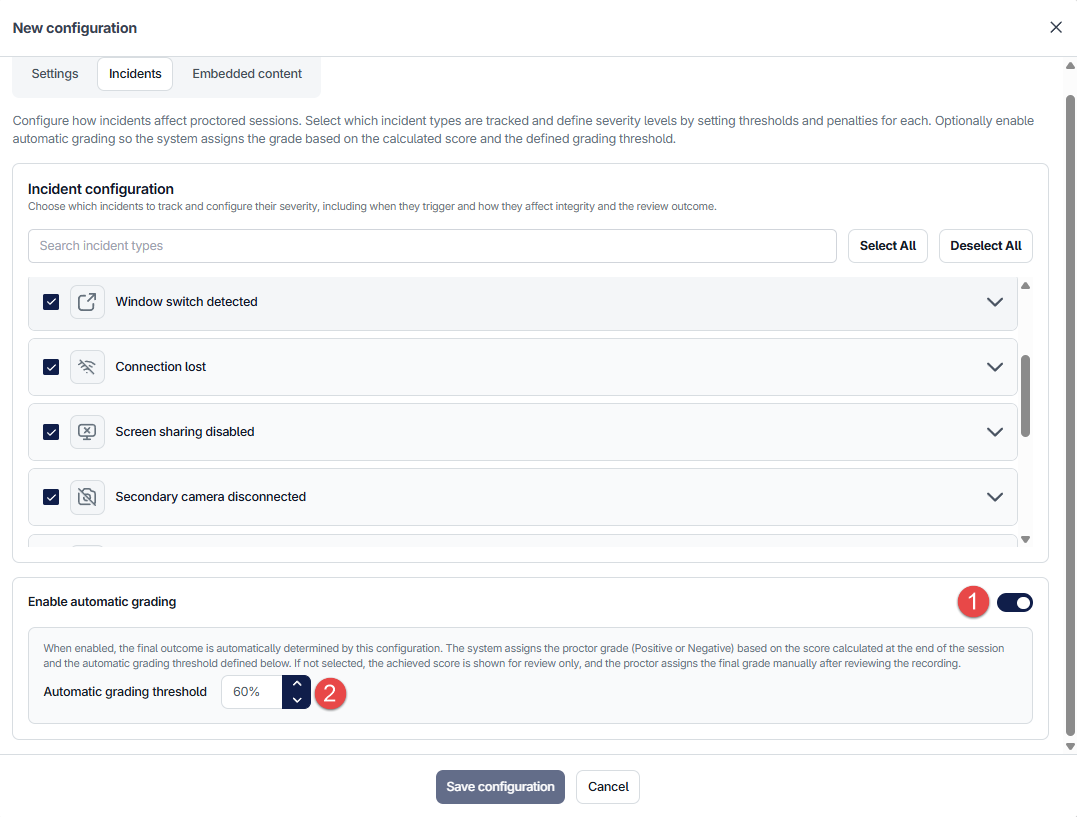
Automatic grading calculates the final integrity score based on the penalties assigned to detected incidents. Each candidate starts with 100 points, and points are deducted when configured incidents are triggered.
To use automatic grading:
- Enable Automatic grading.
- Define Automatic grading thresholds.
At the end of the exam, the final integrity score is calculated as a percentage. If the score falls below the configured threshold, the review outcome is automatically set to Rejected. Otherwise, the review outcome is automatically set to Approved.
If automatic grading is disabled, the integrity score is still calculated and displayed for review, but the final review outcome must be assigned manually by a proctor.
Applying a proctoring configuration
After creating a proctoring configuration, the next step is to apply it to your exams. The process depends on your examination platform. Select your integration below.
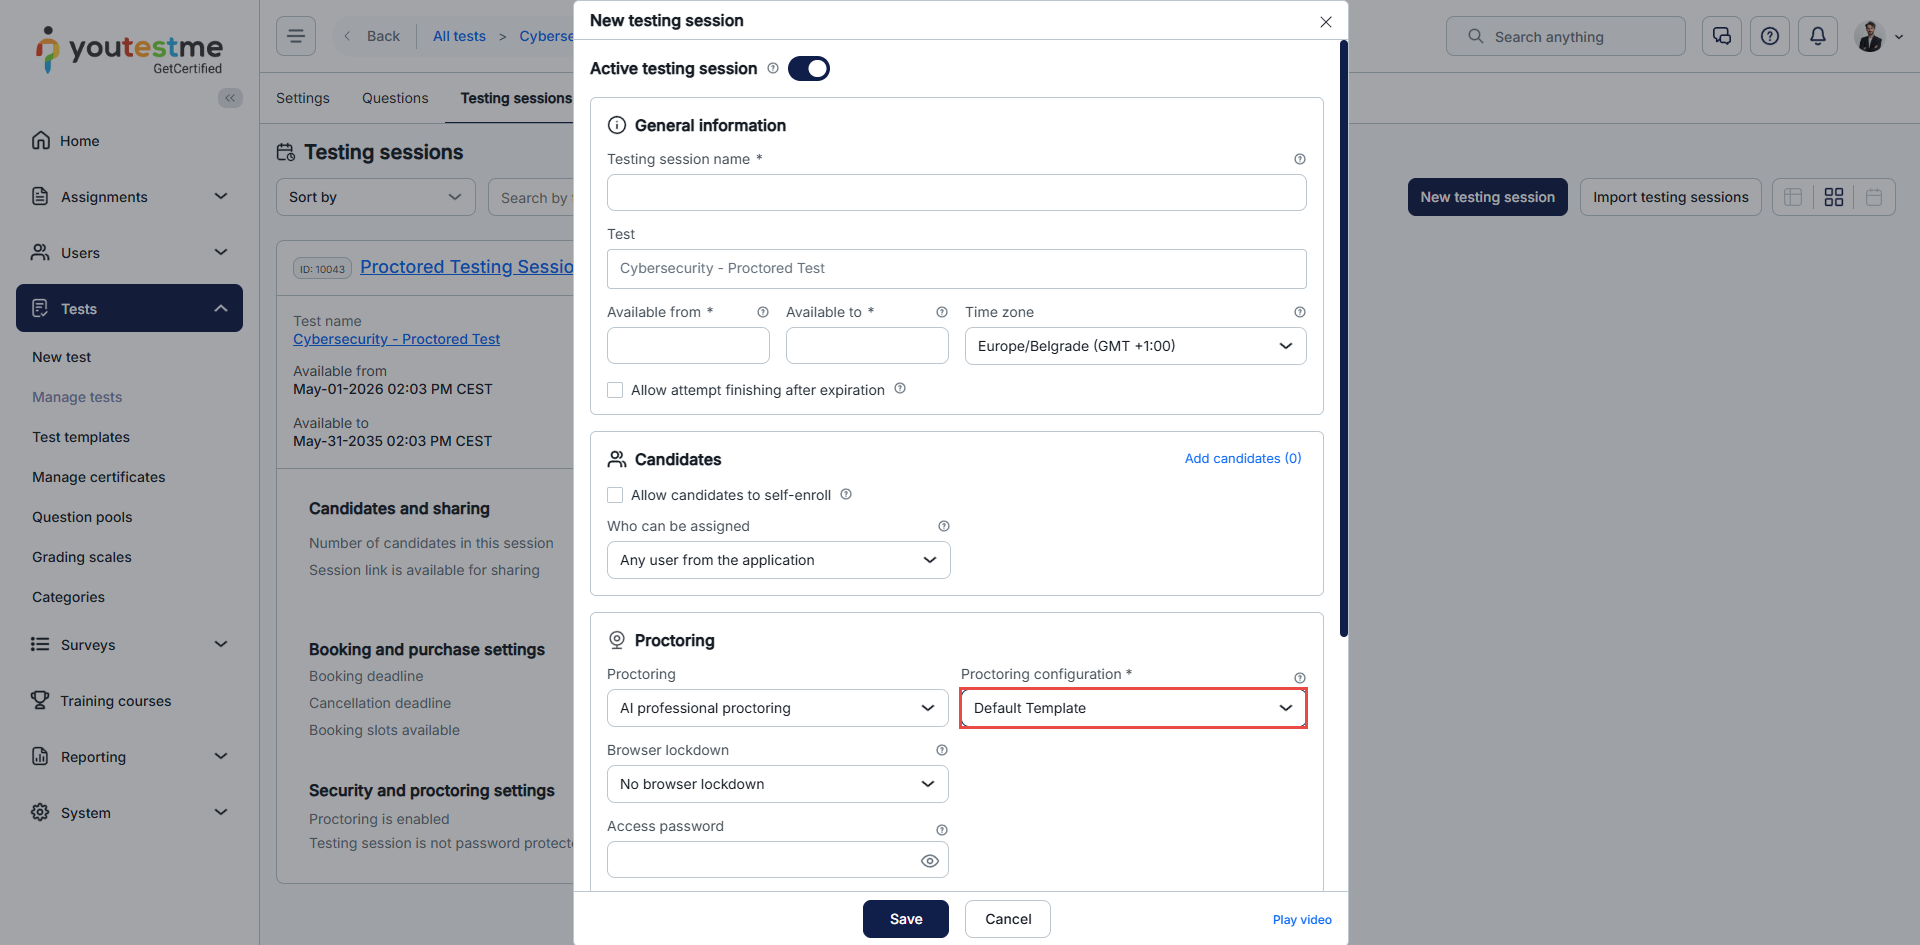
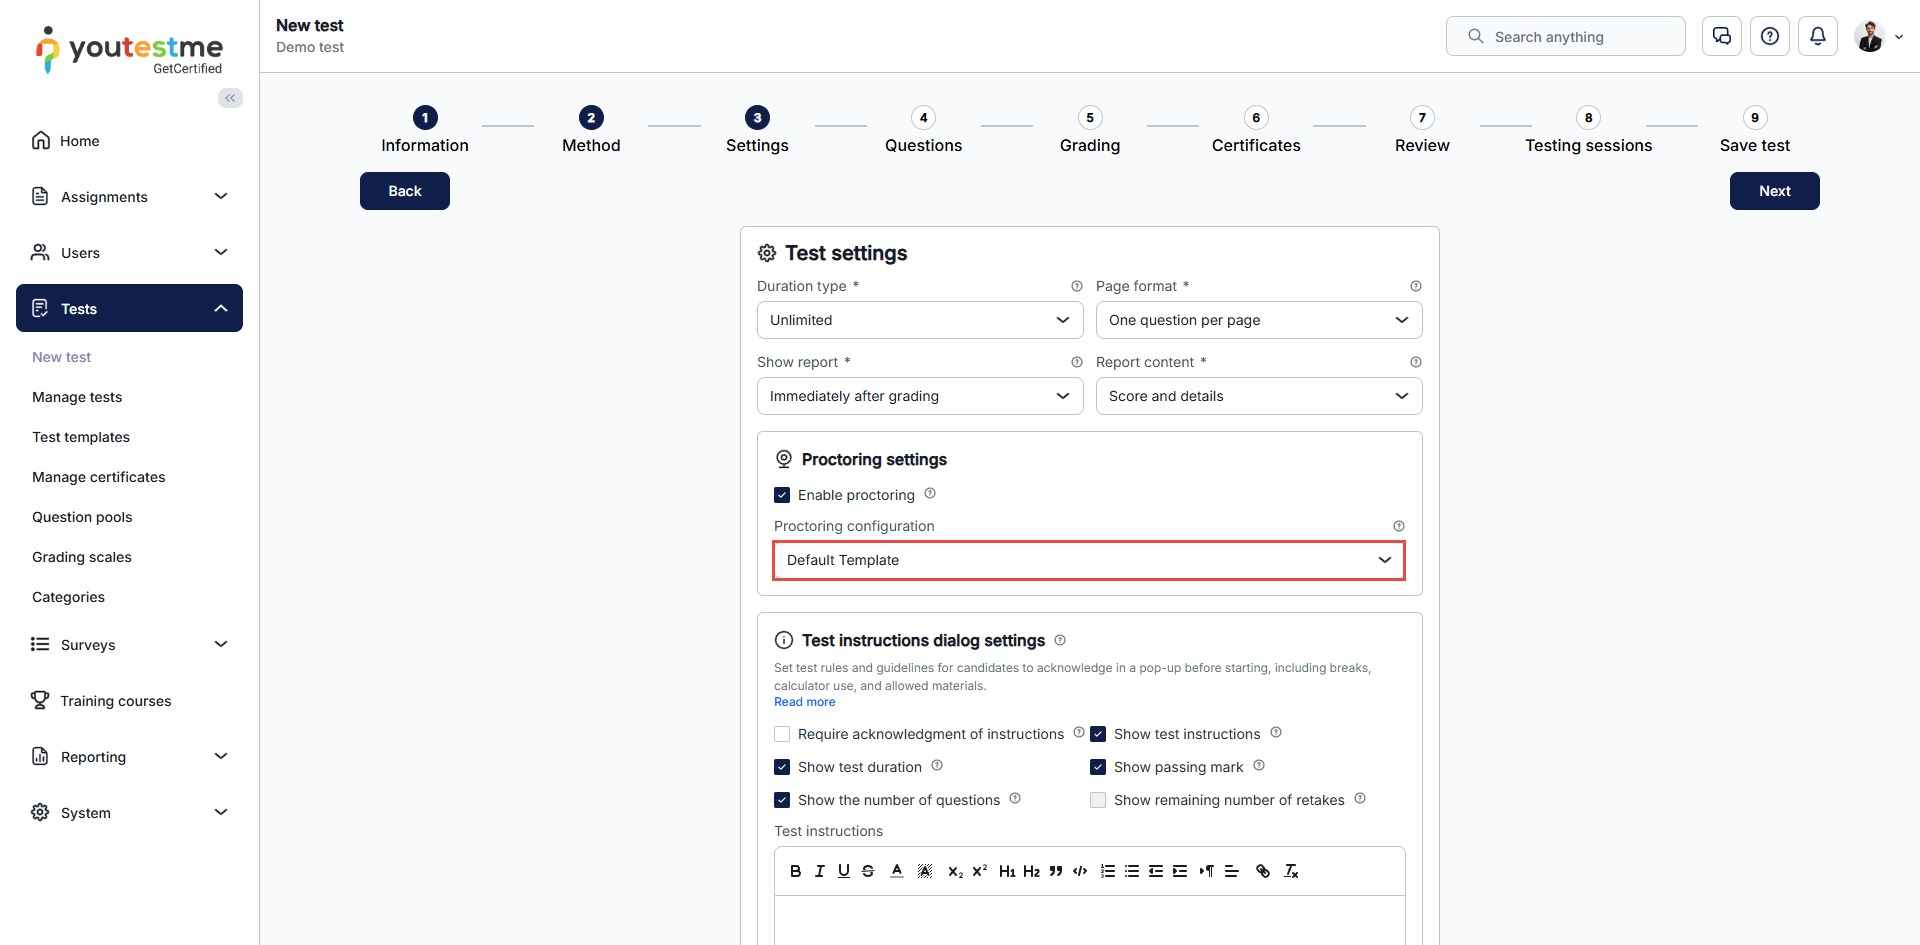
Before a proctoring configuration can be used in GetCertified, it must first be registered in the platform and then assigned to a test or testing session.
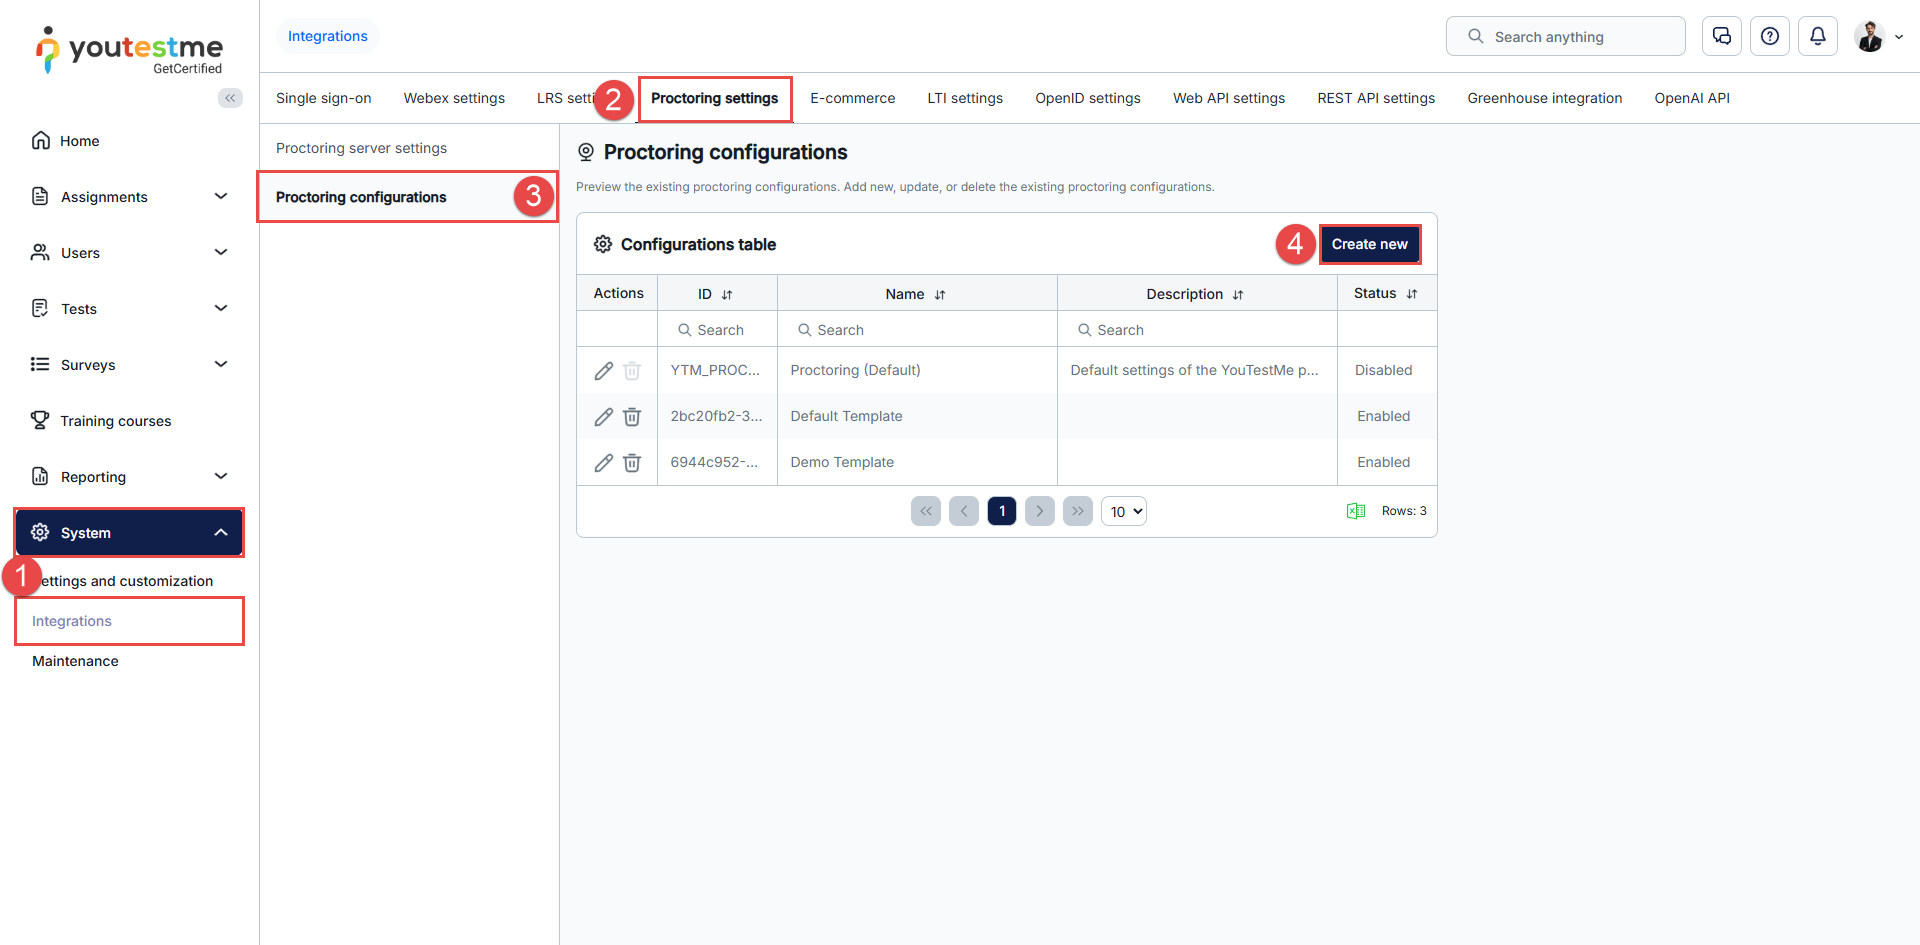
- Go to System → Integrations.
- Open the Proctoring settings tab.
- Open Proctoring configurations.
- Click Create new.
- Enter a name for the configuration as it will appear in GetCertified.
- Enter the name of the configuration you created in the proctoring platform.
- Click Save.
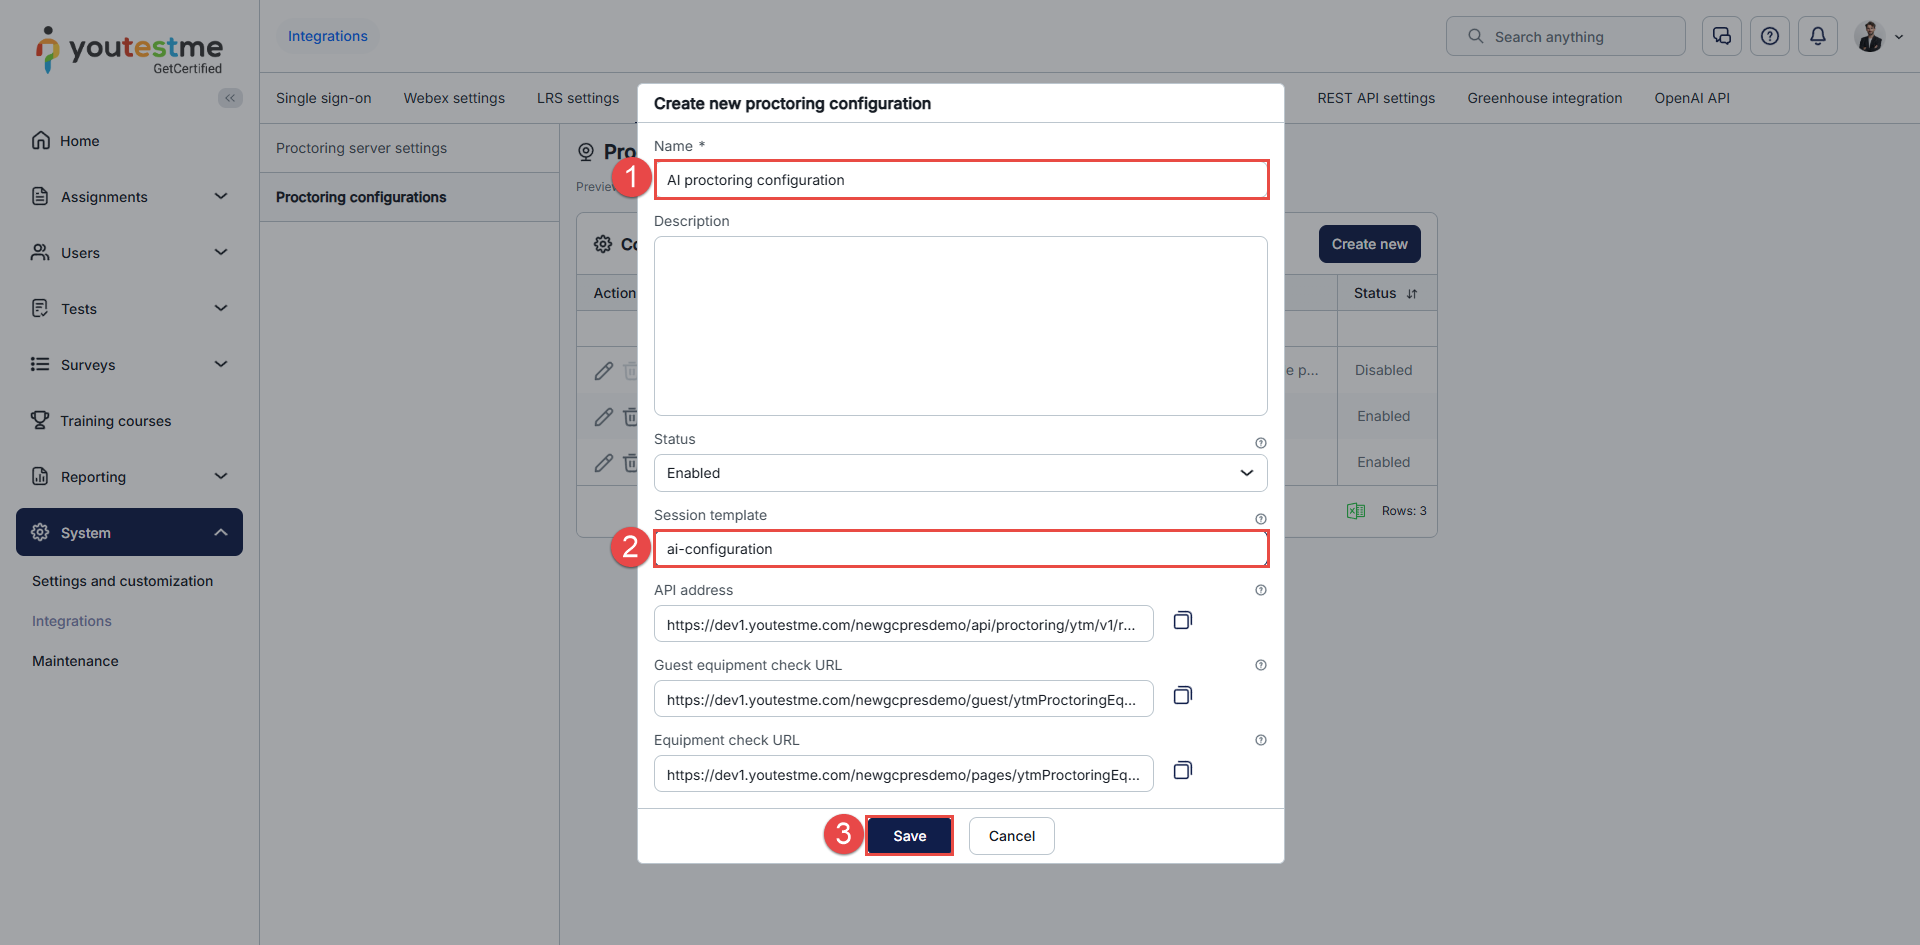
Once saved, the configuration becomes available when creating or editing tests and testing sessions.
Before proctoring can be used in Moodle, a course, proctoring activity, and quiz must be created.
Create a course
Log in to Moodle with administrator credentials.
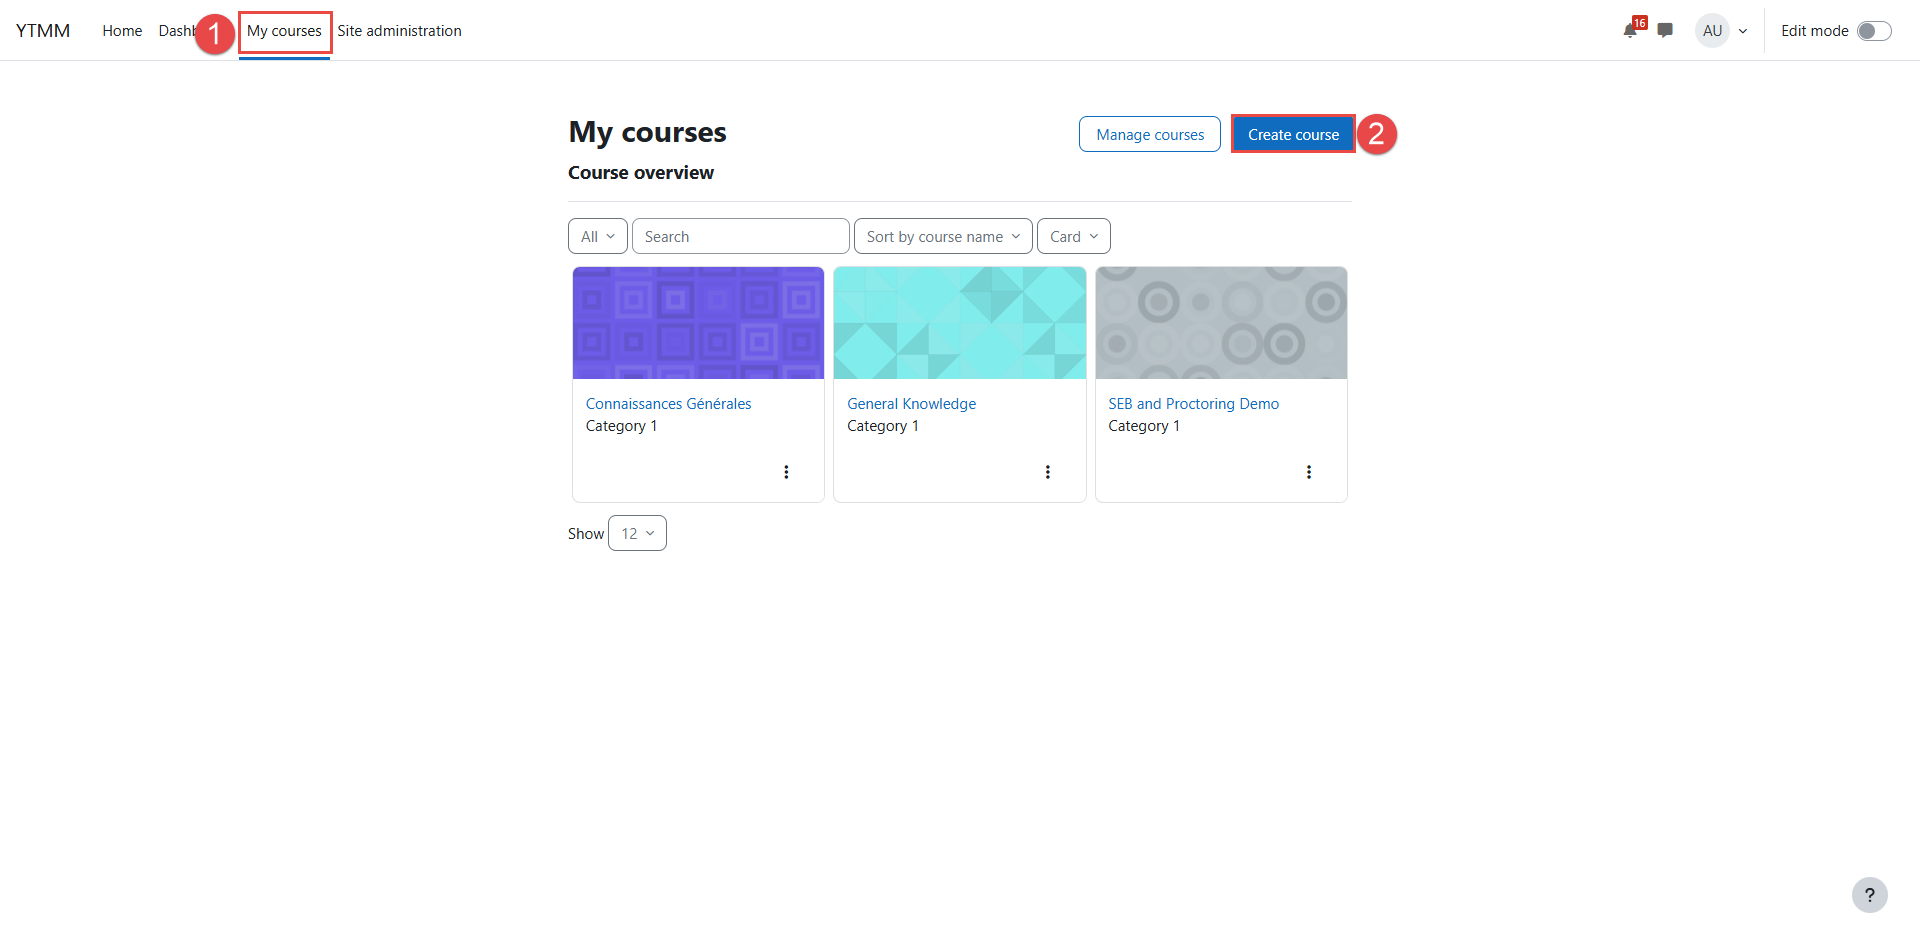
- Go to My courses and click Create course button.
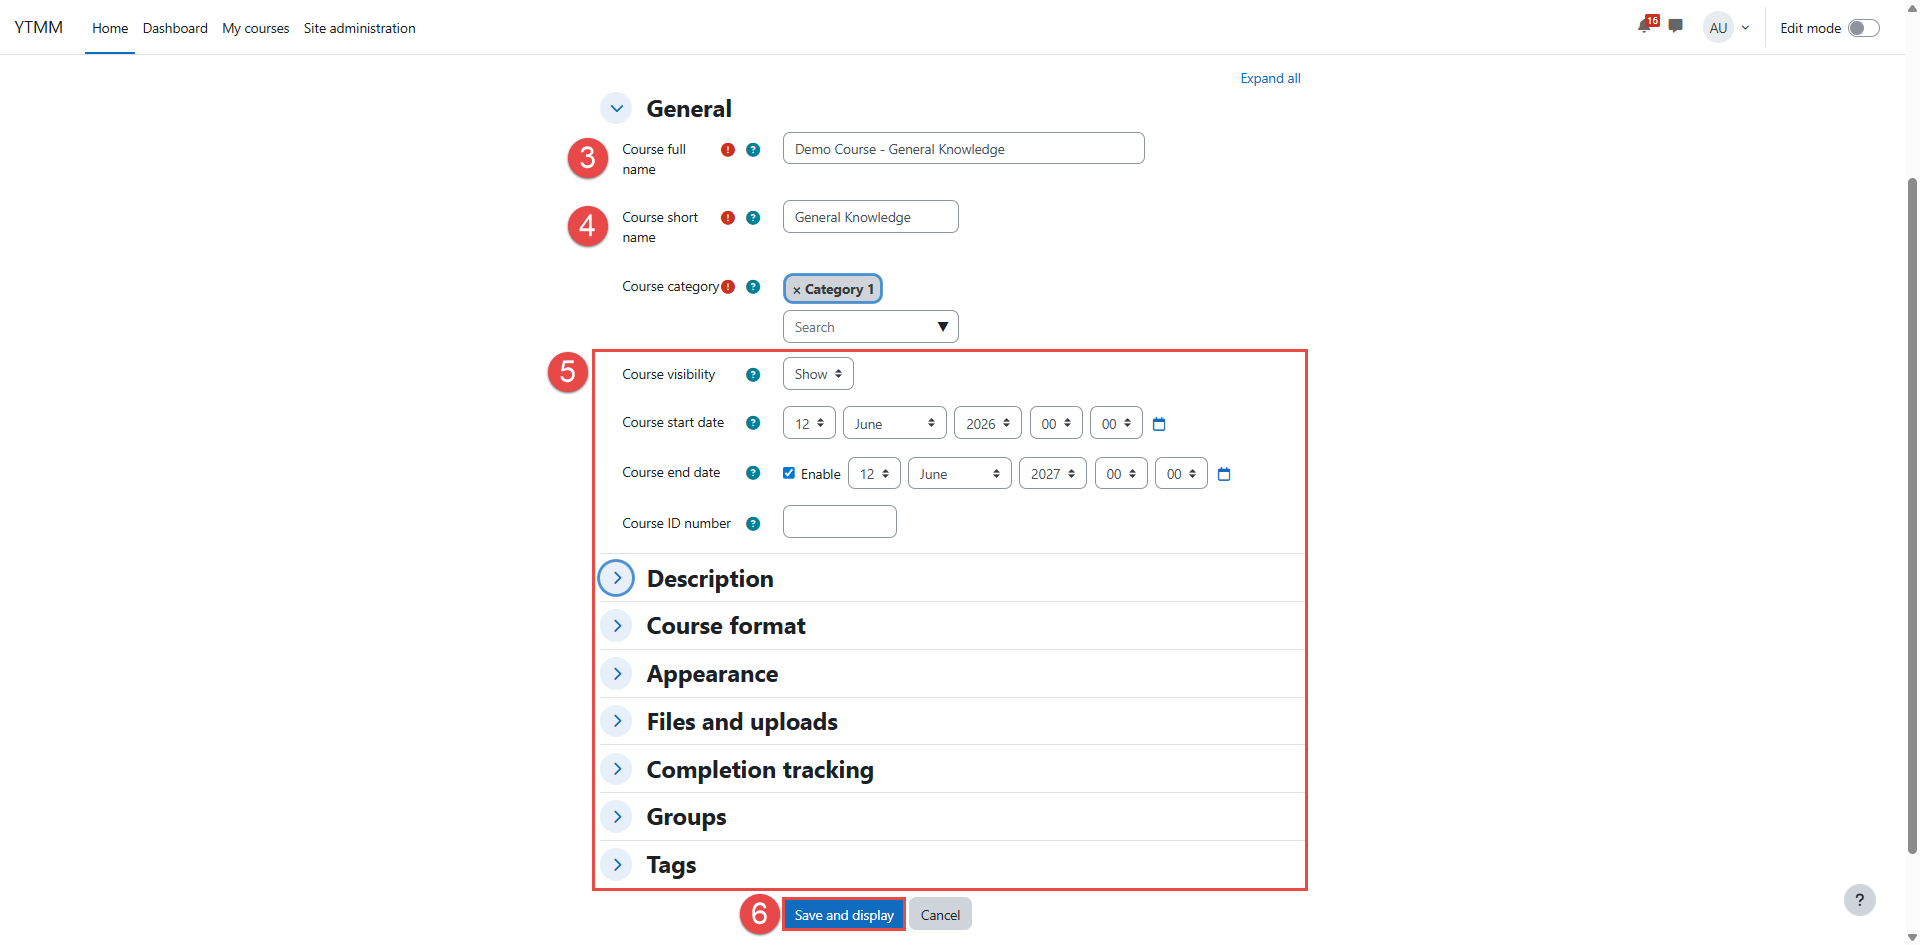
- Enter the Course full name.
- Enter the Course short name. This name is displayed in course navigation and lists.
- Optionally configure additional course settings.
- Click Save and display.
Create the quiz in Moodle
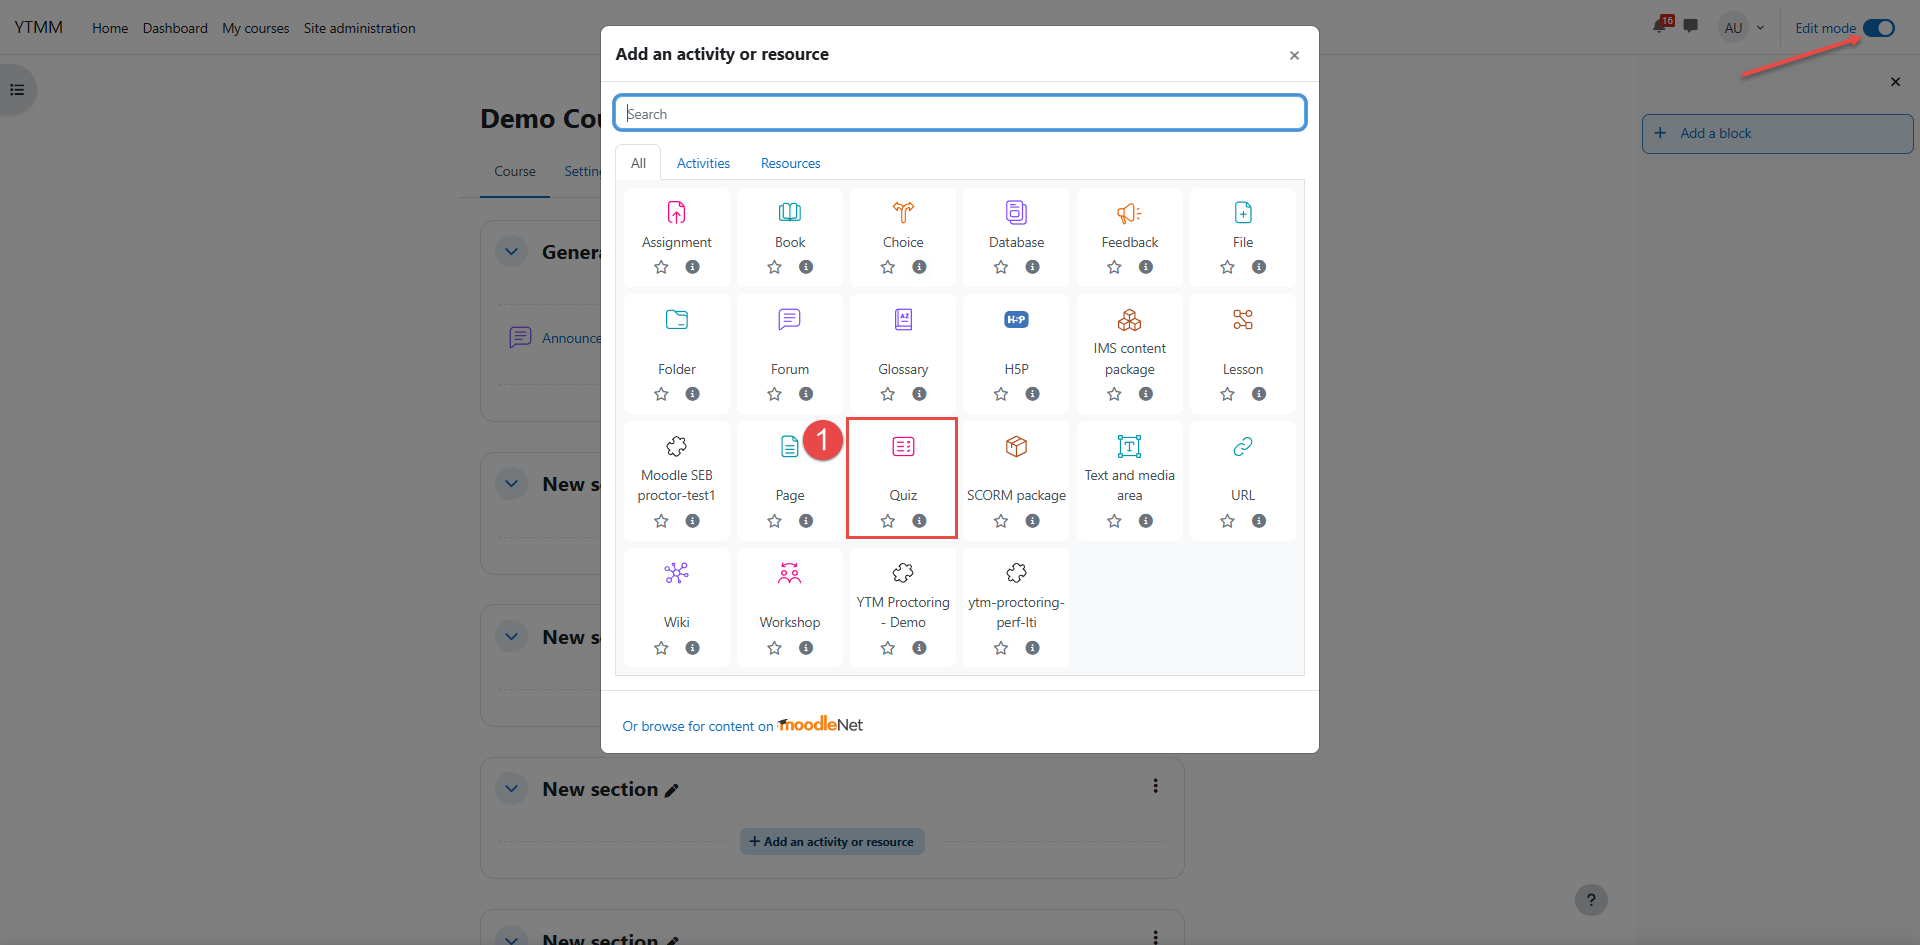
- Open the course, enable Edit mode, and add a new Quiz activity.
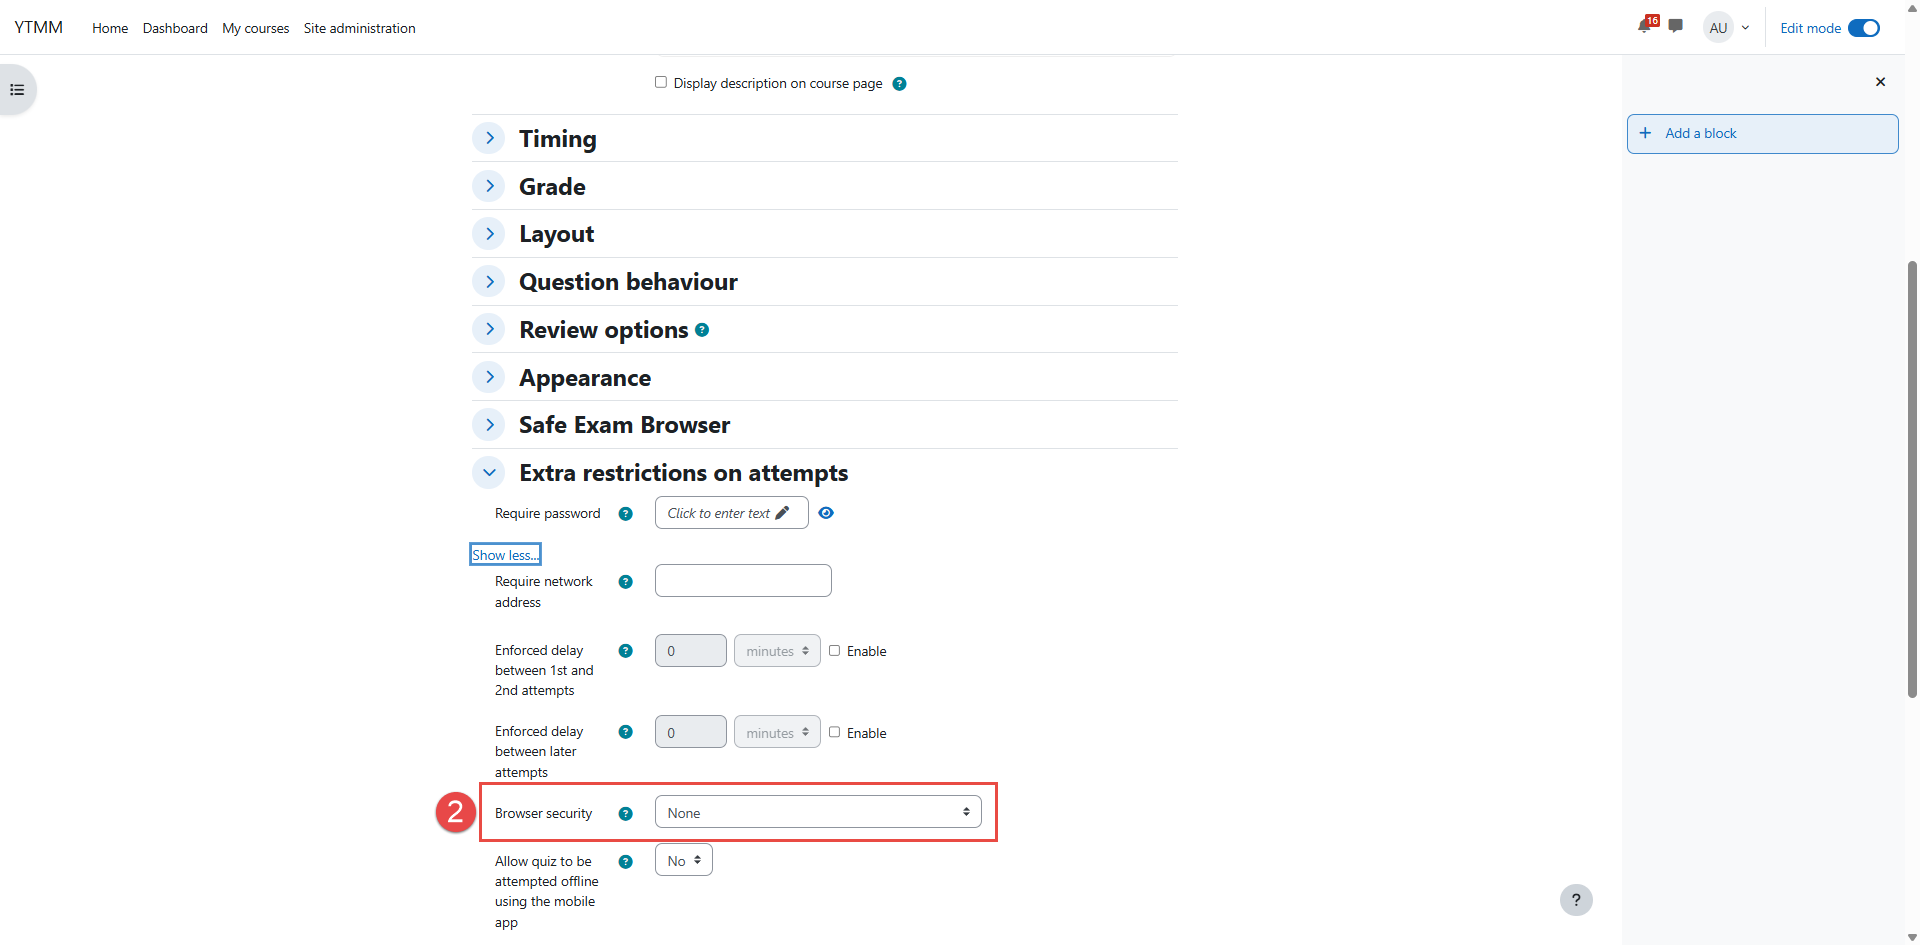
- Open the quiz settings, go to Extra restrictions on attempts → Browser security, and set it to None.
Hide the test element
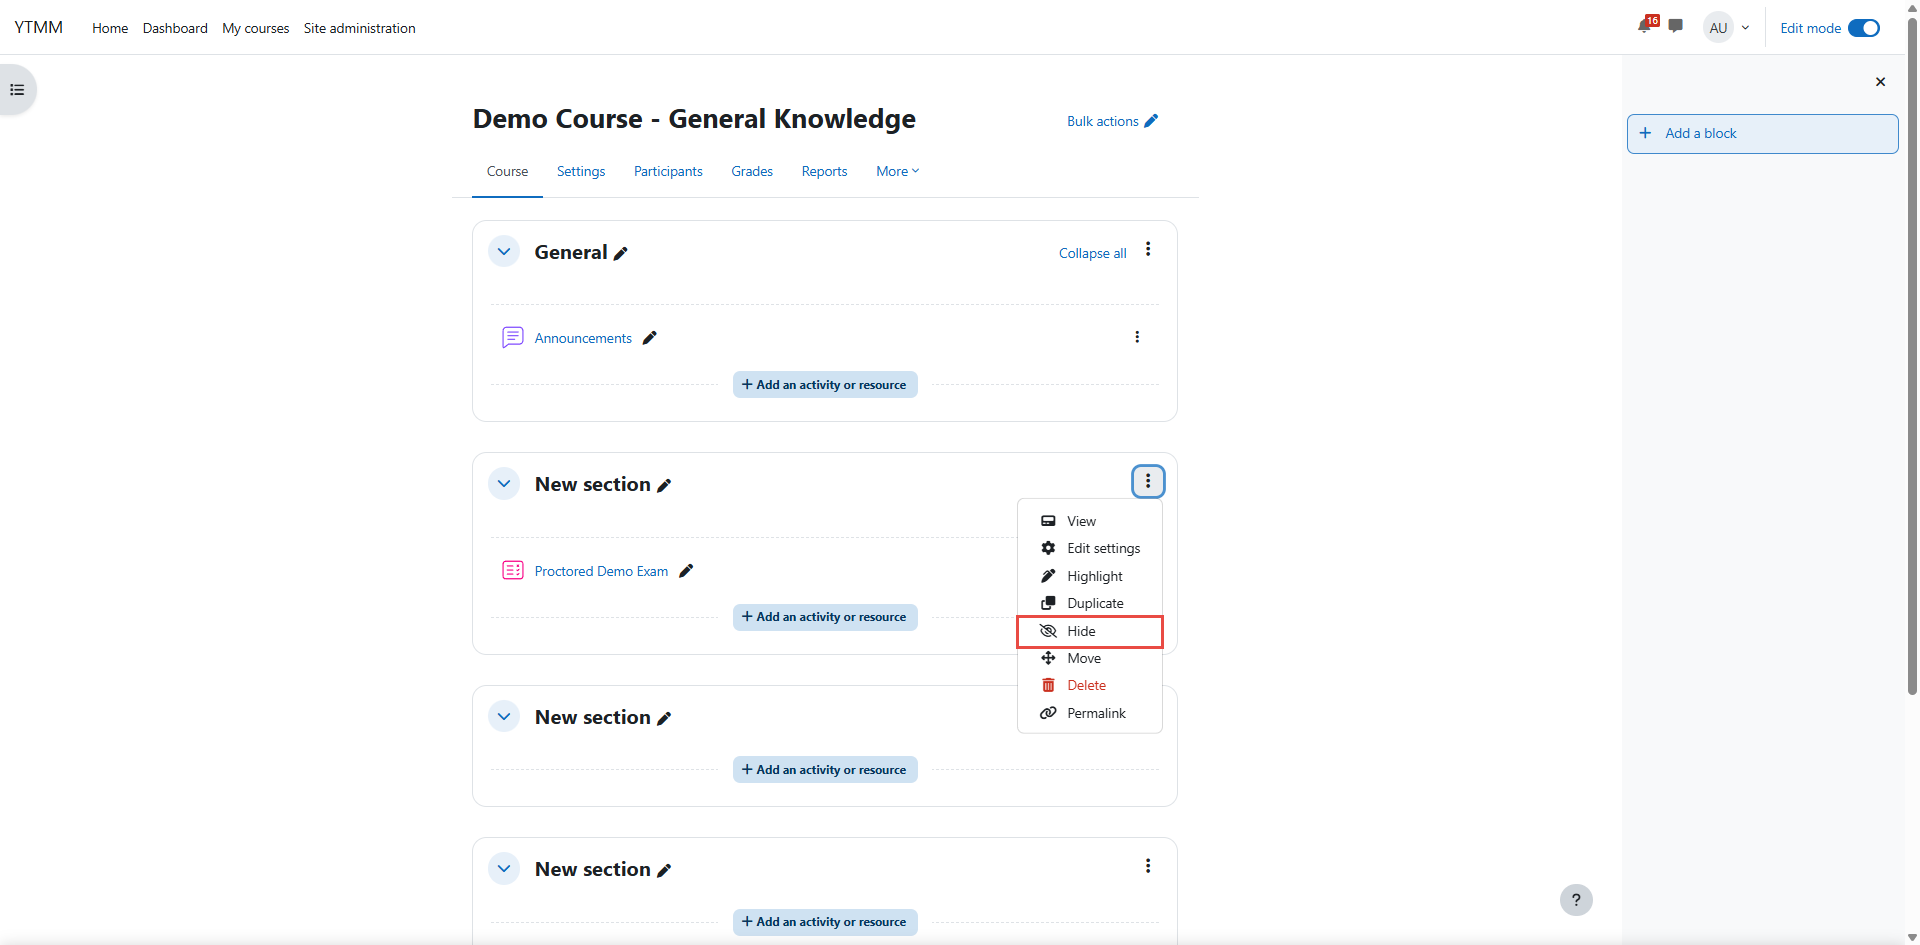
To ensure candidates can access the quiz only through the proctoring workflow, hide the quiz from the course page while keeping it accessible through a direct link.
Hide the course section that contains the quiz.
Get the link to the test element
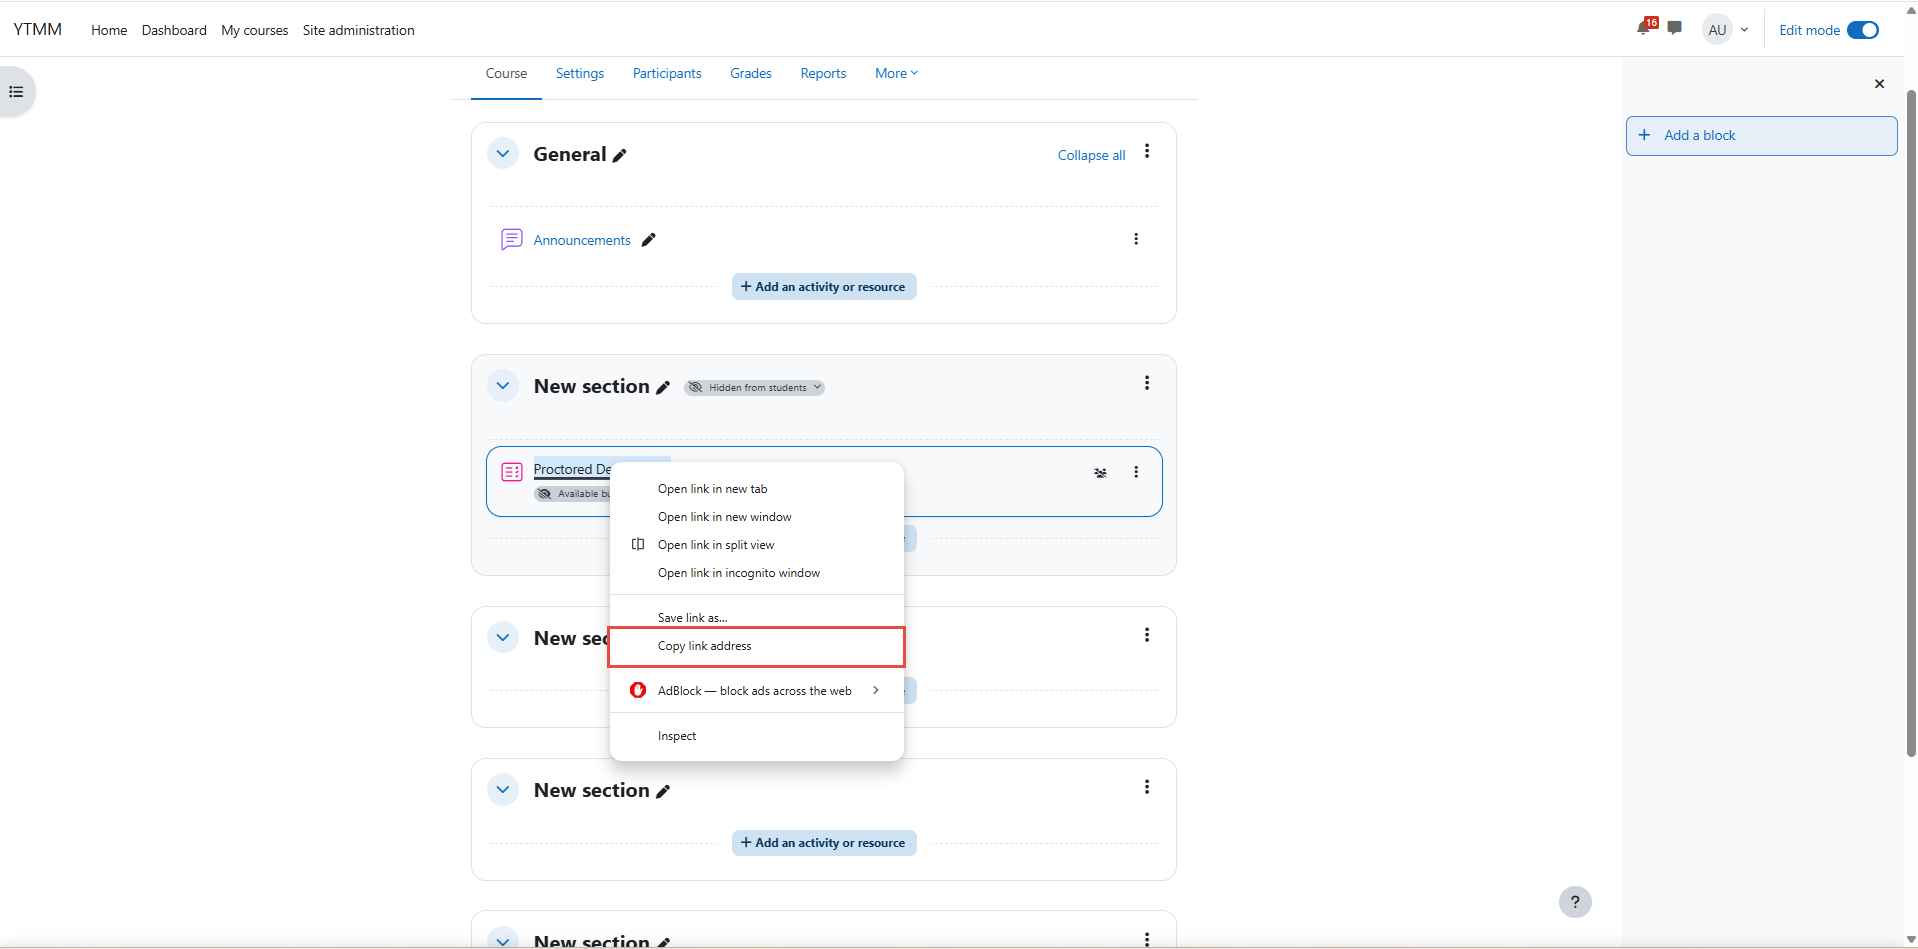
Right-click the quiz and select Copy link address. This URL will be used when configuring the proctoring activity.
Add a proctoring activity
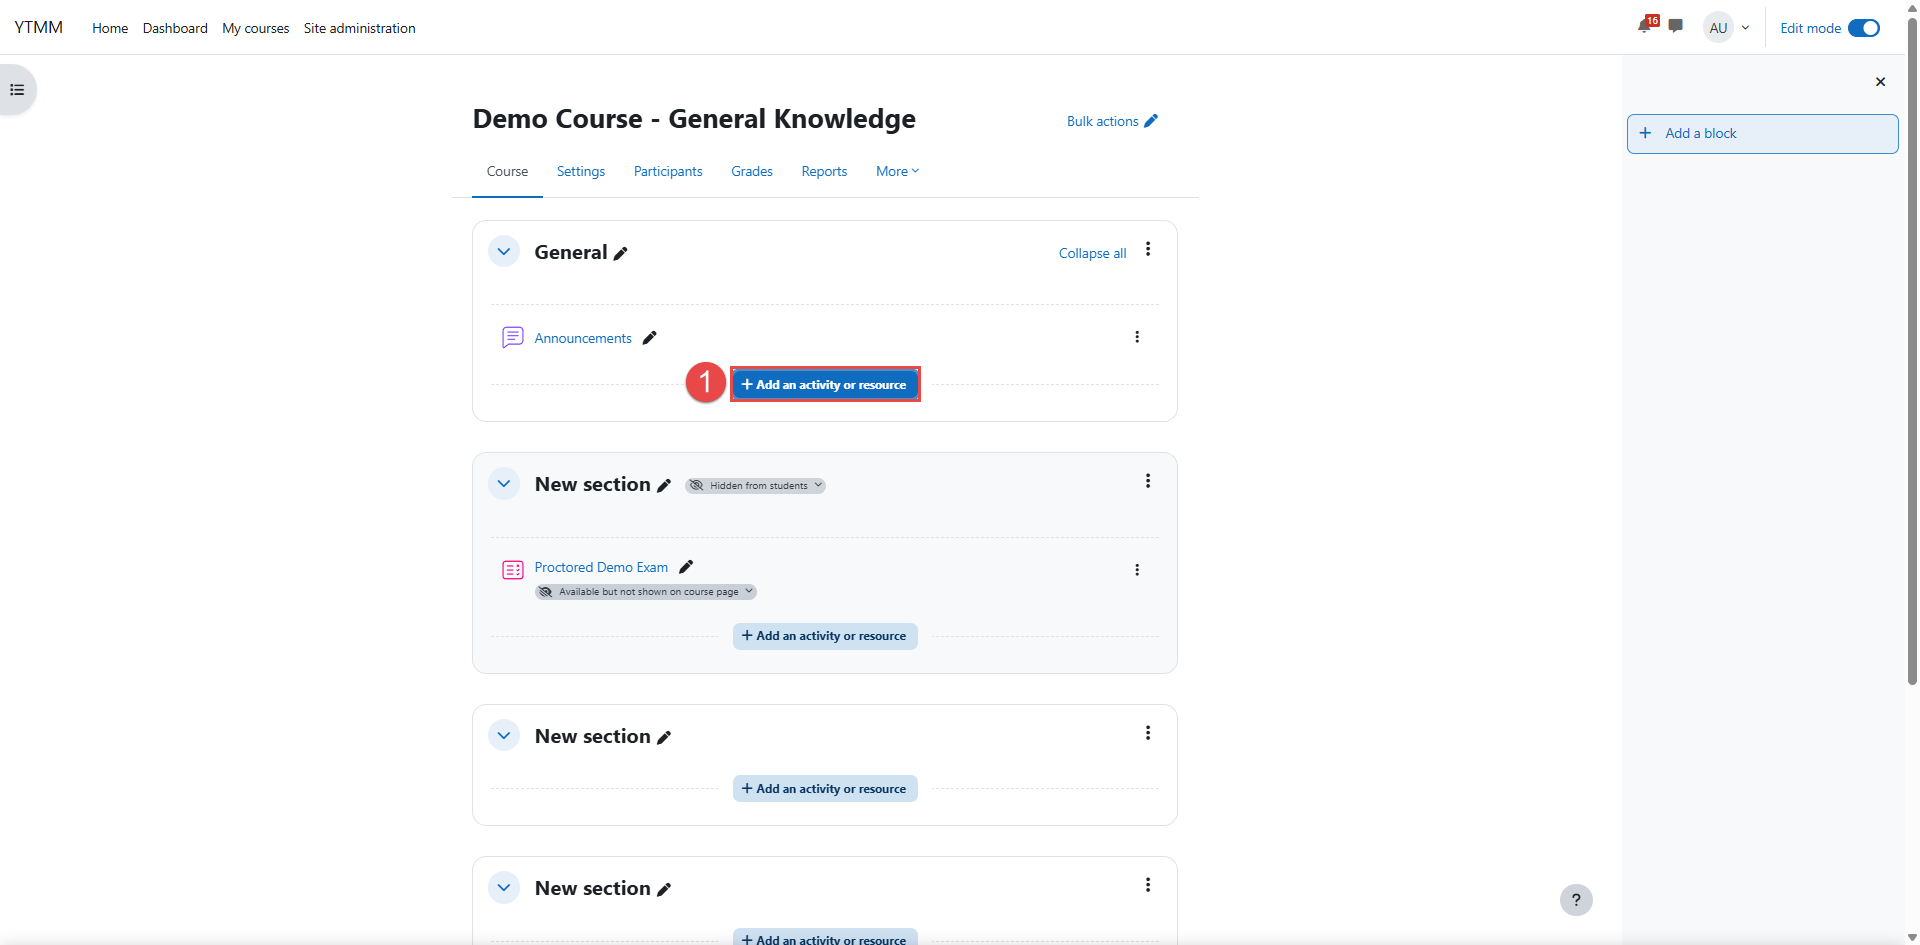
- Add the proctoring activity to a different course section than the quiz. This allows the quiz section to remain hidden while candidates can still access the exam through the proctoring activity.
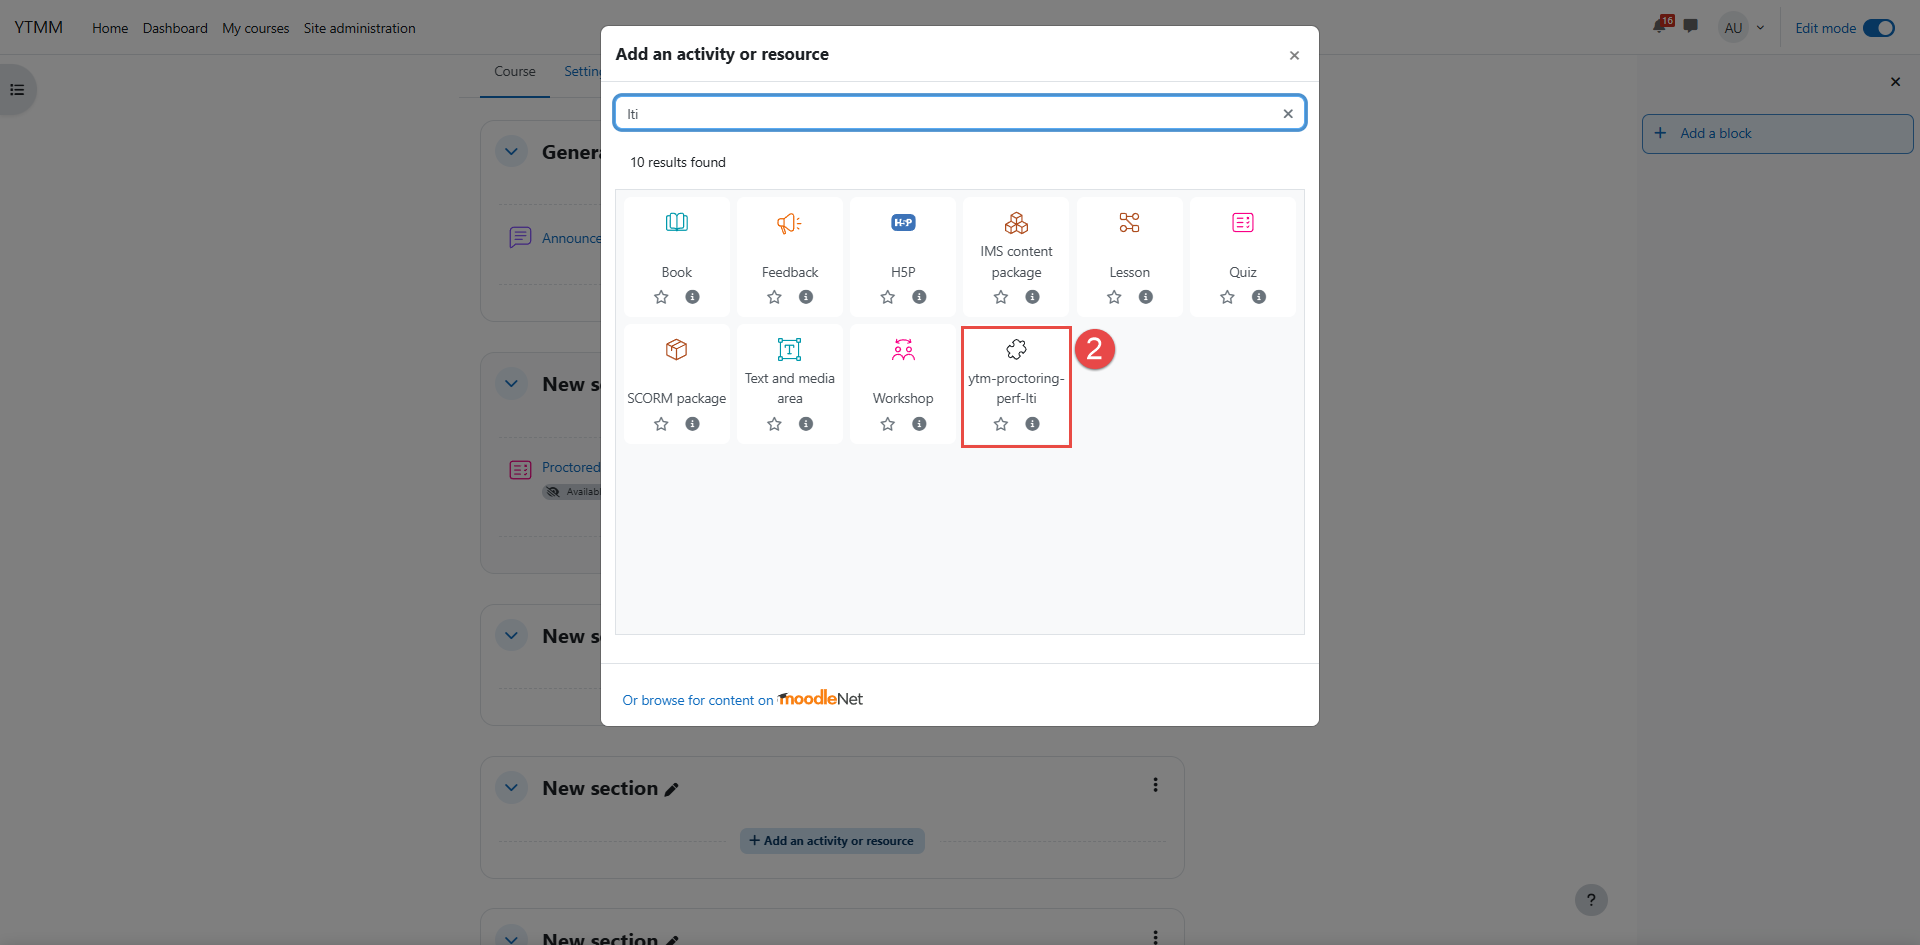
- Add a new activity and select External tool.
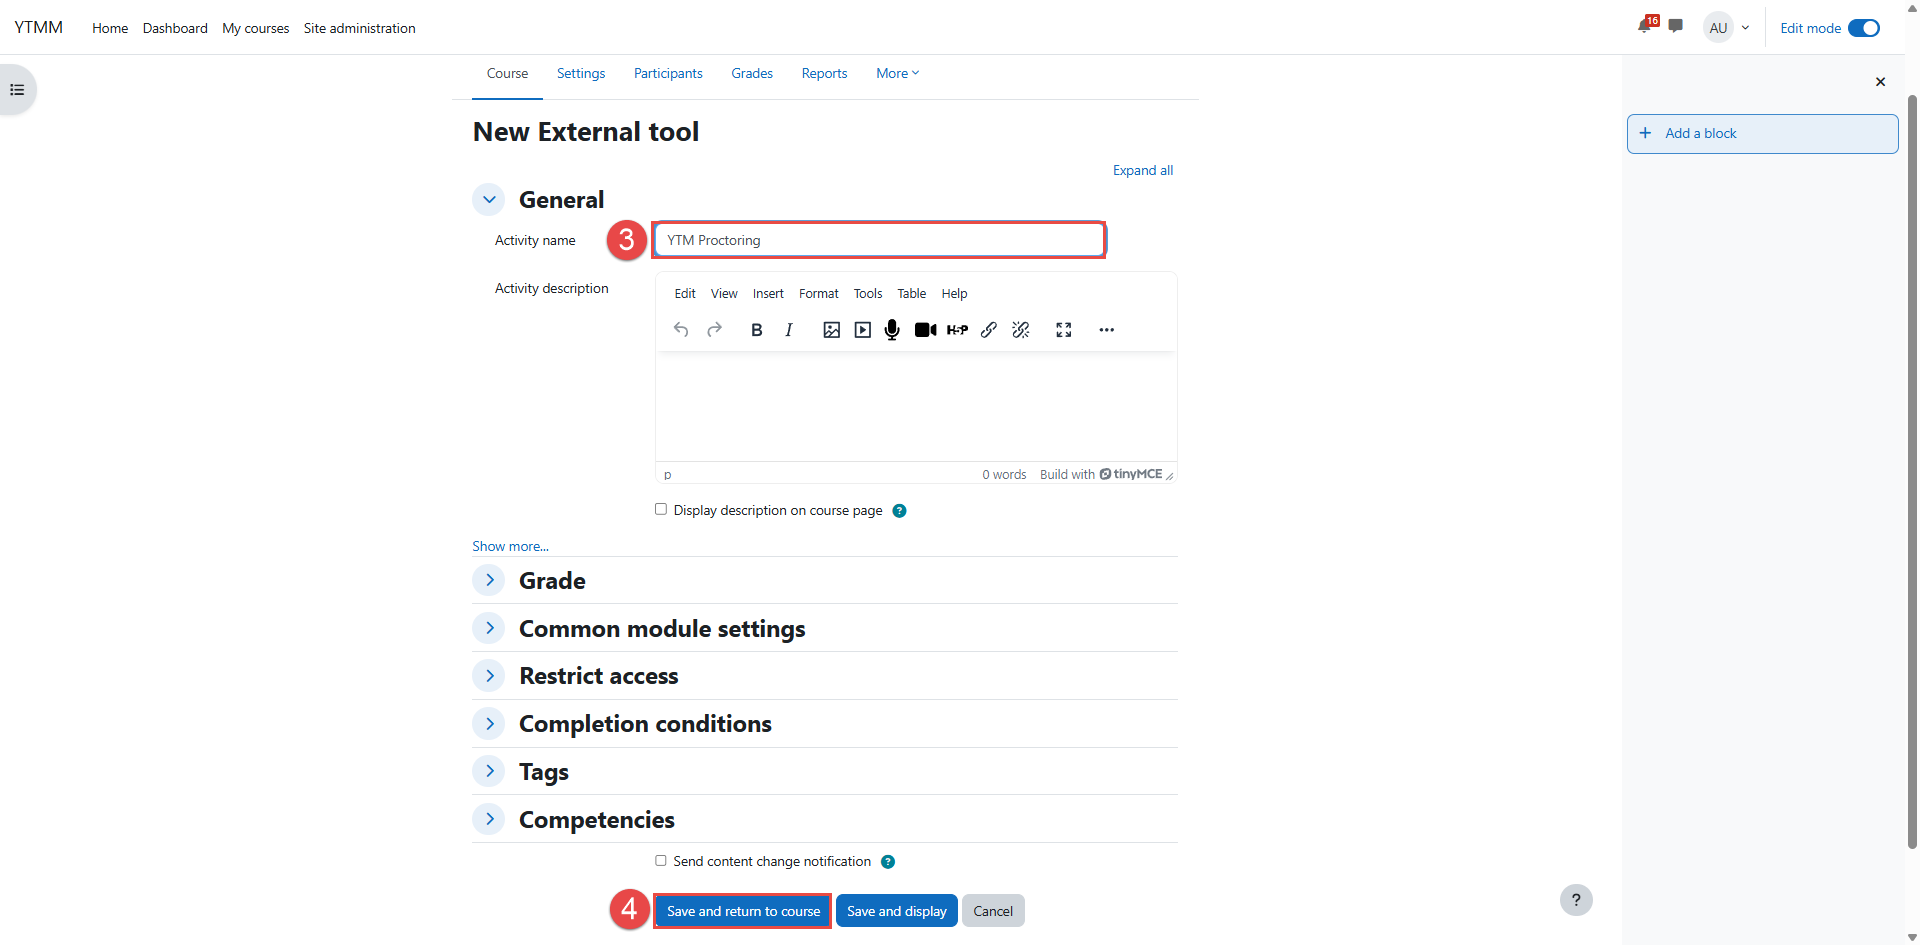
- Enter a name for the activity — this name appears in both Moodle and the YouTestMe proctoring system.
- Click Save and return to course
Set up the proctoring activity
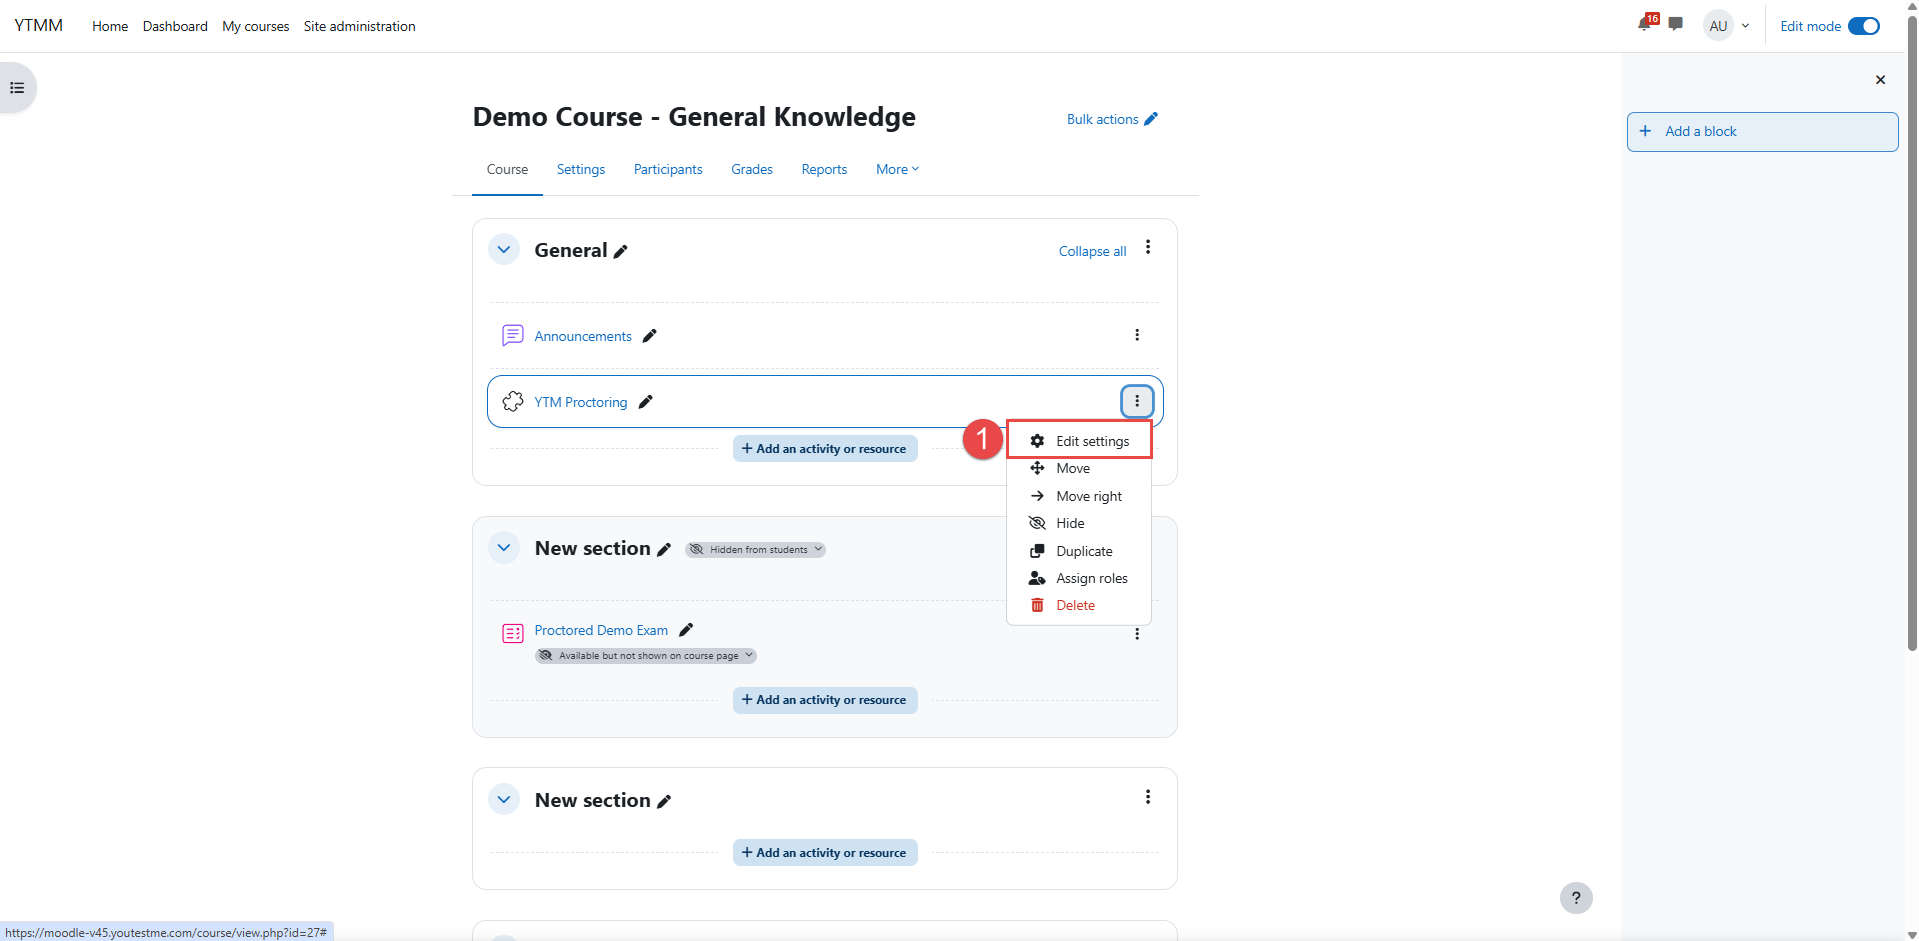
- Edit the proctoring activity.
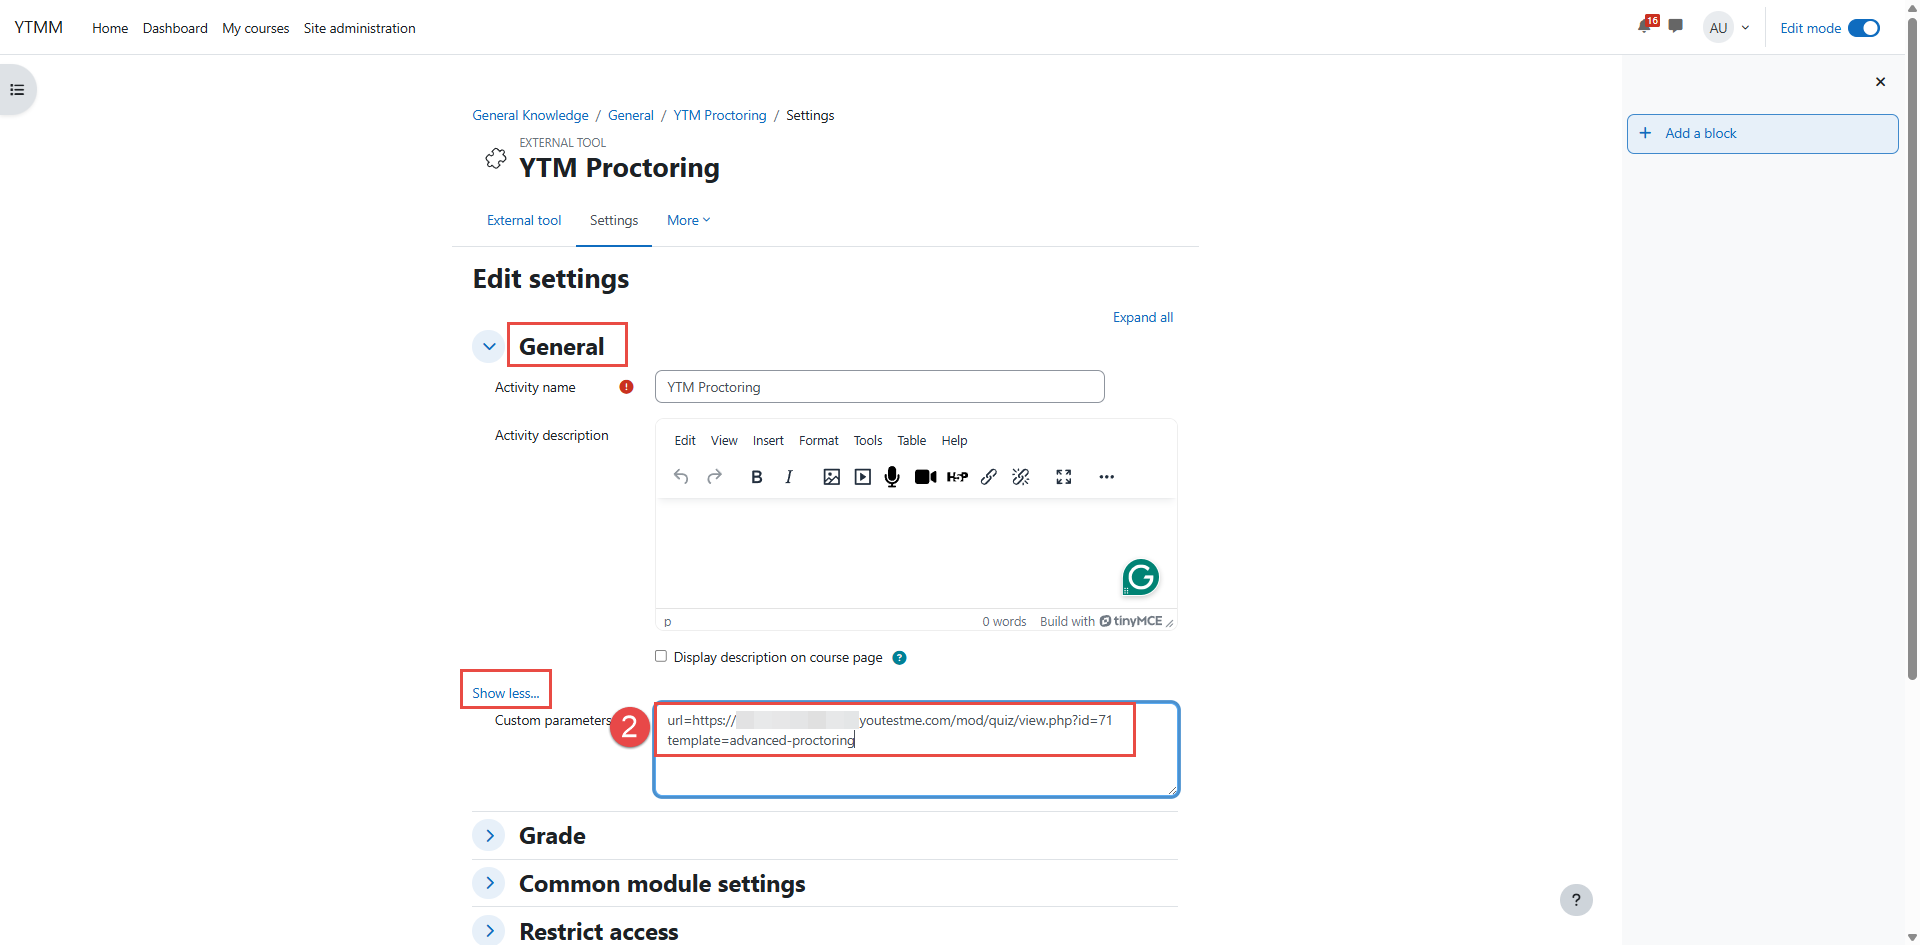
- In the activity settings, add custom parameters to link the proctoring activity to the quiz and the proctoring configuration.
- url – the quiz URL copied in the previous step. When the candidate starts the proctoring activity, the quiz is opened automatically inside the proctoring interface.
- template – the name of the proctoring configuration created in the YouTestMe Proctoring platform.
Add the following parameters to the Custom parameters field, one per line:
If you do not use a supported platform integration, you can still deliver proctored exams by sending candidates the SSO Exam URL directly. Configure Embedded Content with the URL of the exam, form, or other web-based application that candidates should access after completing the system check.
- Enter the URL of the application you want candidates to access after the system check (for example, an exam URL, Google Form, Google Sheet, or another web-based application).
- If the application supports iframes, enable Use iframe to display it directly inside the proctoring interface. Otherwise, the content will open in a separate browser tab.
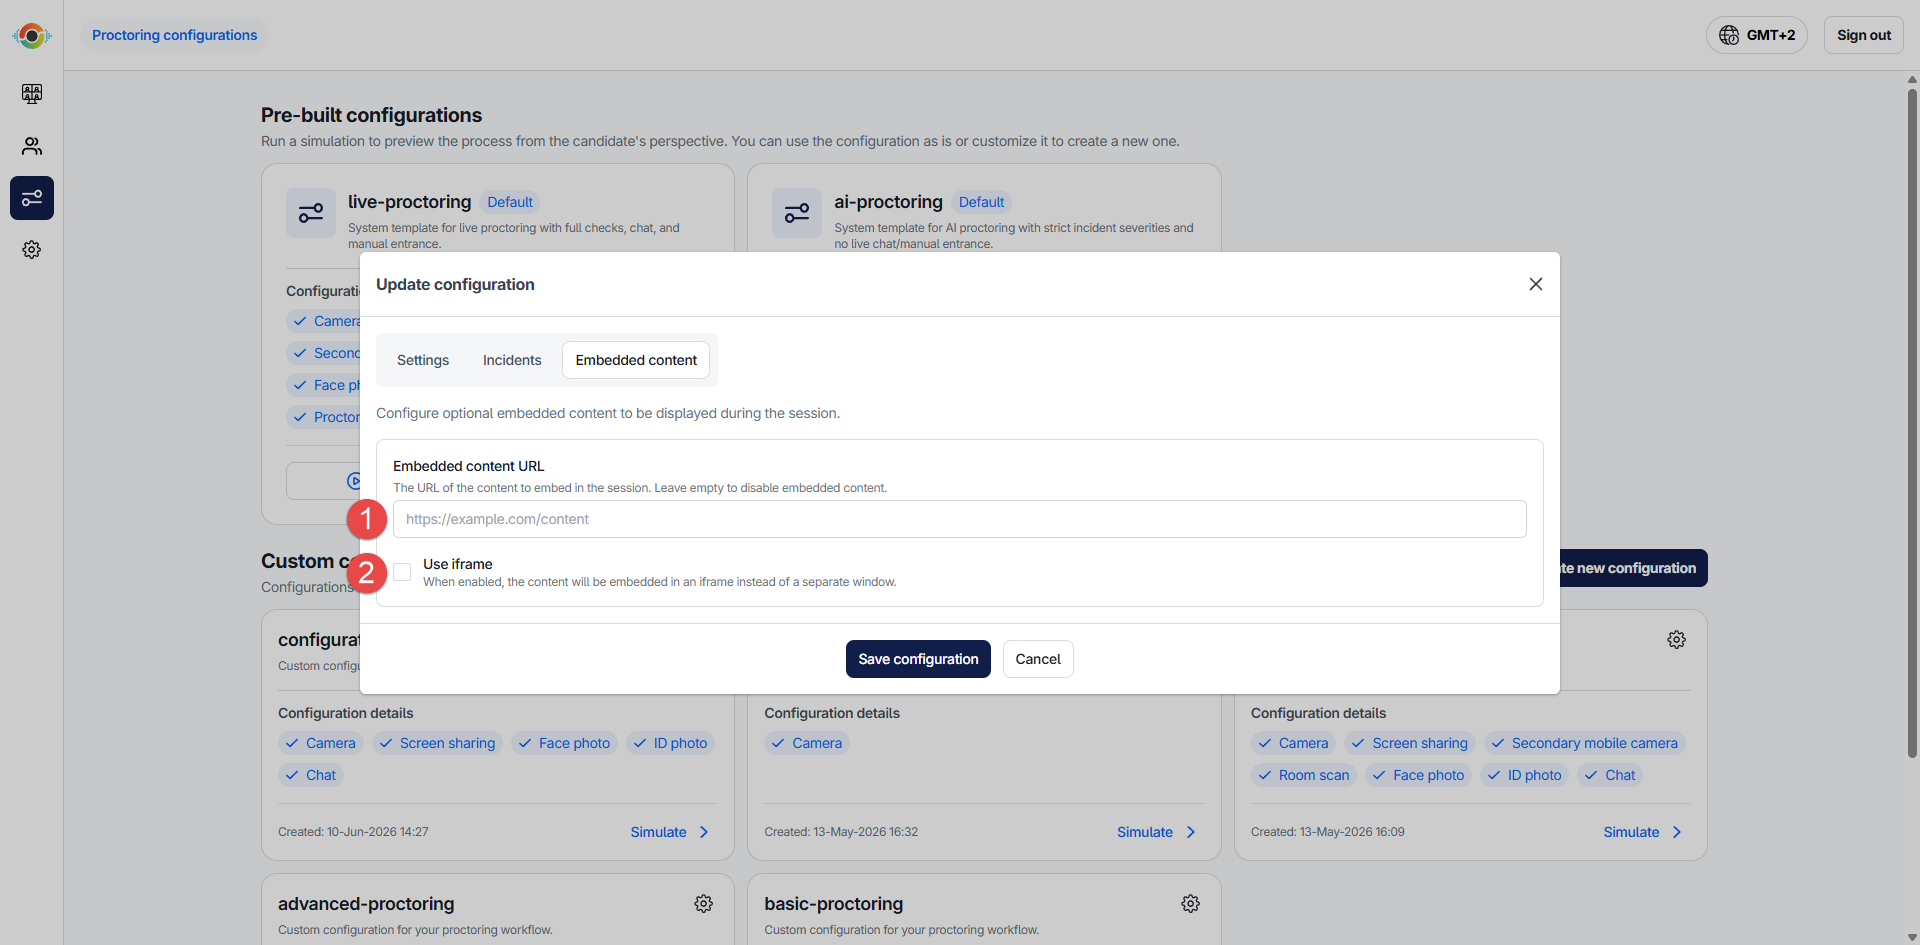
Once the configuration is ready, copy the SSO Exam URL and send it directly to candidates. Candidates will complete the system check first. After monitoring starts, the configured content is opened automatically.
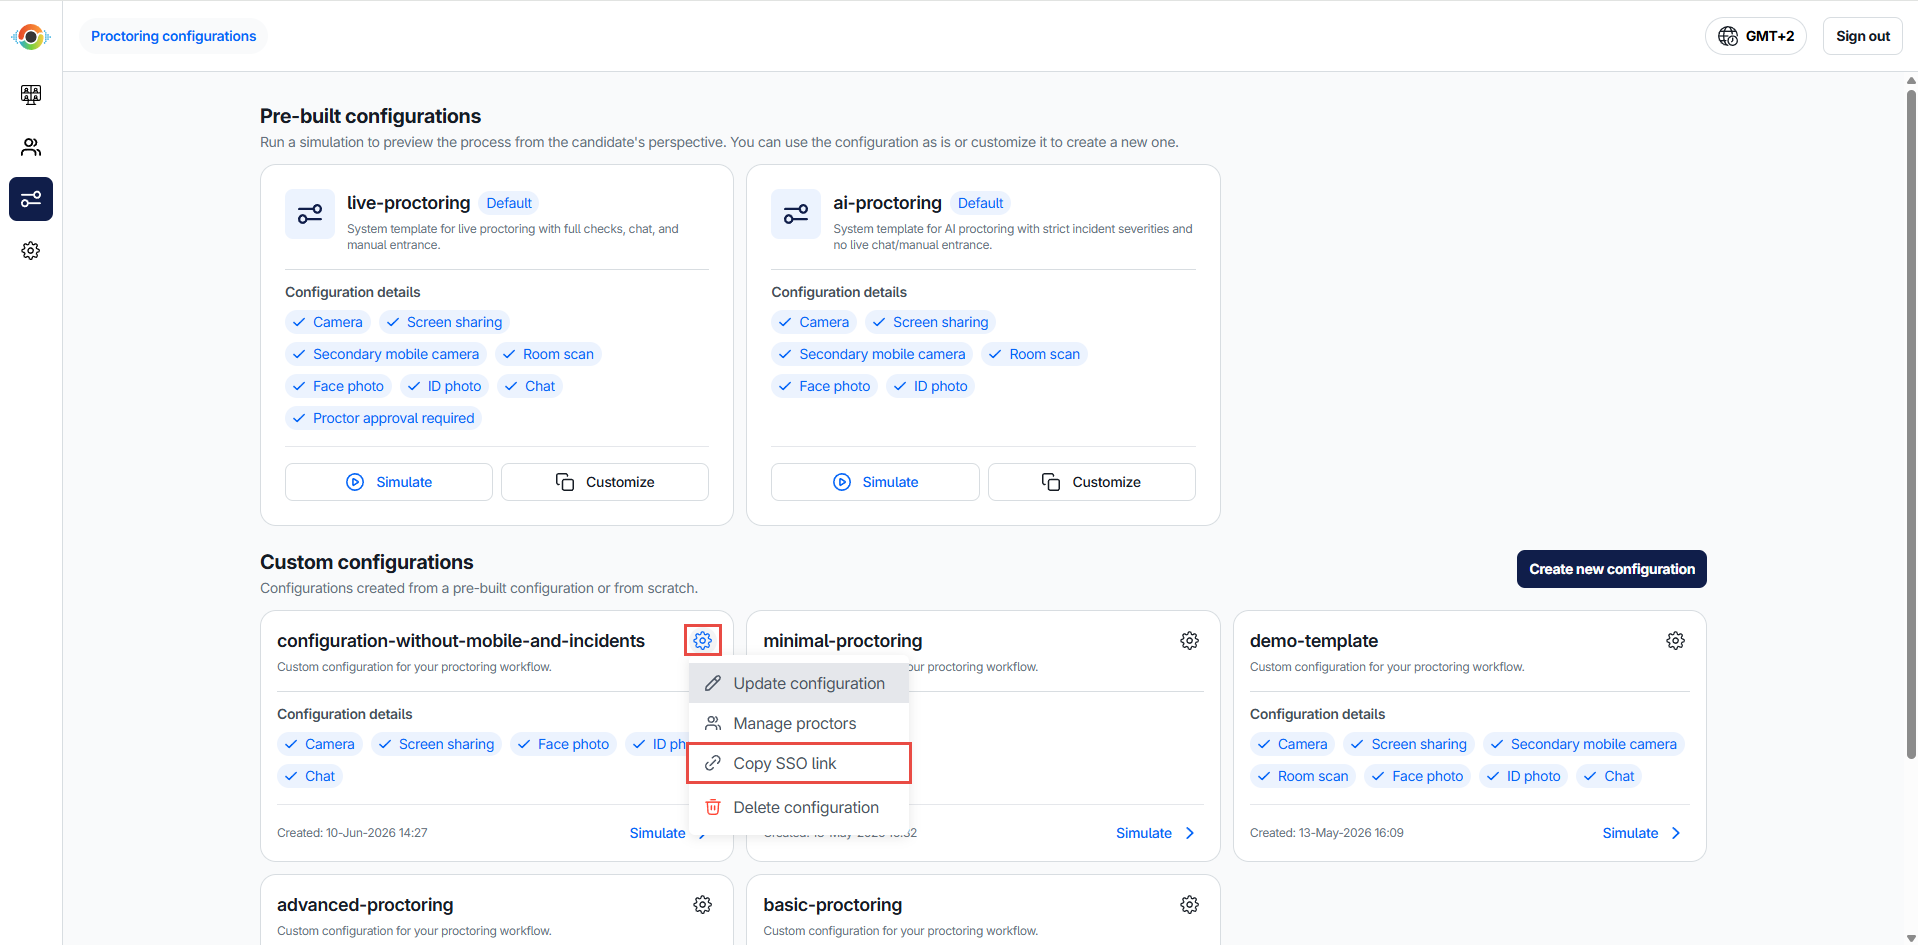
Once you create a proctoring configuration, copy its name and enter it in your examination platform's proctoring integration settings. The configuration name is used to determine which proctoring settings will be applied when candidates start the exam.
Safe Exam Browser (SEB)
Safe Exam Browser (SEB) is an optional additional layer of security that locks down the candidate's device during the exam — preventing access to other applications, browser tabs, or system features. SEB configuration is specific to each integration. Select your integration:
Course organization
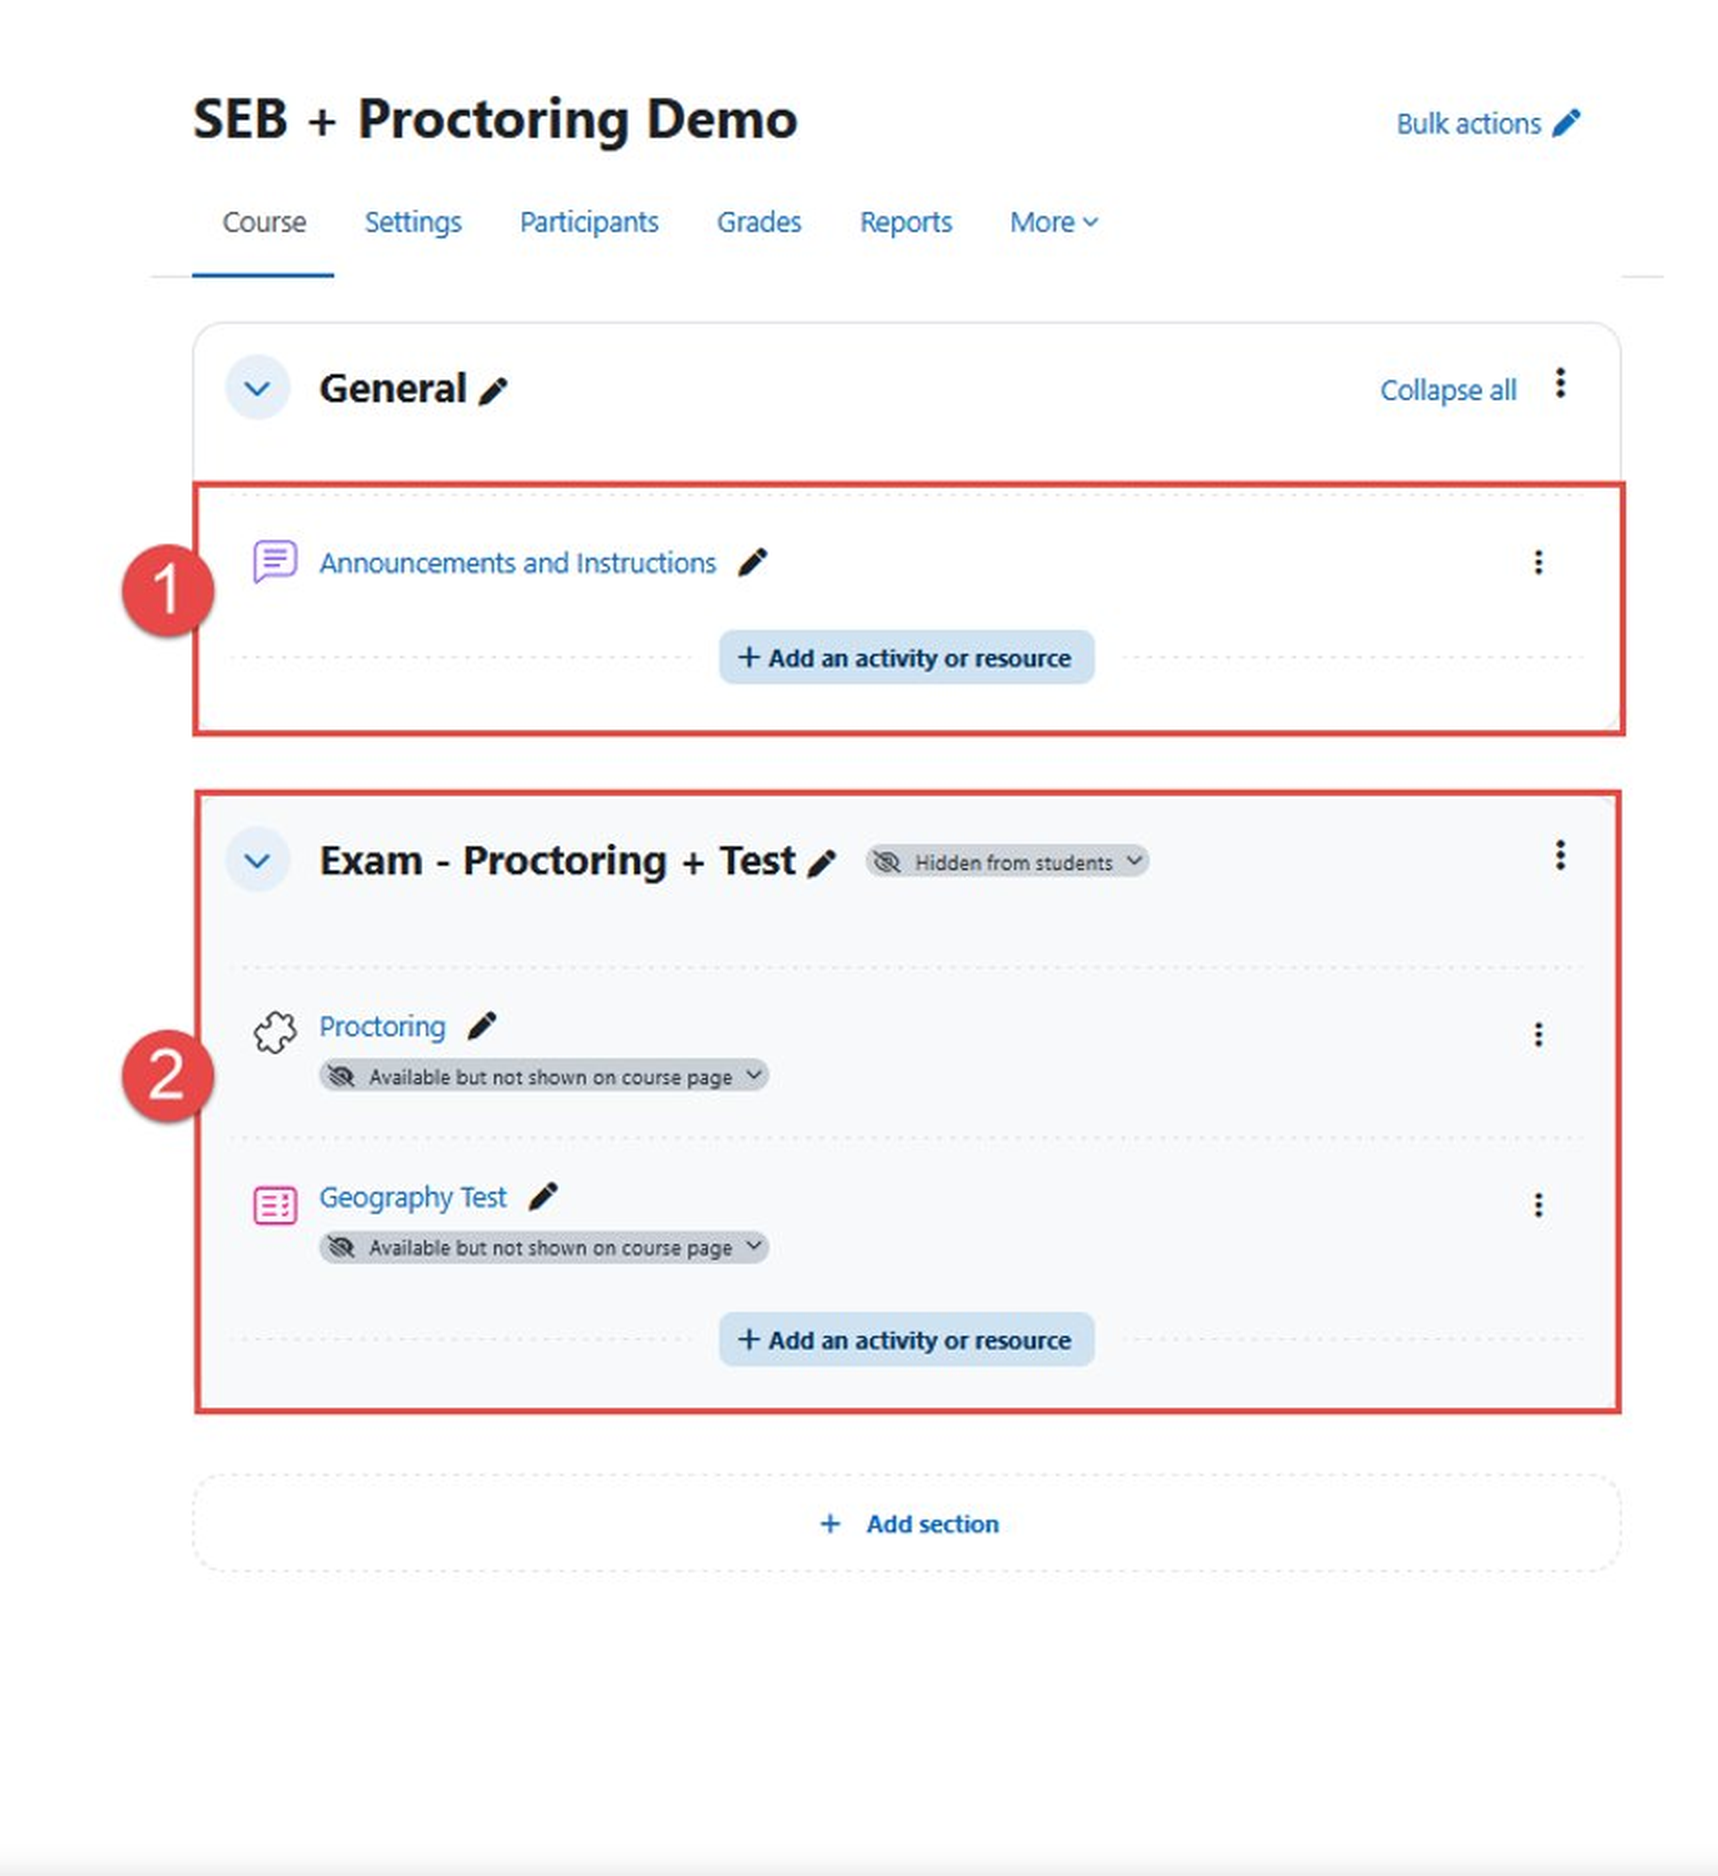
Use the following course structure when configuring SEB with proctoring:
- The first section (for example, Announcements and Instructions) should contain student instructions and a link to download the SEB configuration file.
- The second section should contain the Proctoring activity and the Quiz. Hide this section from students and set both activities to Available but not shown on course page.
Creating the SEB configuration file
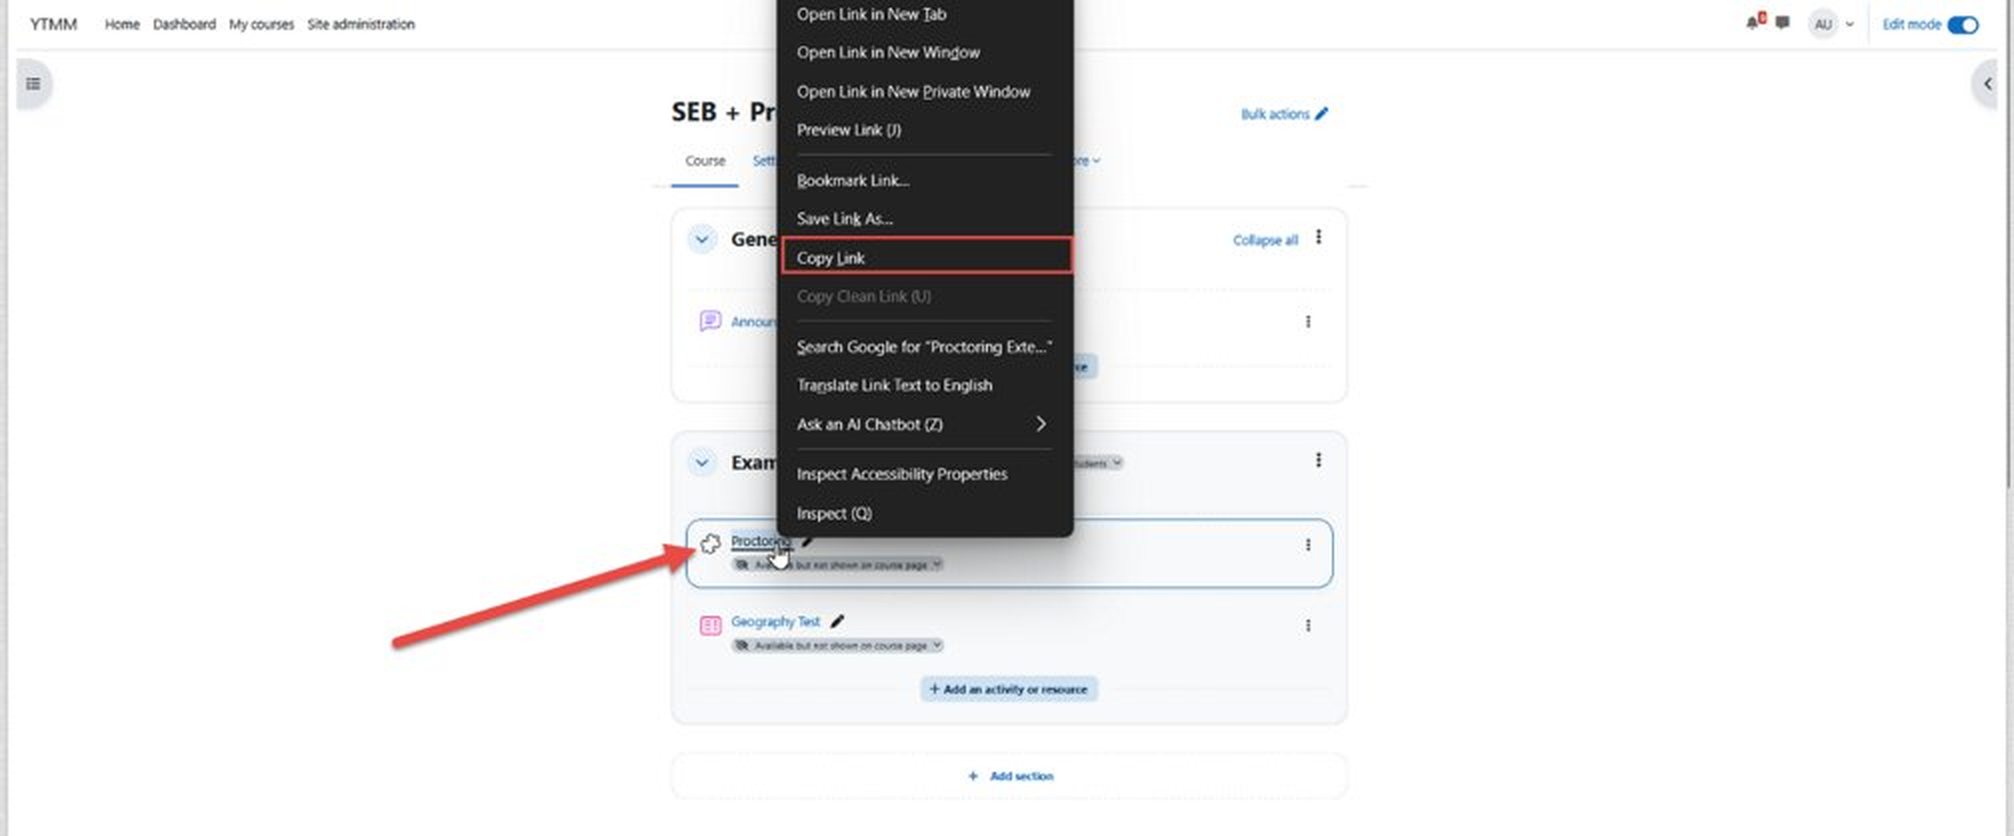
Copy the URL of the previously created Proctoring activity.
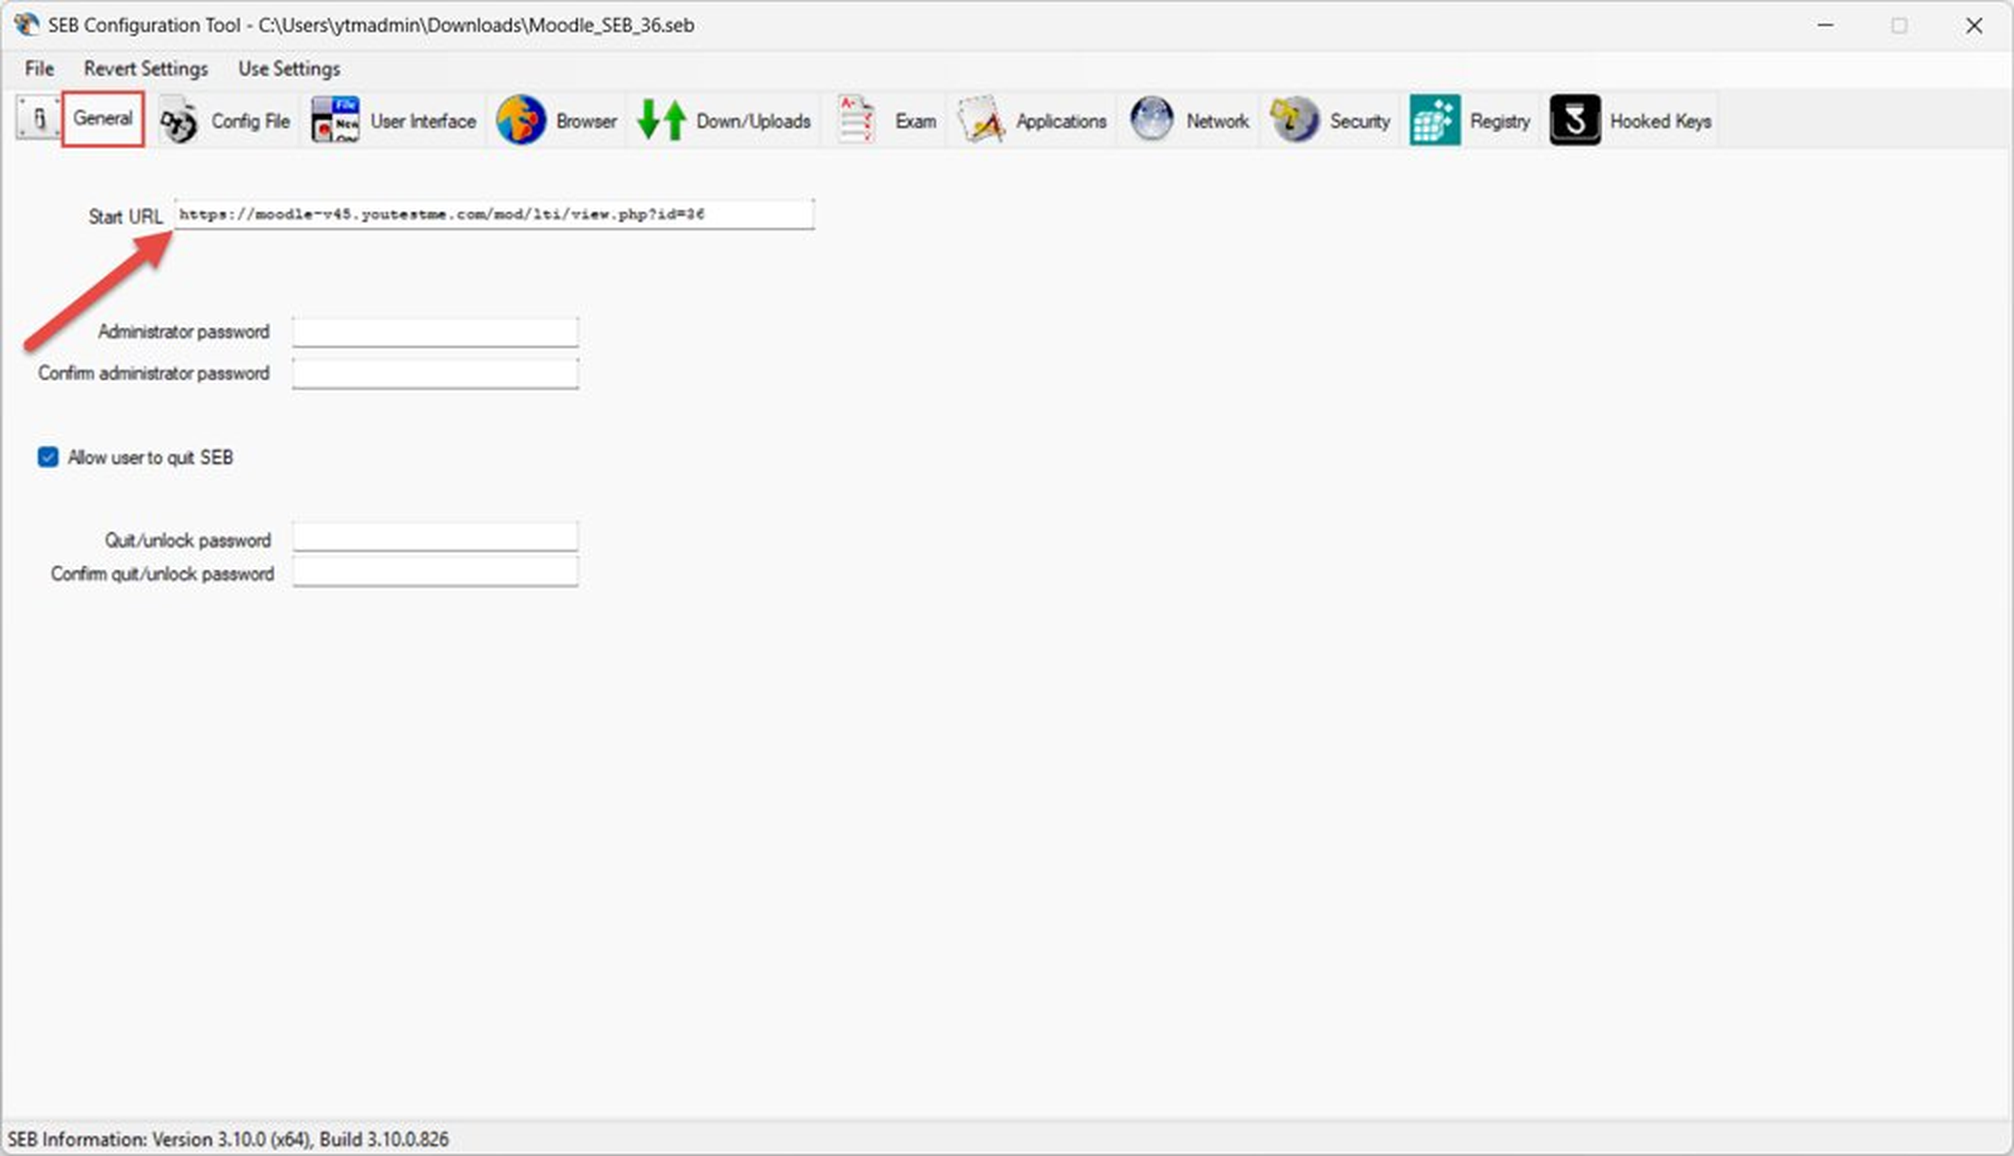
Open the SEB configuration file. In the
General tab, paste the Proctoring activity
URL into the Start URL field:
https://your-moodle-domain/mod/lti/view.php?id=proctoring_element_id
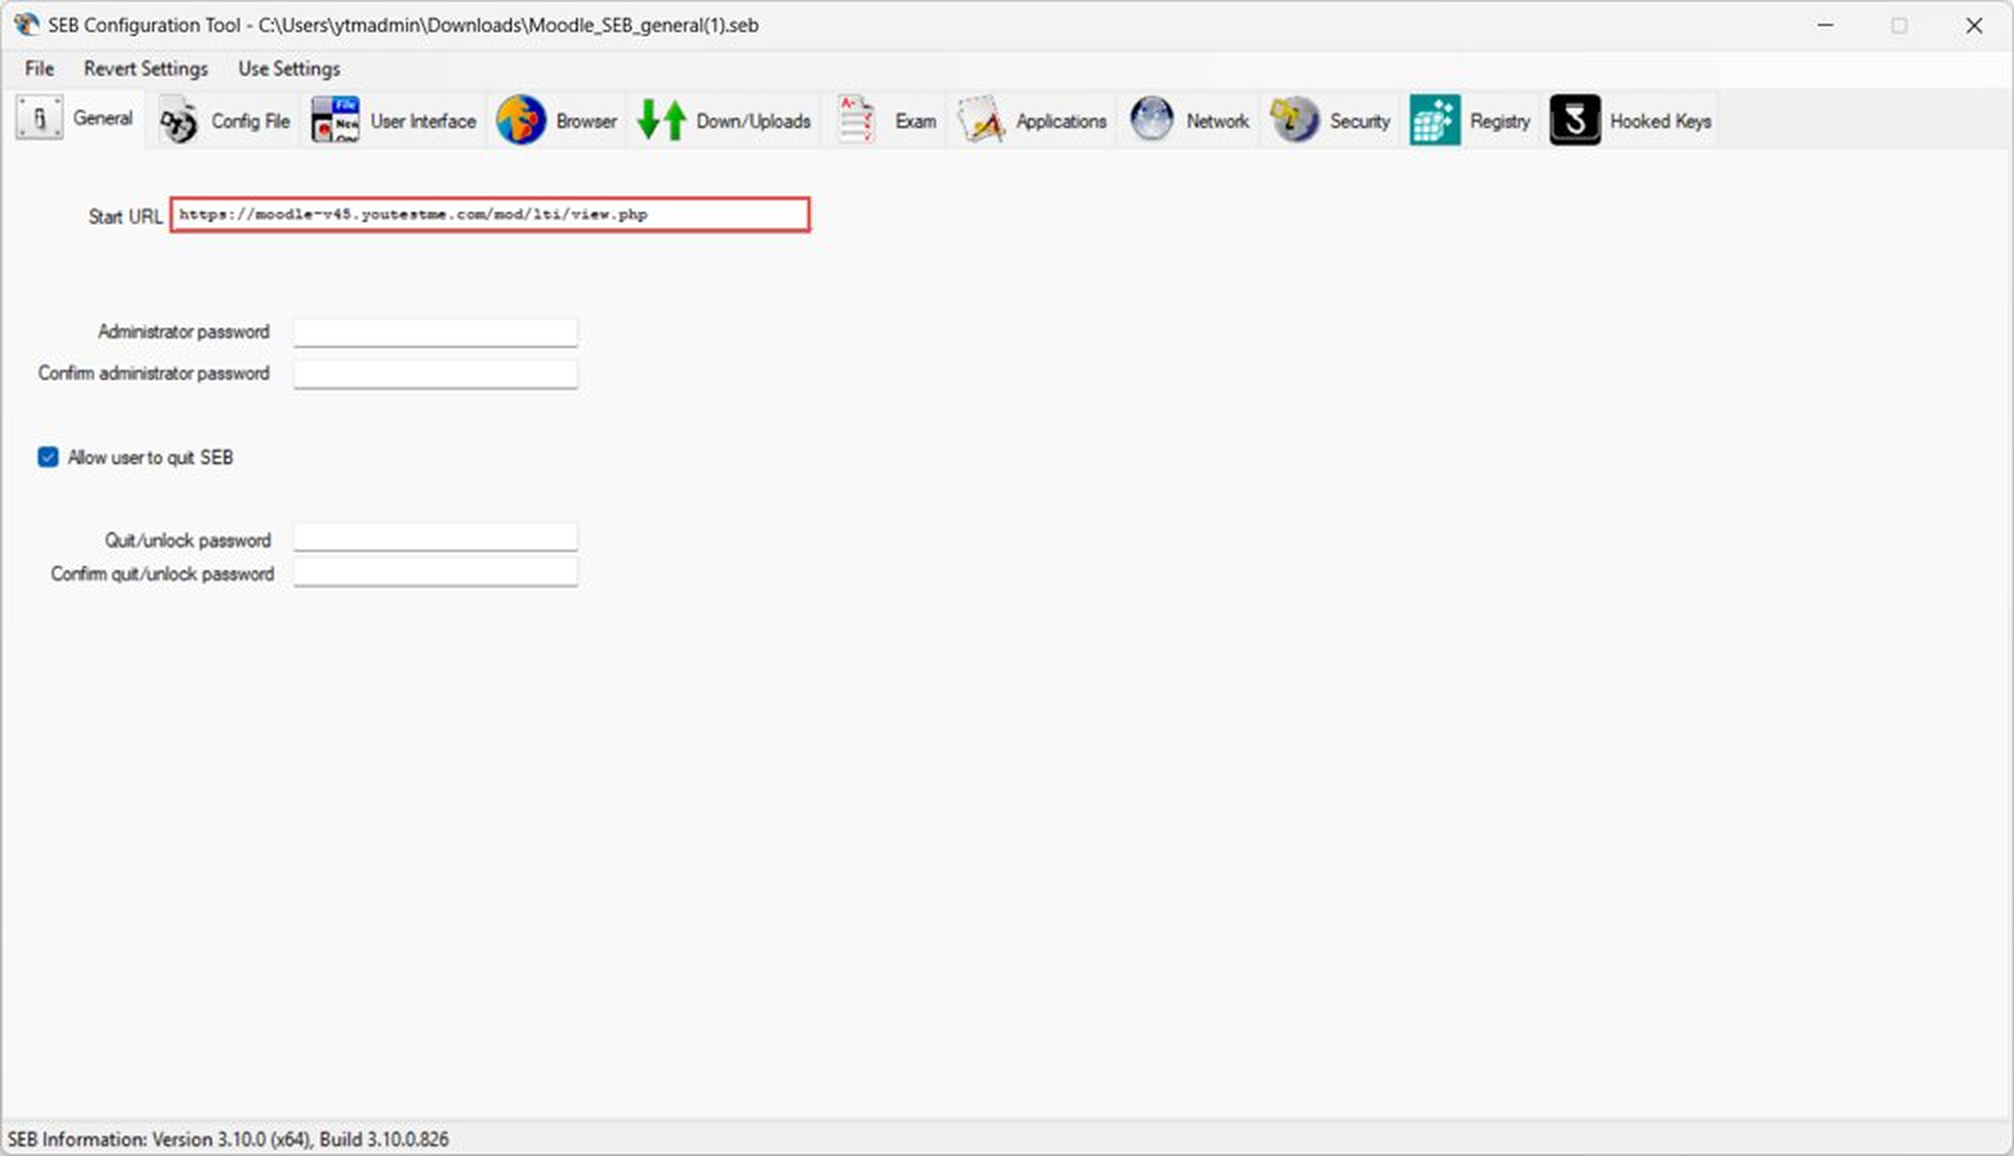
To reuse the SEB configuration across multiple tests, remove
the ID part from the Start URL:
https://your-moodle-domain/mod/lti/view.php
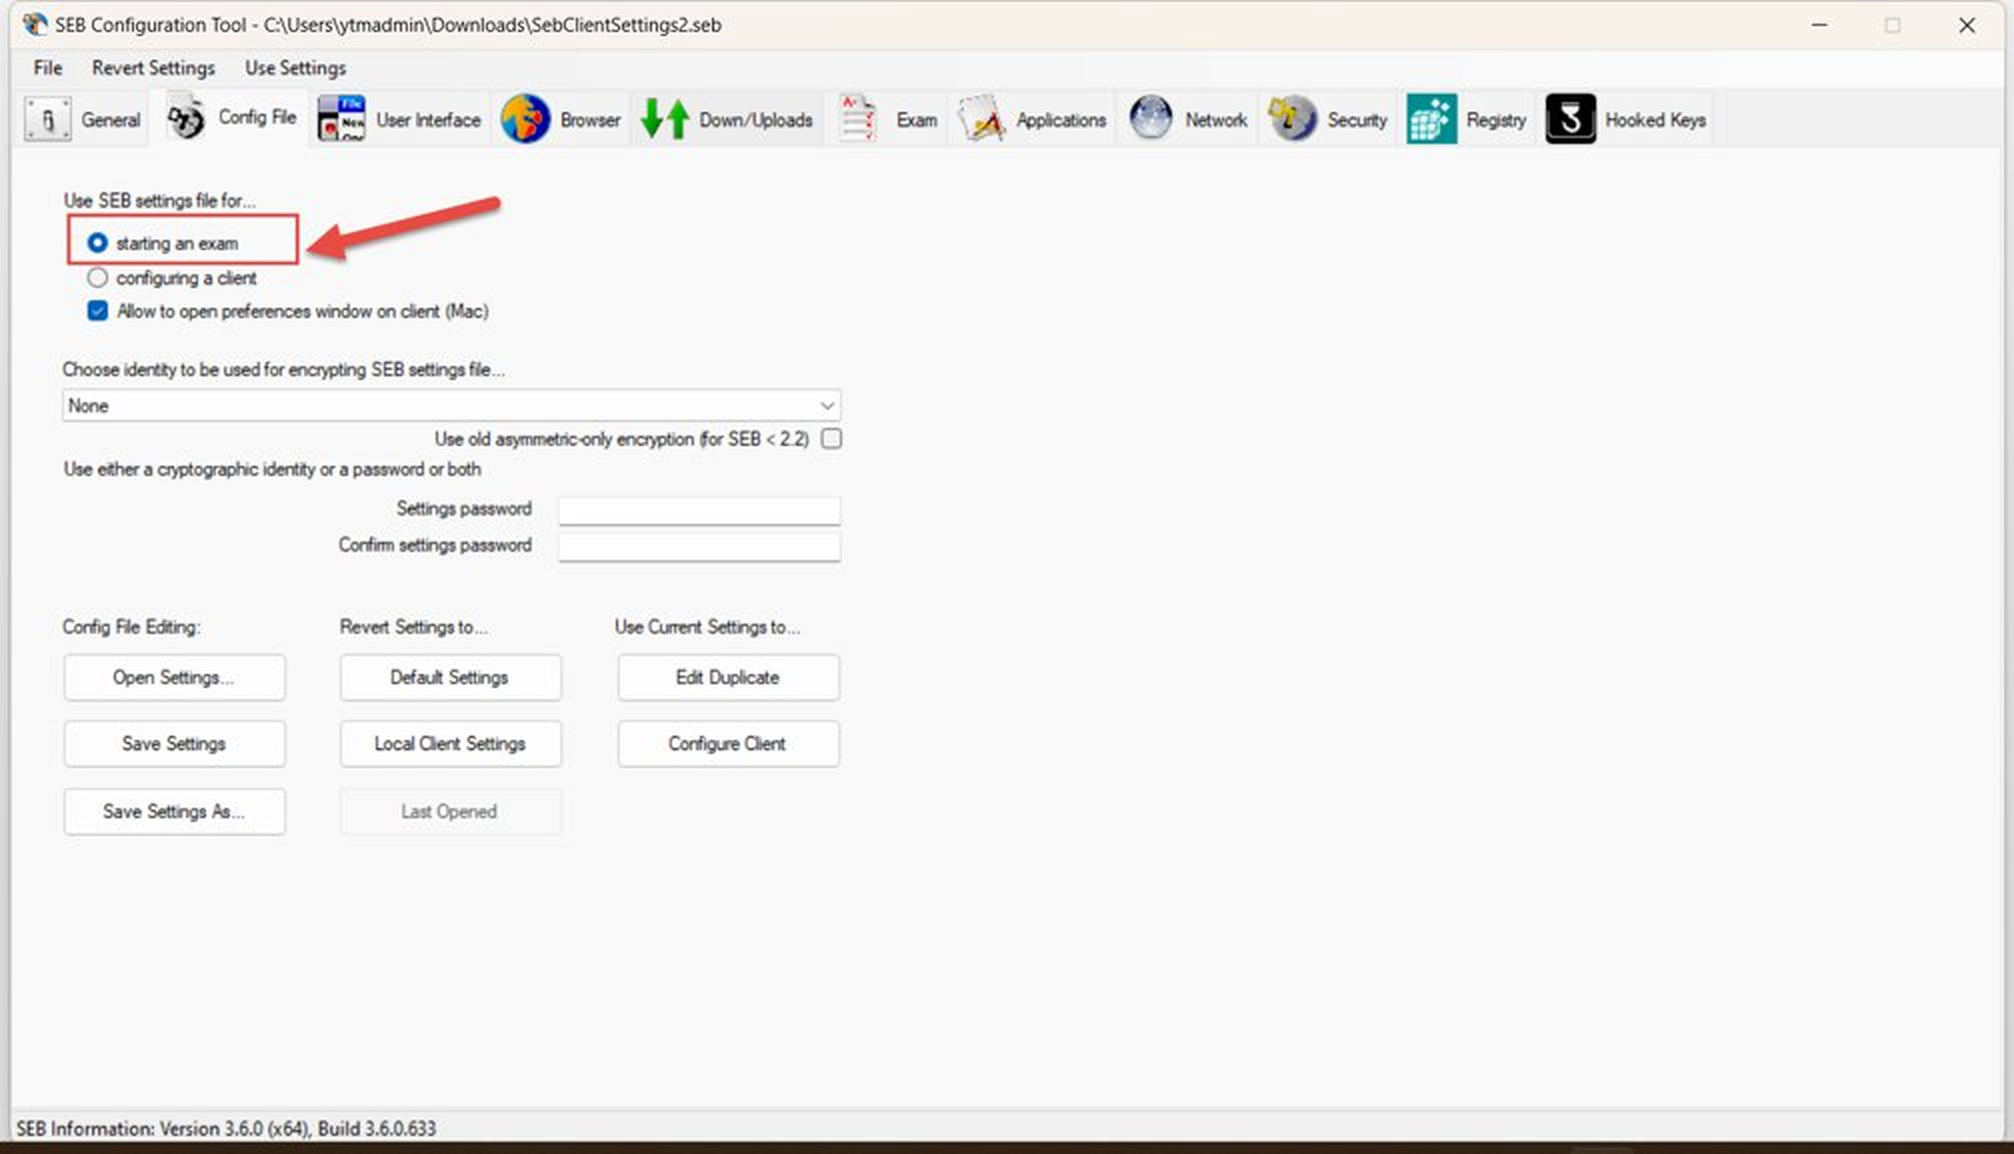
In the Config File tab, select Starting an exam.
Under the Security tab, configure the security options as required.
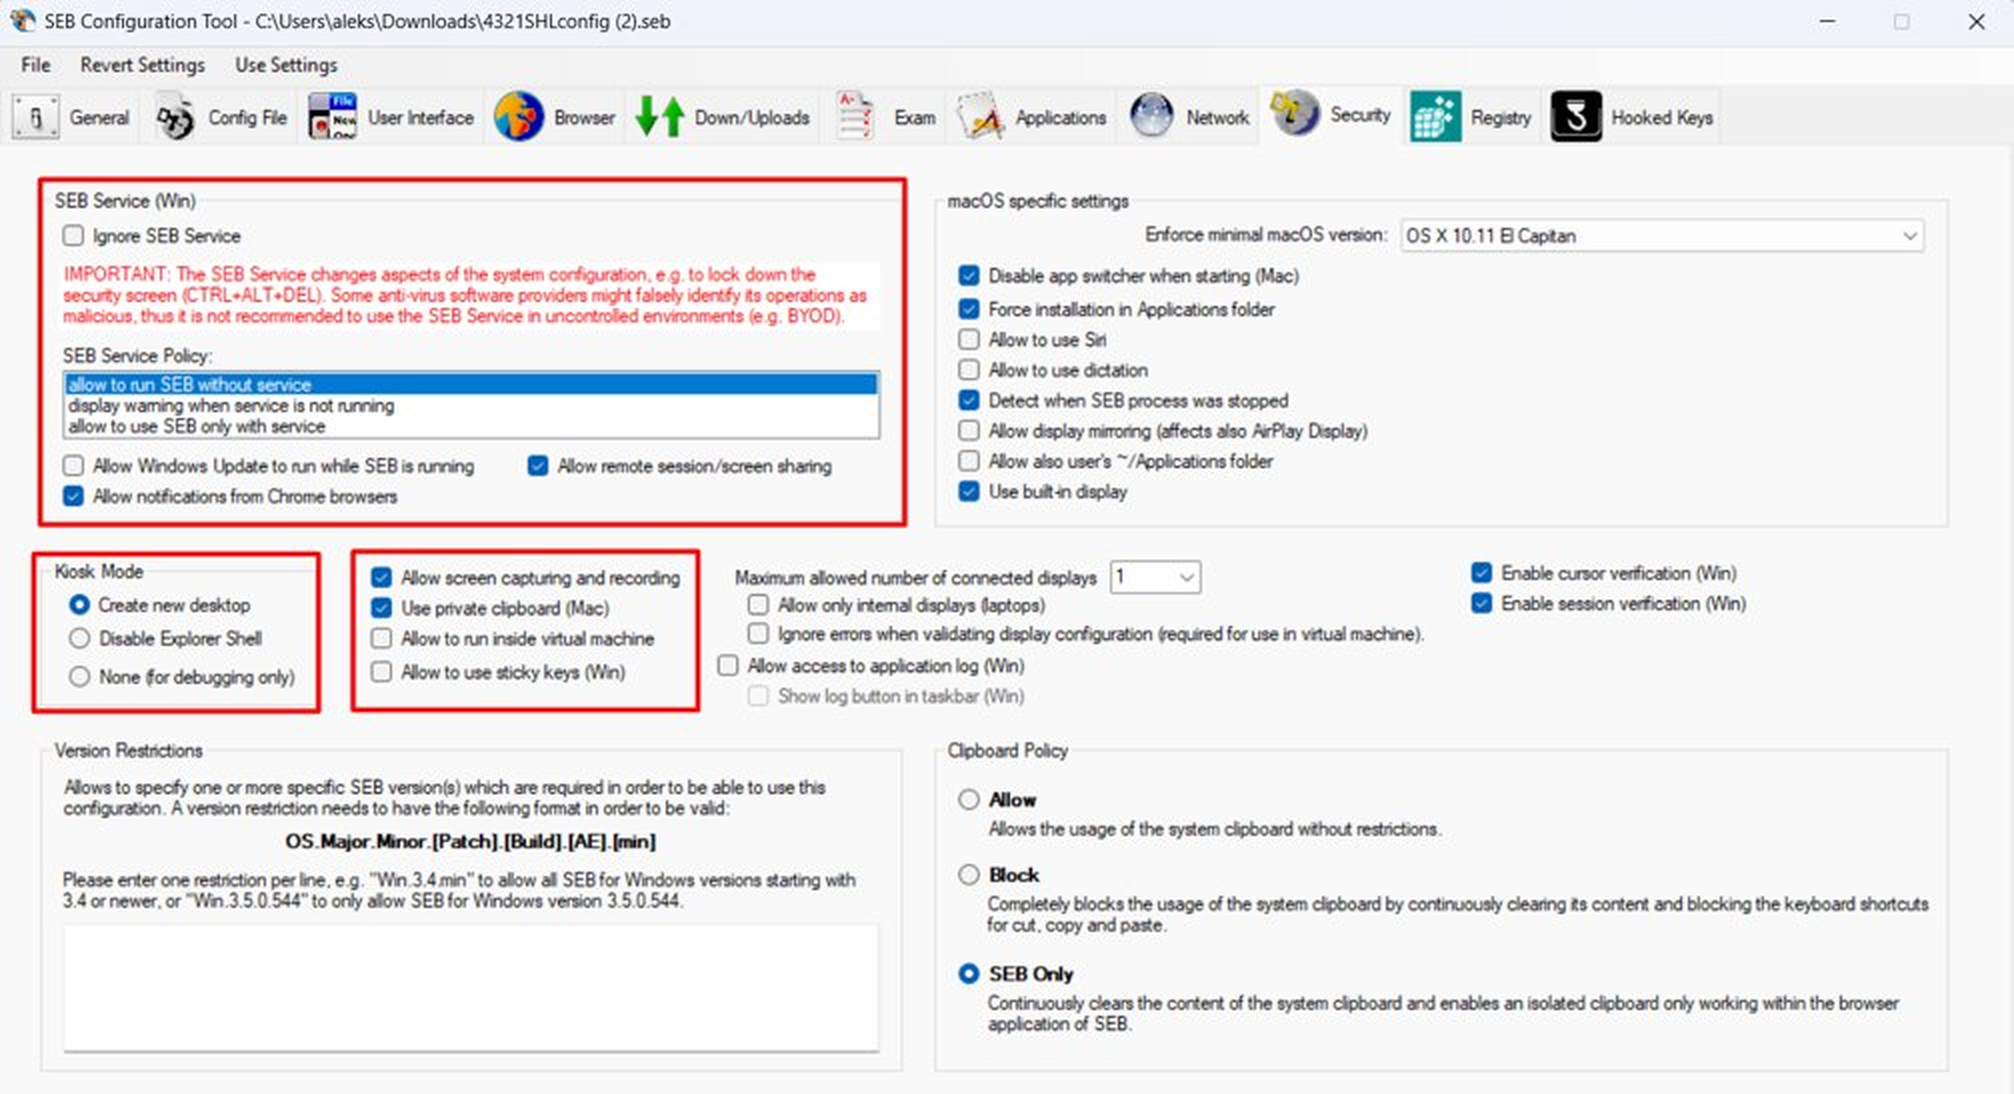
Open the Exam tab and:
- Select Use Browser Exam Key and Configuration Key.
- Select Use Start URL.
- If reusing a single SEB configuration for many tests, enable Allow query parameters.
Save the configuration and copy the Browser Exam Key — you will need it in Moodle.
Upload the SEB configuration file to a storage location that provides a direct download link.
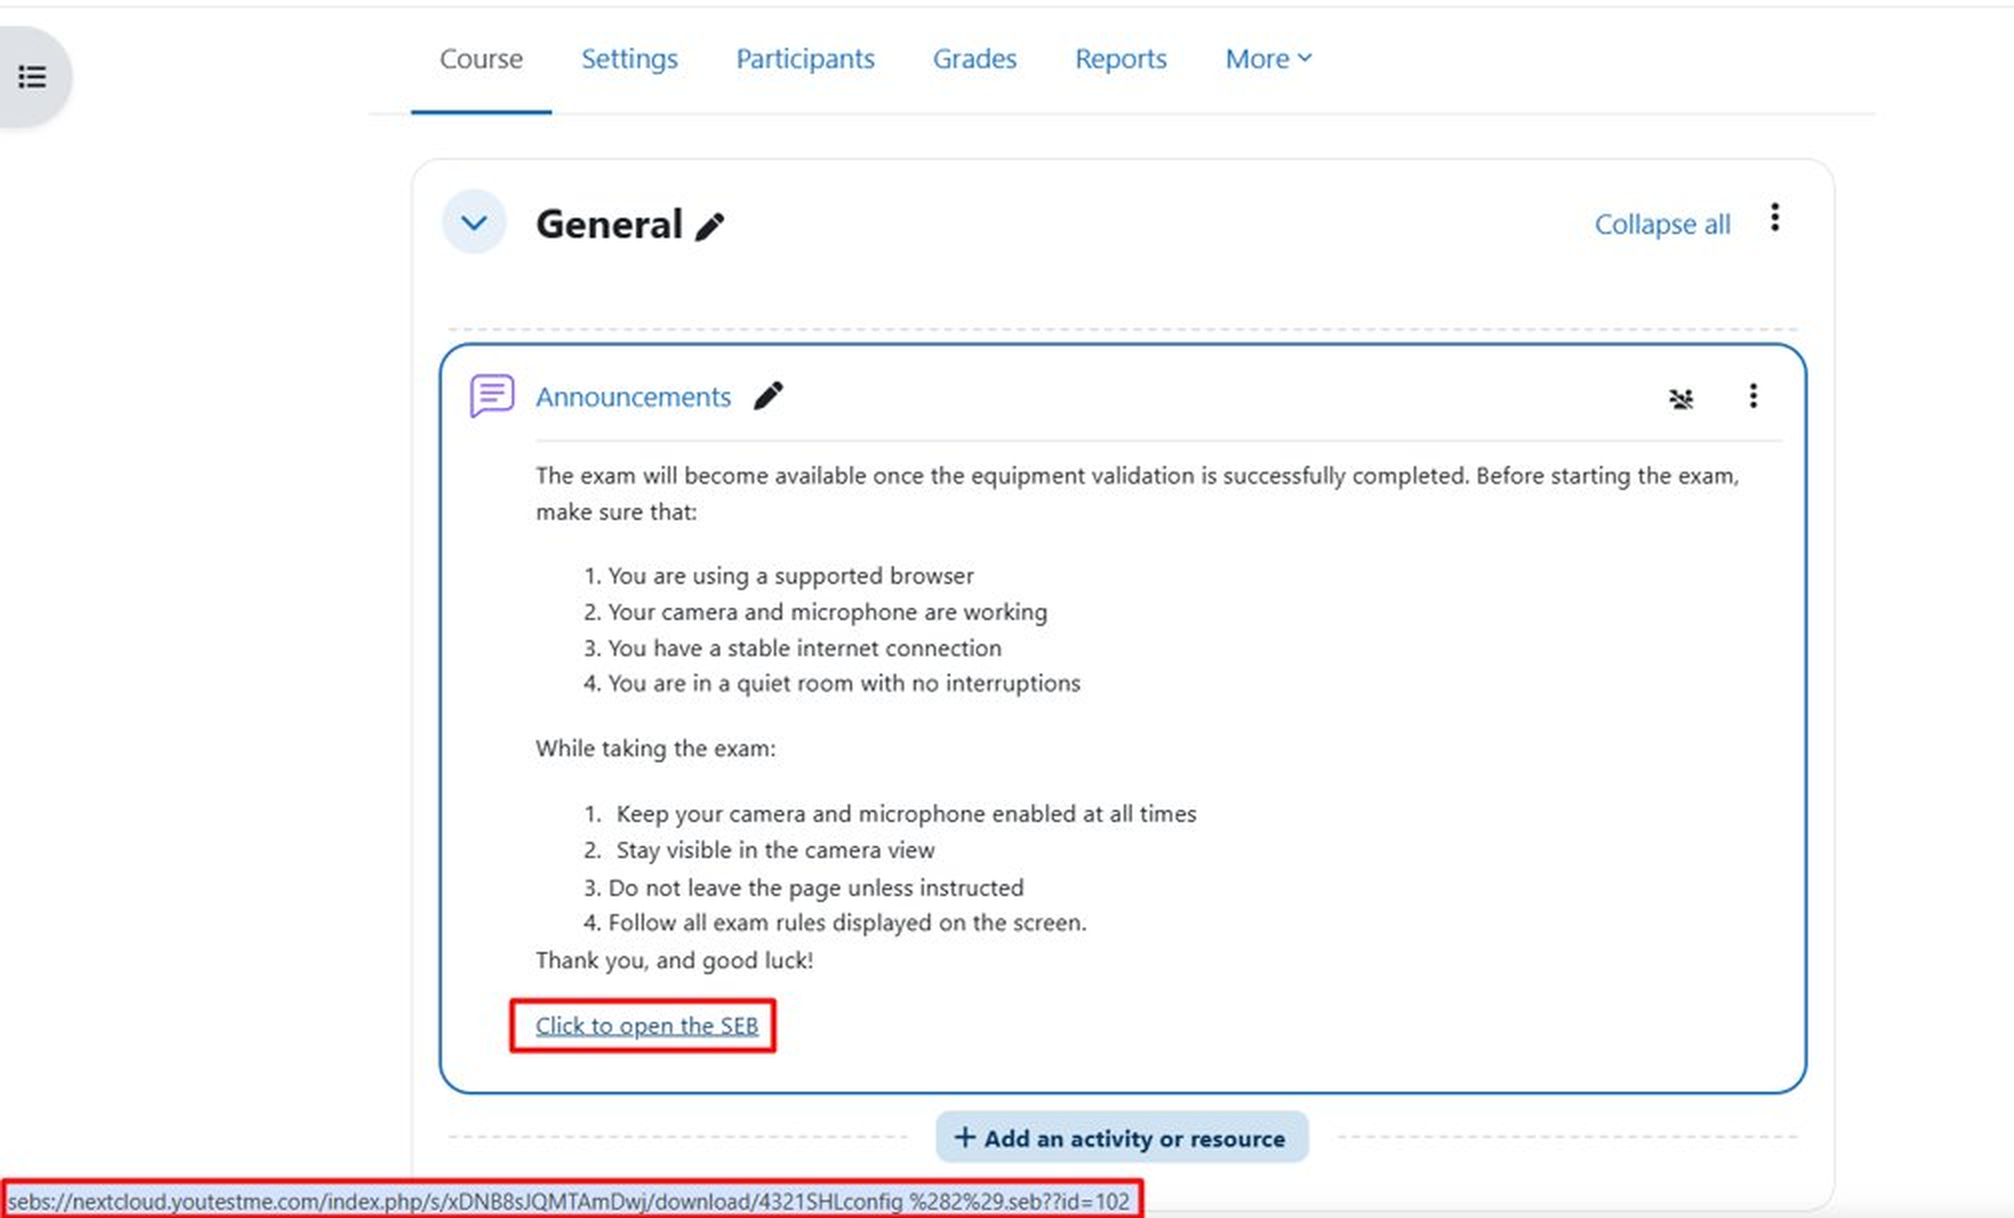
To launch SEB automatically, replace https with
sebs. If the same configuration is used for
multiple tests, append the proctoring activity ID as a query
parameter.
Place this SEB launch link in the "Announcements and Instructions" section so students can launch the test with proctoring in SEB.
Configuring SEB in Quiz
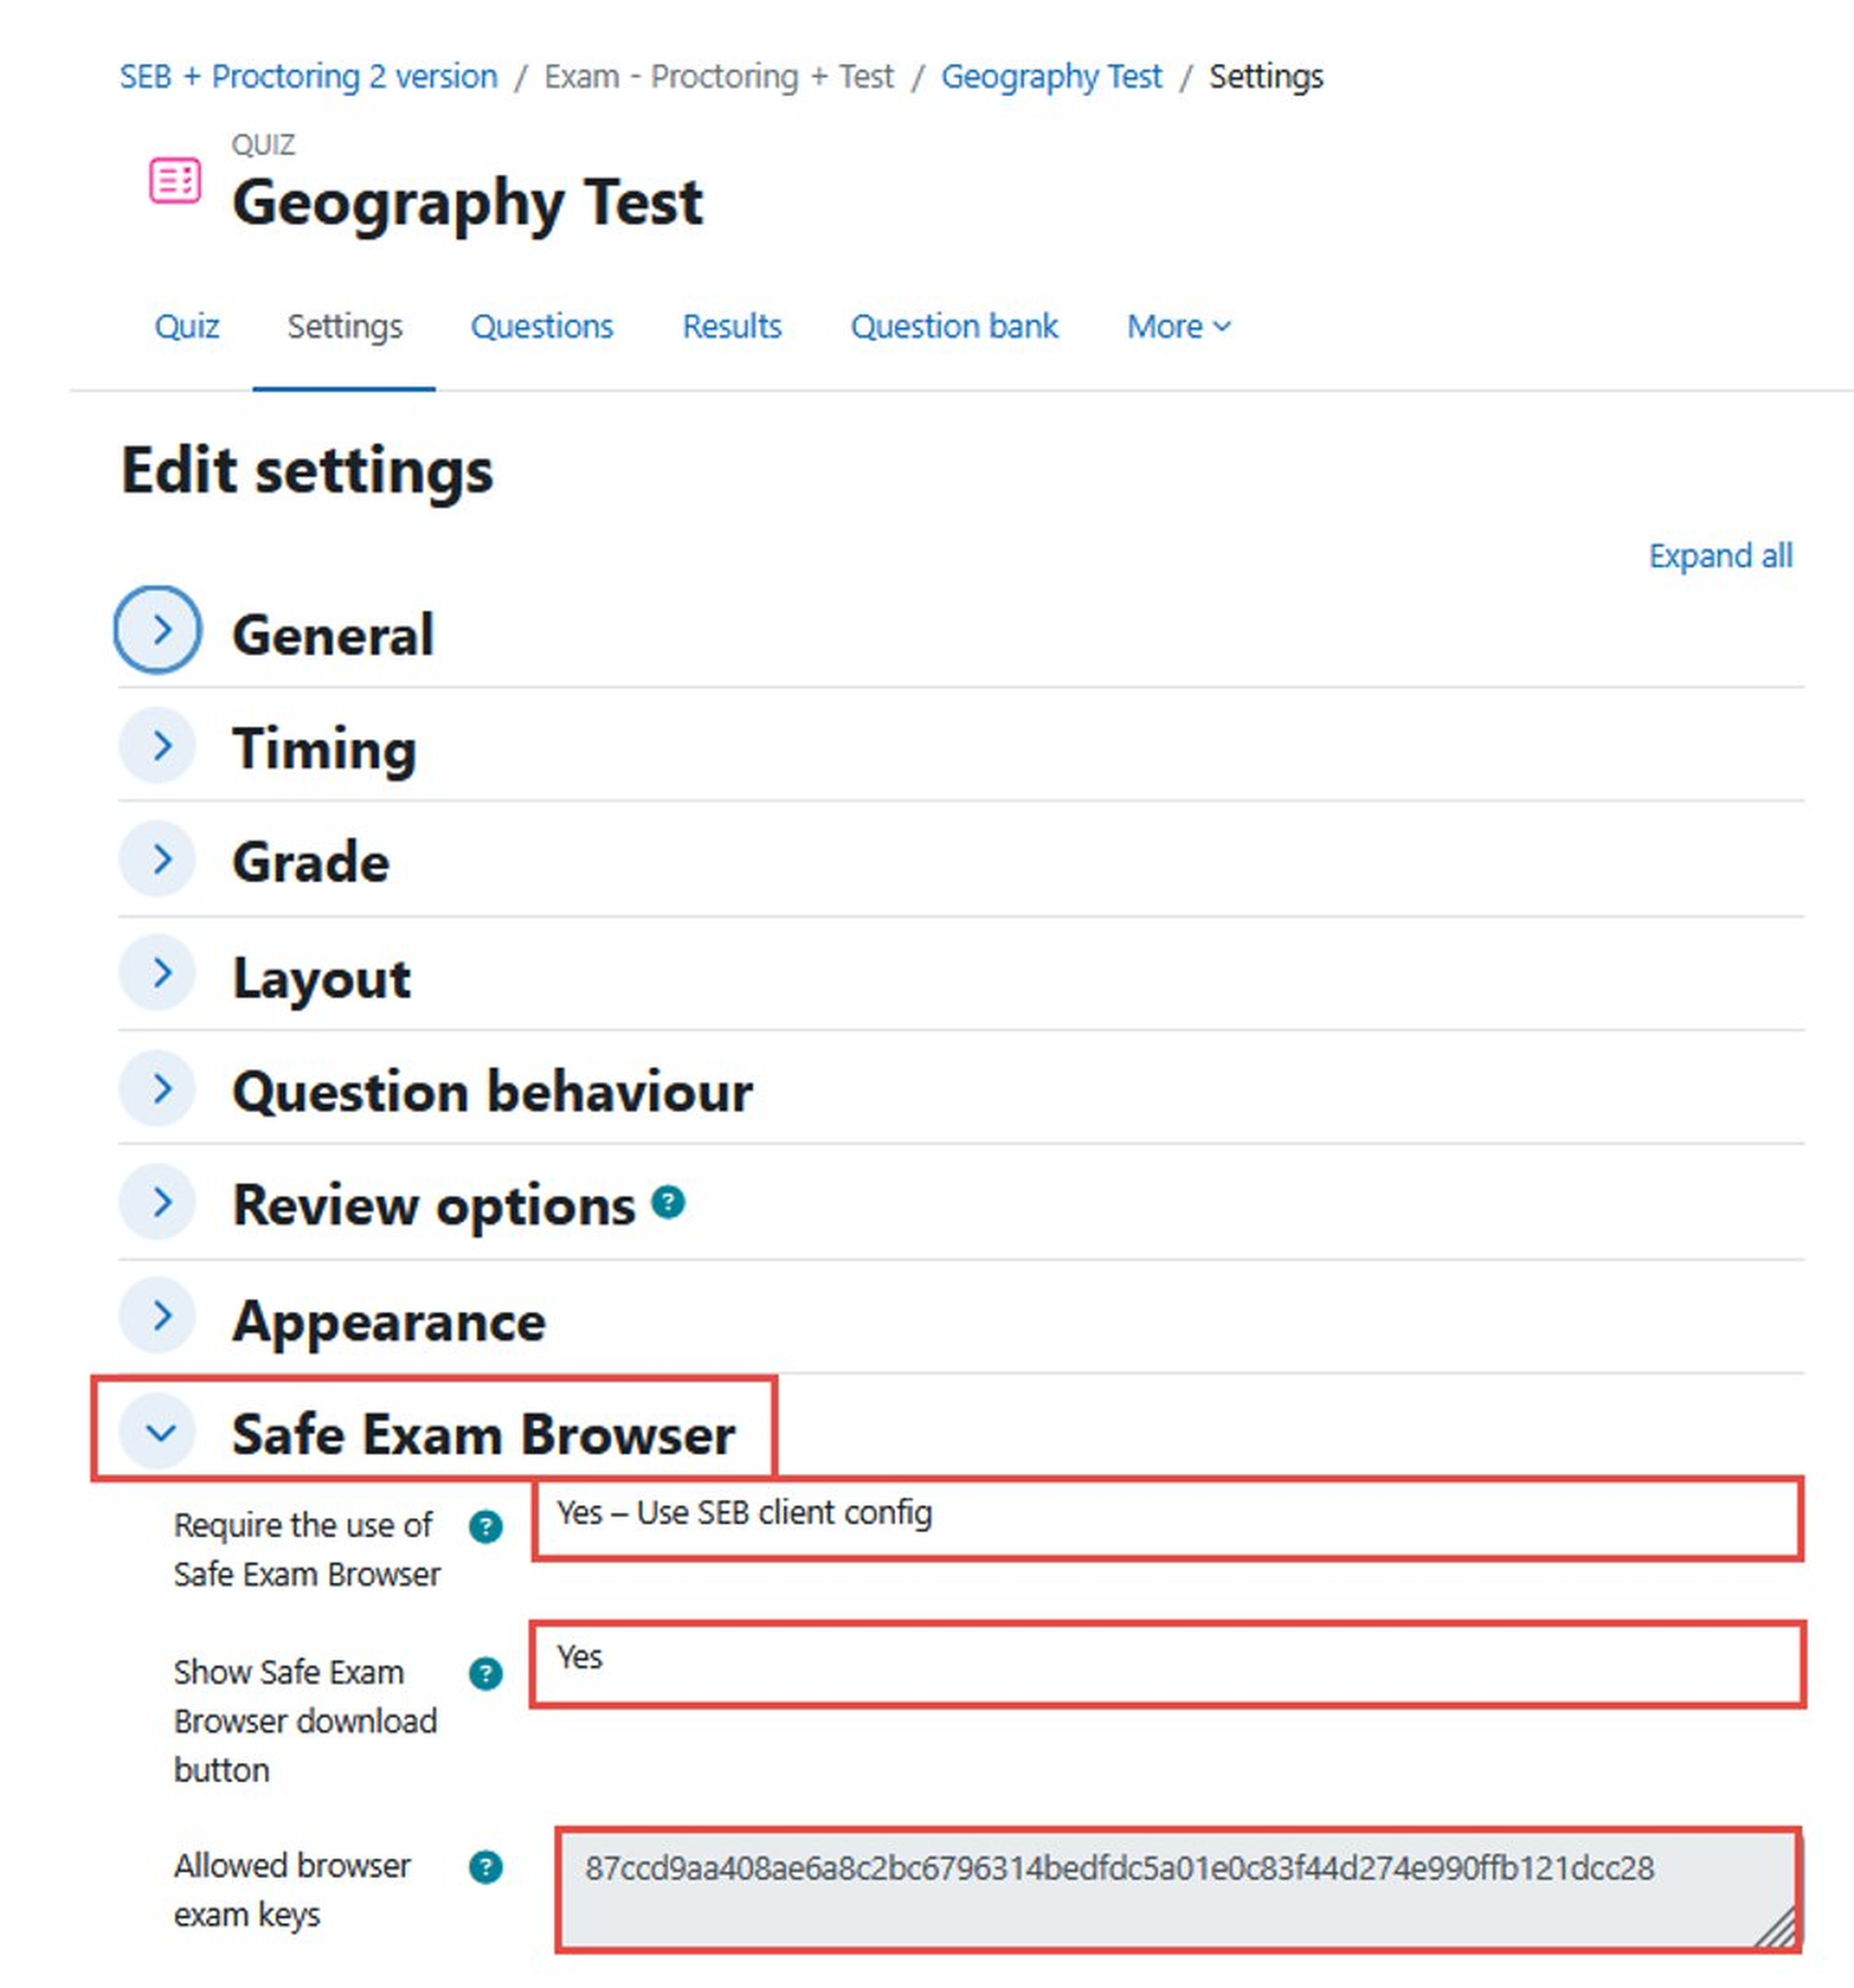
- Open the quiz settings and expand the Safe Exam Browser section.
- Set the use of Safe Exam Browser to Yes – Use SEB client config.
- Optionally enable SEB browser download button.
- Paste the Browser Exam Key copied from the SEB configuration file into the Allowed Browser Exam Keys field.
Student's perspective
Students access the exam by clicking the link to the SEB configuration file. SEB launches automatically and prompts them to log in with their Moodle credentials. After signing in, they are guided through the system check and, once completed, can begin the proctored exam. When the exam is submitted, both the quiz attempt and the proctoring session are completed automatically.
Users
Candidates and proctors are typically created automatically through the integrated examination platform. User profiles are created the first time a candidate accesses a proctored exam or a proctor accesses live monitoring or recordings. Administrator accounts can only be created directly within the proctoring platform.
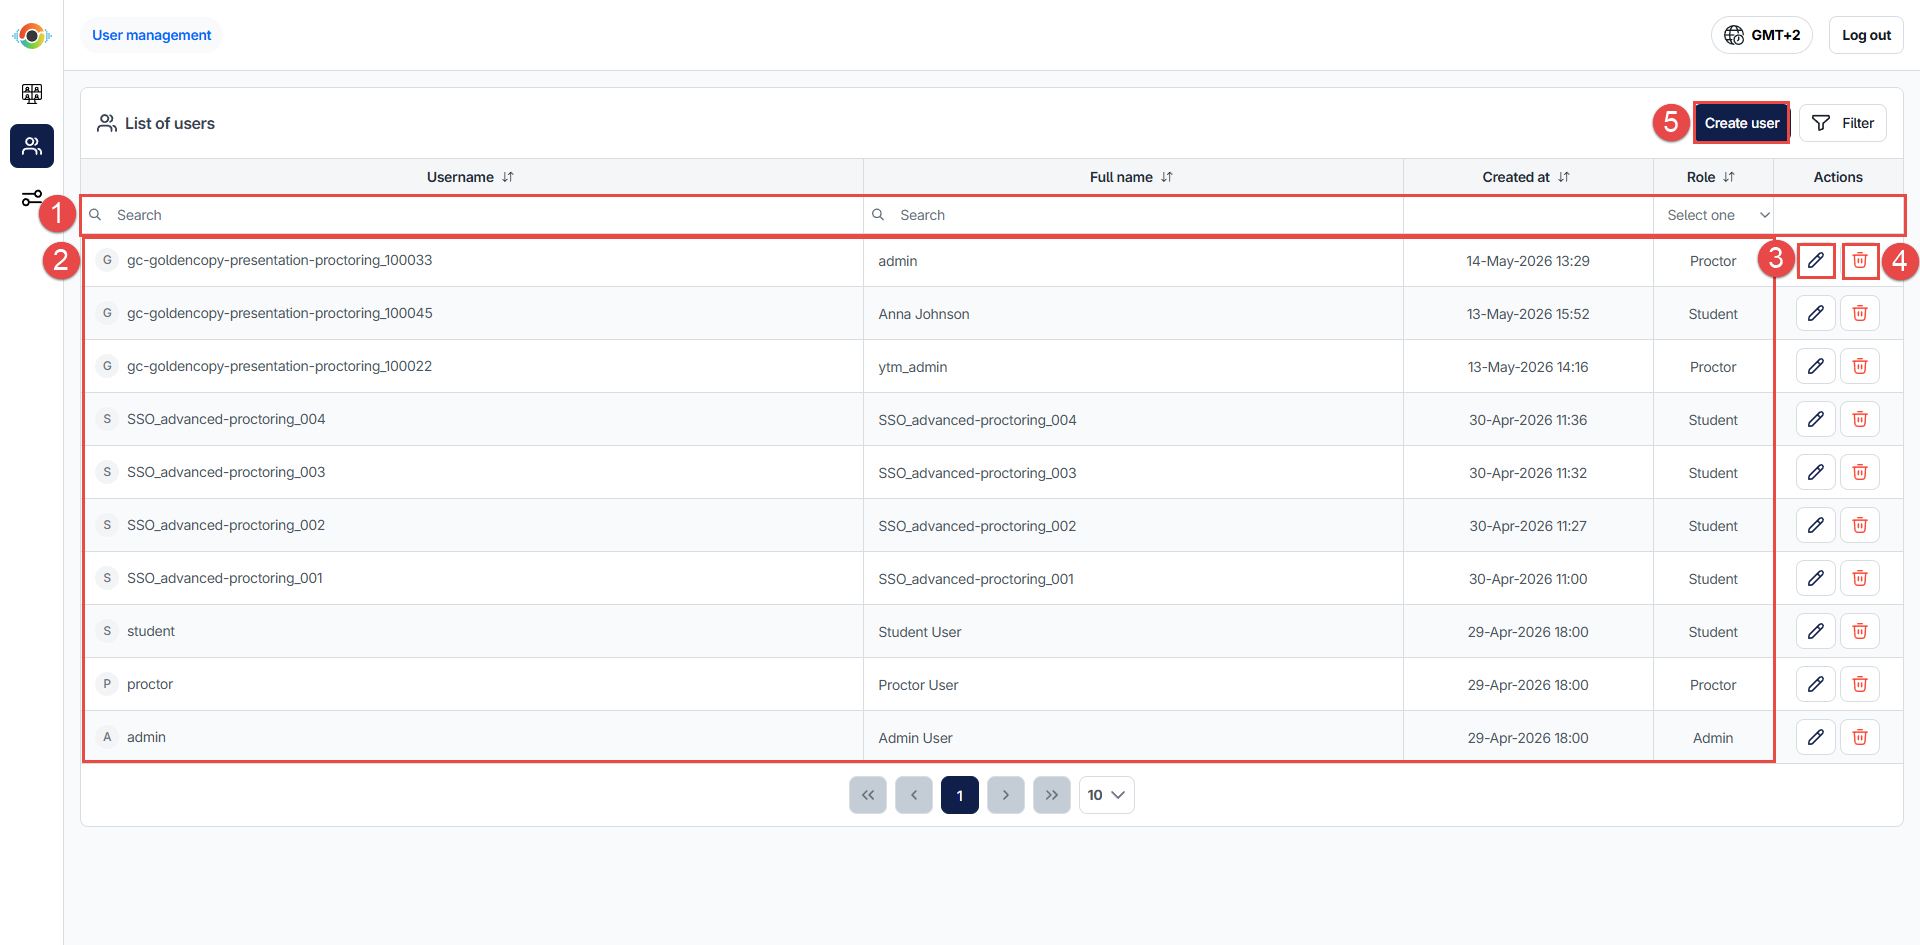
The Users page displays all users who can participate in or manage proctored exams. From this page, you can:
- Search, sort, and filter users.
- View user details, including username, full name, creation date, and role.
- Edit user details.
- Delete a user.
- Create a new user.
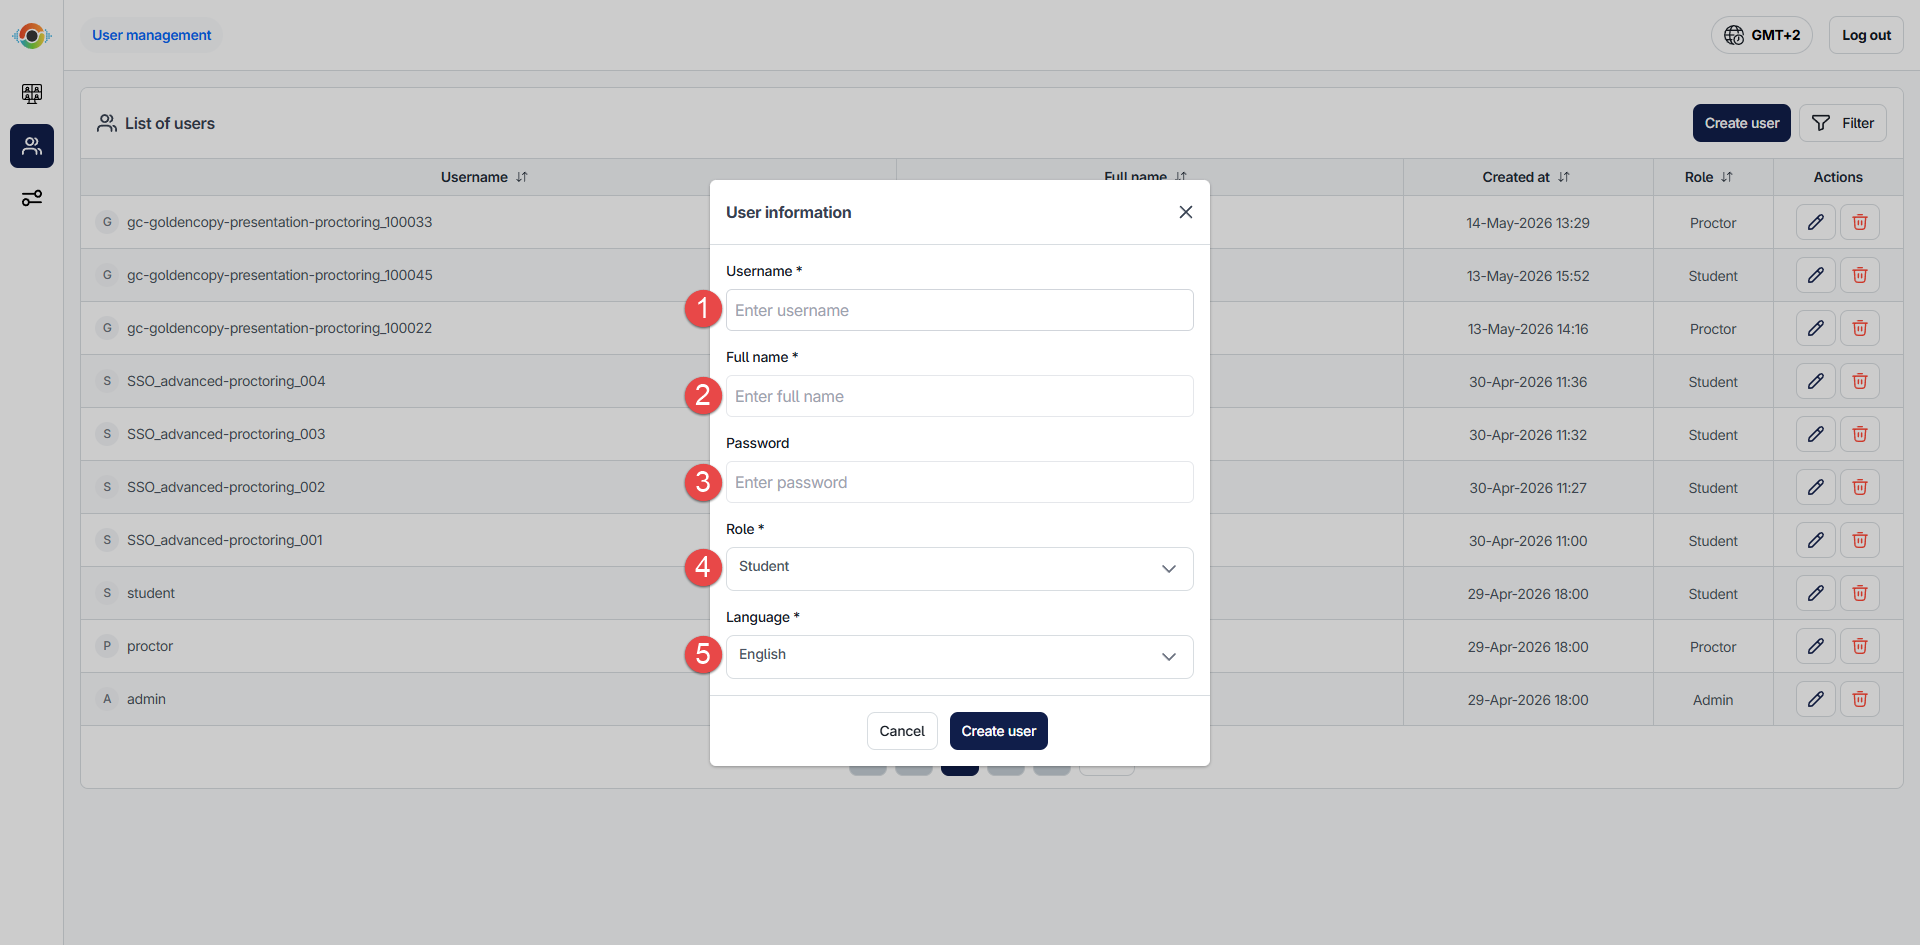
Create new user
To create a new user, click Create user, and complete the following fields:
- Enter the username.
- Enter the full name.
- Enter the password.
- Select the role.
- Select the language.
- Click Create user to save, or Cancel to discard the changes.
Rooms
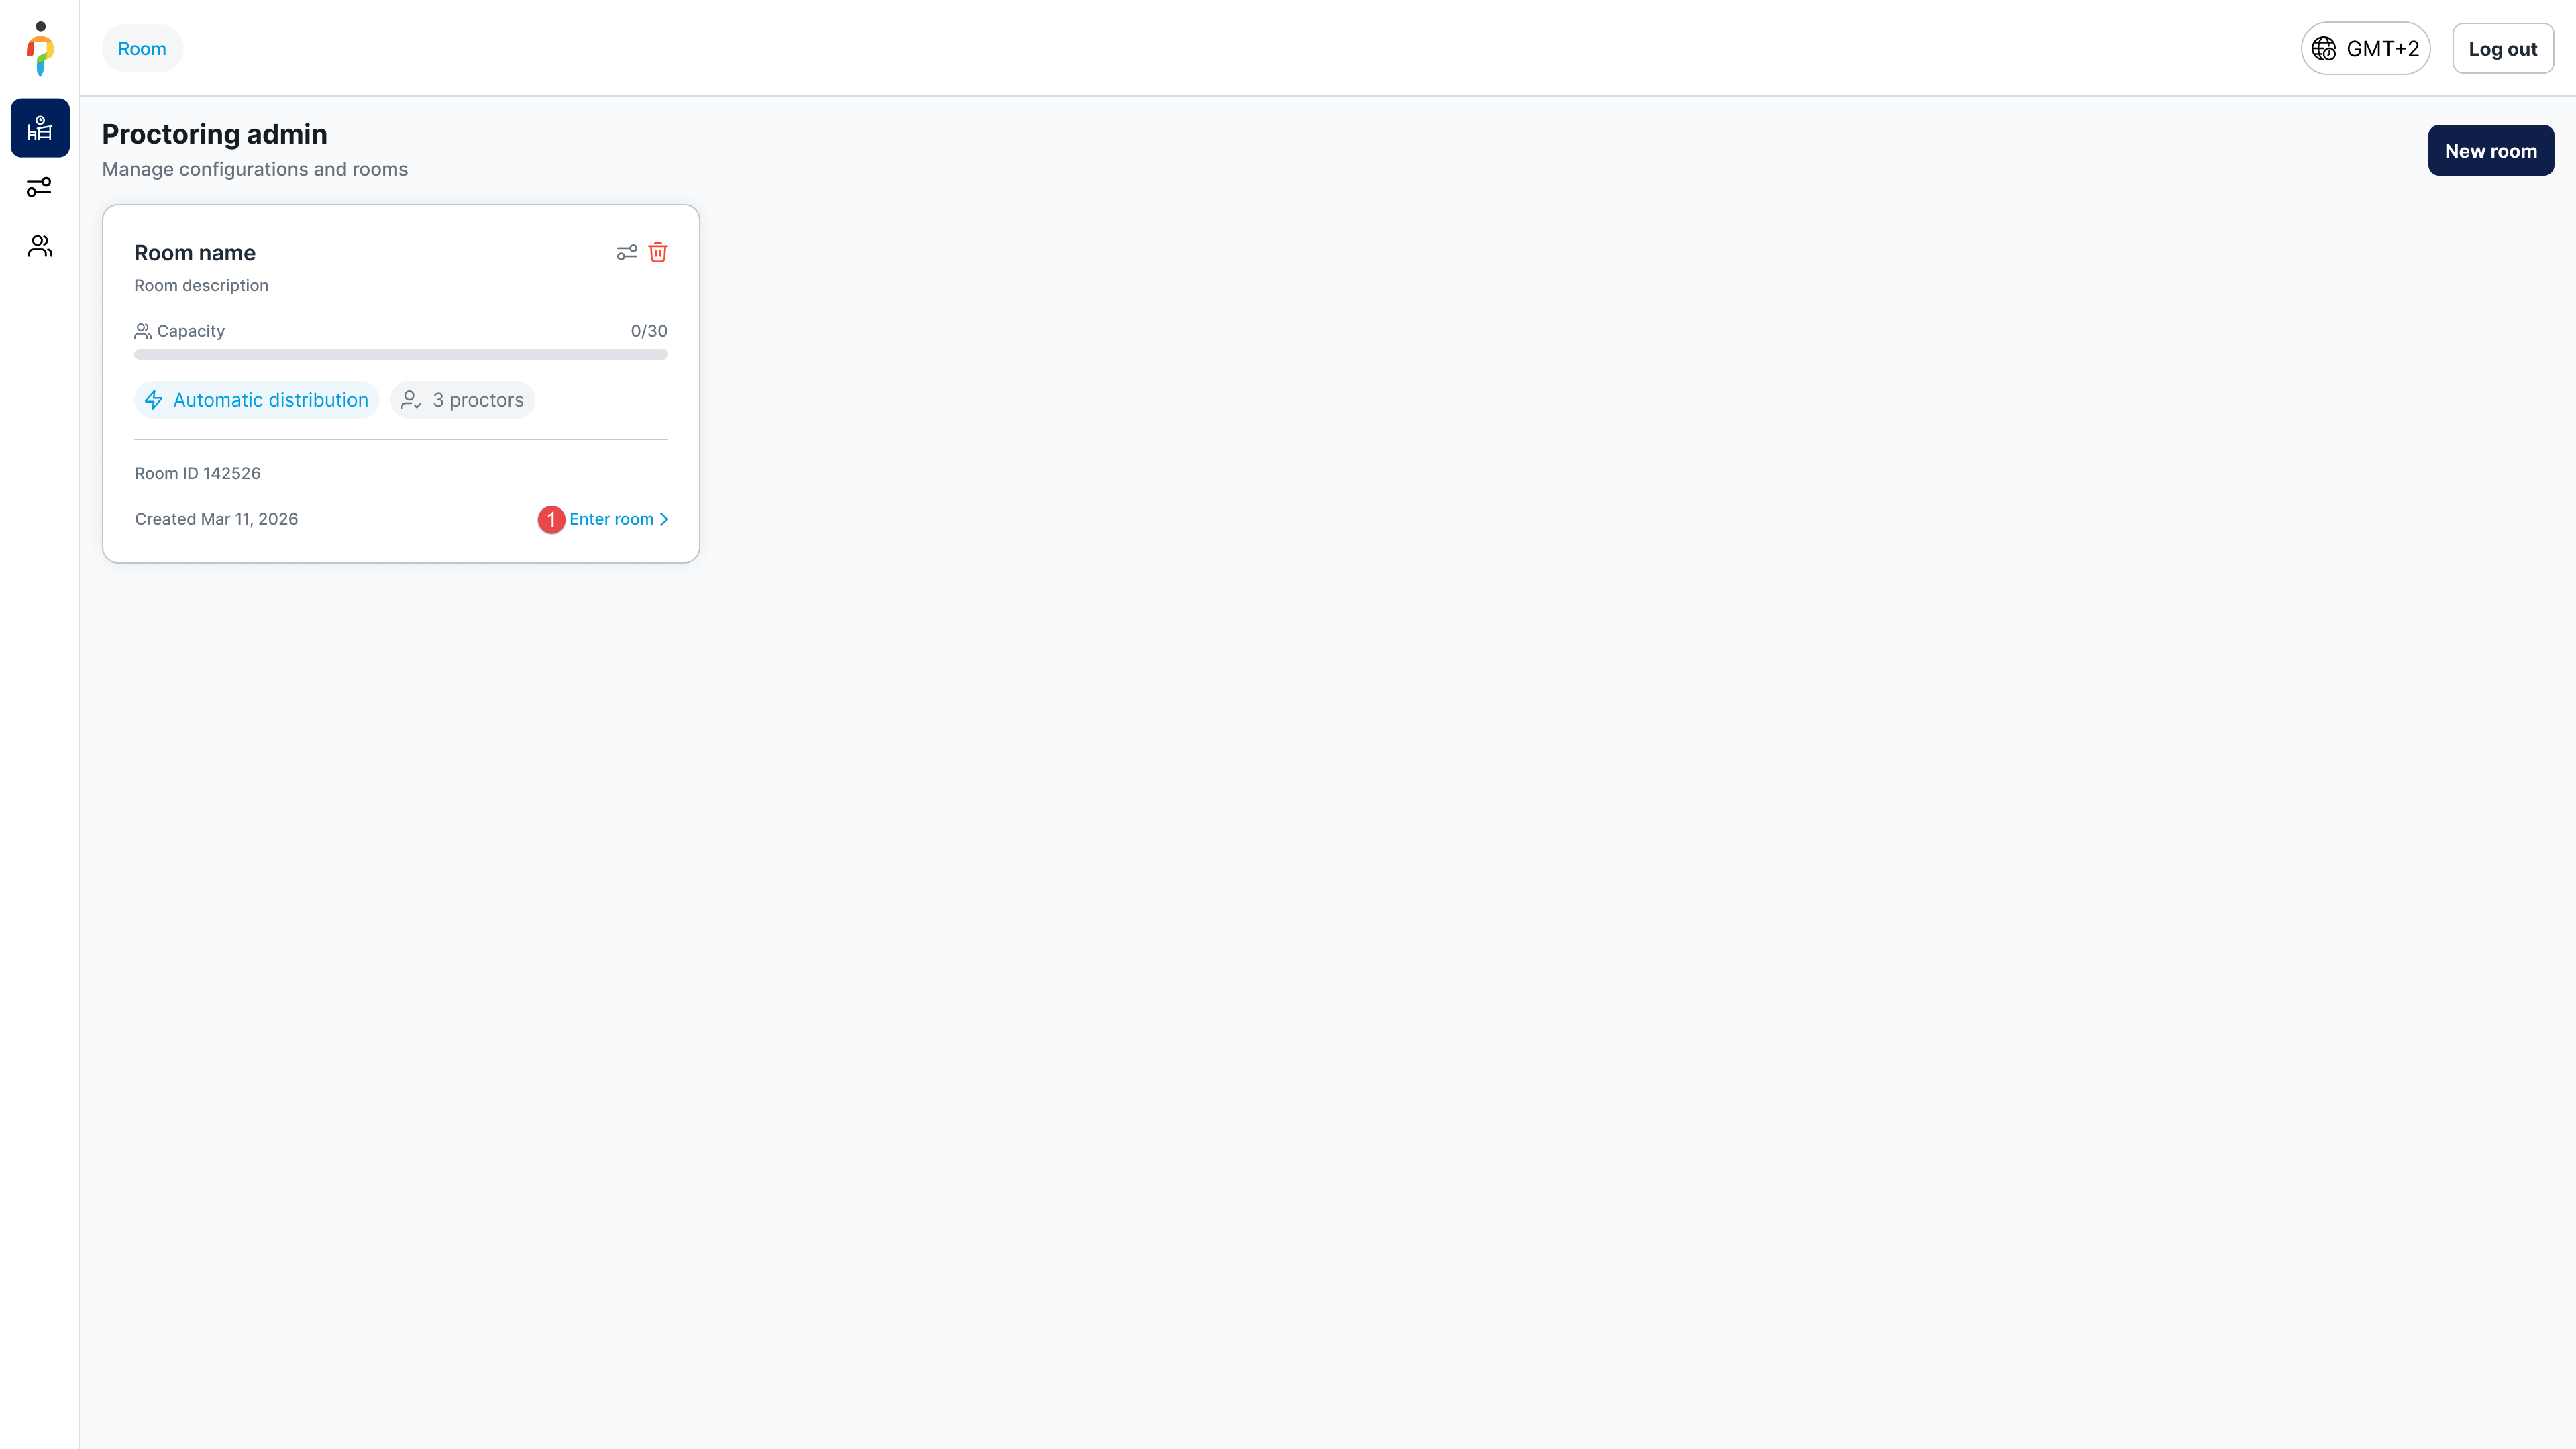
Rooms are the primary organizational unit in the proctoring platform. Each room combines a proctoring configuration, assigned proctors, and candidates. When using an integrated examination platform, rooms, candidates, and proctors are typically created and assigned automatically. For standalone use cases, rooms can also be created and managed directly within the proctoring platform.
Accessing live monitoring and recordings
Depending on your integration, live monitoring and recordings can be accessed either through your examination platform or directly from the proctoring platform. Select your integration below:
Administrators follow the same steps as proctors to access live monitoring and recordings through GetCertified.
Administrators follow the same steps as proctors to access live monitoring and recordings through Moodle.
- Click Enter room to open the room.
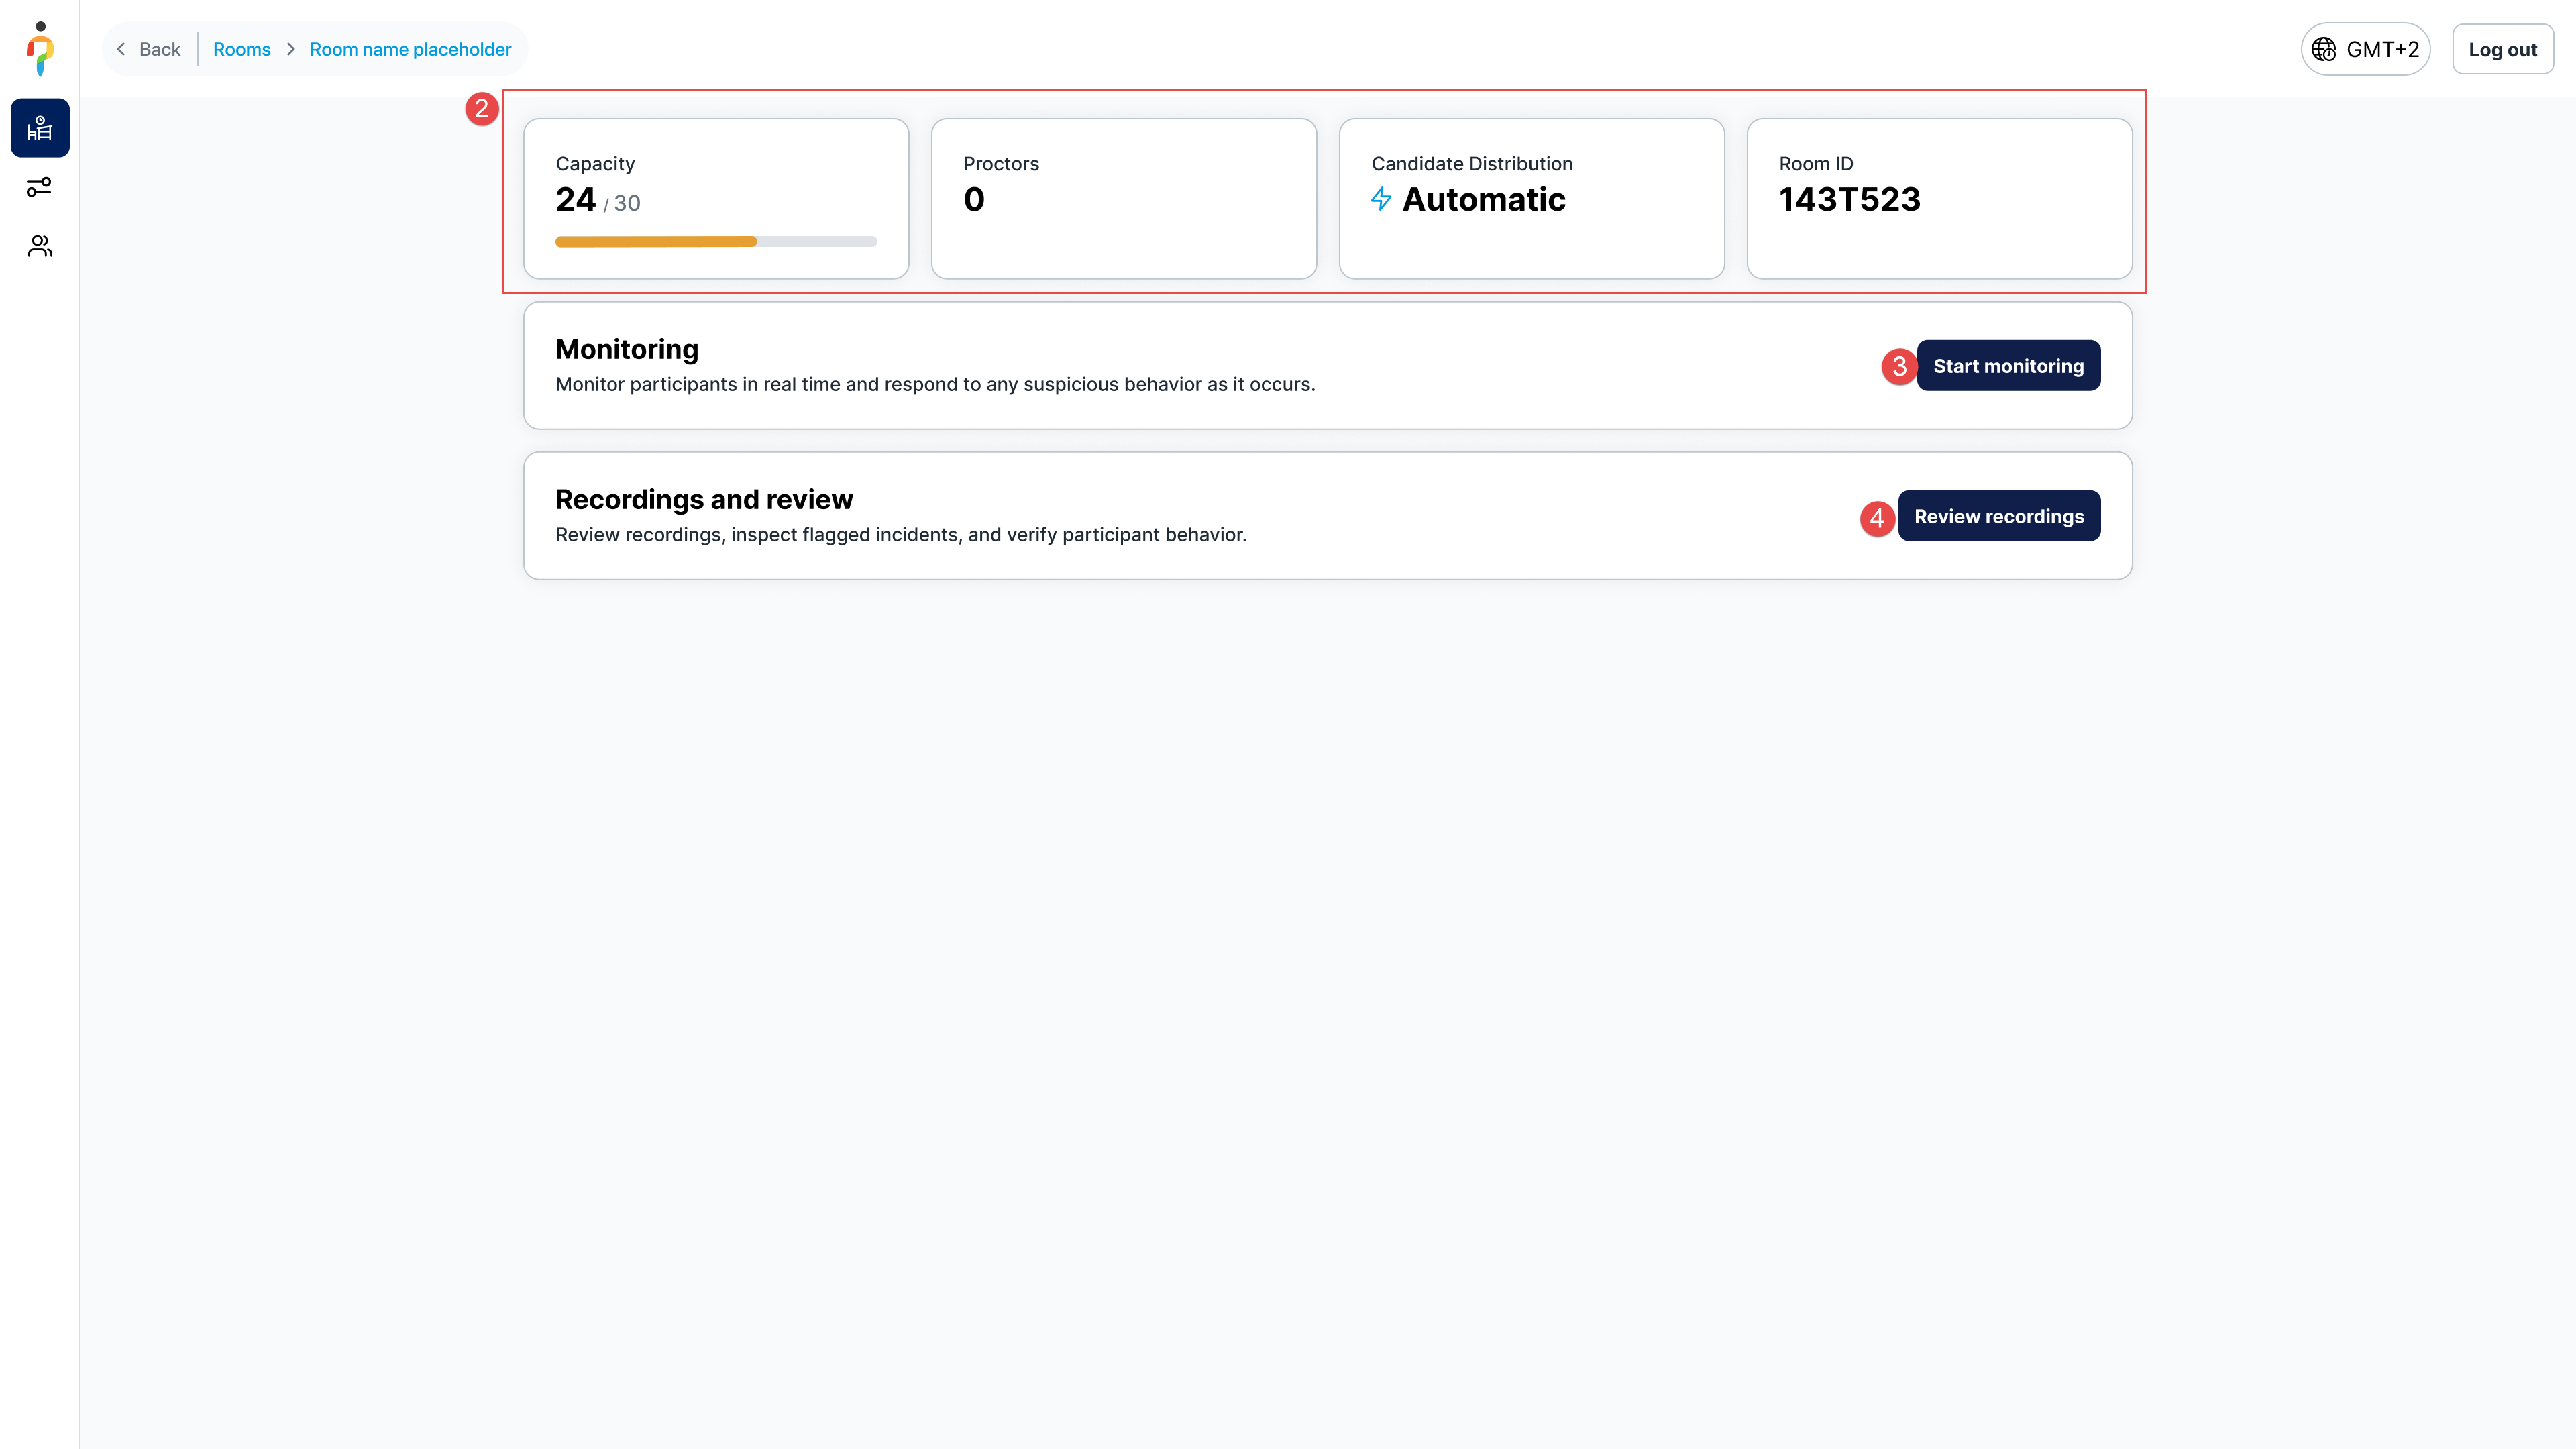
- Review the room details, includingcapacity, assigned proctors, candidate distribution rules, and room ID.
- Click Start monitoring to access live monitoring and observe candidates in real time.
- Click Review recordings to access completed recordings and review candidate activity.
If you are using an integration that is not covered in this guide, access live monitoring and recordings through your examination platform. Refer to your platform's documentation for specific navigation instructions.