
Article verified for Release 16.1 in August, 2026.
This article explains how to create multiple user accounts at once using a predefined Excel template. You can download, fill in, and upload the template to import users efficiently.
Note: To protect sensitive data and align with the security and compliance requirements of the standards for which we are certified, sensitive information is not included in Excel import files.
Uploading users from an Excel file
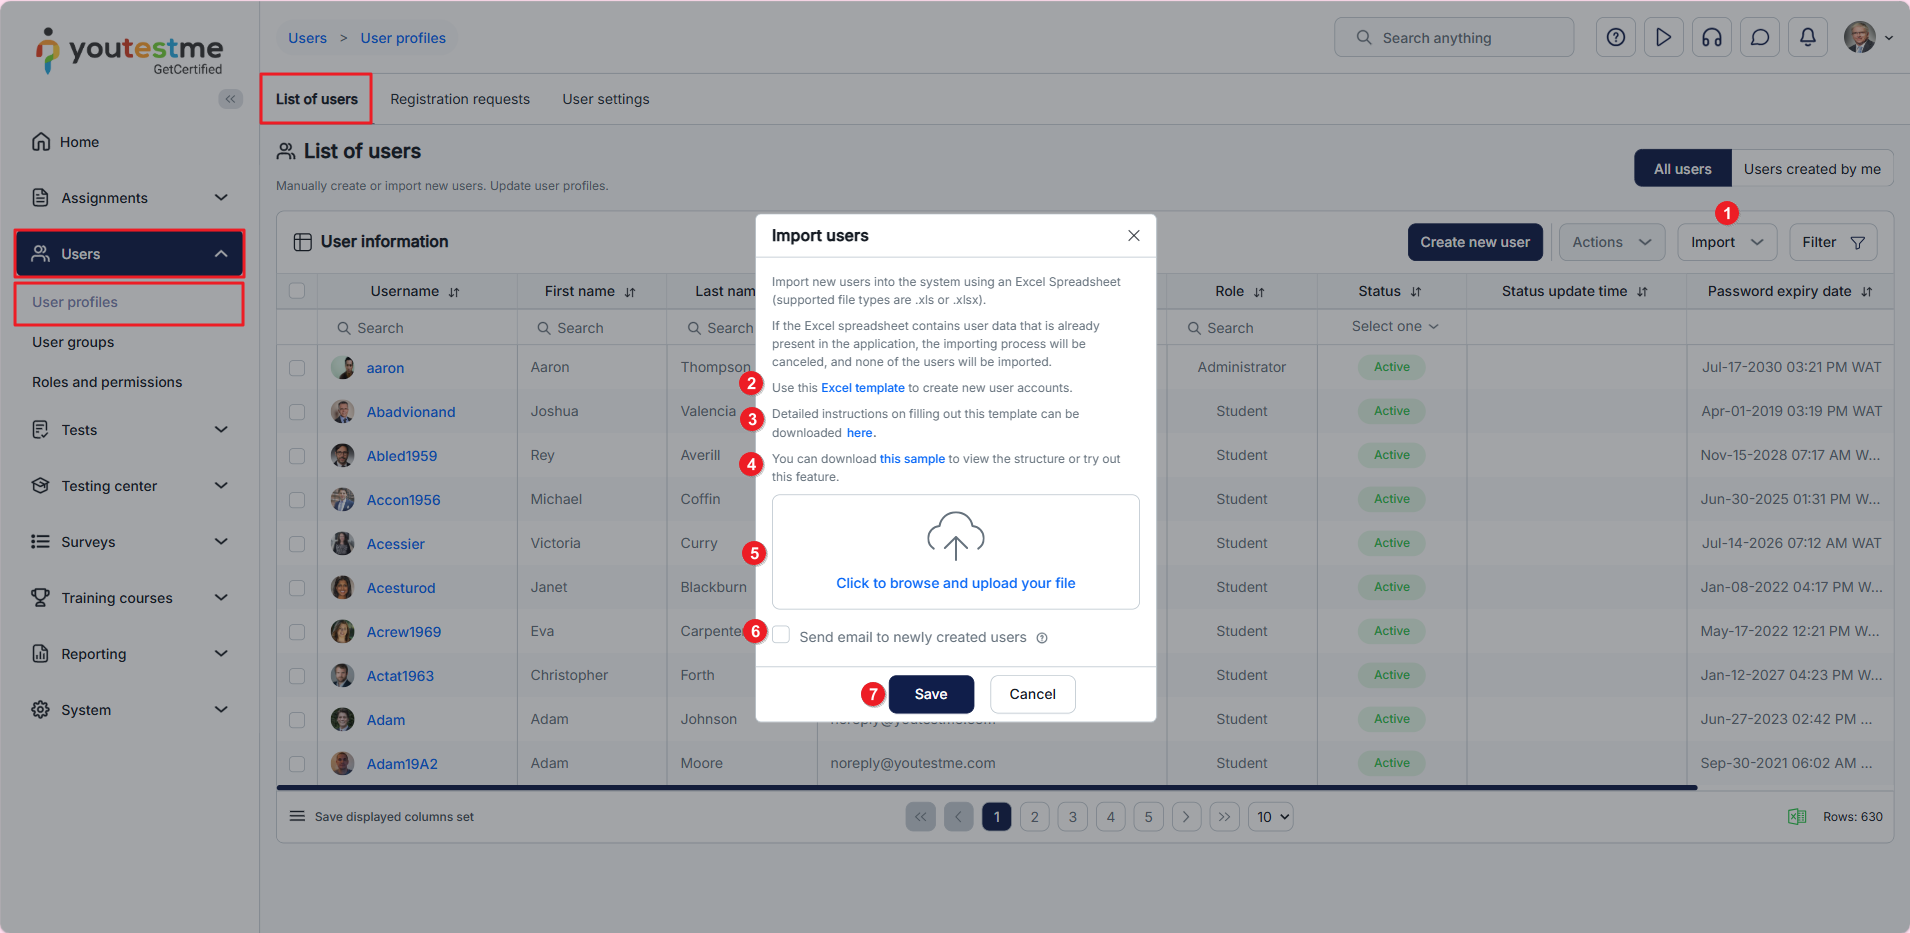
To upload users, select the Users/User profiles tab. Then:
- Click the Import button and select Users.
- Download the Excel template and fill in the mandatory fields.
- Download the Instructions on filling in the Excel template.
- Download the Sample to view the structure of a properly filled Excel template or explore the feature.
- Choose the Excel file by clicking Click to browse and upload your file and selecting the file from your computer.
- Optionally, check the Send email to newly created users option to notify users that their account has been created and provide them with a password reset link.
- Click the Save button.
Filling in the Excel template
Users
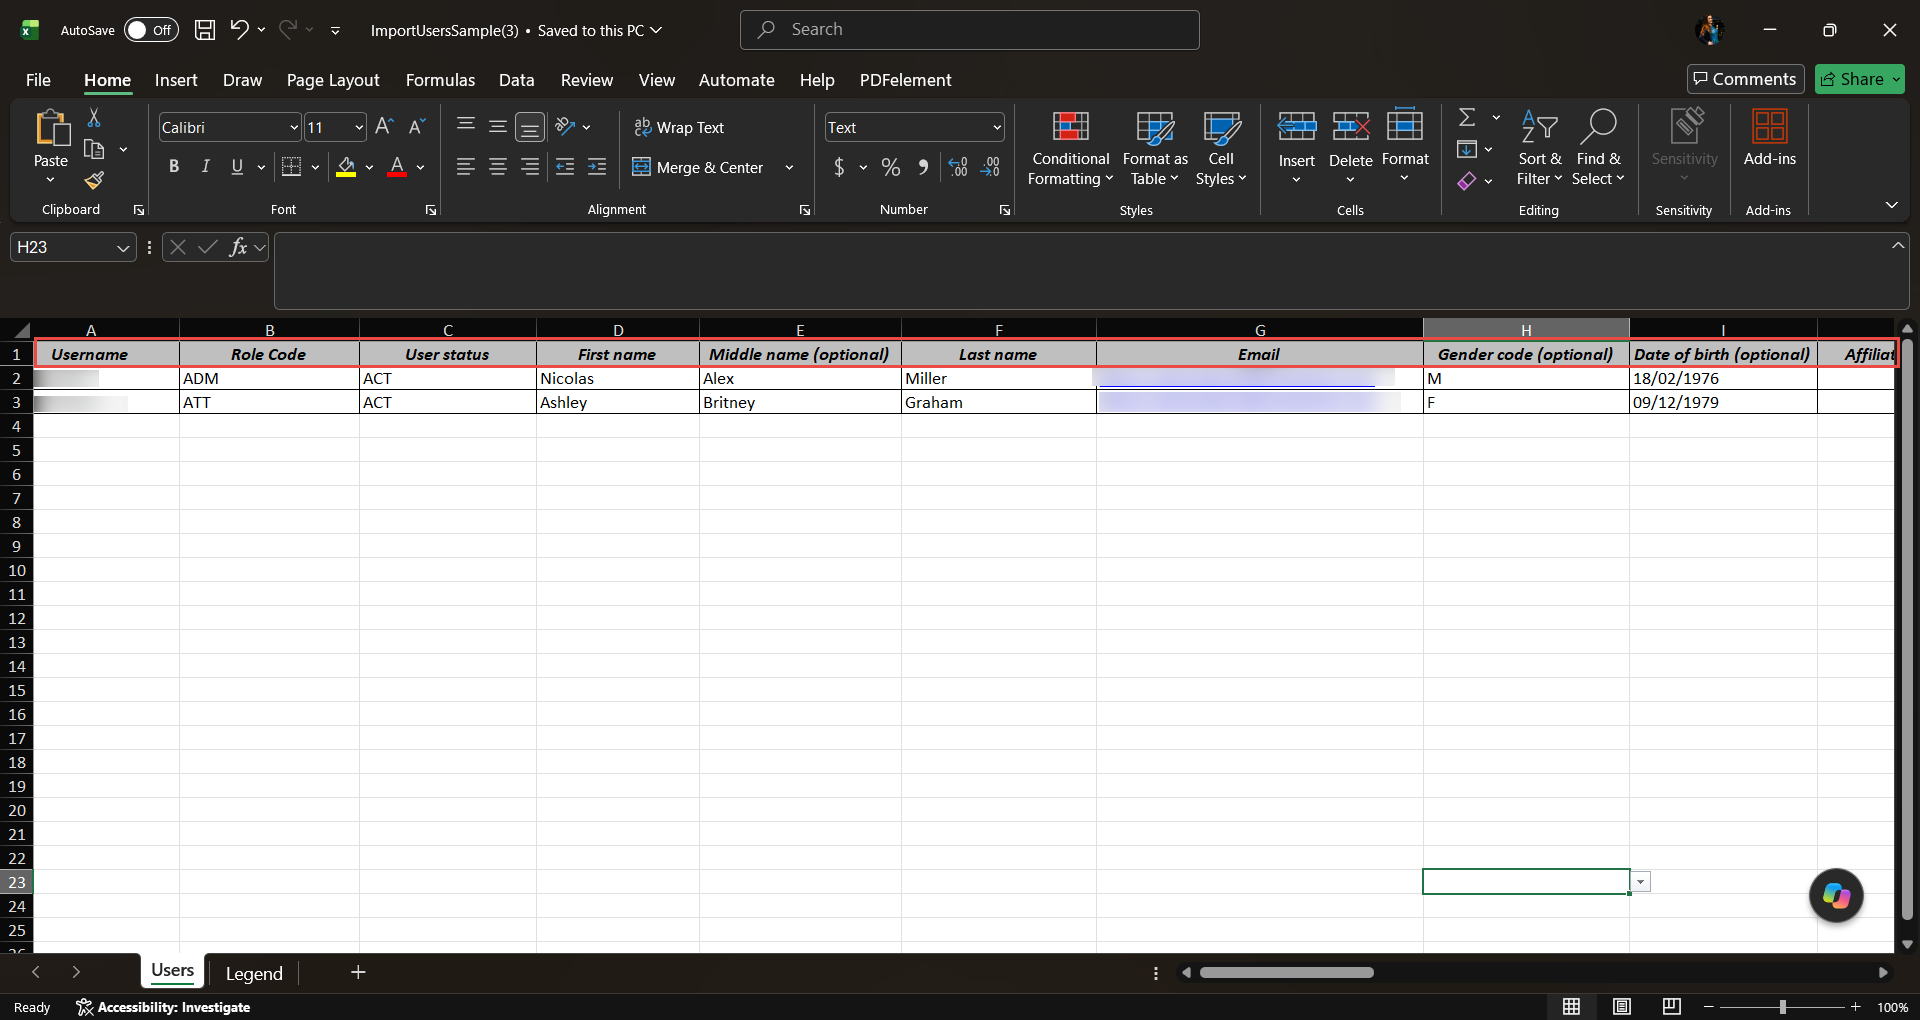
The Excel template consists of a sheet containing fields where the users’ personal and account information should be entered.
- The following fields are mandatory: Username, Role code, Status code, First name, Last name, and Email address.
- The following fields are optional: Middle name, Gender code, Date of birth, Affiliation within the organization, External ID, Groups, Country, City, Zip code, Interface language, and Test language.
Password management and security
The Password column is not included in the Excel user import template because passwords are sensitive information, and managing them through the import file is not aligned with the security and compliance requirements of the standards for which we are certified.
By default, Enable Admin Password Management Legacy Mode is disabled. With this configuration, administrators cannot directly set or change another user’s password.
When a new user is created and the Send email to newly created users option is enabled, the system sends the user an email confirming that their profile has been created and providing a password reset link. The user follows the link to set their own password.
If an organization has an explicit business requirement for administrators to manage user passwords, Enable Admin Password Management Legacy Mode can be enabled upon request. When enabled, administrators can manually set and change users’ passwords through the available password management functionality.
Important: Enabling Enable Admin Password Management Legacy Mode does not add a Password column to the Excel user import template. The template does not contain a Password column regardless of whether Legacy Mode is enabled or disabled.
Legend
The second sheet contains the Legend. It provides explanations and instructions for filling the fields that require predefined codes, specifically:
- User roles in the system – There are four default roles in the system: administrator, student, instructor, and proctor. However, new custom roles can be created, and the system will generate codes.
- Status – A user account’s status can be active, suspended, locked, inactive, or pending. The legend provides explanations and codes.
- Gender – Insert a code denoting the user’s gender.
- User groups – Each user group in the system has its ID. When uploading users as an Excel file, enter the ID found in the Information tab of the corresponding group to add them to the user group.
- Custom columns – Custom user property fields are visible on the user’s profile page in the Personal Information tab.

Additionally, the template supports custom properties. You can add as many custom properties as needed.
For more information on how to use and create custom properties, please see this article.

When the Excel file is uploaded, you can view the imported users by filtering them by Creation date in descending order.
Note: Imported users are not automatically assigned to any workspace. Workspace membership must be set manually. As a result, assignments linked to a workspace will not be visible to them. If an imported user belongs to a user group that is already associated with a workspace, they will still not see the assignments until they are added as members of the same workspace.
Assigning Users as Group Managers from the Excel Template
In the Groups manager column, insert the group ID where the newly created user will be automatically added as a manager.

Example: We created a user, jimsmith, and set them as a group manager with the ID 1543.
Note: If the same group ID is assigned to both the Group Manager and Group Member columns, the user will be imported as a Group Manager.

After uploading the Excel template, navigate to the User groups tab and search for the ID set in the template. Then, click the Managers tab to view all managers in the selected group.
Note: If a user is assigned the Group Manager role, they will have access to all information related to their assigned group or subgroup. If assigned the role of Group Member, they will only have access to the Information tab.

Load User certificates
First, create the certificates in the system to assign them to users.
For bulk assignment of certificates via an Excel file:
- Click the Import button and select User certificates.
- Download the Excel template and complete the mandatory fields.
- Choose the Excel file by clicking Click to browse and upload your file and selecting the file from your computer.
- Click the Upload button.
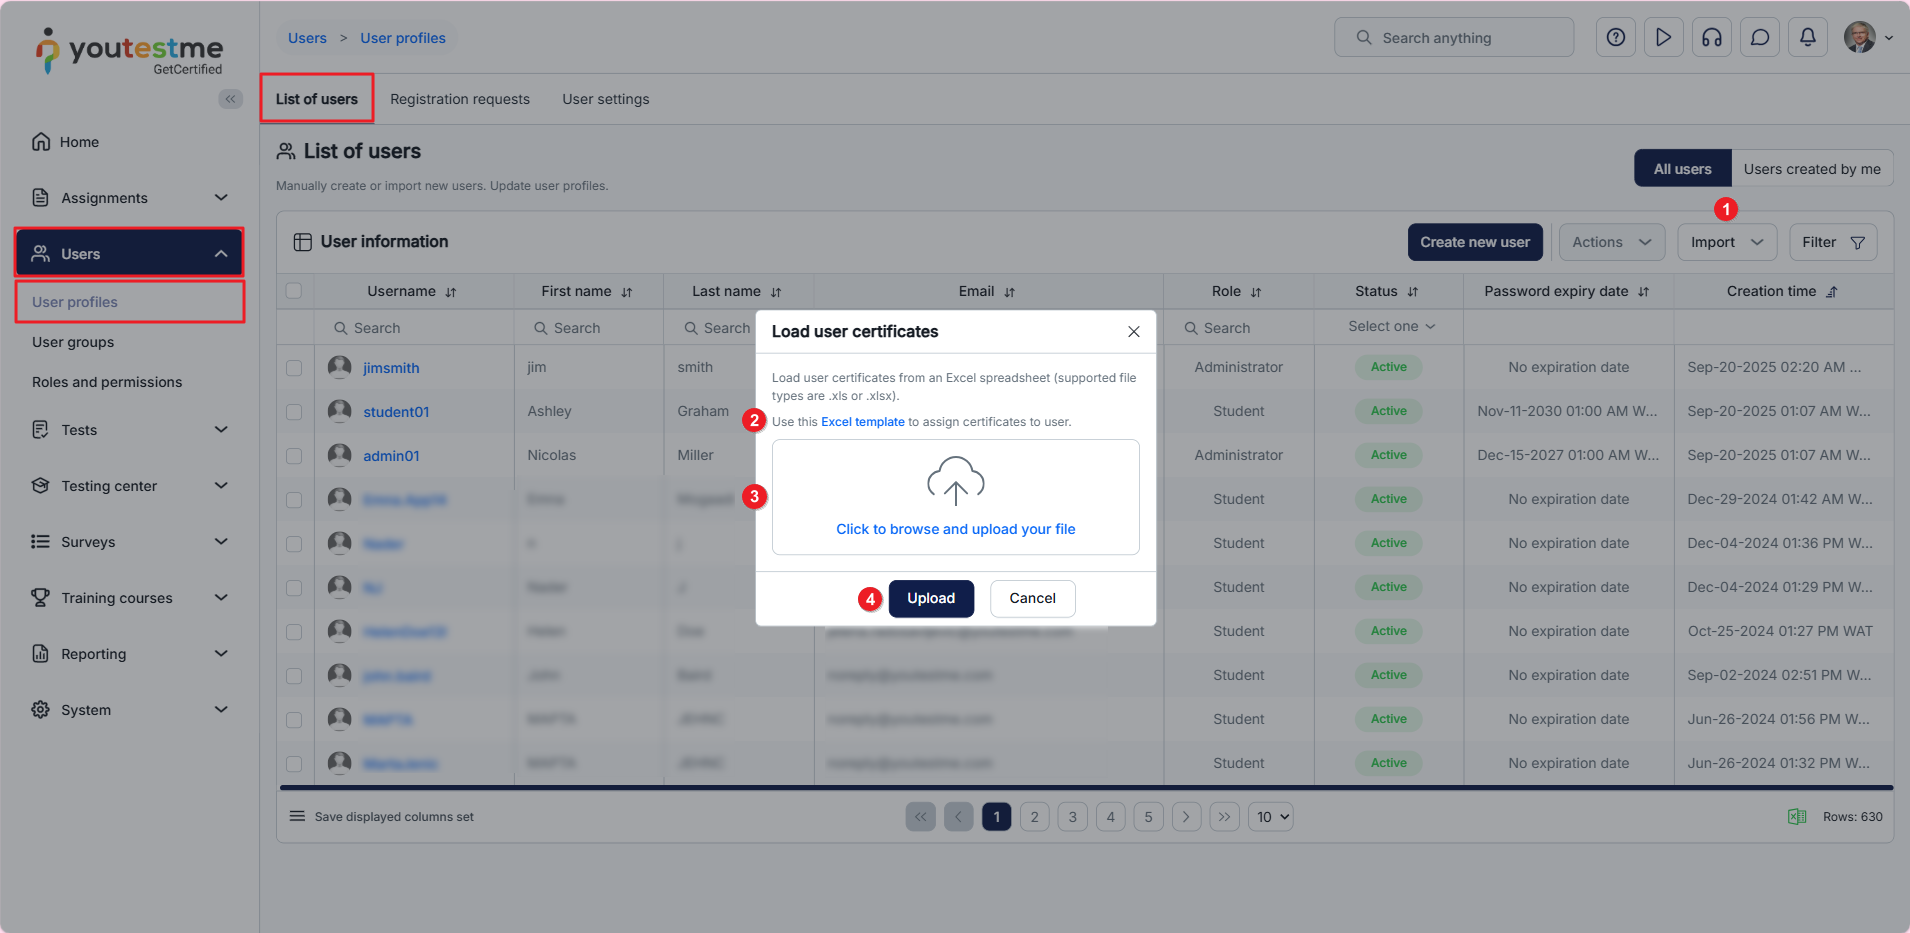
In the Excel file, enter the username of the user to whom you want to add the certificate, the certificate ID, and the certificate’s validity period.

Note: If the Excel file contains errors, the entire operation will be canceled, and no certificates will be assigned.
For more useful instructional materials, please visit: