Article verified for Release 17.0 on October 12, 2026.
YouTestMe GetCertified supports complete white-labeling. This article explains how to change the application theme (interface colors), the Glass theme, the login page appearance, the logo and favicon, the browser tab title, the text shown in emails and instructions, the application link, the test logo, in-app and email notifications, languages and language bundles, and country settings.
Settings and Customization overview
The Settings and Customization module is where administrators white-label the application and configure system-wide settings. From here, you can customize the theme, logo and favicon, language, notifications, mail server, support contacts, and country settings.
To open the Settings and Customization module:
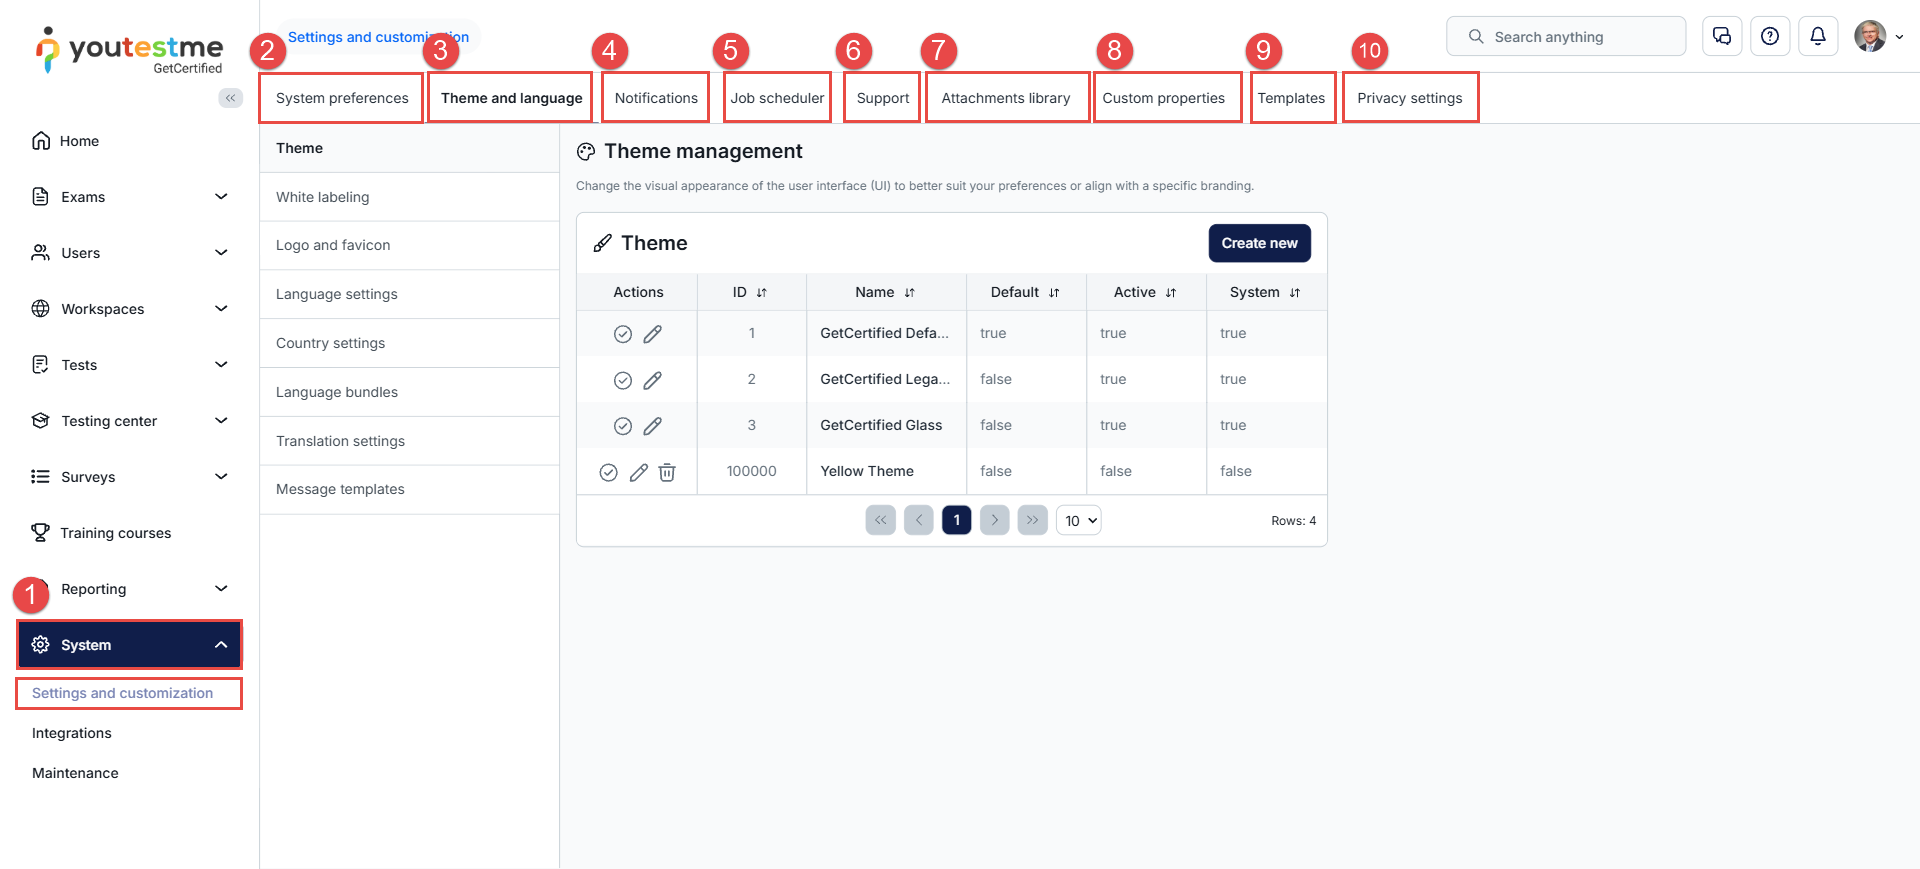
- Click System in the main menu and select Settings and Customization.
You will have access to the following tabs:
- System preferences: This tab allows you to configure the application’s date and time, registration page layout, password policies, and global exam settings, including assignment reminders, booking, cancellation, authorization, web session settings, and other system-wide options.
- Theme and language: This tab allows you to customize the application’s appearance and branding, including the theme, white-label settings, logo, and favicon. You can also manage language and translation settings, as well as message templates.
- Notifications: This tab allows you to configure and manage the in-app and email notifications sent to users, including their content and delivery settings.
- Job scheduler: This tab allows you to create and manage scheduled jobs, such as data imports and exports, and configure their execution frequency. You can also view existing jobs, run them manually, review execution history and logs, preview results, edit jobs, duplicate them, or delete them.
- Support: Here you can define support contacts that all application users can reach. Once defined, users can contact support by clicking the dedicated support icon, displayed in the top-right corner of the login page and accessible from all application pages, except the test-taking screen.
- Attachments library: The attachments library serves as a storage repository for all your attachments, including public attachments from other creators.
- Custom properties: This tab allows you to define custom data types and create additional properties for users, questions, and custom categories to meet your organization’s specific requirements.
- Templates: Here you can define templates for exporting data from the application.
- Privacy settings: Here you can create and manage the consent texts that users must accept.
Theme and Language
Theme
A theme is the application’s color scheme. By default, the GetCertified default theme is applied, but you can create new themes that match your branding.
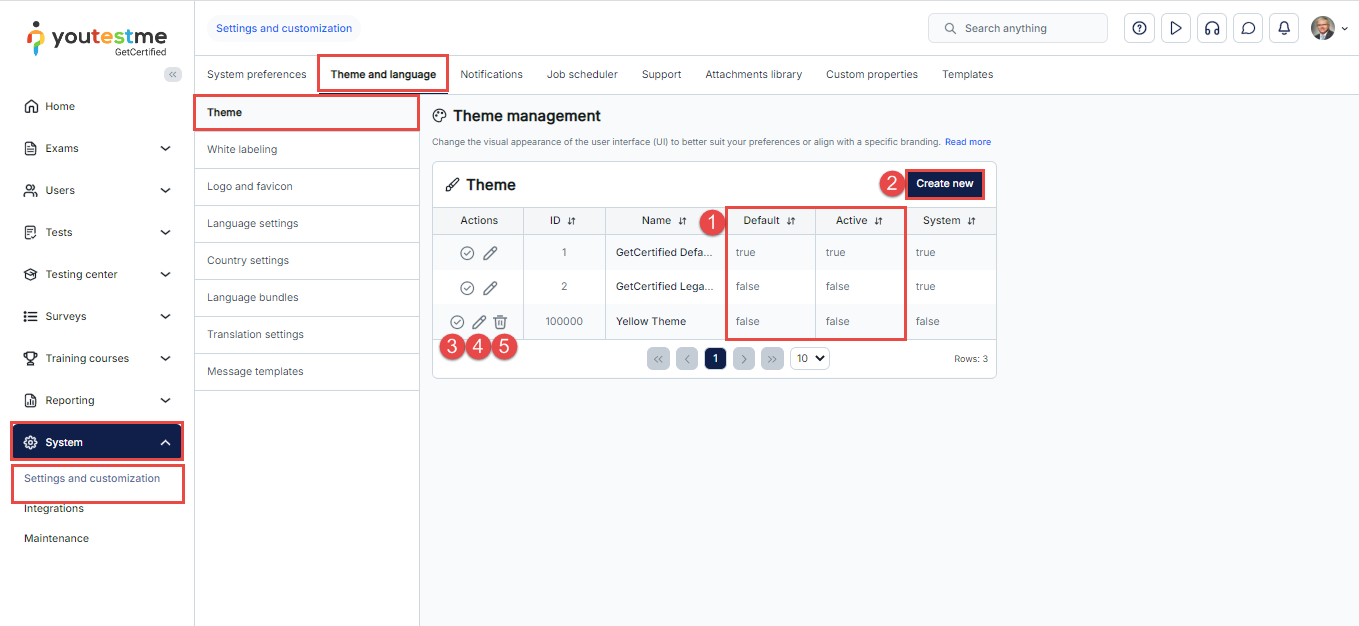
On the theme tab, you can:
- View the list of already created themes. The Default column shows which theme is set as the default theme. The Active column displays themes marked as active. The System column identifies system themes that are always present in the application and cannot be deleted.
- Create a new theme.
- Apply one of the already created themes.
- Edit an existing theme.
- Delete a theme.
To create a new theme:
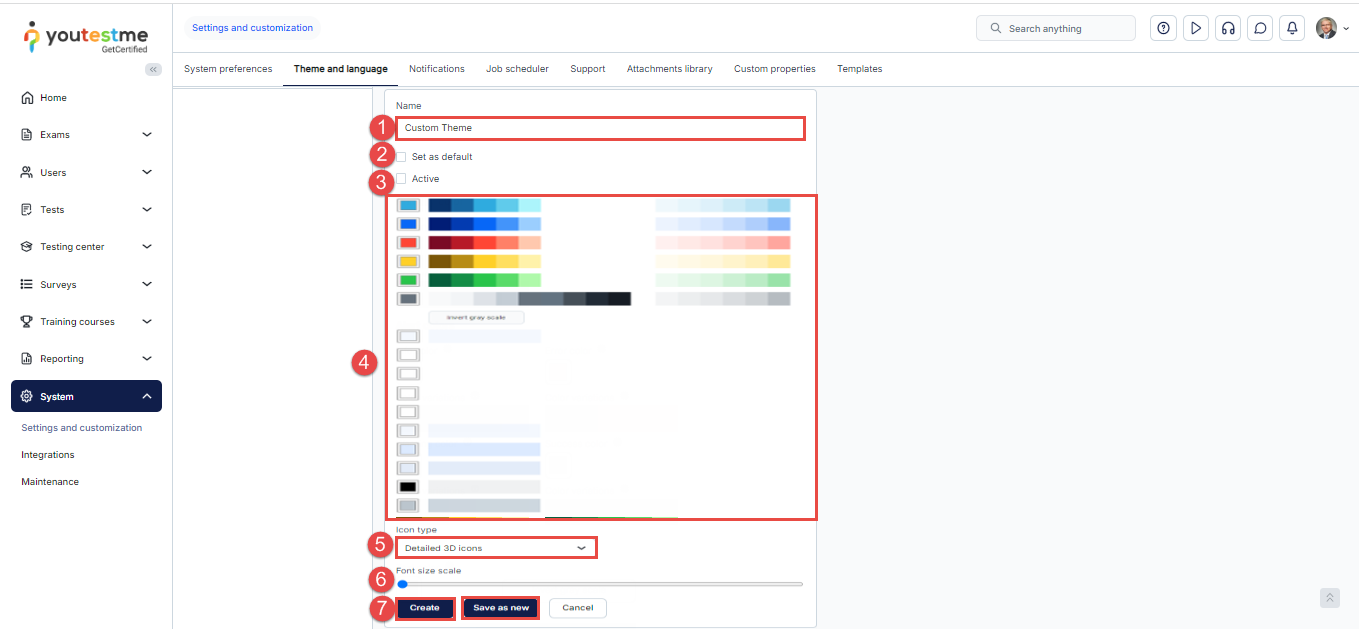
- Enter the Name of a new theme.
- Select the Set as default option if you want the currently selected theme to become the default theme applied when users log in to the application. Note that only one theme can be set as default at a time. If another theme was previously set as default, enabling this option on another theme will turn off the default setting on the previous theme.
Note: To set a theme as the default, it must also be marked as Active. - Set the theme as Active, and it will appear in the list of themes on the user’s profile, allowing them to choose it for their profile. The default theme is applied if no other theme is selected in the user’s profile. If the theme is not set as Active, it will not be displayed on the user’s profile.
- Adjust theme colors.
- Select between detailed 3D icons or simple flat icons.
- You can adjust the font size by dragging the circle to the right if needed.
- Save the new theme using one of the following options:
- Create
- Save as new
Theme colors
- Change primary color– The primary color is typically the dominant color used for buttons, links, marking menu items, and other key elements.
- Change info color – The color used for informative messages that appear in the top right corner when performing specific actions, such as confirming the saving of test settings changes.
- Change error color – The color for error messages that appear in the top right corner.
- Change warning color – The color for warning messages that appear in the top right corner, for example, a note indicating that you need to select a test to perform a certain action.
- Change success color – The color used to indicate important labels (e.g., the Passed label on tests or testing sessions that are currently available) or actions (such as the Start button on the My tests page, Test preview action, etc.).
- Change grey color – Customize the shades of grey used in the application; for example, all hints, tab names, and menu names will be changed according to these color shades.
- Click the Invert grayscale button to change the colors by inverting the grayscale values. When you invert the grayscale, the darkest areas become the lightest, and vice versa.
- Change menu color – The background color of the main menu.
- Change background color – The background colors, such as the colors of the pages, tabs, and header names.

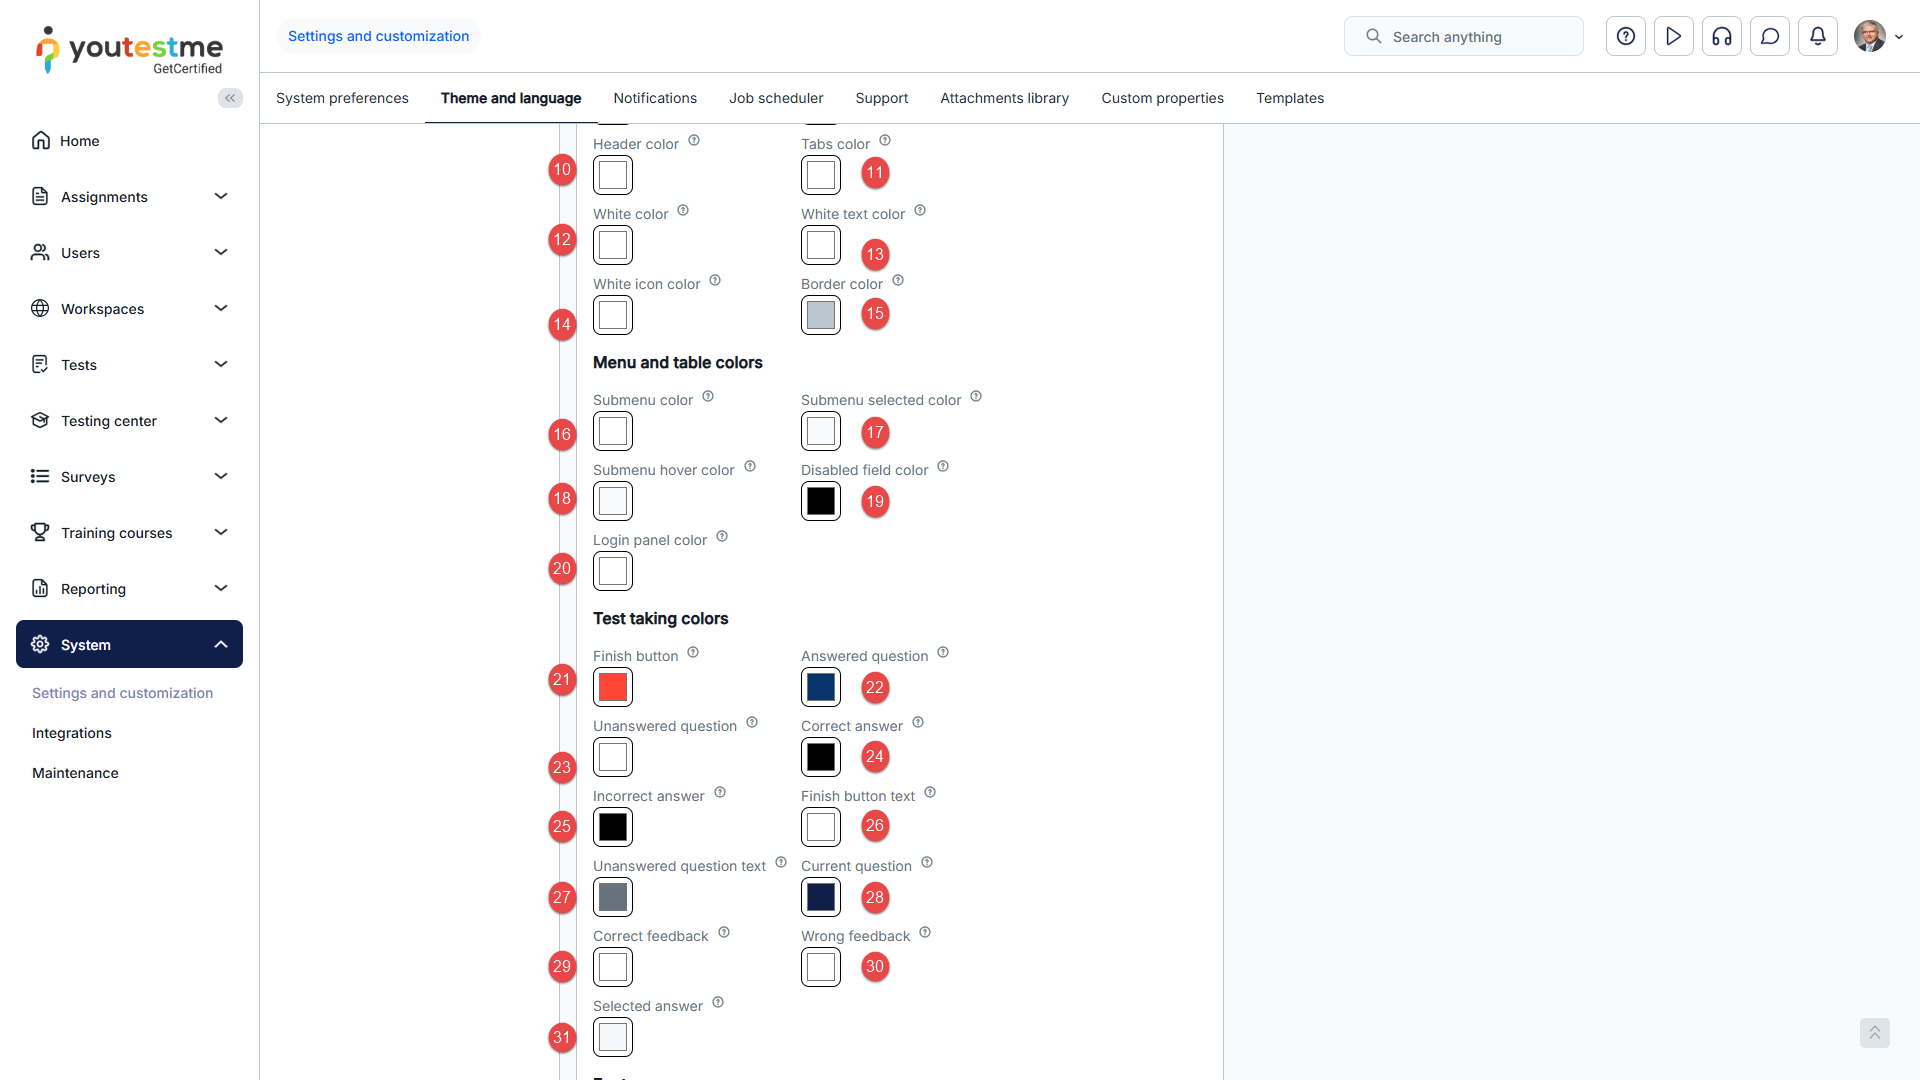
- Change header color-color of the header in the application
- Change tabs color-color of the tabs in the header of the application
- Change white color – The interior color of buttons, dropdown menus, tab headers, the background of odd table rows, etc.
- Change white text color – The color of white text, for example, text when the menu title is selected.
- Change white icon color – The color of white icons, for example, menu-title icons.
- Change border color – The color of border lines.
- Change submenu color – The background color of submenu items in the navigation
- Change submenu selected color – The accent color used when selecting rows in tables.
- Change hover accent color – The colors used when hovering over input or dropdown fields.
- Change disabled accent color – The accent color used for fields that cannot be changed.
- Change login panel color – The background color of the login panel area.
- Change finish button color – The color of the “Finish” button in test-taking views.
- Change answered question color – The color used to mark answered questions.
- Change unanswered question color – The color used to mark unanswered questions.
- Change correct answer color – The color that highlights correct answers.
- Change incorrect answer color – The color that highlights incorrect answers.
- Change finish button text color – The text color displayed on the “Finish” button.
- Change unanswered question text color – The text color for unanswered questions.
- Change current question color – The color used to indicate the current question being viewed.
- Change correct feedback color – The color shown for correct feedback after answering.
- Change wrong feedback color – The color shown for incorrect feedback after answering.
- Change the color of the selected answer within the test-taking process.
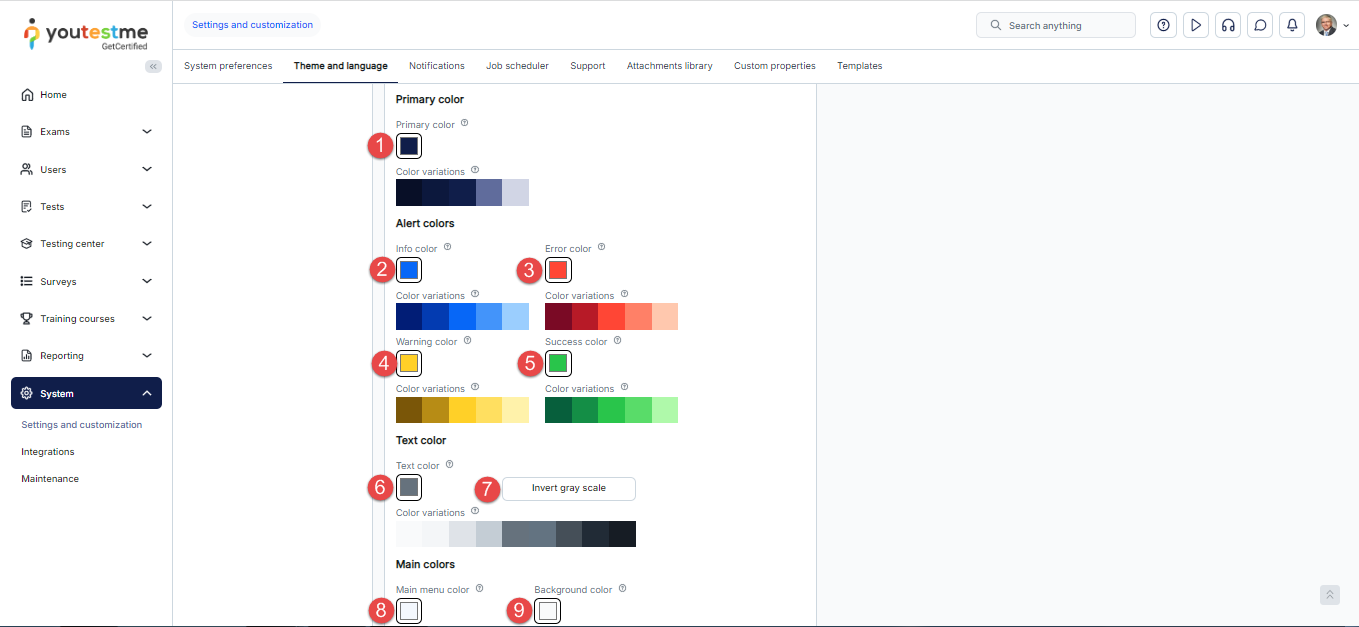
Note: For colors where multiple shades are displayed on the right side, these varying shades will be applied to different parts of the application.
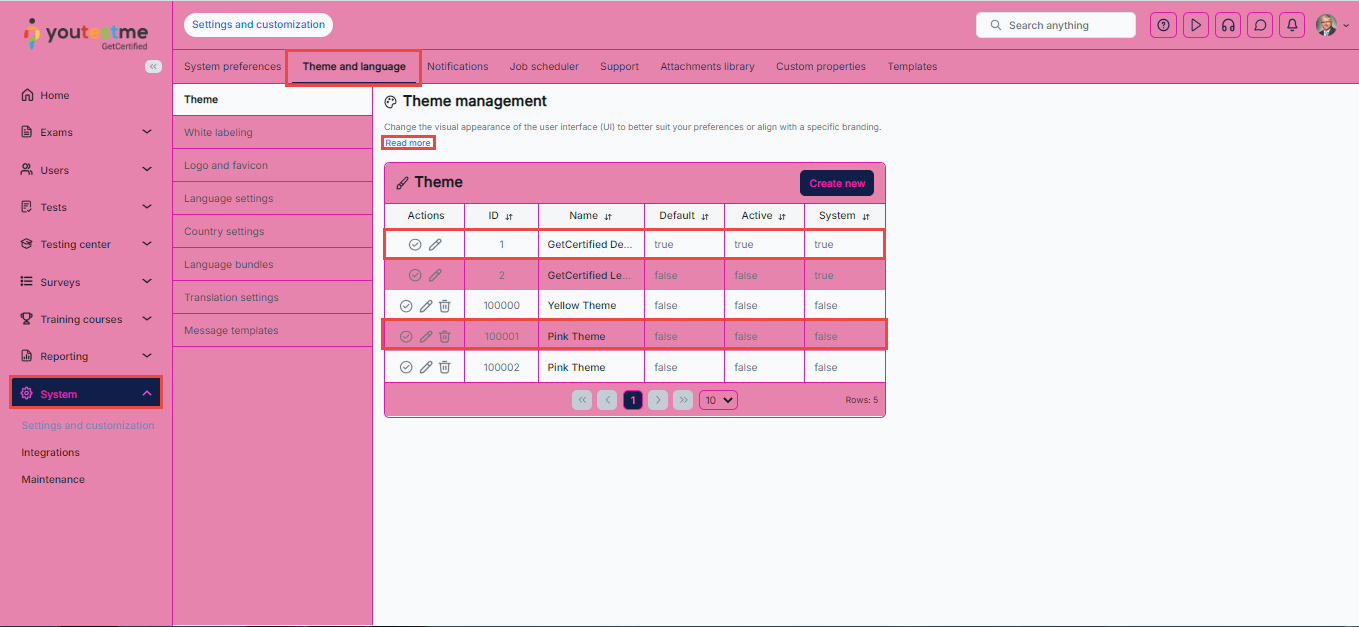
Below is an example where specific color changes can be observed.
Glass Theme
In YouTestMe, you can use the existing Glass theme or create your own Glass theme, giving your interface a fully personalized look and feel. Whether you prefer sleek minimalism, sophisticated transparency effects, or a completely unique combination of colors and styles, our customization tools allow every interface to reflect your individual style and preferences.
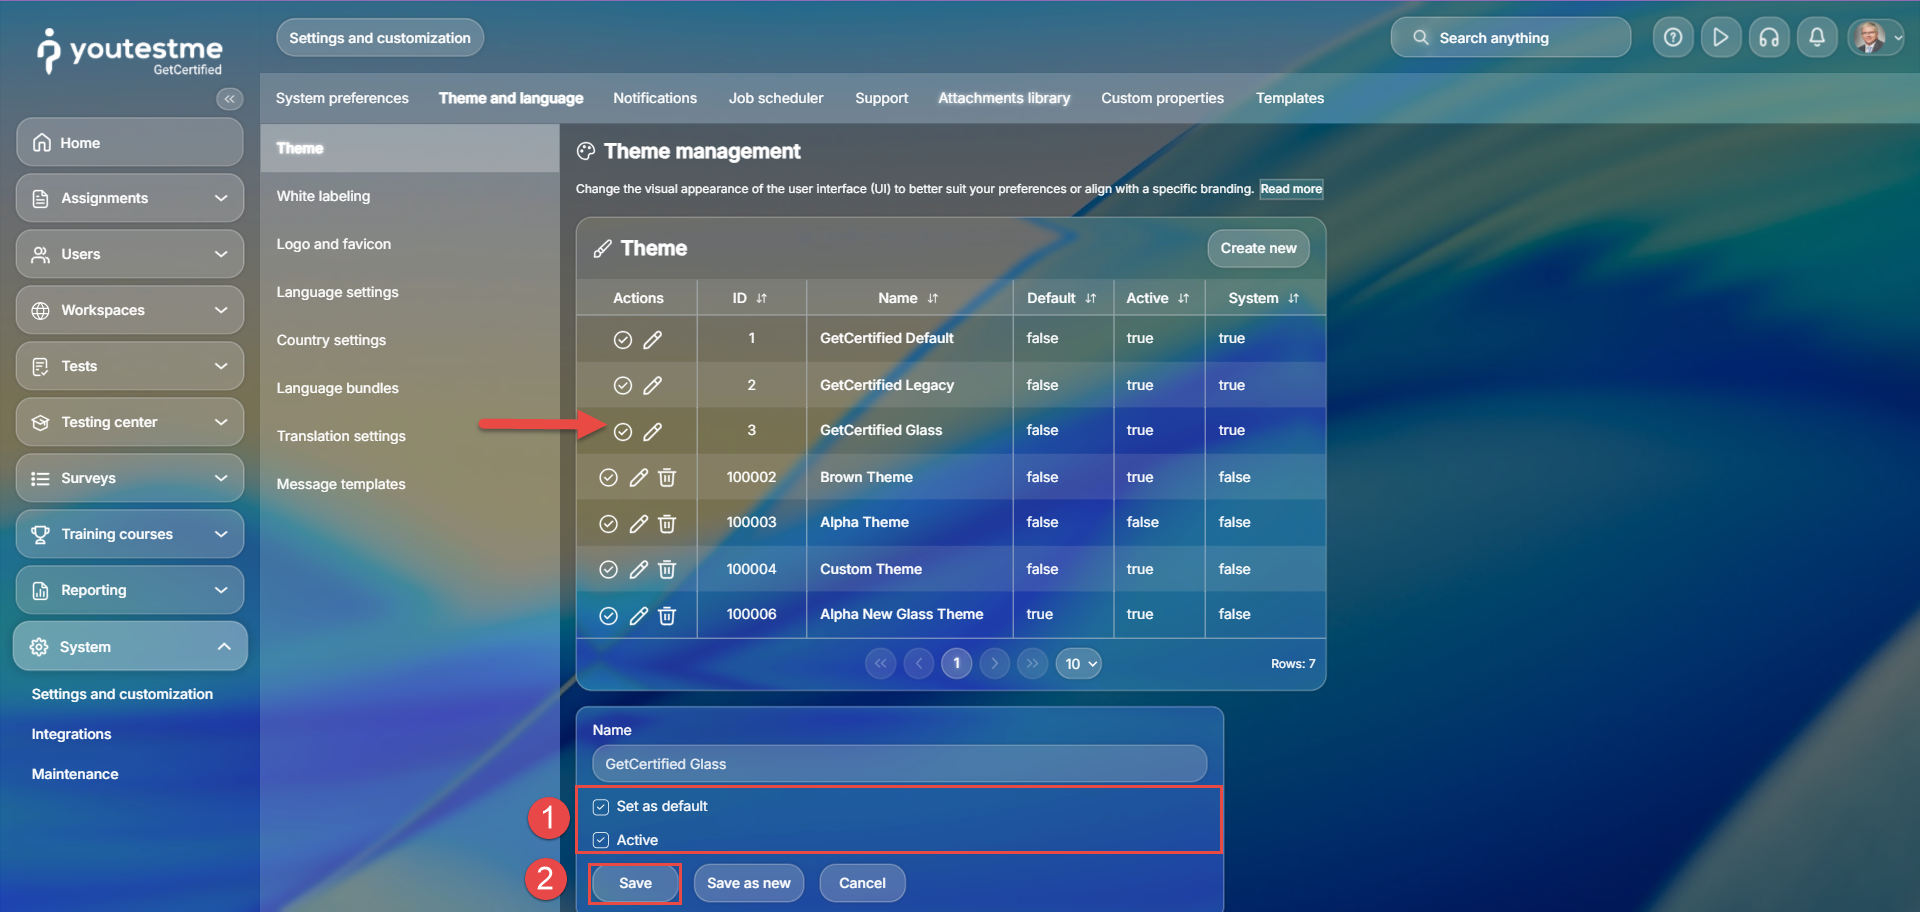
To use an existing Glass Theme, click on the pen icon next to its name and:
- Make sure the theme is set as Active and Default.
- Click Save to apply your changes.
To create your own Glass theme, click on the Create new button:
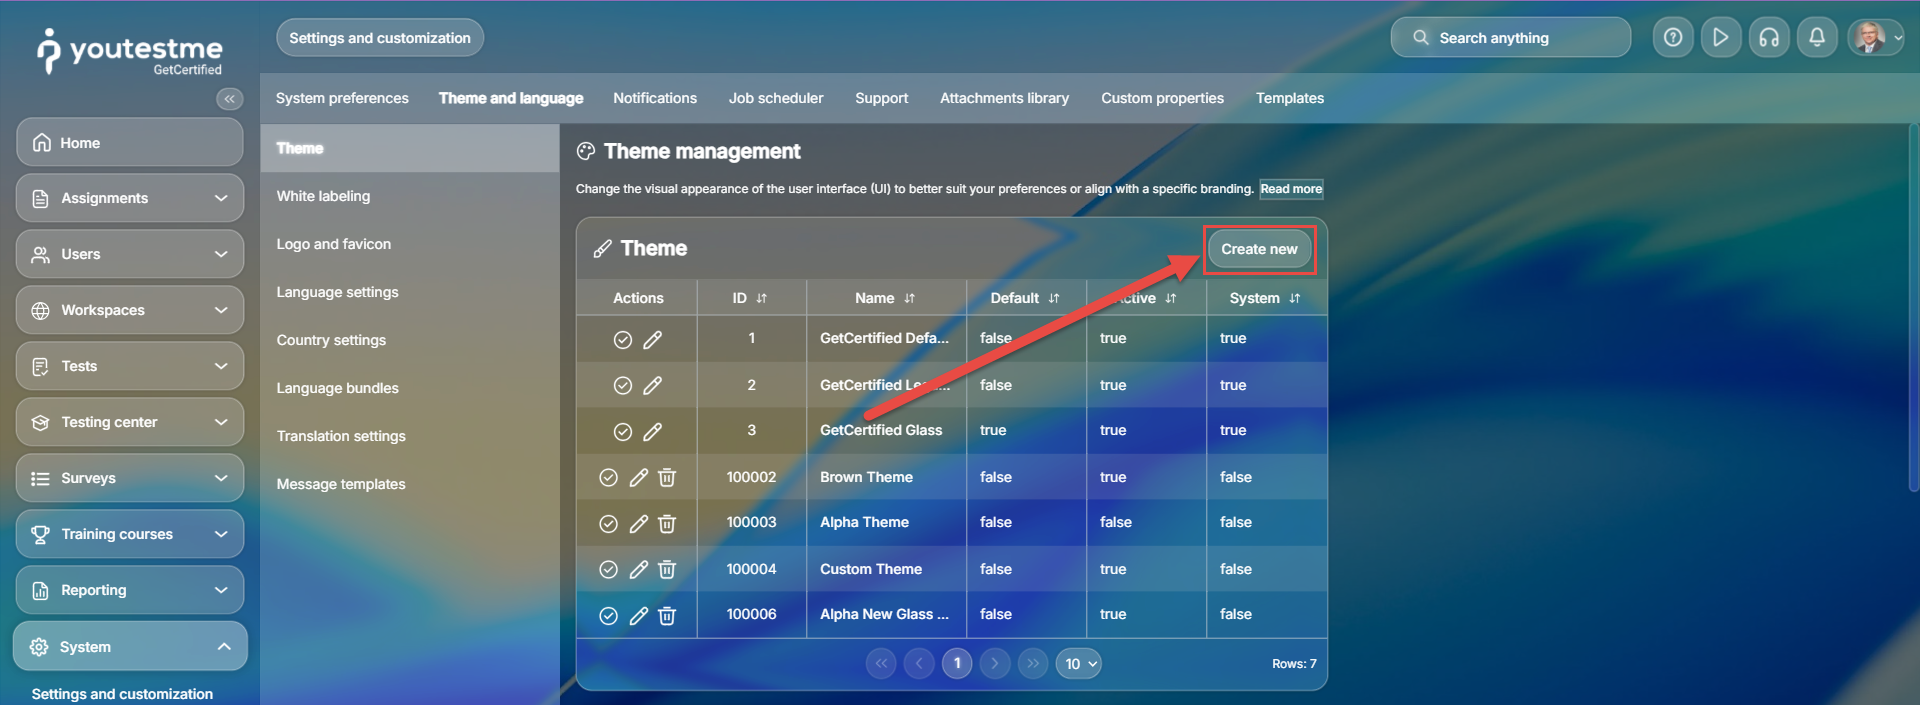
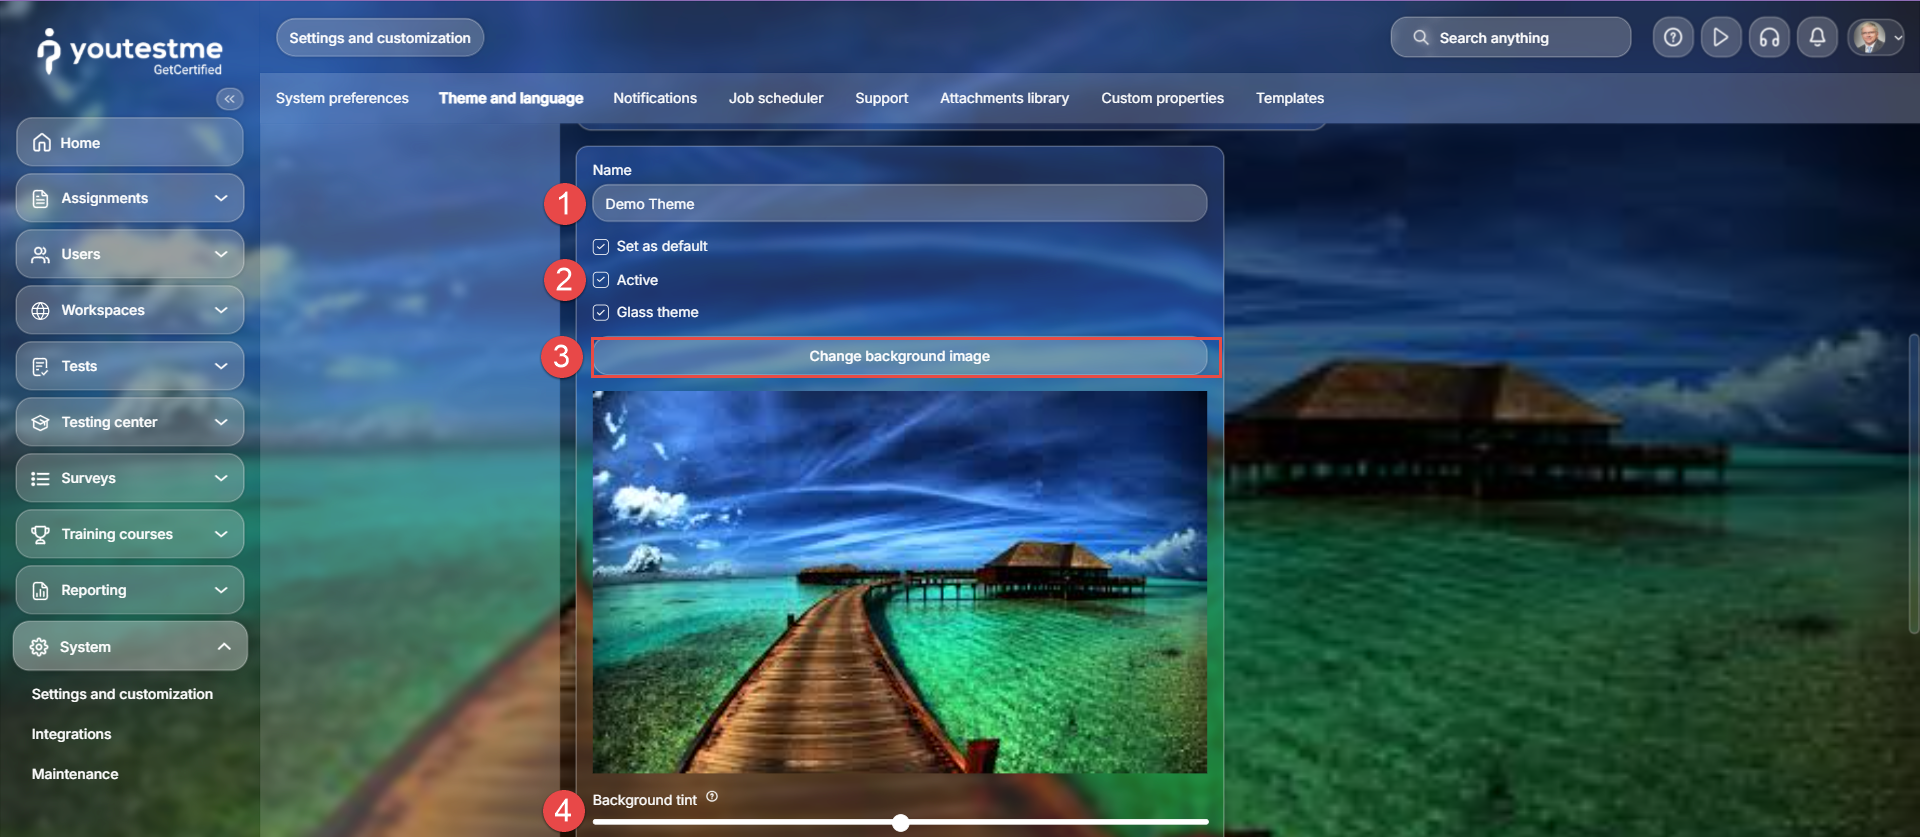
To create and customize a theme, follow these steps:
- Enter a name for your theme.
- Enable all options as illustrated in the image below to ensure the theme is Active, Default, and Glass.
- Select or update the background image.
- Adjust the brightness of the chosen background to your preference.
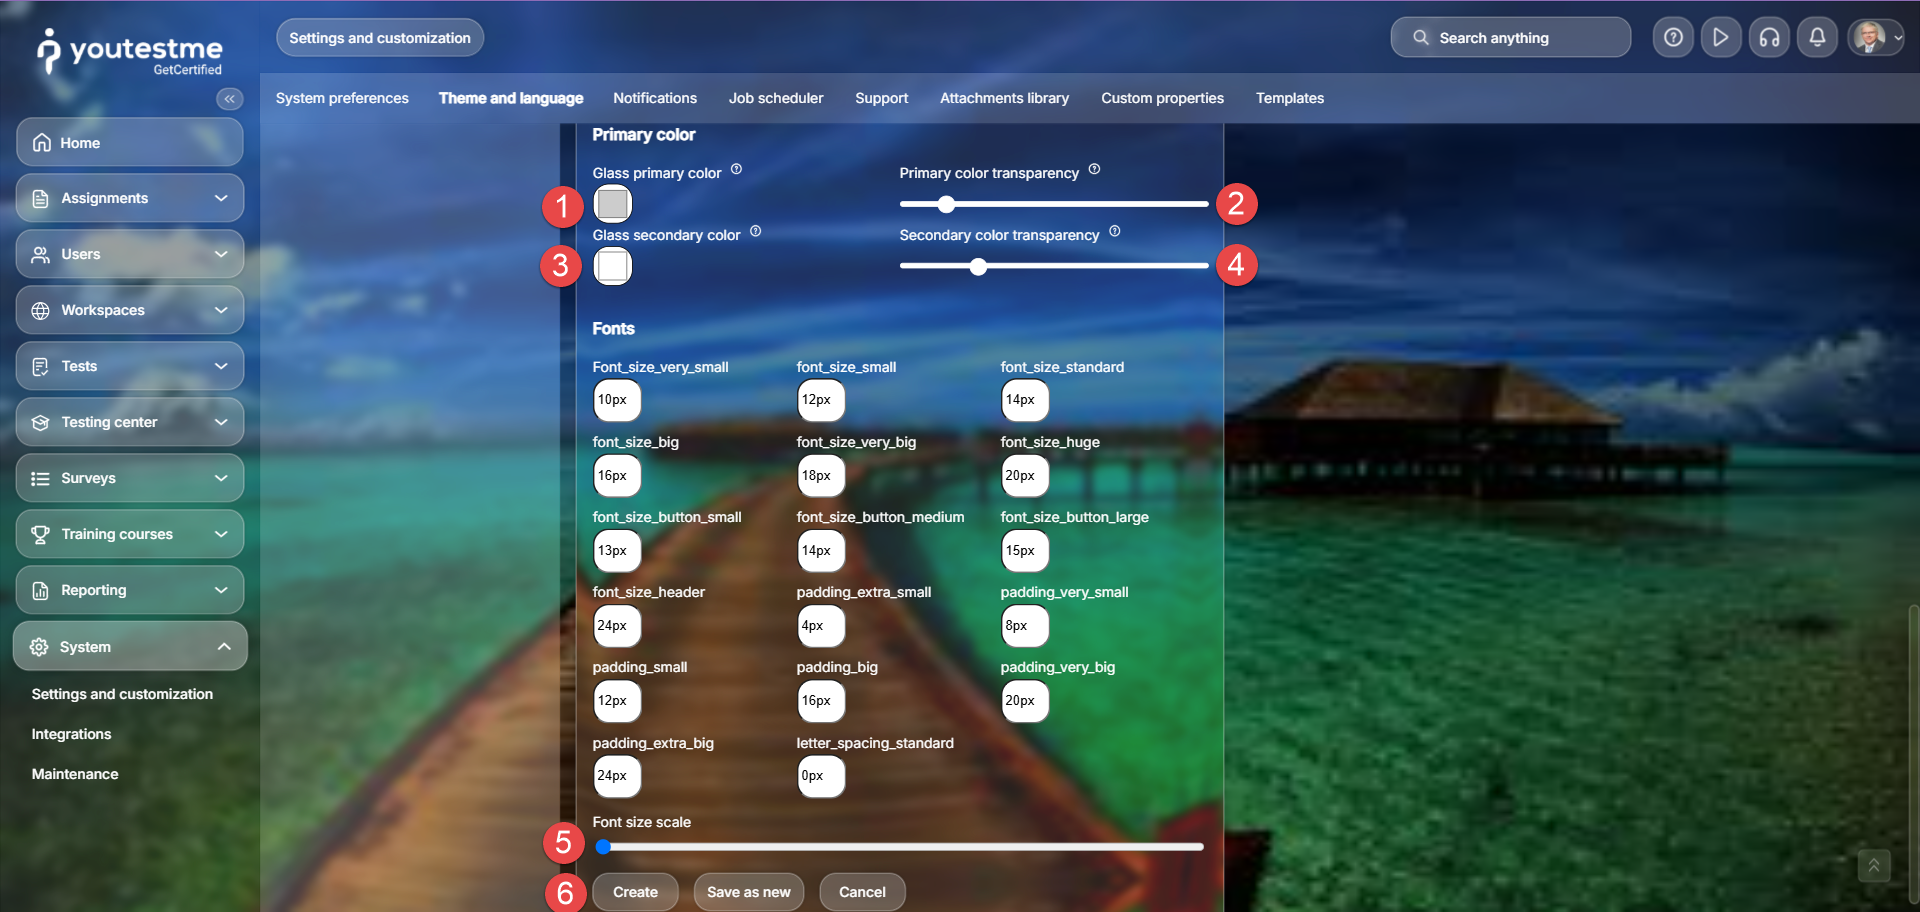
After that, you can further customize your theme by:
- Selecting the theme’s primary color.
- Adjusting the primary color’s transparency.
- Choosing a secondary color.
- Adjusting the secondary color’s transparency.
- Setting the font size according to your preference.
- Saving the theme by clicking the Create button.
After that, your theme is ready and will be applied to all users of the application.
Candidate’s Perspective


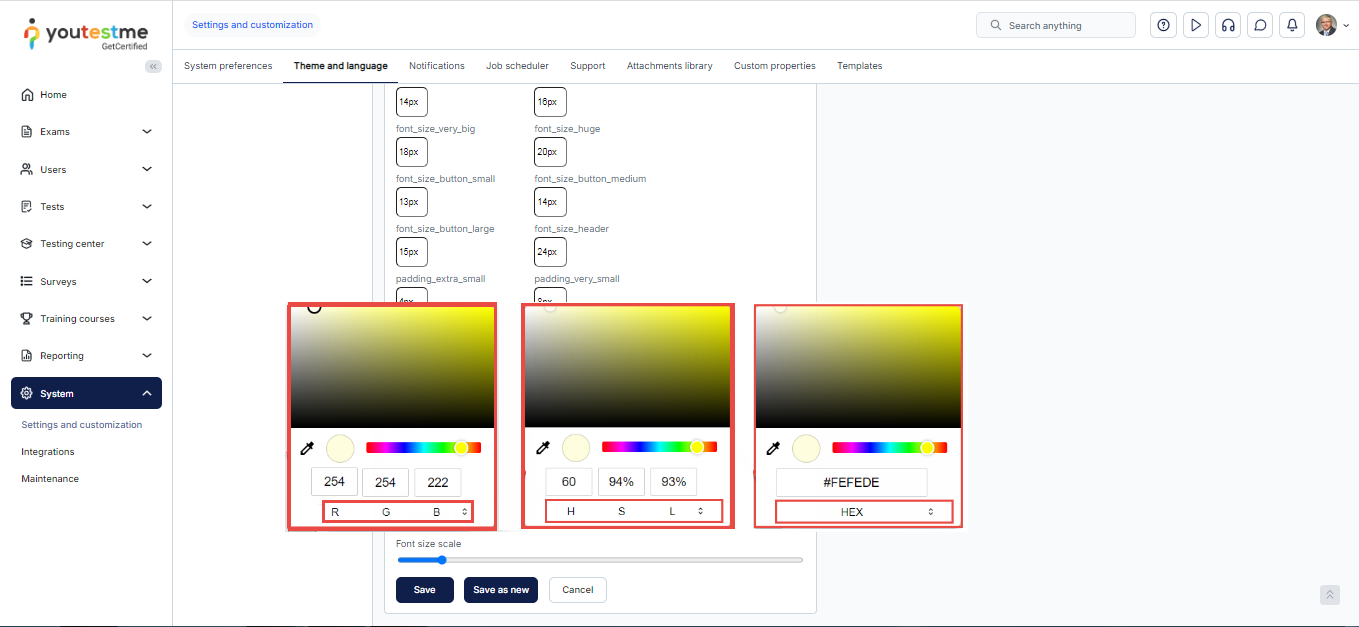
Additionally, another way to change the color is by choosing between RGB, HSL, or HEX formats and selecting their respective option names.
White labeling
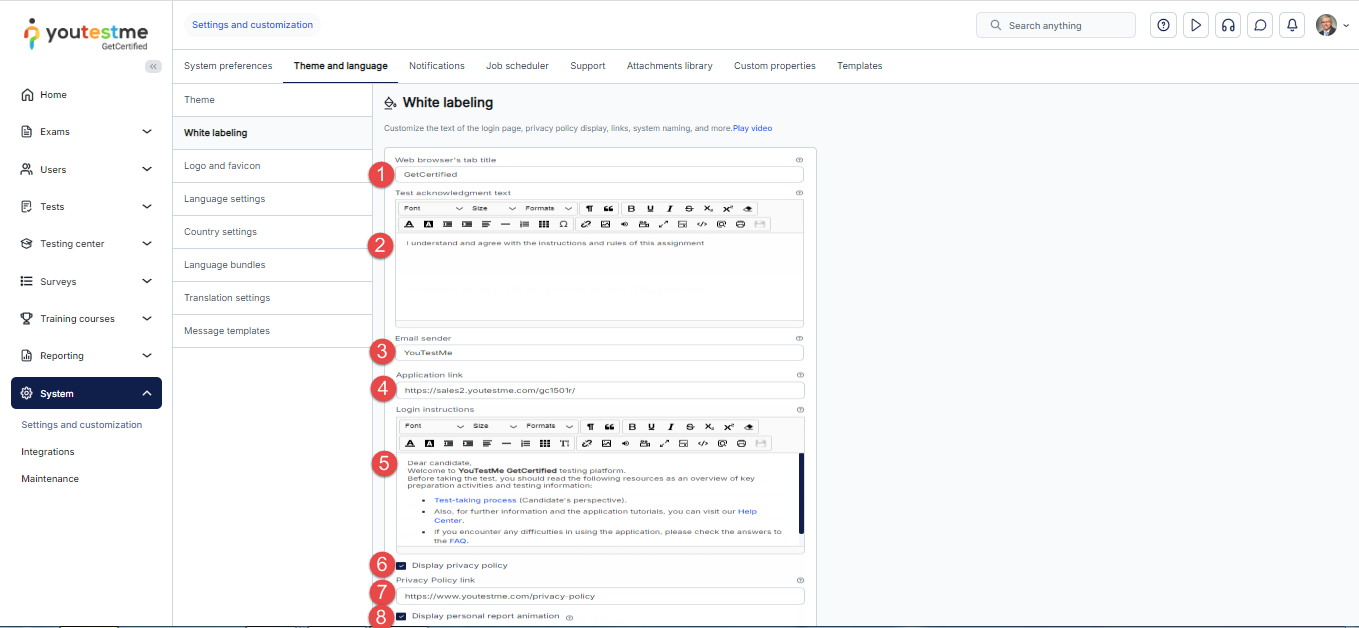
On the White Labeling tab, you can customize the login page text, the privacy policy display, links, system naming, and more.
The following options are available:
- Web browser’s tab title – Modify the application name in the web browser’s tab title, right beside the favicon.
- Confirmation label – Modify the acknowledgment text presented on the instructions screen before the test begins. Additionally, this text can be customized for each test separately under the Test instructions dialog settings. To include an acknowledgment checkbox for candidates, make sure to enable the Require instructions acknowledgment option.
Note: Changing the application language will result in the translation of the default text. However, modifying the default text itself will not be translated when altering the application language. - Emails sent from – The name entered here will be presented as the sender’s name in the email body, replacing the $from$ parameter.
- Application link – The URL entered here will be used to generate necessary links for email notifications. The YouTestMe team will update this link if you have configured a custom application domain. This ensures that the email links will be presented using the new custom domain.
- Login instructions – Provide detailed guidelines or include useful links for users to be displayed on the login screen.
- Display privacy policy – Enable this option and a privacy policy link will be displayed on the user registration page.
- Privacy policy link – Enter your custom privacy policy link instead of the default one.
- Display personal report animation – Show/Hide animation on the left side of the candidate’s personal report page

Logo and favicon
On this tab, you can change the application’s logo and favicon.
- Click the Change logo button to upload a logo representing your company or organization. The recommended image size is 270 x 69 pixels.
- Click Reset to default to restore the application logo to the default one.
- Click the Change favicon button to replace the favicon displayed in the web browser’s tab title.
- Click Reset to default to restore the favicon to its default setting.
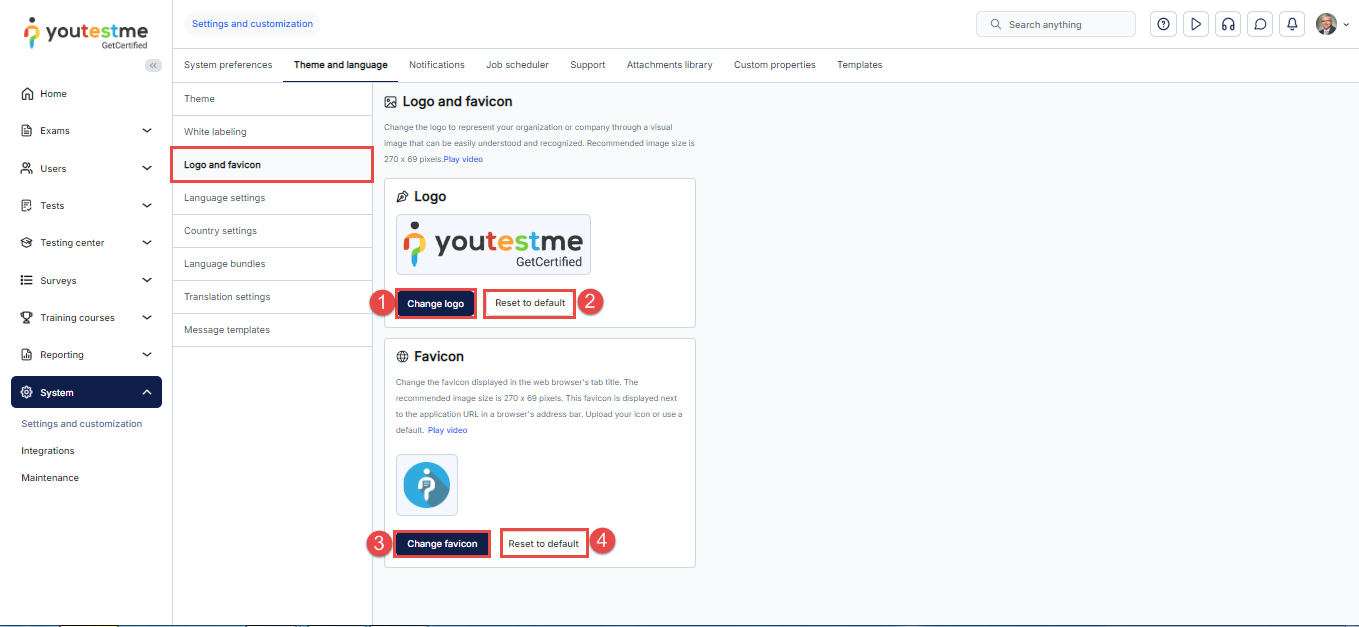
Note: Changes become visible the next time you log in. To see them immediately, log out of the application. The new logo is displayed on the login page.
For more information, please watch this video.
Language settings
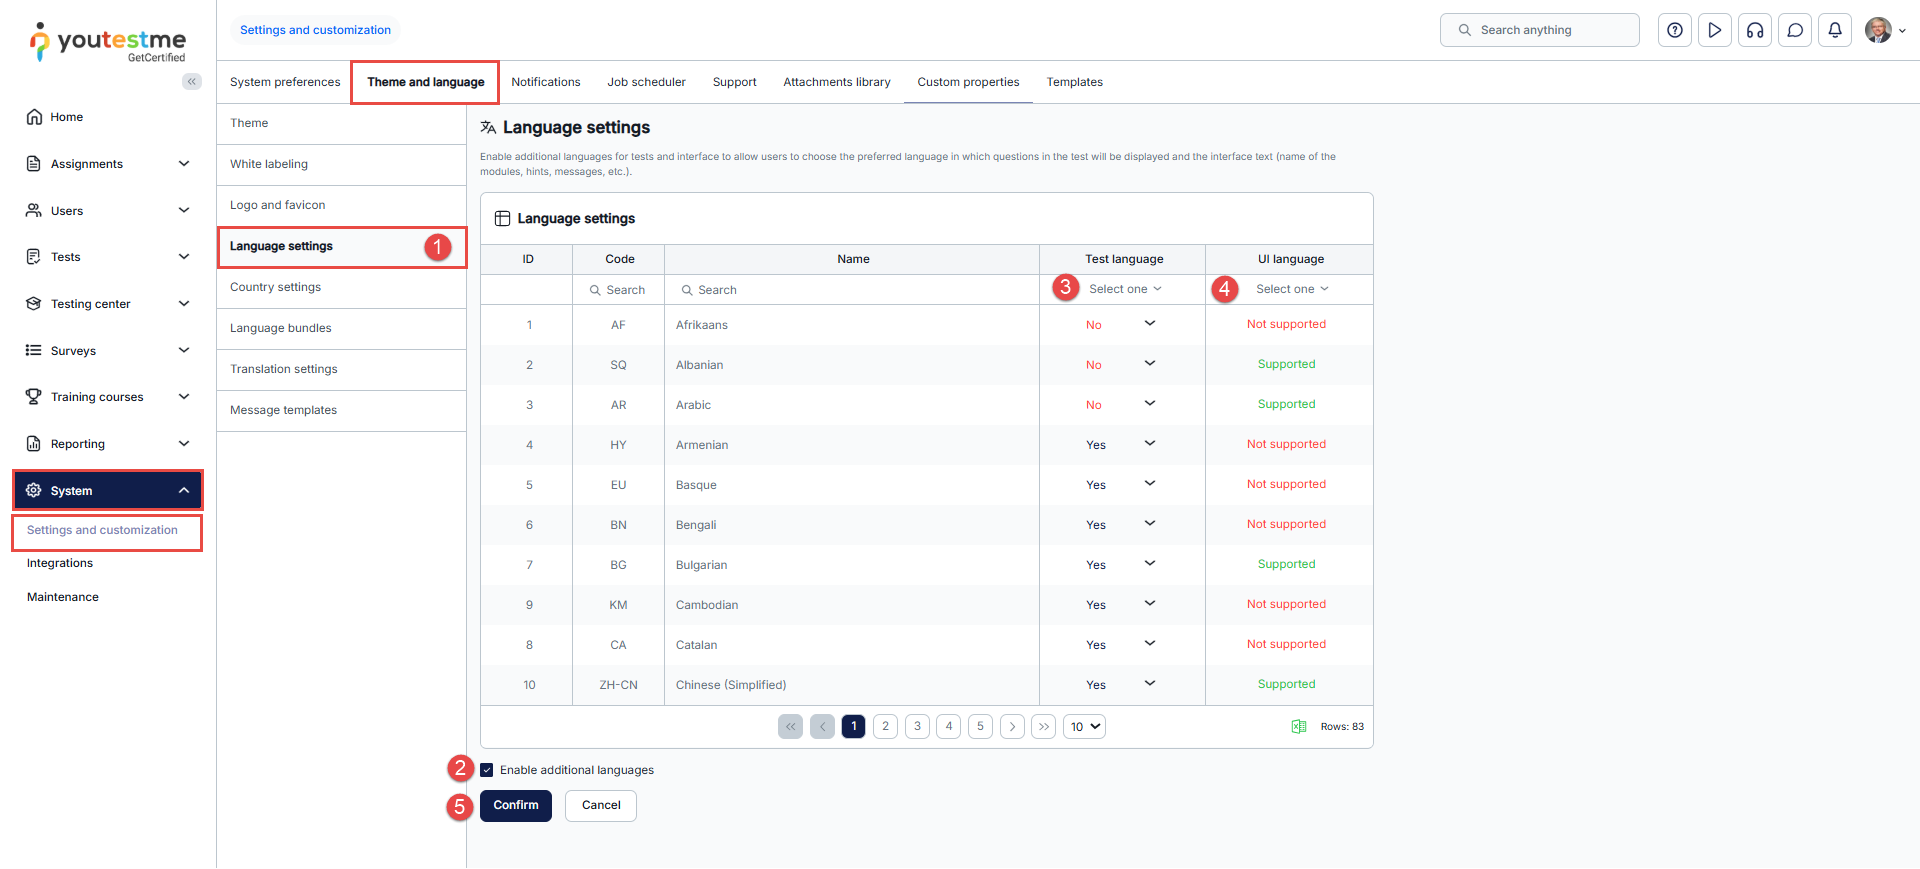
To set up the desired language, do the following:
- Go to the System/System and customization/Theme and language/Language settings tab.
- Check the checkbox Enable additional languages.
- Enable/disable the test language.
- Enable/disable interface language.
- Click on the Confirm button.
Language bundles settings
Users can customize the application interface text in the Language bundles tab to meet their needs, change label names, create new hints, and modify notification content.
A language bundle is a file containing key/value pairs. Each property is connected to one or more UI components via a property key.
Note: It is impossible to delete default language bundles, but you can create new ones based on them. You also cannot have two active bundles of the same type.
There are two ways to create a custom language bundle:
- Changing the language bundle by editing one-by-one property values.
- Download the language bundle, edit the file offline using your preferred text editor, and import it into the application.
Note: The keys must not be changed. Otherwise, the changes will not be visible.
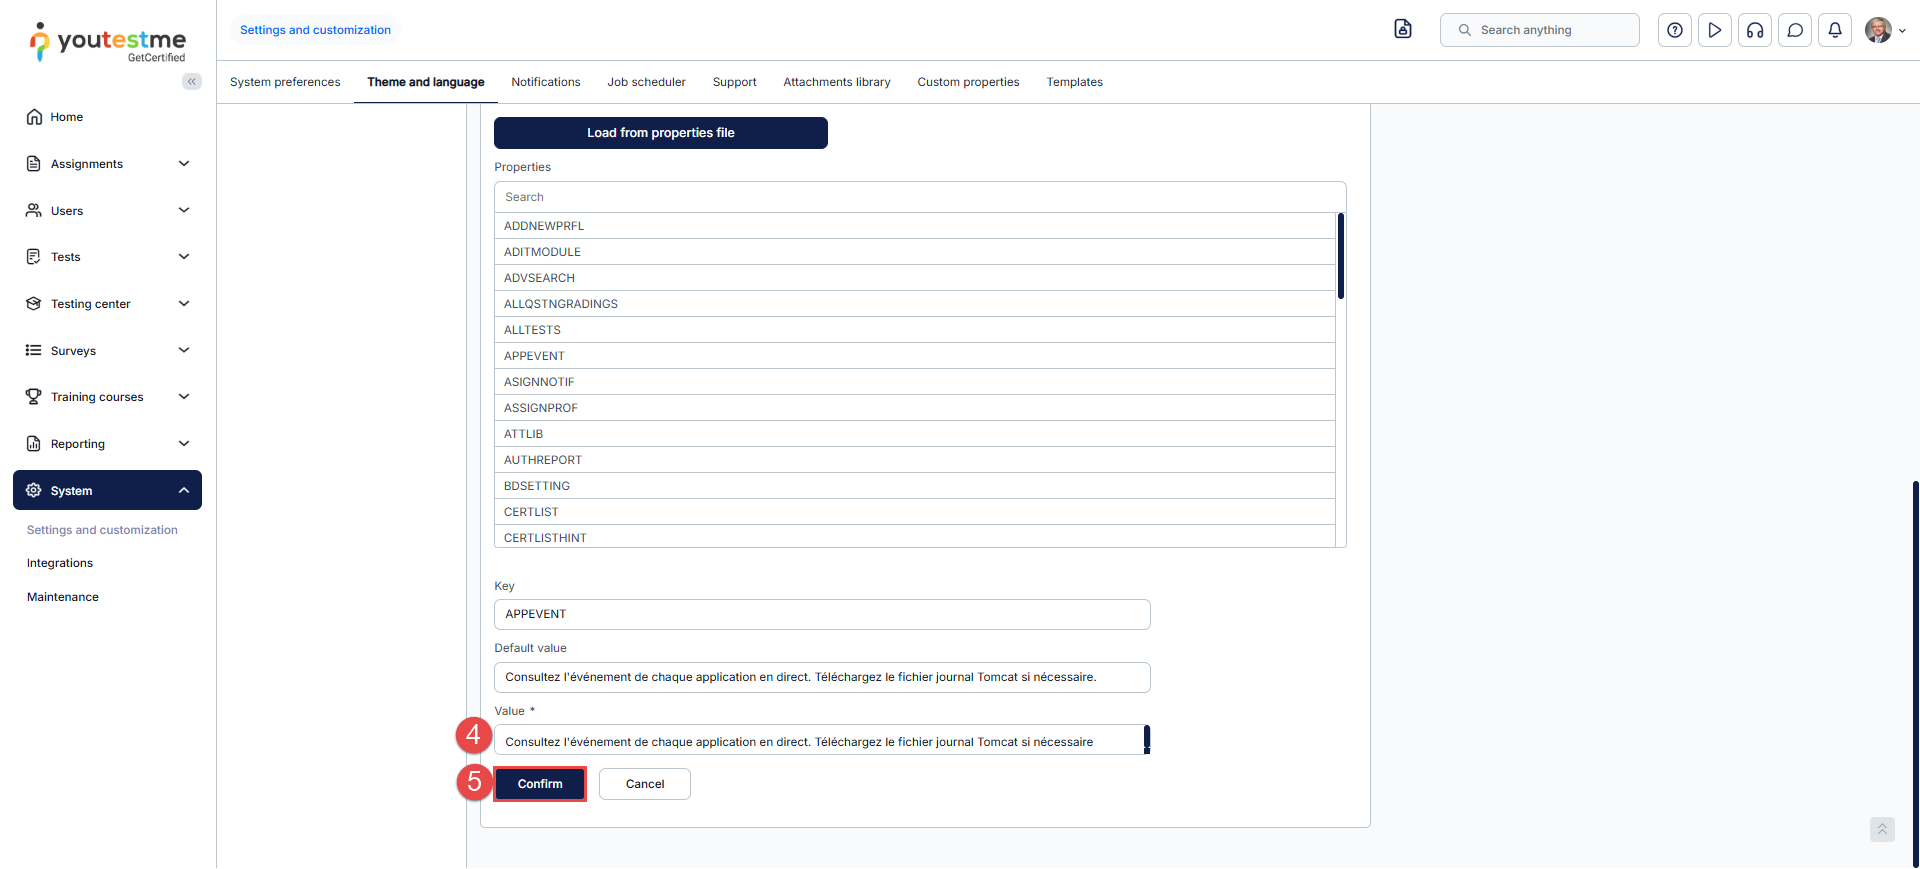
To create a new language bundle by editing one-by-one property values:
- Click the pencil icon in the Actions column for the language bundle you want to create a new one from.
- Search for the property value or key you want to change.
- To identify the language bundle file containing a specific text, use the Activate Preview Keys Mode button. Once activated, the interface displays text keys instead of their corresponding text, allowing you to identify the relevant key and locate it in the language bundle where it is stored.
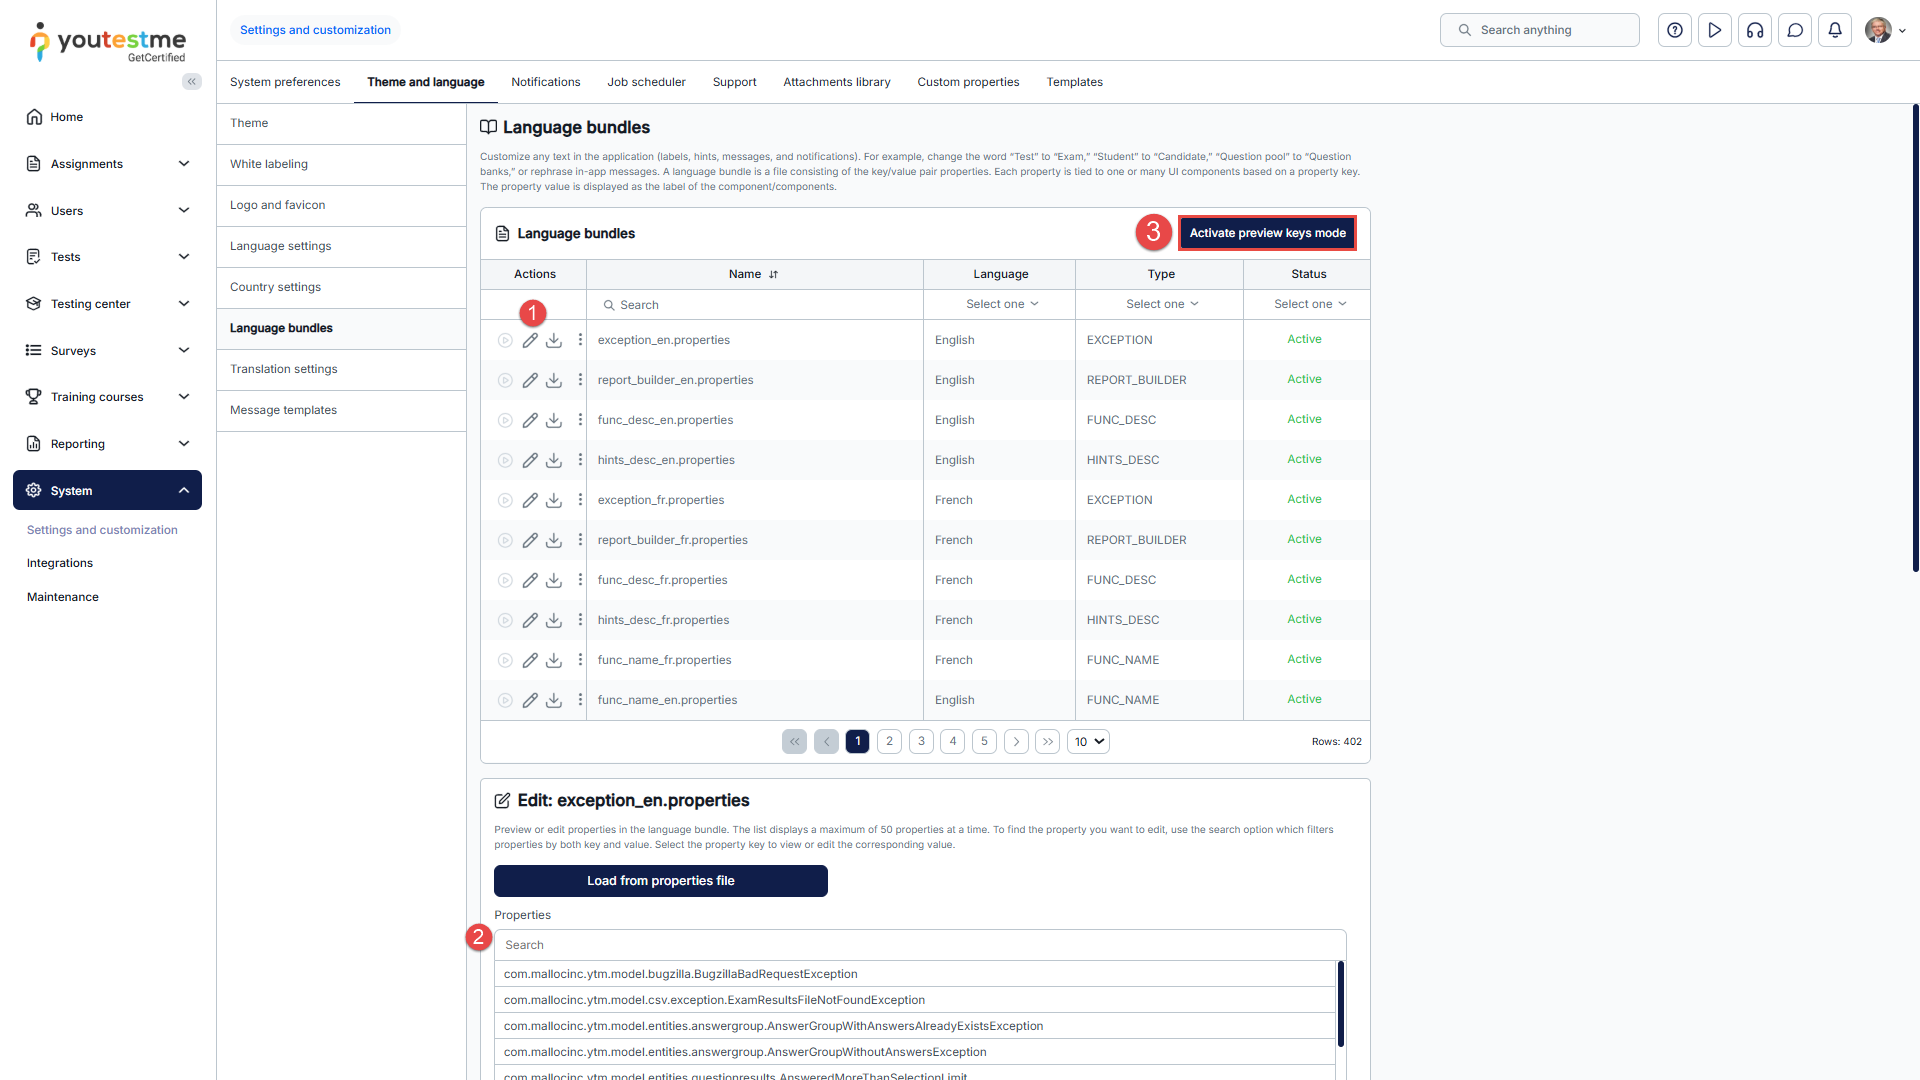
- Edit the text.
- Confirm or discard the changes you made in the property value field.
Country Settings
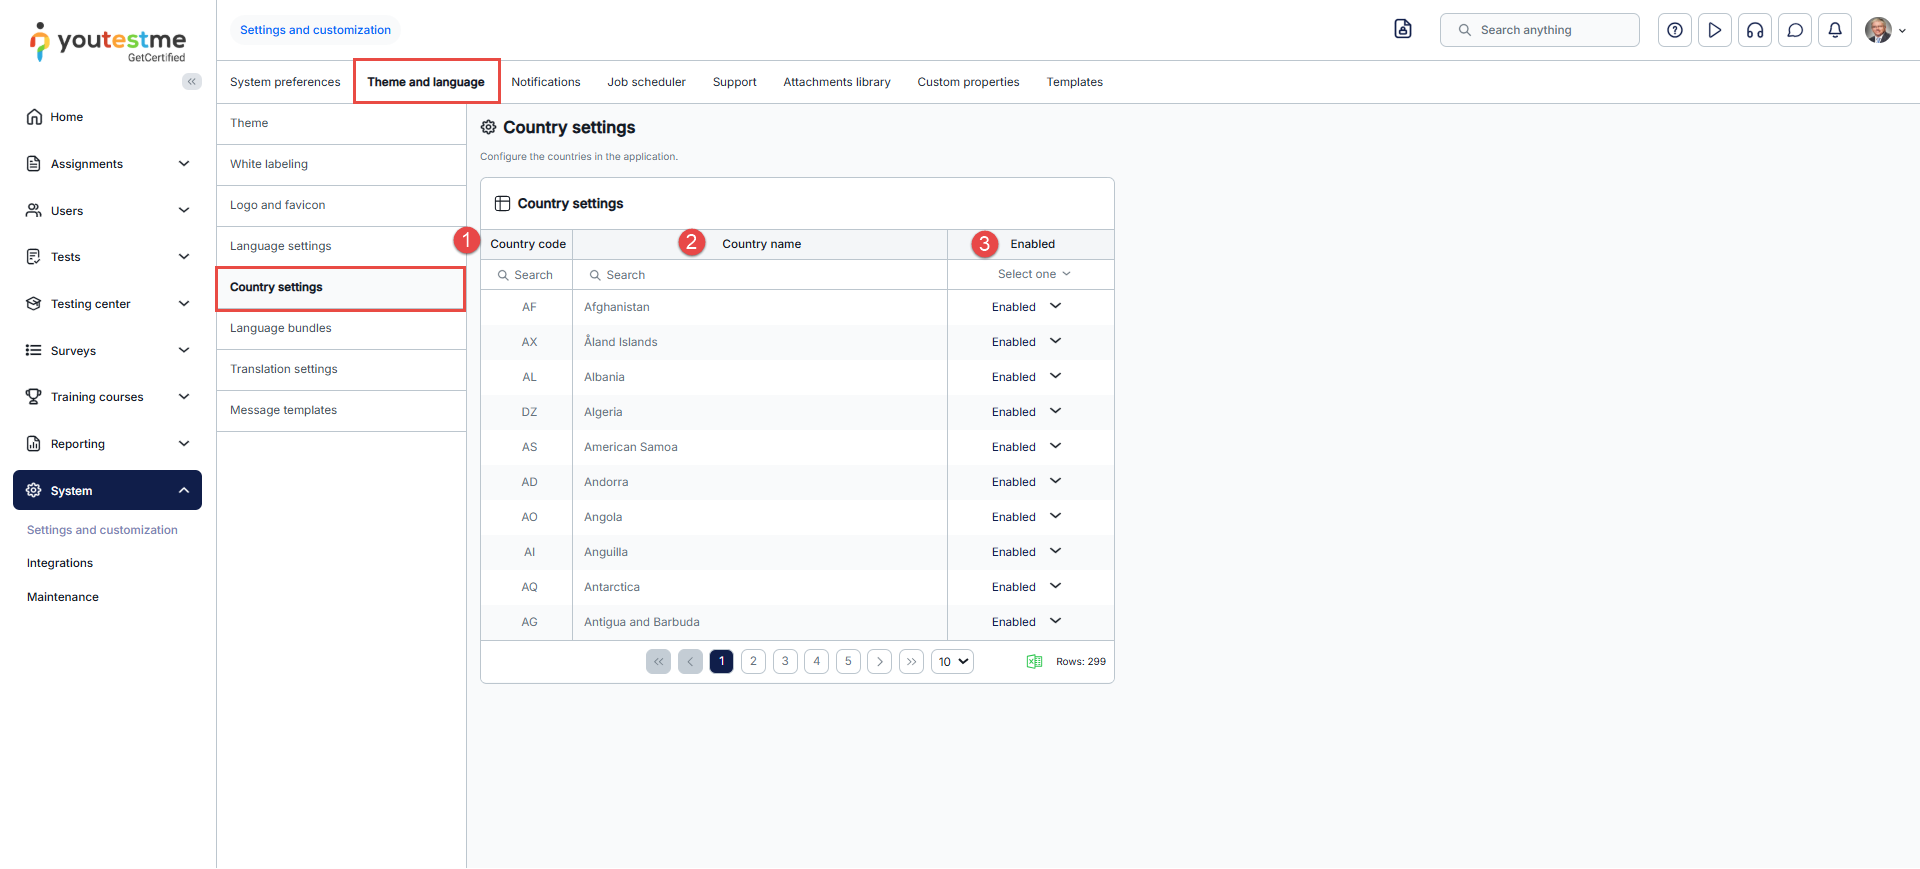
You can manage the countries available in the application, including those used for Dynamic Tax configuration, by navigating to Country Settings. In the table, you’ll find:
- Country Code – The standardized code for each country.
- Country Name – The full name of the country.
- Enabled Status – Indicates if a country is active. Disabled countries won’t appear in the Dynamic Tax list when adding a new tax.
Translation Settings
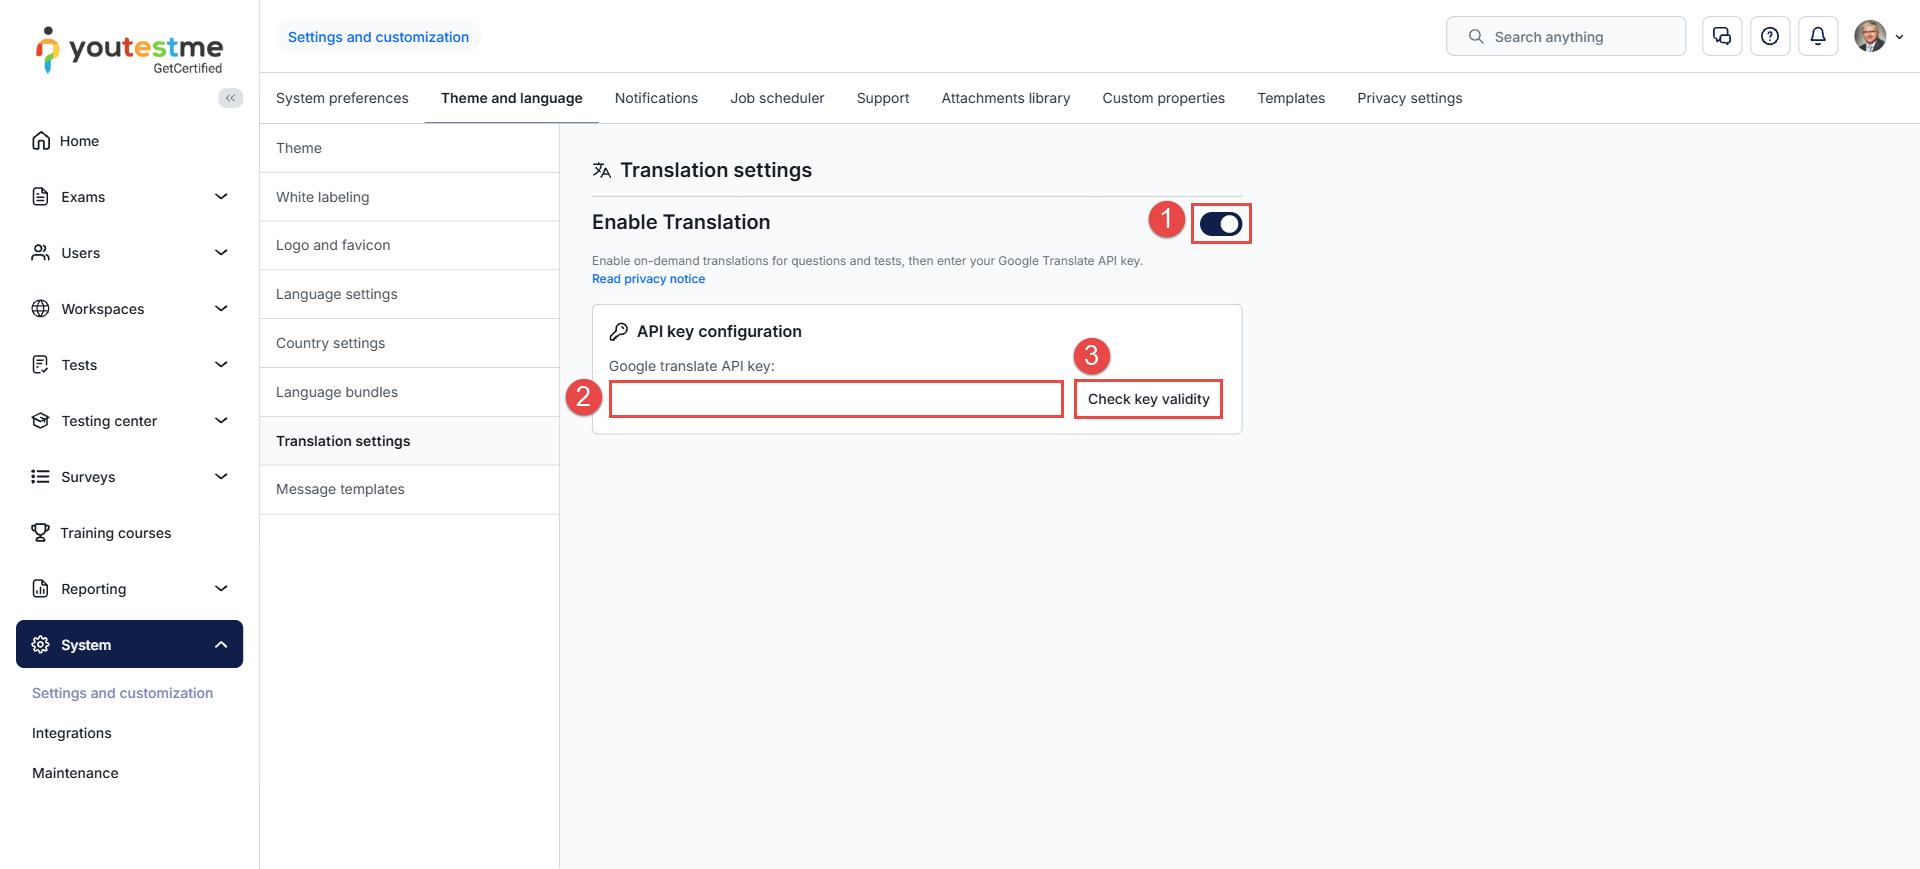
The Translation settings feature lets authorized users integrate the application with Google Translate so that questions and tests can be translated on demand. Once enabled and configured with a valid API key, translations are available without manually recreating content in other languages.
Important: Google Translate is a third-party service. When you enable this feature, a consent notice is displayed. Review it carefully before entering your API key, as content sent for translation is processed by Google.
- Enable Translation. Turn on the Enable Translation toggle. A consent notice about the use of a third-party service (Google) will be displayed. Accept it to continue.
- Enter the API key. In the API key configuration section, paste your Google Translate API key into the Google Translate API key field.
- Verify the key. Click Check key validity to confirm the key works. If it is valid, translation is ready to use. If not, re-check the key and try again.
Message Templates
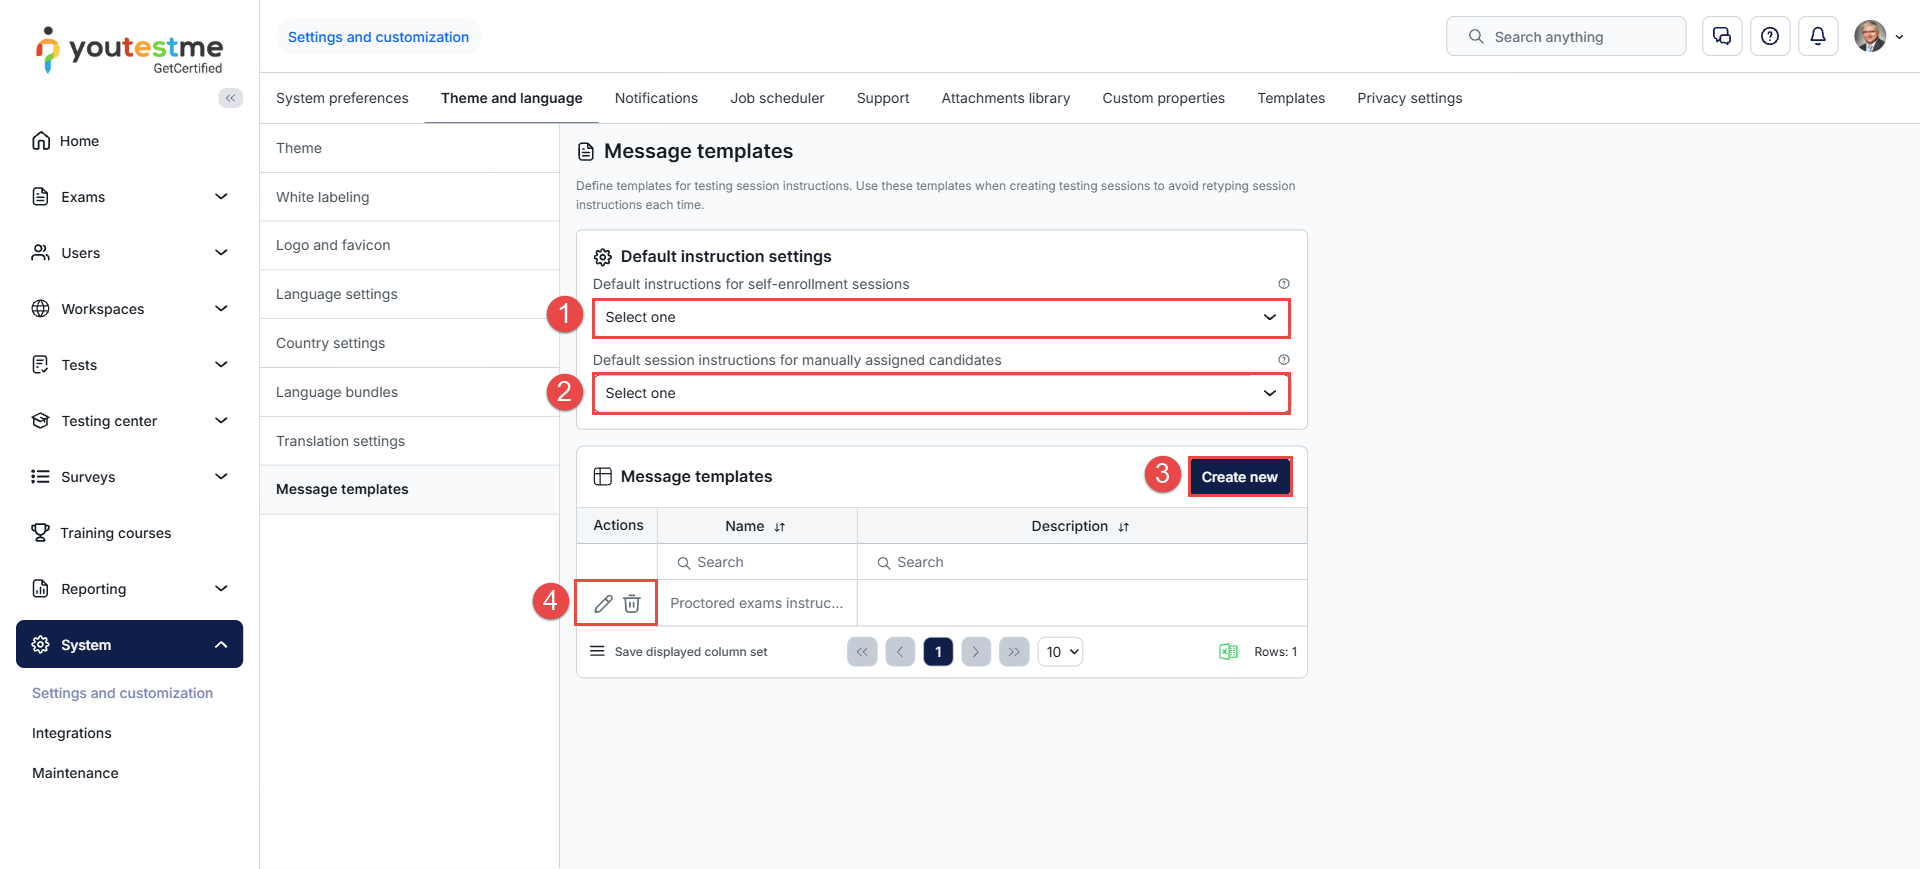
Message templates let you define reusable instructions for testing sessions and exams. Instead of retyping the same instructions every time you create a session, you create a template once and apply it to any exam. You can also set default templates so the right instructions are applied automatically.
- Self-enrollment sessions. In Default instructions for self-enrollment sessions, select the template to be used by default for sessions where candidates enroll themselves.
- Manually assigned candidates. In Default session instructions for manually assigned candidates, select the template to be used by default when candidates are assigned by an administrator.
- Create a template. Click Create new in the Message templates section, then enter the template’s name, description, and instructions, and save it.
- Edit or delete a template. In the Actions column, click the pencil icon to edit a template or the trash icon to delete it.