
Article verified for Release 15.2 on January 30, 2026.
This article will explain how to create a test with sections in YouTestMe, add questions, set passing requirements, and prepare the test for candidates.
Understanding tests with sections
A test with sections divides one test into separate groups of questions. Each section has its own question-selection method and settings. You can also define passing requirements for individual sections.
Use sections when your test covers different topics or when different parts need different settings. For example, an English assessment could contain Grammar, Reading, and Listening sections.
First, configure the overall test. Then create its sections, add questions, and define grading and candidate access.
Note: Test-level settings apply to the overall test. Section-level settings apply to an individual section. The duration type selected for the test determines whether timing is configured for the whole test or separately for each section.
The screenshots show where to find the controls. Their sample names, question counts, and scores are examples, not recommended settings. Use values that match your own test.
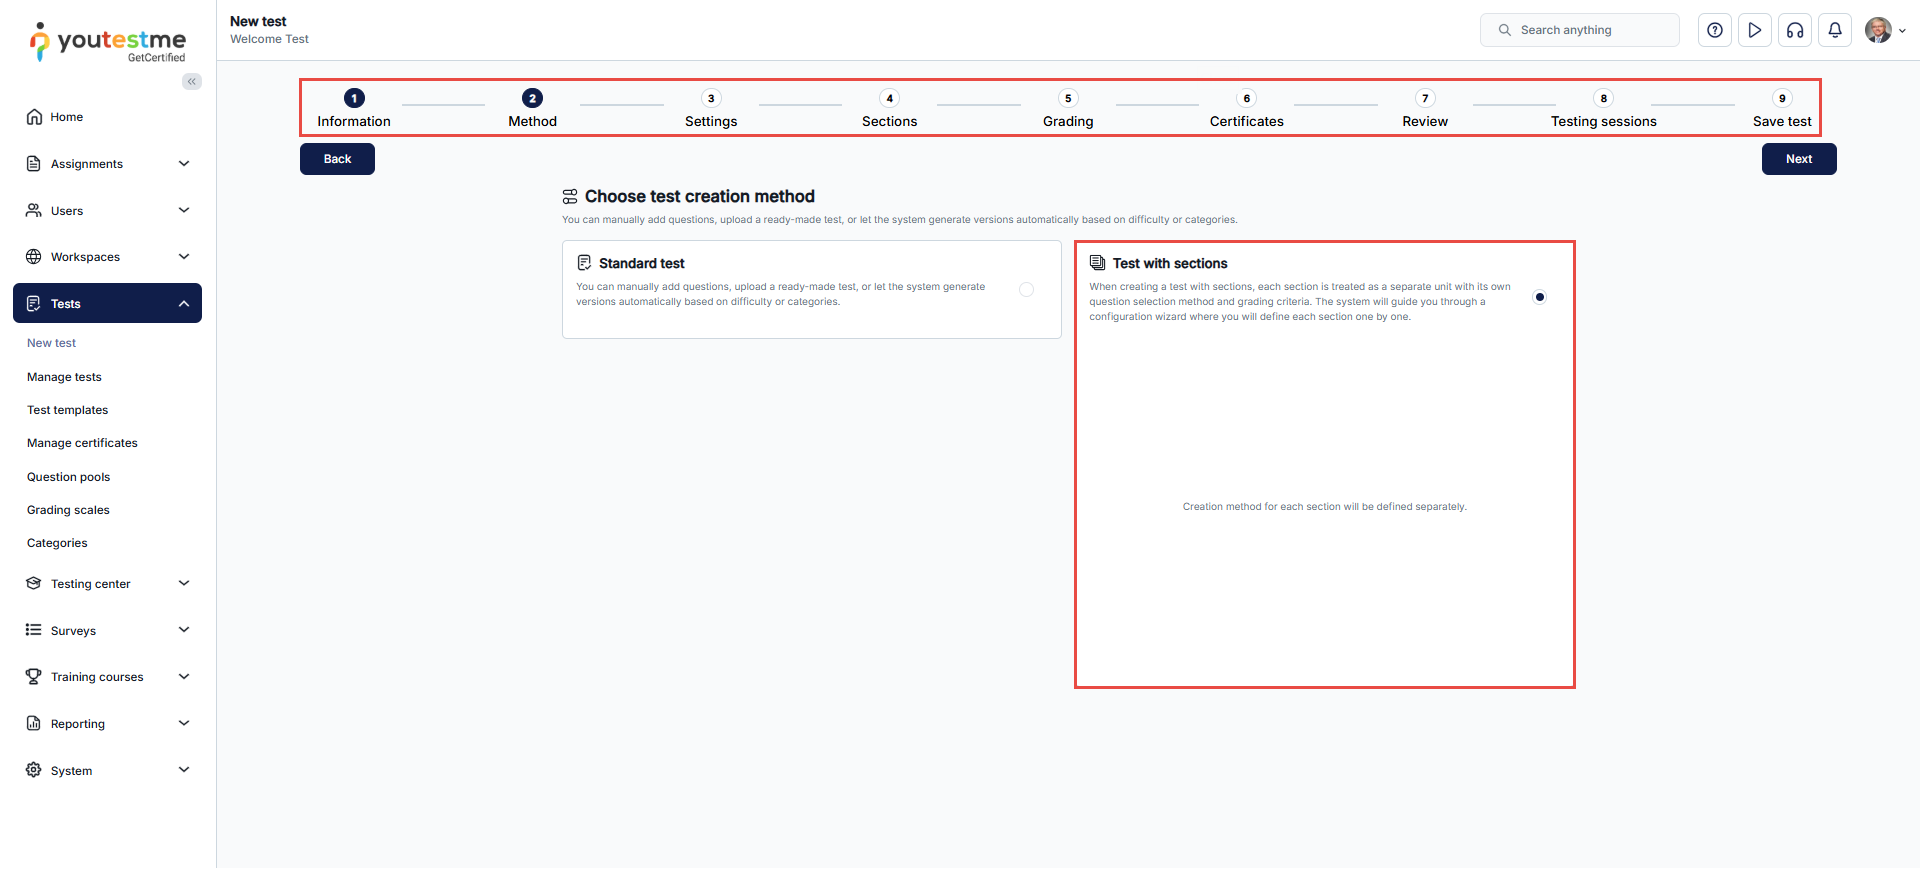
Starting test creation
- Open Tests in the main menu and select New test.
- Complete the Information step with the test’s basic information.
- At the Method step, select Test with sections.
- Click Next to open Settings.
Configuring test-level settings
At the test’s Settings step, configure the options that apply to the overall test.
Choosing timing, reports, and proctoring
- Duration type – Choose how time should be managed:
- Time defined in each section – Configure the duration separately for each section.
- Time per test – Set one total time limit for completing all sections. Candidates can divide this time between sections.
- Deadline to answer all questions – Set a completion period in days, hours, and minutes. The countdown continues even when the candidate leaves the test.
- Score report and Report content – Choose when candidates can see their results and whether the report includes only the score or also answer details.
- Select a workspace when the test should be restricted to a specific workspace.
- Proctoring settings – Configure monitoring when the test needs to be proctored. For instructions, see How to Create a Proctored Test.
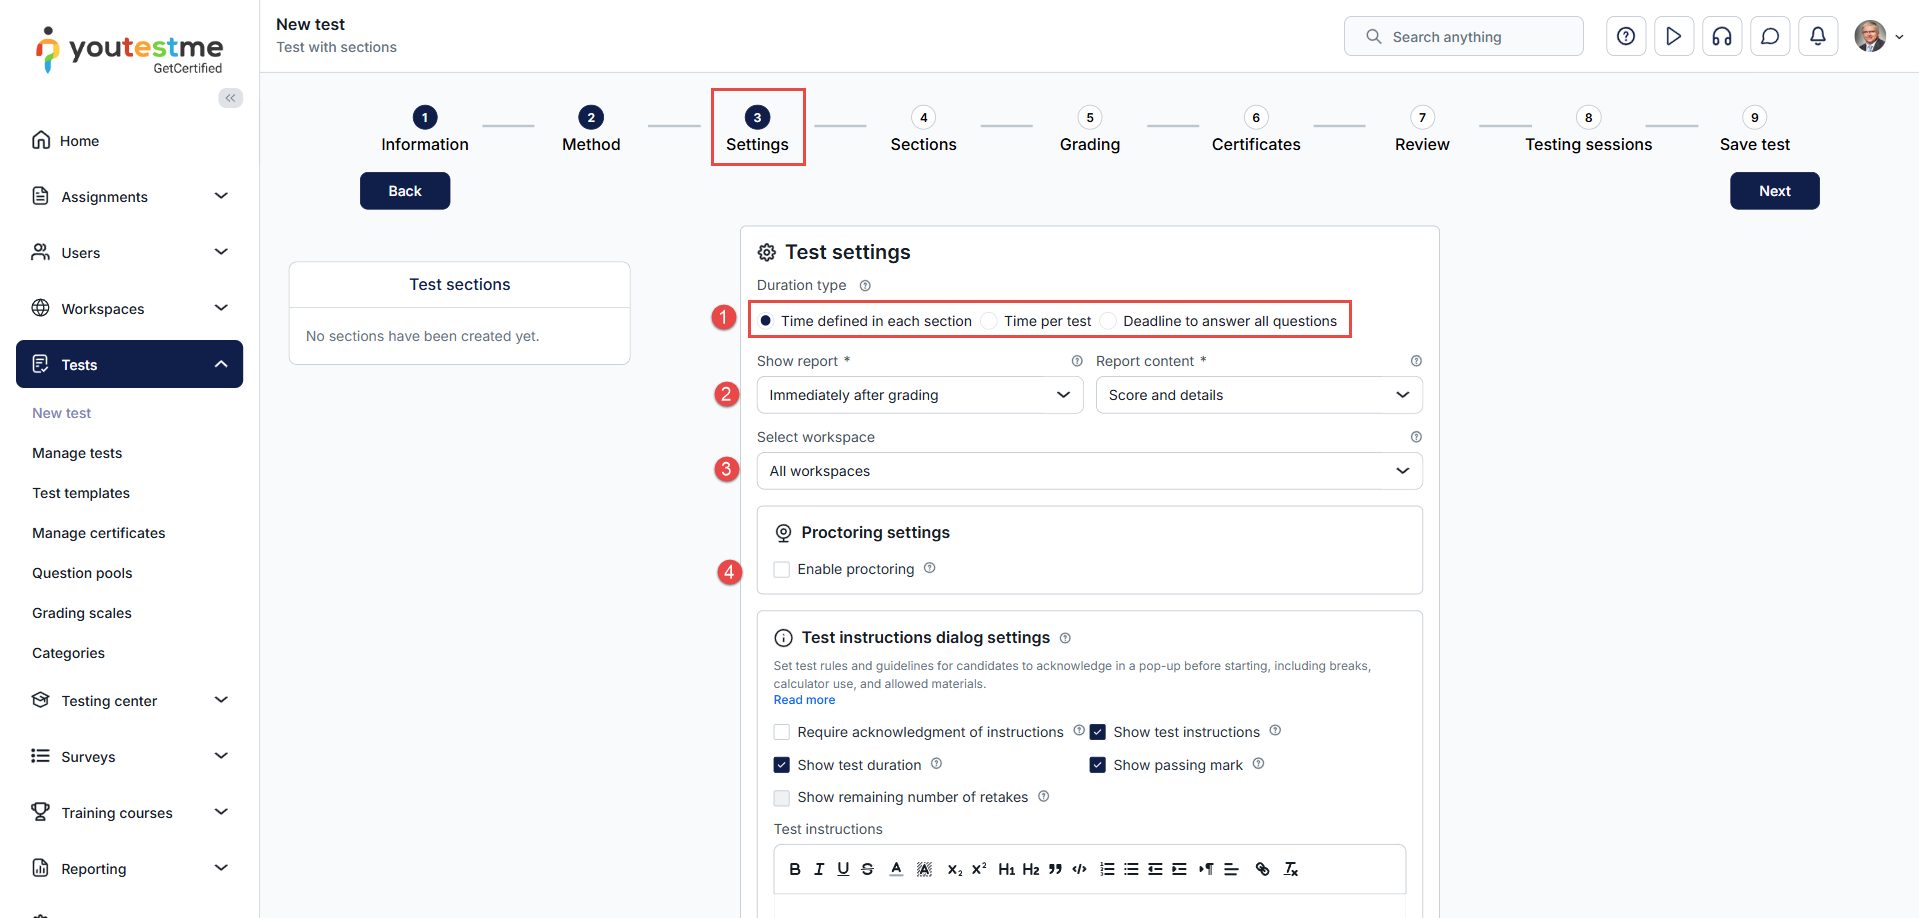
Note: Timing is configured at one level. To define separate section time limits, select Time defined in each section rather than a test-wide time limit. See How to Define the Test Duration Settings for details.
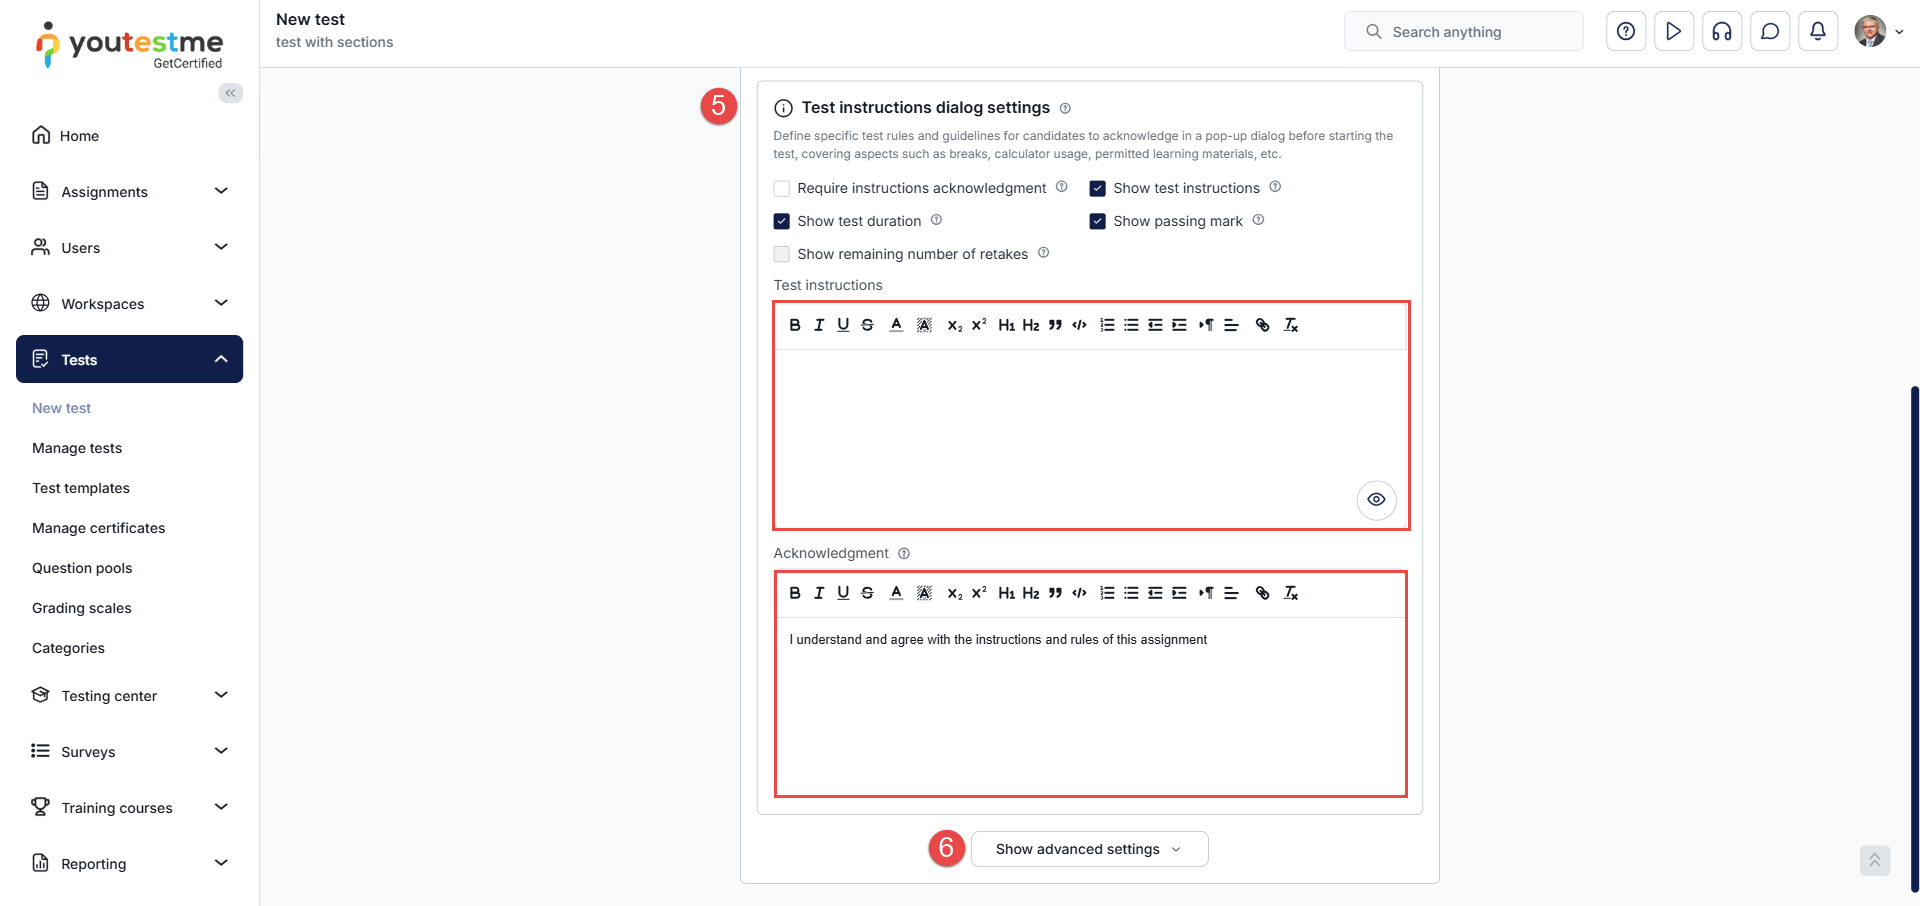
Writing instructions and opening advanced settings
- Open Test instructions dialog settings and enter the instructions candidates should read before starting. Enable Require instructions acknowledgment when candidates must confirm that they have read them. Customize the acknowledgment message as needed.
- Click Show advanced settings to display additional test options.
Configuring additional test settings
Review the additional options below. Enable only the options needed for your test.
- Test completion message – Enter a message for candidates when results are not available immediately. For example, explain when they can expect their results.
- Allow test continuation – Let candidates use Continue later to leave the test and return later. Timer behavior depends on the selected duration type. A deadline countdown continues while the candidate is away.
- Allow test retaking – Allow additional attempts and define the retake conditions, such as the number of attempts and the time between retakes.
- Enable a limited number of free reschedules – Allow candidates to reschedule a specified number of times. After reaching the limit, they must submit a rescheduling request.
- Hide “Finish test” button until last question – Hide the Finish test button until the last question.
- Enforce section order – Require candidates to follow the section order configured for the test.
- Automatically log out the candidate after finishing or pausing – Log candidates out automatically when they finish the test or pause it using Continue later.Note: This option is available only at the test level. It can be used in tests with or without sections. It is not available in individual section settings.
- Browser lockdown on by default – Start the test in full-screen mode.
- Configure report lifespan – Limit how long candidates can access their detailed personal reports. This option is available when Report content is set to Score and details. For instructions, see How to Set a Personal Report Lifespan.
- Require updating the user profile – Require candidates to update their profile information before starting. For instructions, see How to Require Updating Profile Information.
When the test-level settings are complete, click Next to continue to Sections.
Creating and configuring a section
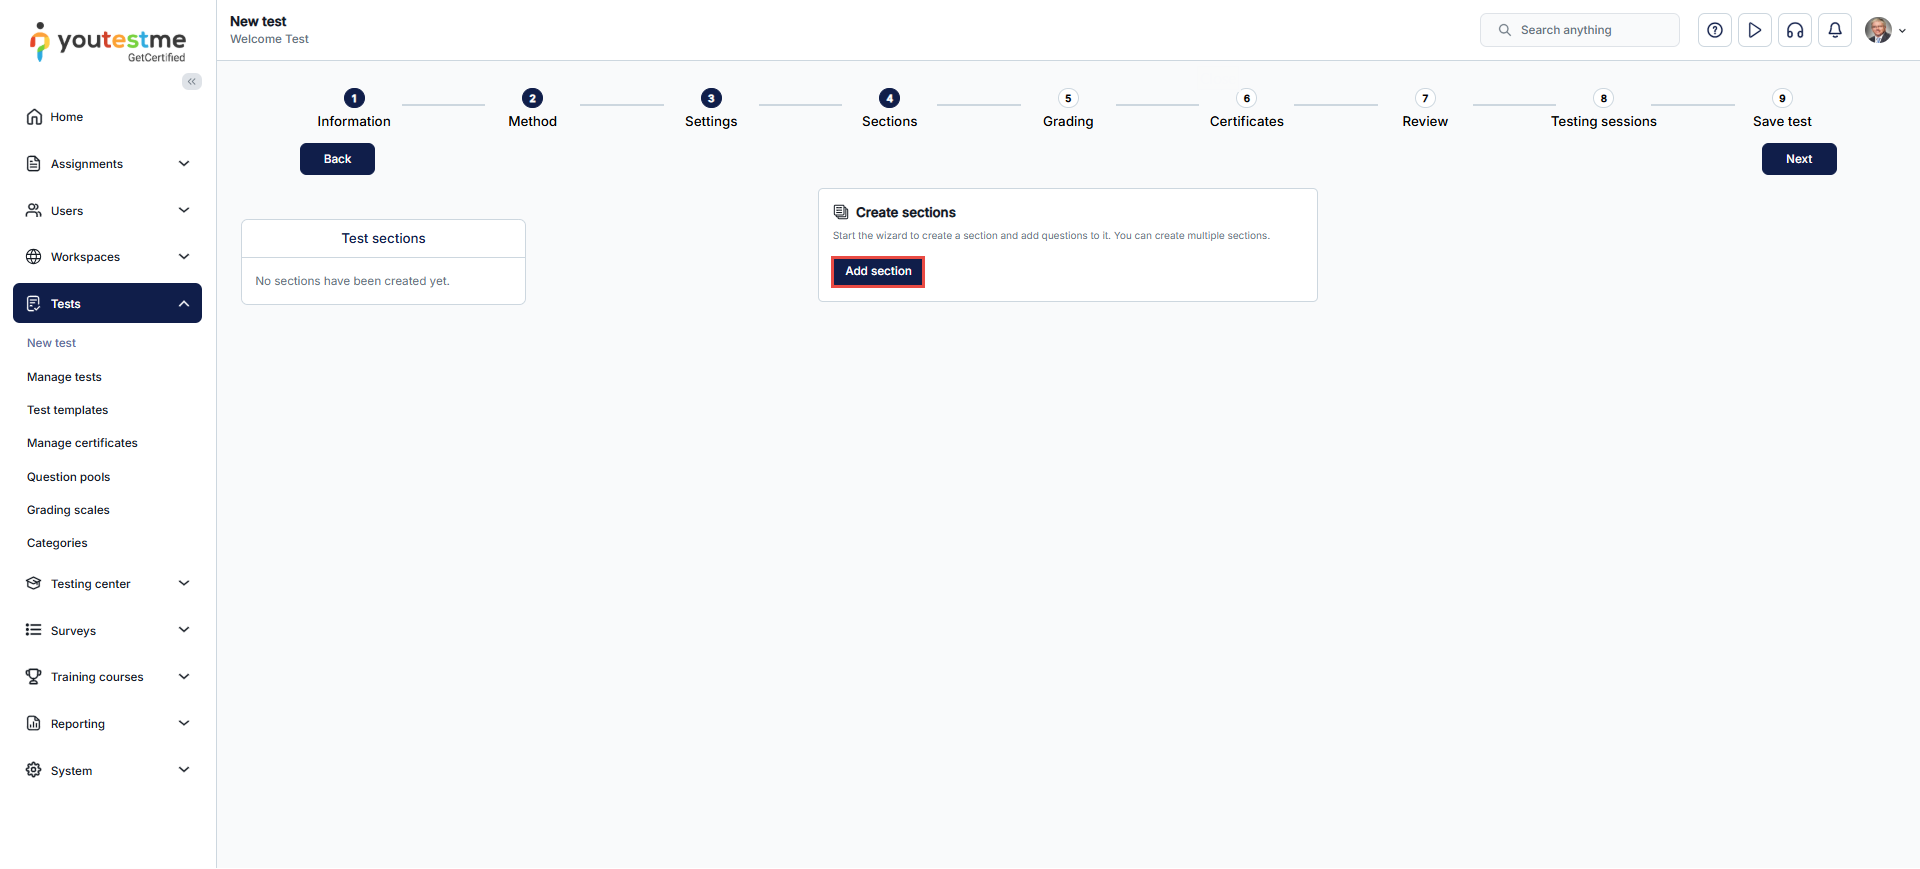
Opening the section creation wizard
- At the Sections step, click Add section.
- Use the section creation wizard to enter information, choose a creation method, configure settings, and add questions for this section.
Entering section information
- Enter a Name that clearly identifies the section, such as Grammar.
- Enter an optional Description to explain what the section covers.
- To add supporting materials, open the advanced settings. Under Section attachments (callout 4 in the screenshot), use Create new or Import from library.
- Click Next to continue to Method.
For attachment instructions, see How to Add Attachments to Your Test, Test Section and Individual Questions.
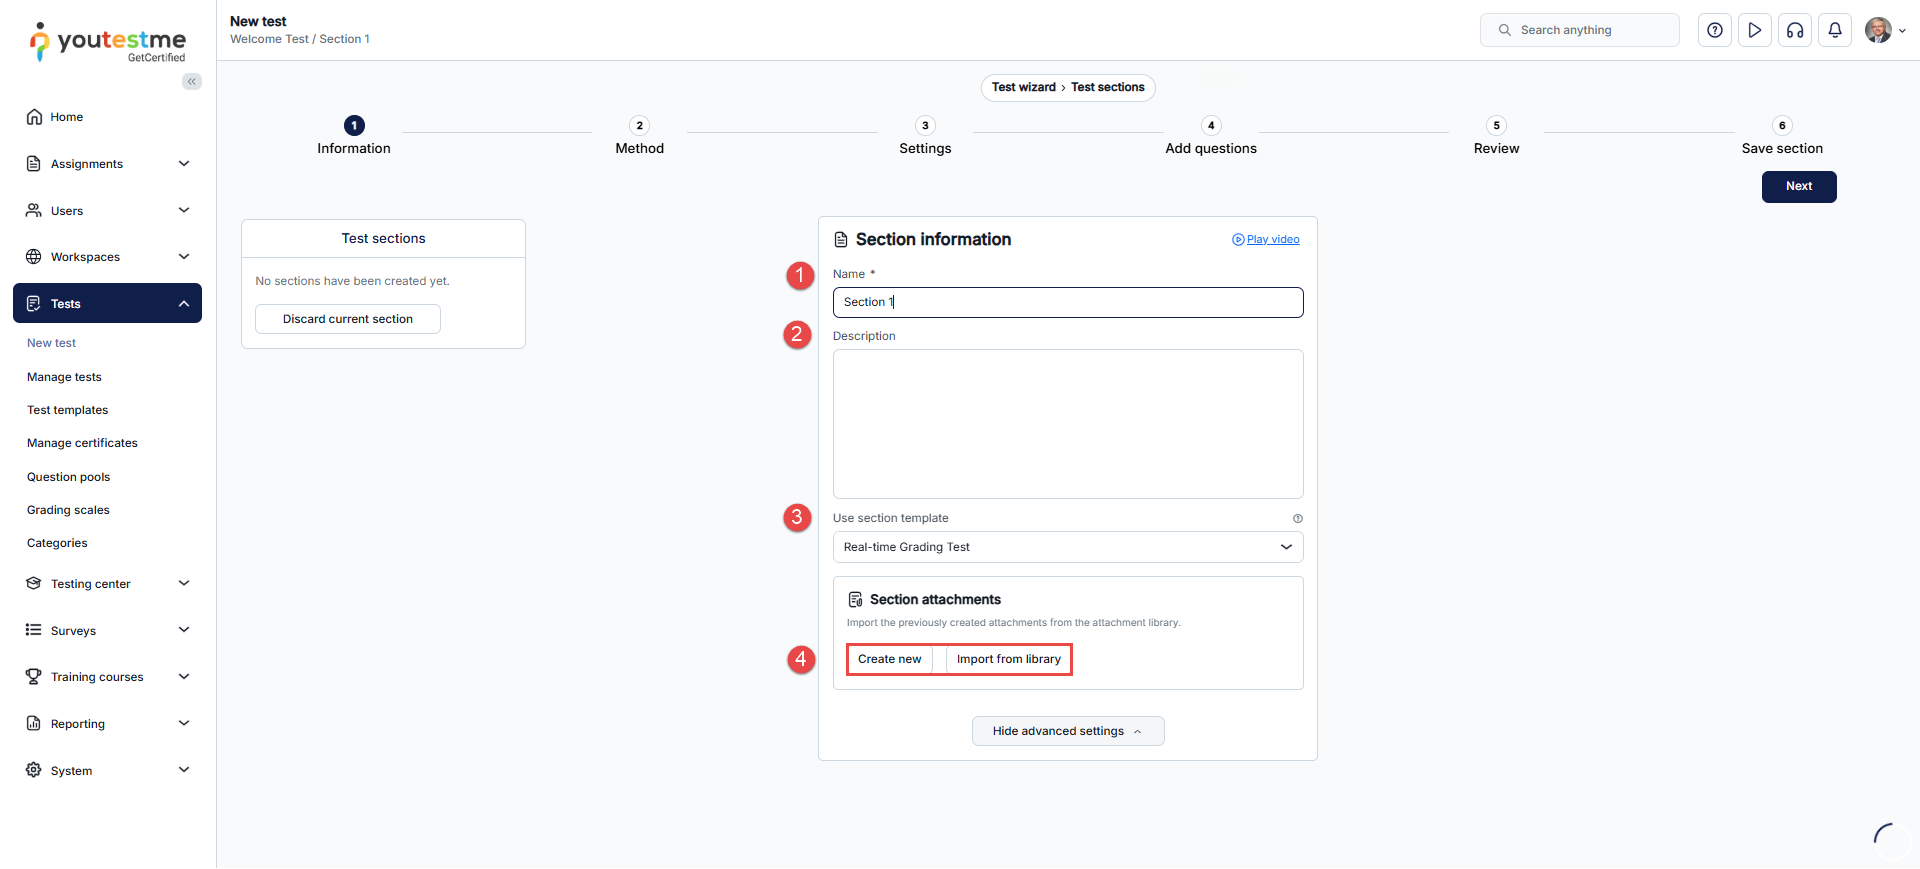
The screenshot identifies Name (1), Description (2), Use section template (3), and Section attachments (4). The attachment instructions refer to callout 4.
Choosing how to add questions
A question pool is a collection of questions saved in the system. At Method, choose one of the following methods for this section:
- Pick questions from pools or create them manually – Choose existing questions yourself or create new questions.
- Upload a ready-made test file – Import a prepared test file instead of entering its questions individually.
- Automated test generator selects questions – by difficulty – Select questions automatically from pools according to the required number of easy, medium, and hard questions.
- Automated test generator selects questions – by category – Select questions automatically using rules based on their assigned categories.
Note: The difficulty-based and category-based automated generation methods are separate options and cannot be combined within the same section.
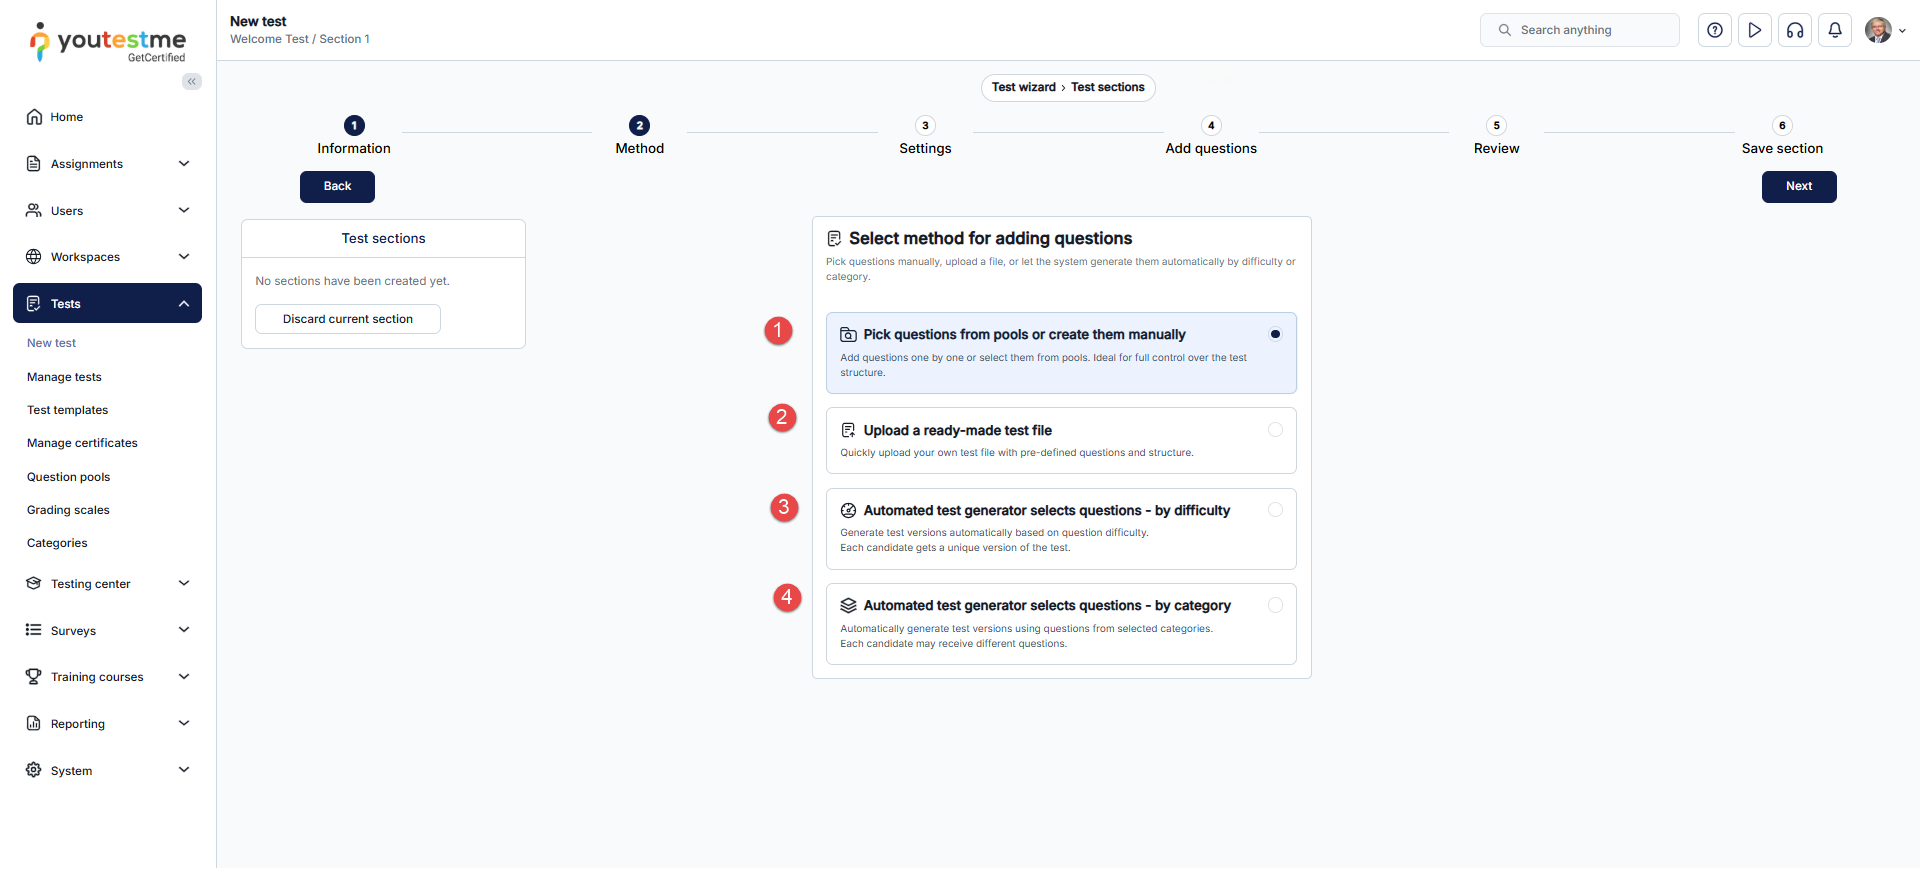
For more information, see How to Choose the Right Test Creation Method.
Choosing section duration and layout
At the section’s Settings step, configure its timing and question layout.
- When the test uses Time defined in each section, choose a Duration type for this section:
- Unlimited – Do not apply a time limit to the section.
- Time per question – Give each question its own time limit. Configure the time limit in the question settings.
- Time to answer all questions – Set one time limit for all questions in the section.
- Deadline to answer all questions – Start a countdown when the candidate enters the section. The countdown continues even when the candidate leaves.
- Choose the Page format:
- One question per page – Display one question at a time.
- All questions on one page – Display all questions together.
Note: All questions on one page is unavailable when branching questions are used. Branching means that the next question depends on an earlier answer. For easier navigation, this layout is recommended for sections with up to 20 questions; this recommendation is not a stated system limit.
For more information about section timing, see How to Define the Test Duration Settings.
Configuring additional section options
Review the options for the current section. Open Show advanced settings to see additional settings.
- Enable “I don’t know” option – Let candidates choose I don’t know to avoid negative points for an incorrect answer.
- Enable answer feedback to candidates – Display the question’s configured answer feedback when candidates move to the next question. Define the feedback when creating or editing the question.
- Show question attachments – Make question attachments available during the test.
- Show question metadata to candidate – Display question details, such as points, type, and difficulty.
- Enable notes – Let candidates write notes during the section. Notes are visible only to the candidate during the test. Enable this option separately for each section where notes are needed.
- Enable candidates’ feedback on questions – Let candidates leave feedback about individual questions.
- Enable unanswered questions message – Warn candidates about unanswered questions when they try to finish the test.
- Require answering all questions – Require candidates to answer all questions before finishing.
- Disable going backwards in test section – Prevent candidates from returning to previous questions within the section.
- Disable answer deselect – Prevent candidates from clearing selected answers in single-choice, multiple-choice, and true/false questions.
- Enable revisiting section – Let candidates return to the section before submitting it using Finish section.
Note: When notes are enabled and section attachments are available, candidates can use Open this attachment as note to open an attachment and write beneath it.
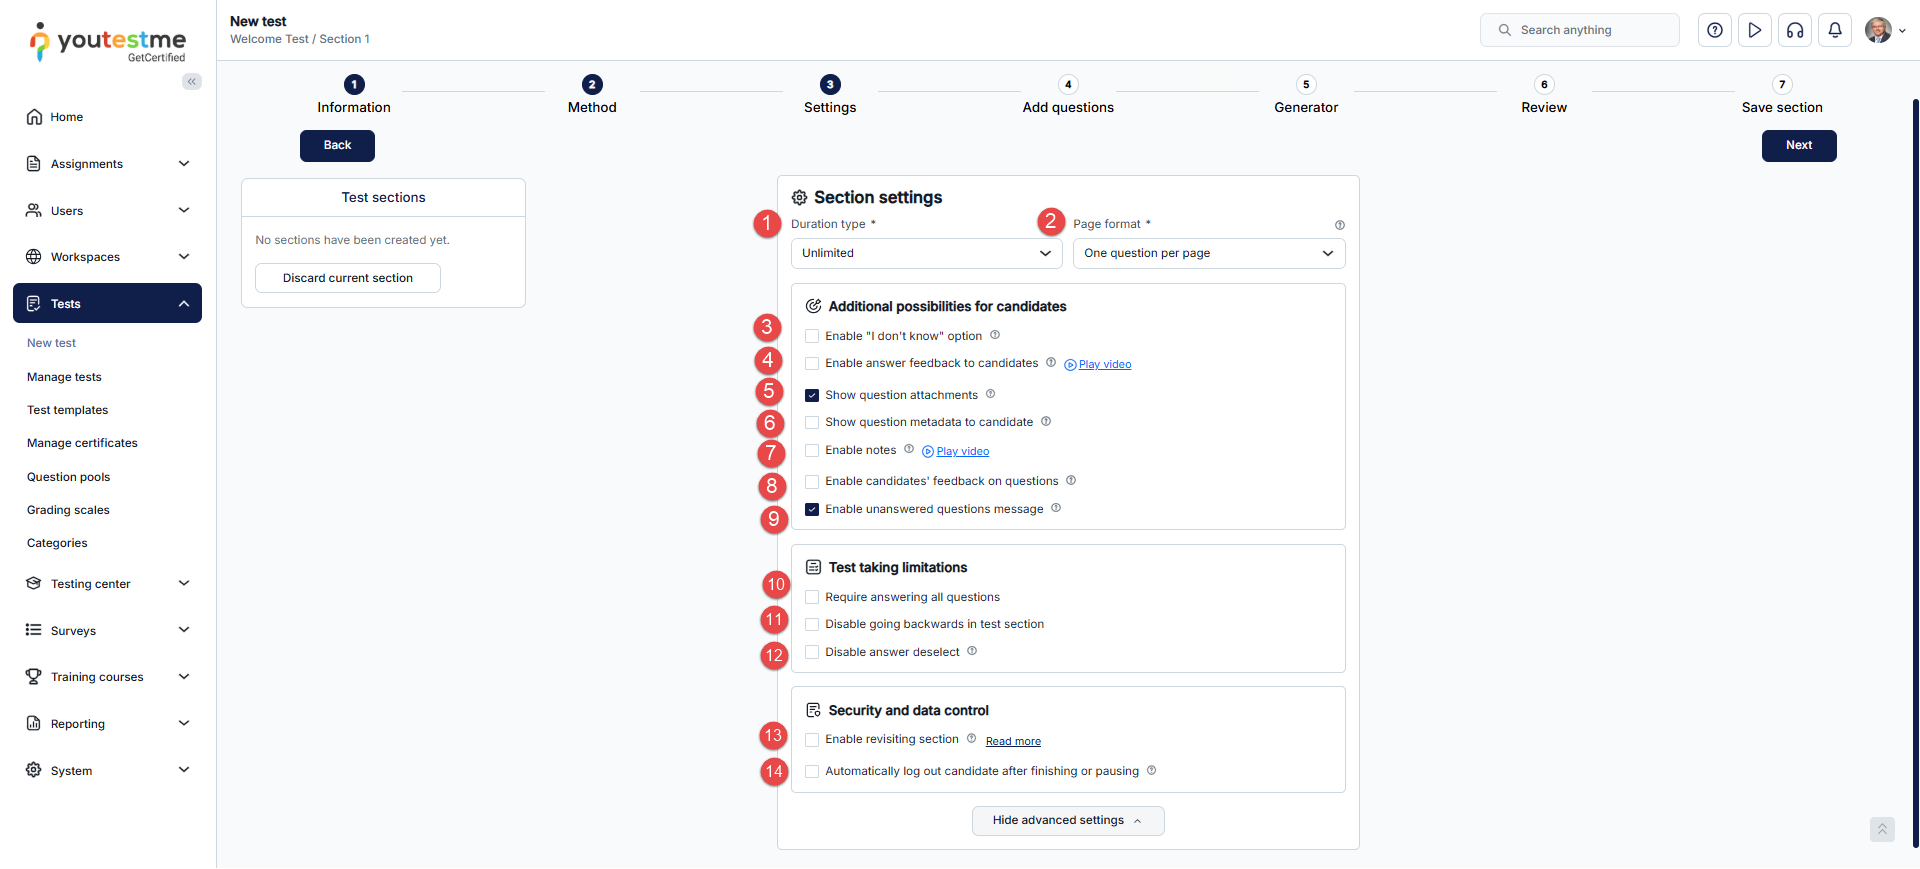
The image is cropped to show the section-level controls described above.
Adding questions
Follow the instructions for the creation method selected for the section.
Adding questions manually or from pools
For Pick questions from pools or create them manually, use the following controls at Add questions:
- Click Add new question to create a question.
- Click Import from pools to select existing questions.
- Review the questions before continuing. You can use new questions, questions from pools, or a combination of both.

Uploading a prepared test file
For Upload a ready-made test file, use the provided Excel template to prepare your file. The documented upload method supports .xls and .xlsx files.
- Obtain the Excel template and its instructions through the upload workflow.
- Complete the template with the test content.
- Upload the completed file.
- Review the imported questions and make any necessary changes.
For the documented upload procedure, see How to Choose the Right Test Creation Method.
Generating questions by difficulty
For Automated test generator selects questions – by difficulty, choose the pools and the number of questions to include from each difficulty level.
Note: To retain the points and penalties configured on individual questions, enable Allow different points in test versions before adding question pools.
- At Add questions, click Add question pool and select a pool.
- Specify how many Easy, Medium, and Hard questions to include from that pool.
- Repeat for any additional pools.
- Click Next to continue to Generator.
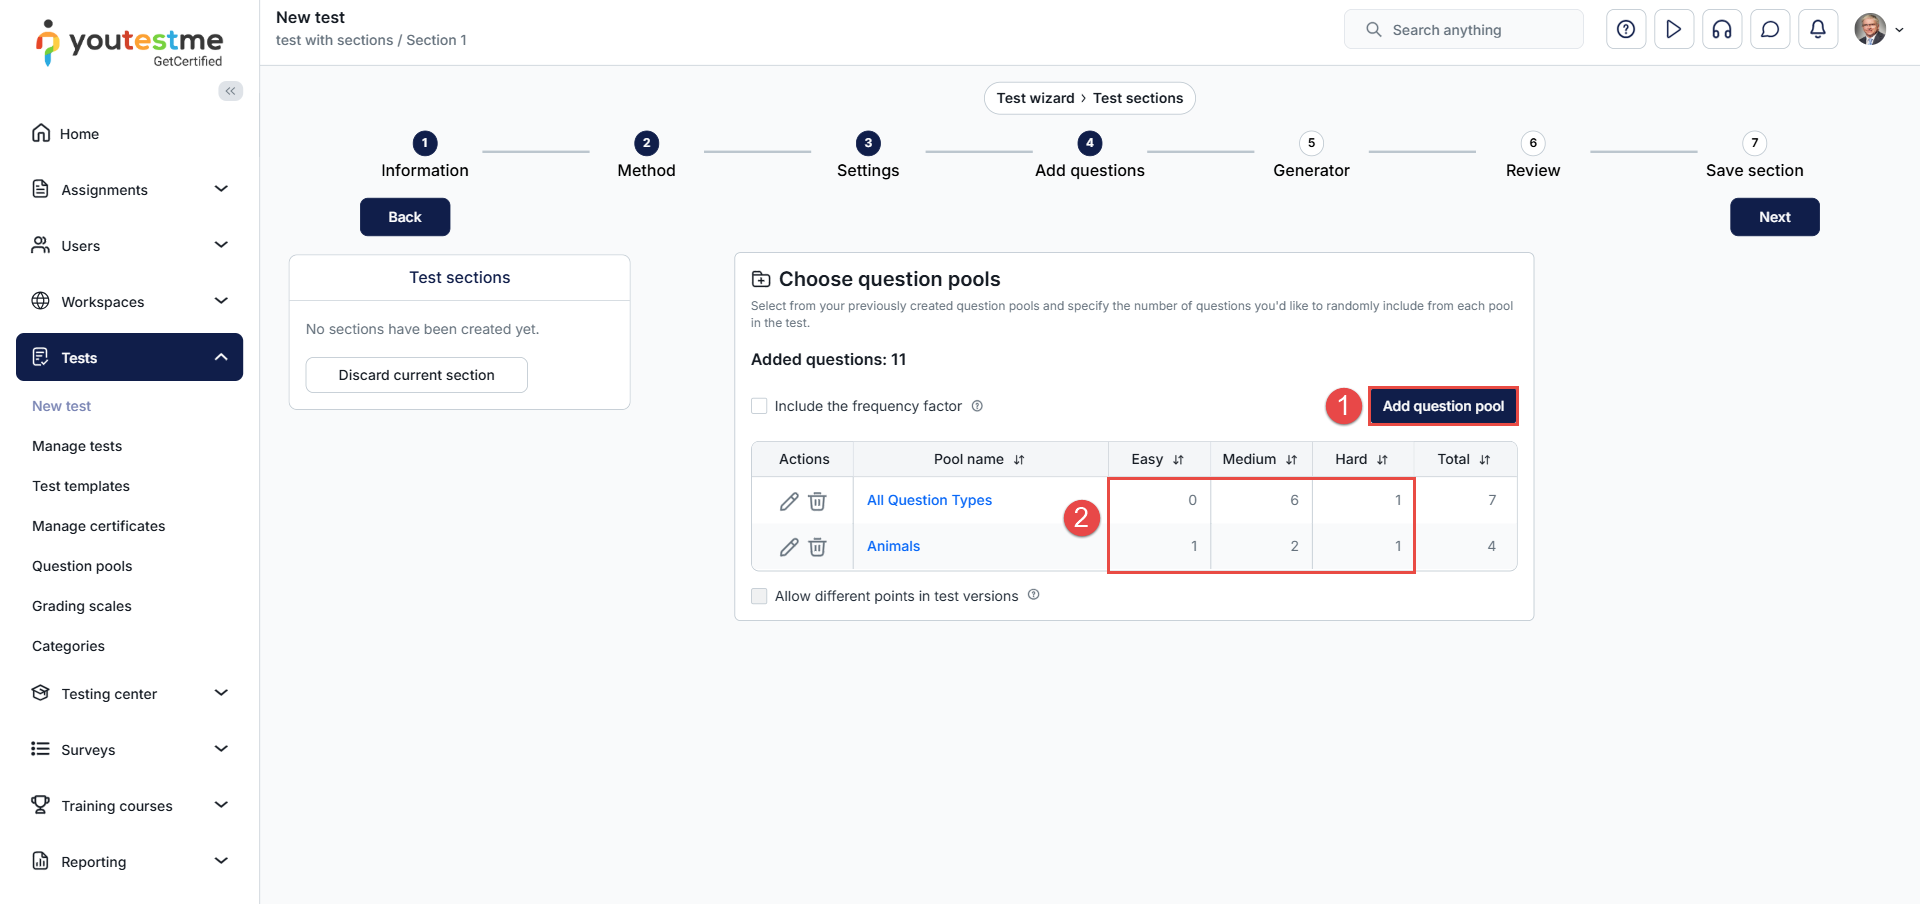
At Generator, configure Points and Penalty for each difficulty level when you are not using the individual questions’ scoring settings. A penalty is the number of points deducted for an incorrect answer.
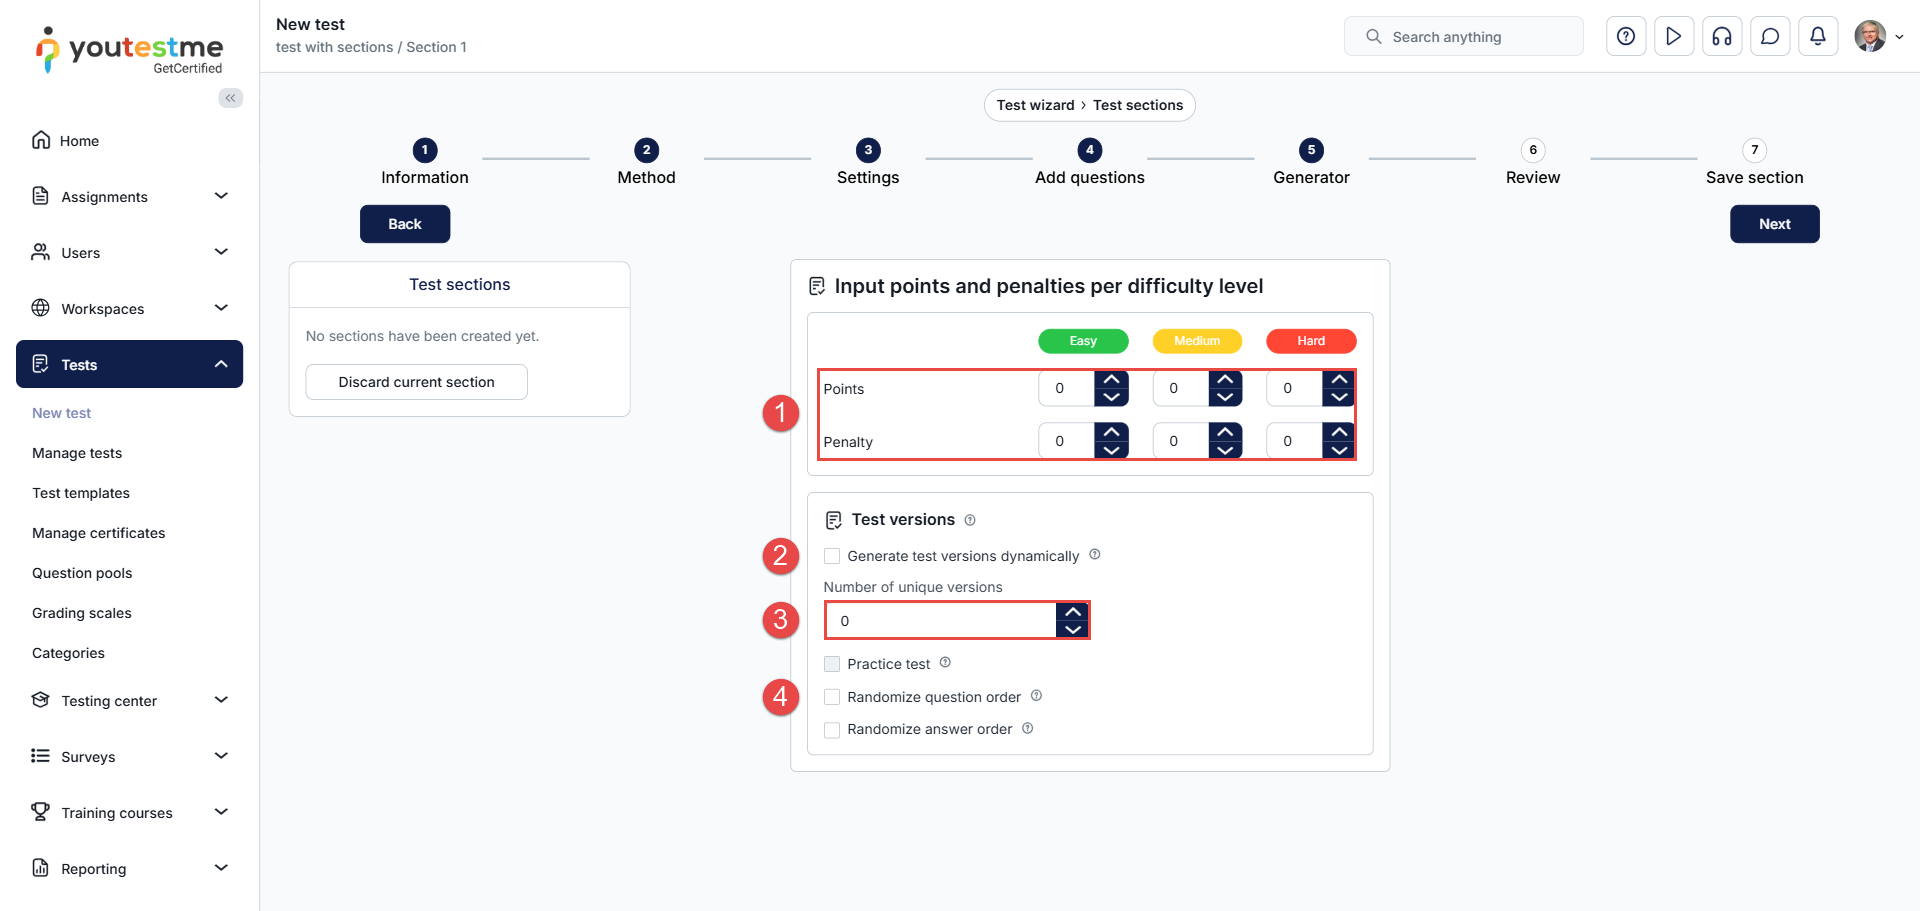
The screenshot identifies scoring fields (1), dynamic generation (2), the fixed version count (3), and question and answer randomization (4). The version options are explained below.
Generating questions by category
For Automated test generator selects questions – by category, create rules that determine which questions to include.
At Add questions, click New rule, then complete the following fields:
- Select the question pool.
- Enter the Number of questions, or select Include all questions from question pool to include all questions that meet the rule’s conditions.
- Configure Points per question and Penalty per question.
- Click Add new condition to define the category values the questions must match.
- Click Confirm to save the rule.
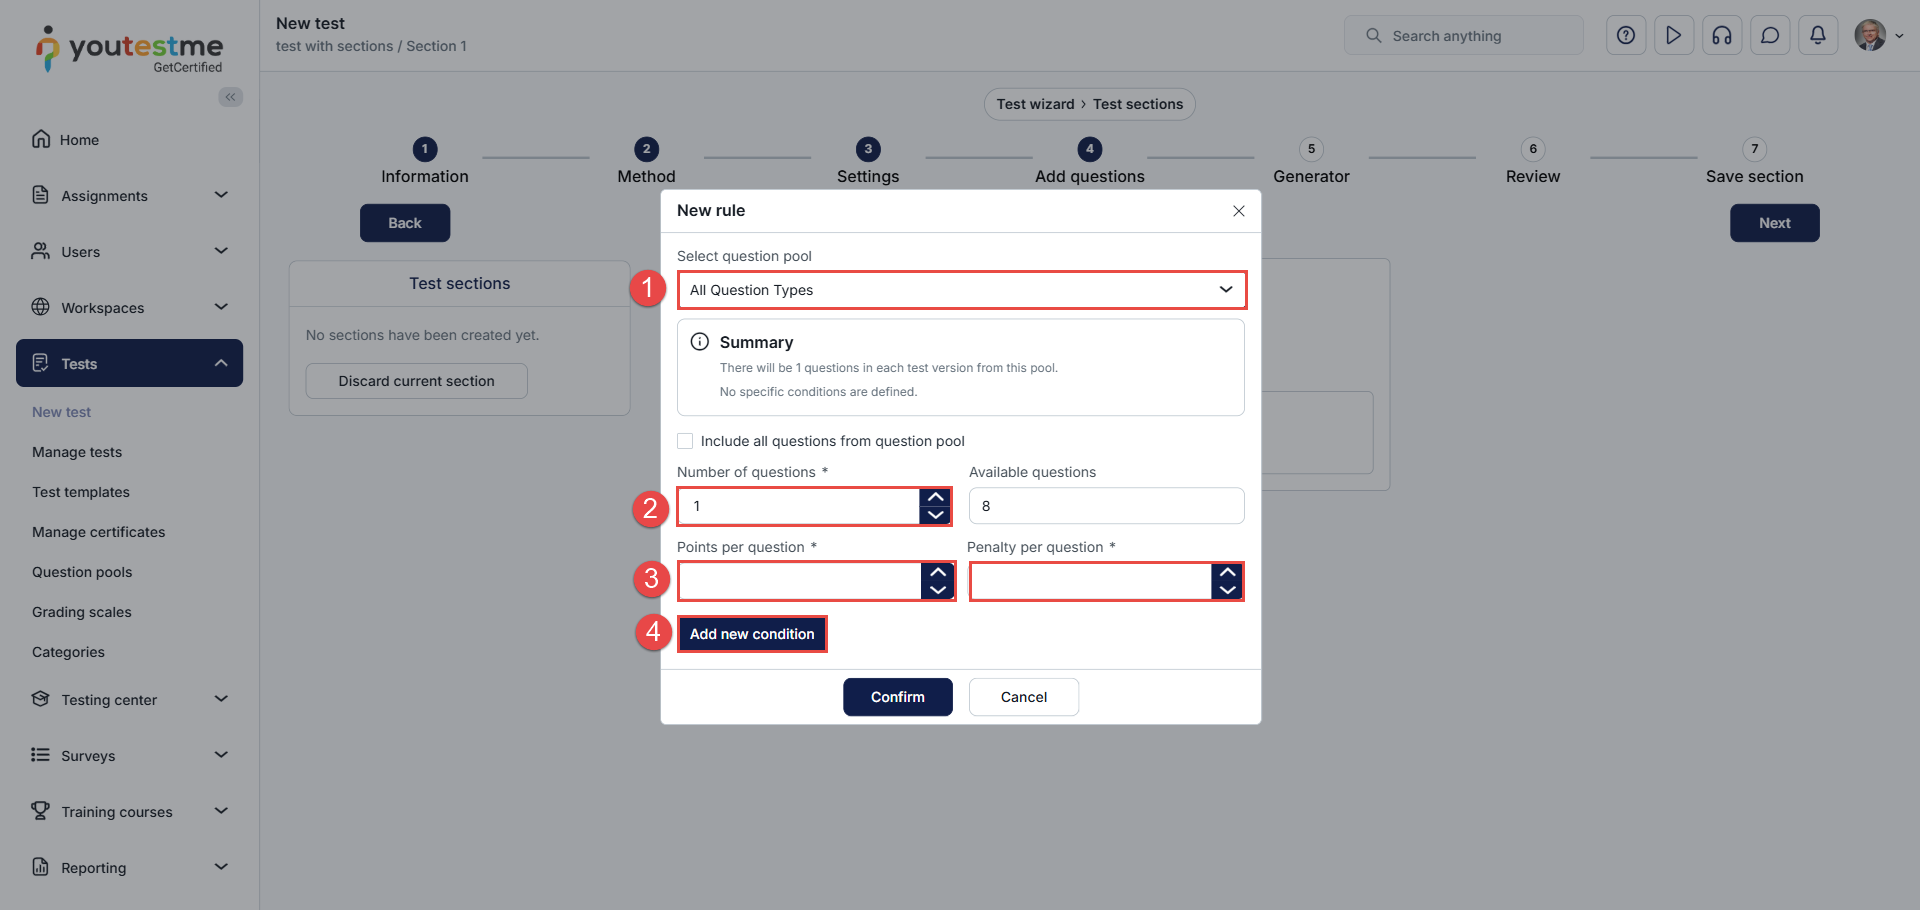
Add further rules as needed, then continue to Generator.
Configuring generated versions
For either generator method, use the following settings at Generator:
- Generate test versions dynamically – Enable this option to generate versions as candidates start. Leave it disabled to use a fixed set of versions.
- Number of unique versions – When dynamic generation is disabled, enter the number of versions to create.
- Randomize question order and Randomize answer order – Enable these options to vary the order of questions and answers.
Note: Dynamic generation and a fixed version count are alternative choices. You do not need to enable both.
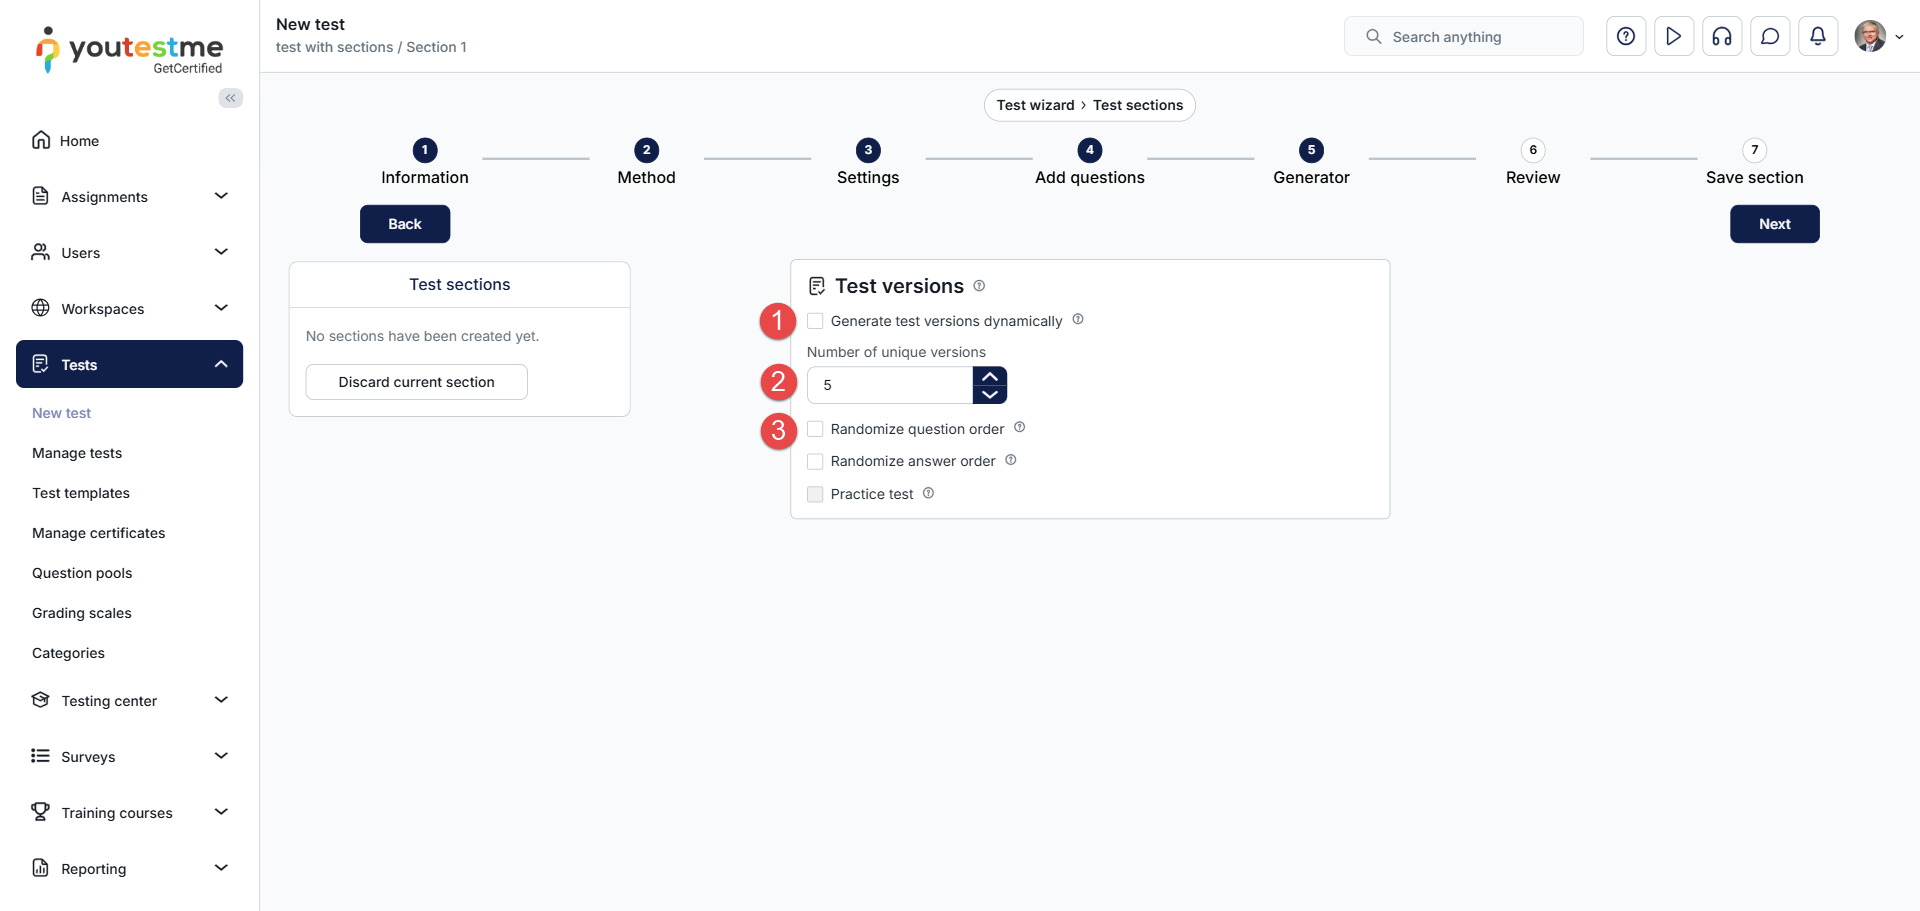
For more information, see How to Create a Generated Test.
Creating different section versions
A section can have multiple versions containing different sets of questions.
Creating section versions manually
- For a manually created section, open Add questions.
- Click Add more test versions.
- Add or import questions for each version.
For detailed instructions, see How to Create Multiple Test Versions.
Understanding section-version assignment
When assigning an existing section version, the system selects the least-used version within the current testing session. When several versions have equal usage, it randomly selects one of them.
This selection happens independently for each section.
Note: A candidate can receive the same version number in more than one section. Creating multiple versions does not guarantee different version numbers across sections.
Reviewing and saving sections
Reviewing the section
- At Review, check the section’s configuration and question summary.
- Click Back to make changes.
- When the section is ready, click Next to continue to Save section.
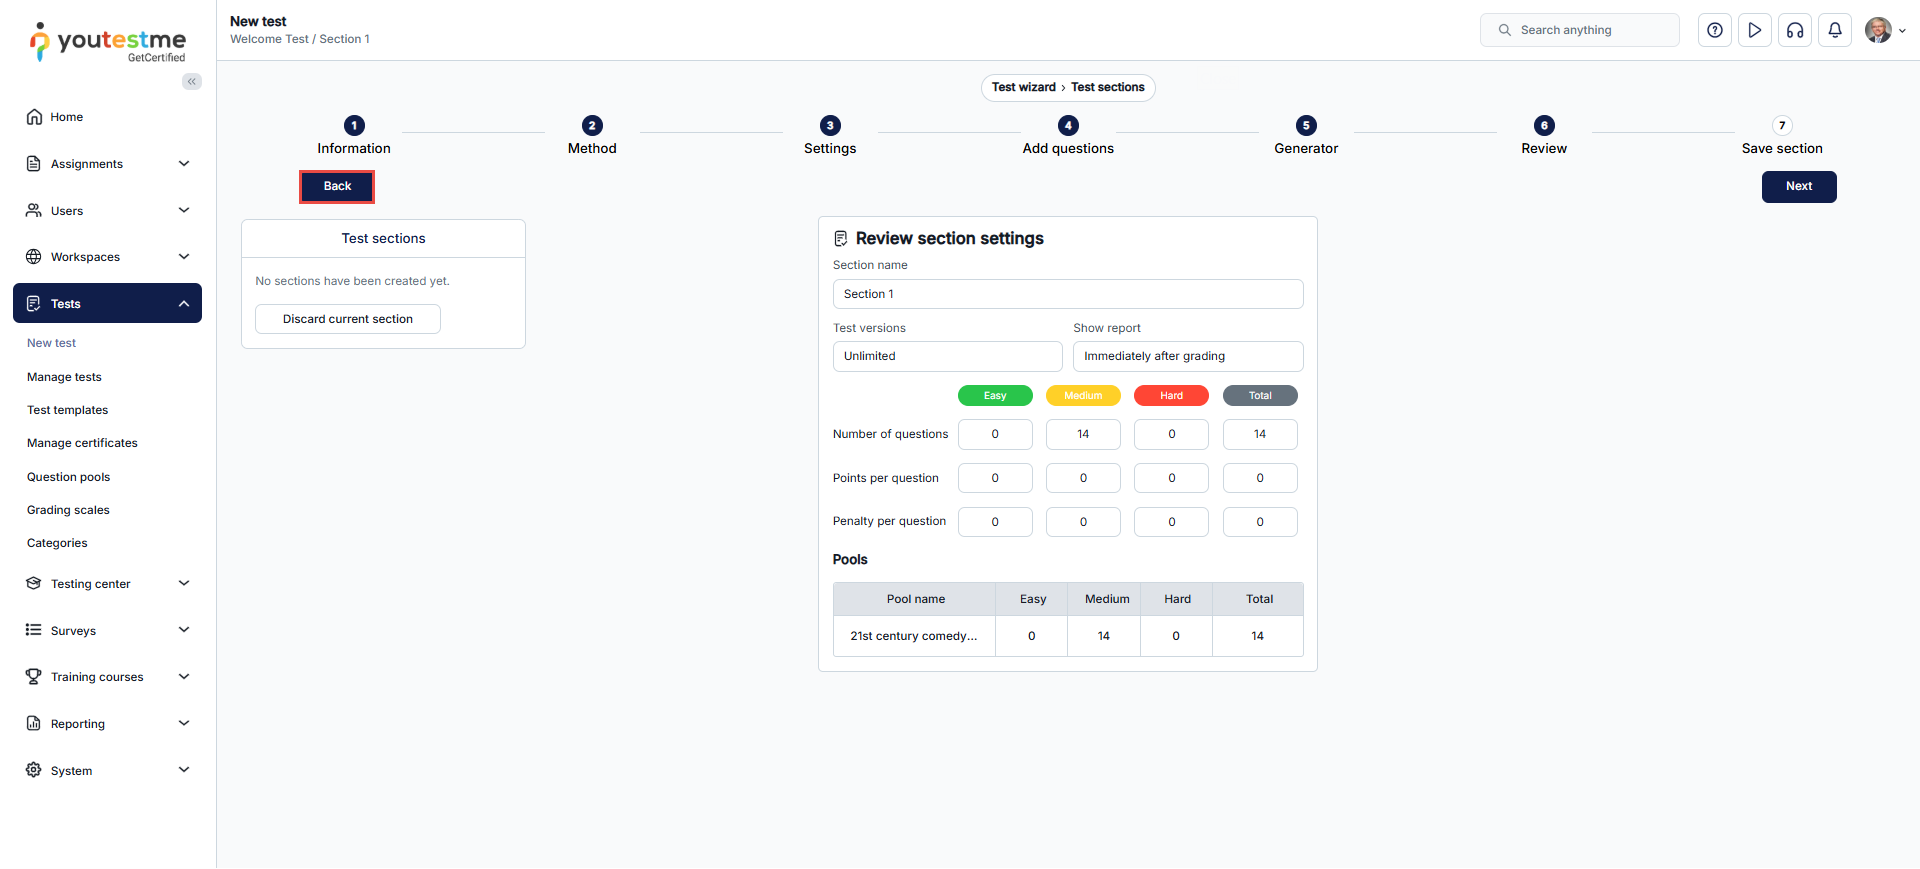
Saving the section or adding another
At Save section, choose one of the following actions:
- Add another section – Save this section and start creating another.
- Save and continue – Save this section and return to the main test wizard.
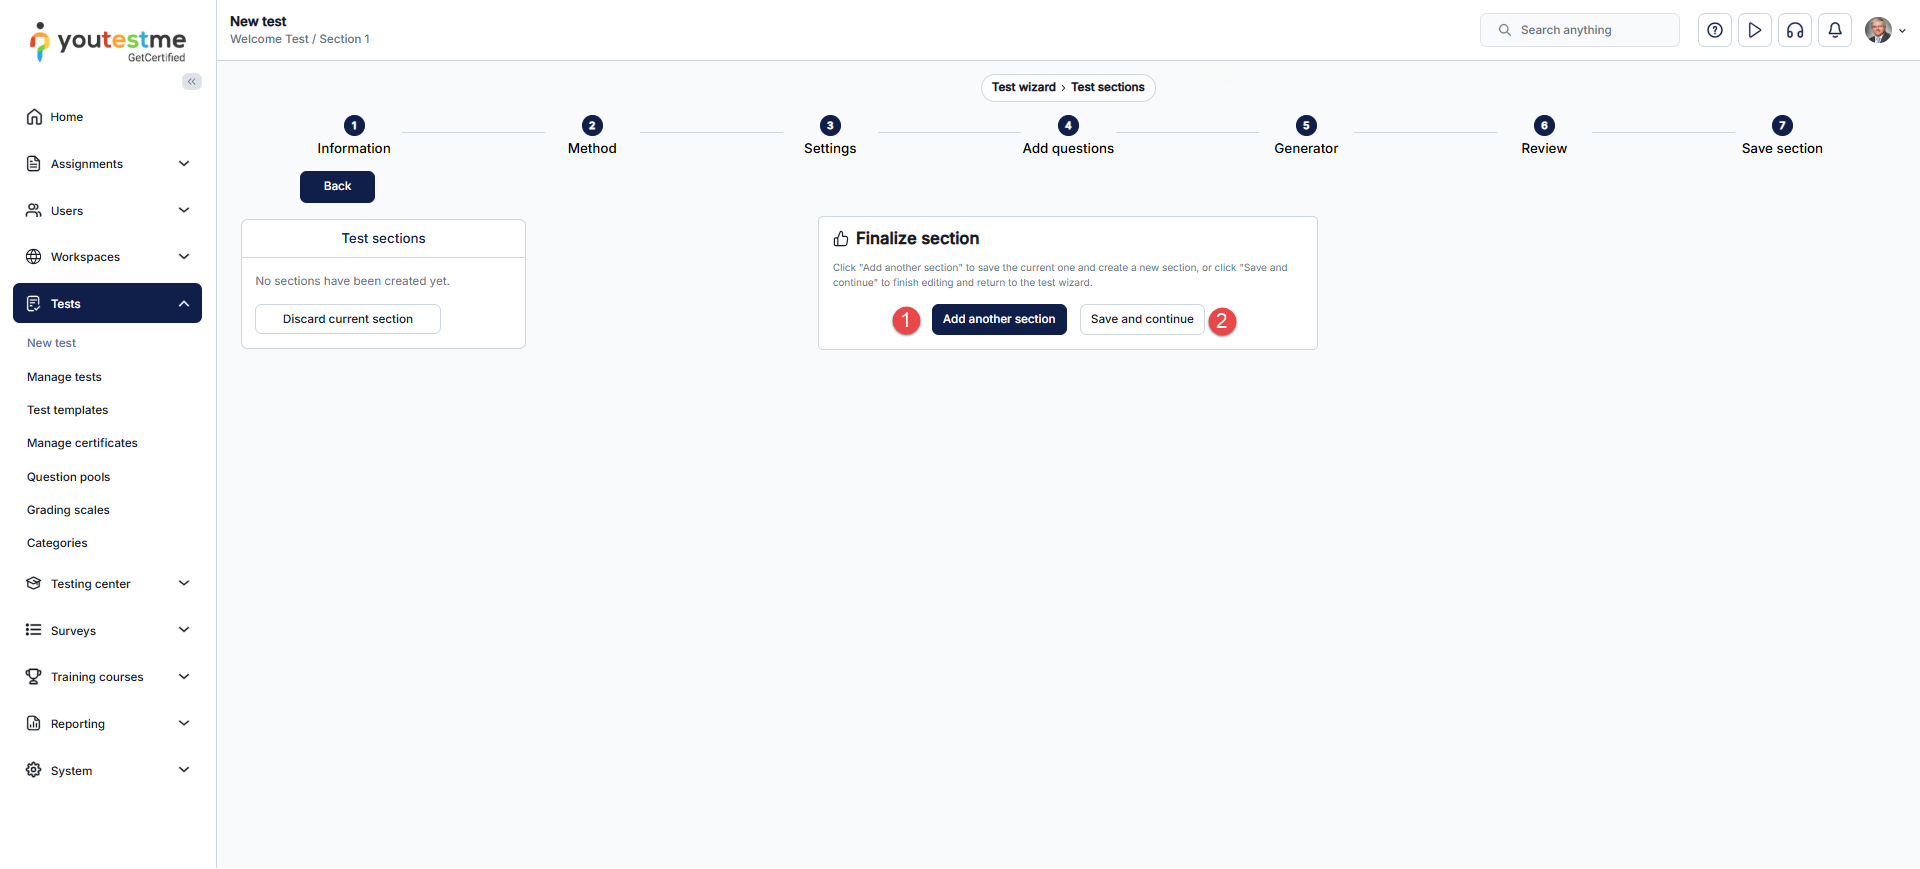
After adding all sections, continue to Grading in the main test wizard.
Defining passing requirements
A passing mark is the score a candidate must achieve to pass. You can configure a passing mark for the overall test and additional requirements for individual sections.
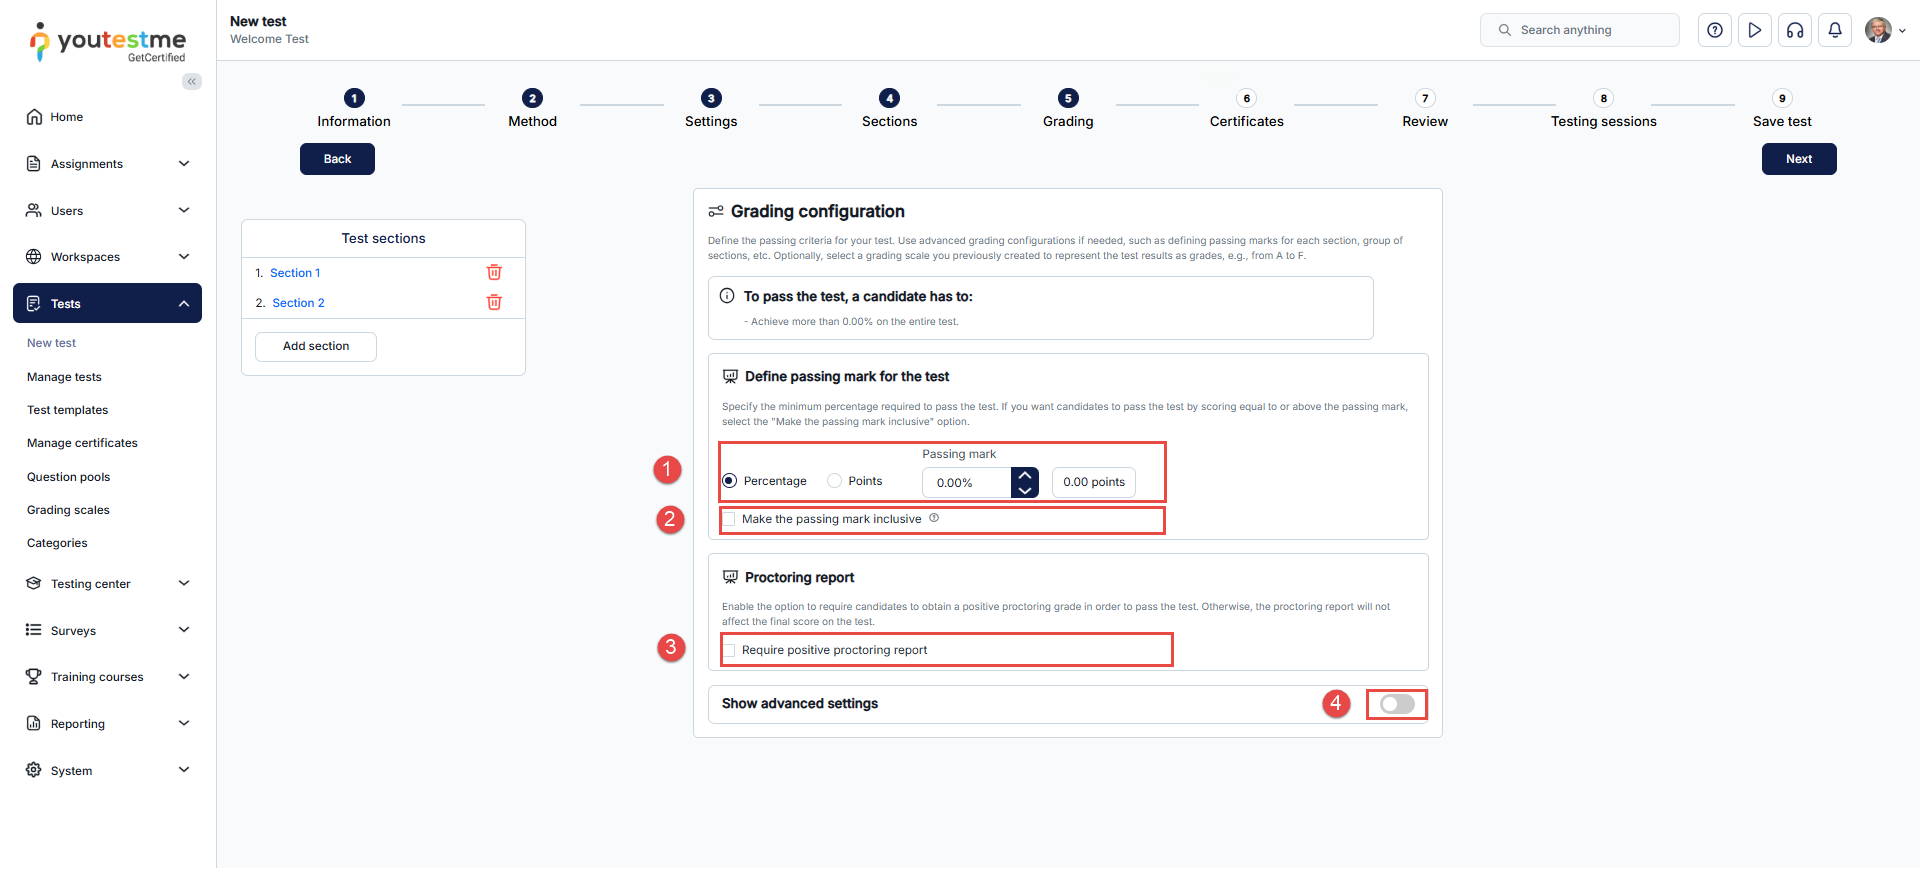
Setting the test passing mark
- At Grading, choose Percentage or Points and enter the Passing mark.
- Enable Make the passing mark inclusive when a score equal to the passing mark should count as a pass.
- For a proctored test, enable Require positive proctoring report when a positive proctoring grade must be an additional passing requirement.
- Open Show advanced settings to configure section passing requirements and other grading options.
For example, with an inclusive passing mark of 70%, a candidate meets that score requirement with 70% or higher. Without an inclusive passing mark, the score must be higher than the threshold. Other configured passing requirements still apply.
Setting section passing requirements
In the advanced grading settings, locate Define passing marks for sections.
- Click the pencil icon beside the section to edit its passing requirements.
- Set Passing required when candidates must pass that section to pass the overall test.
- Enter the section’s Passing mark.
- Configure Inclusive passing mark to determine whether a score equal to the threshold is sufficient.
- Select an optional Grading scale to display the section result as a grade.
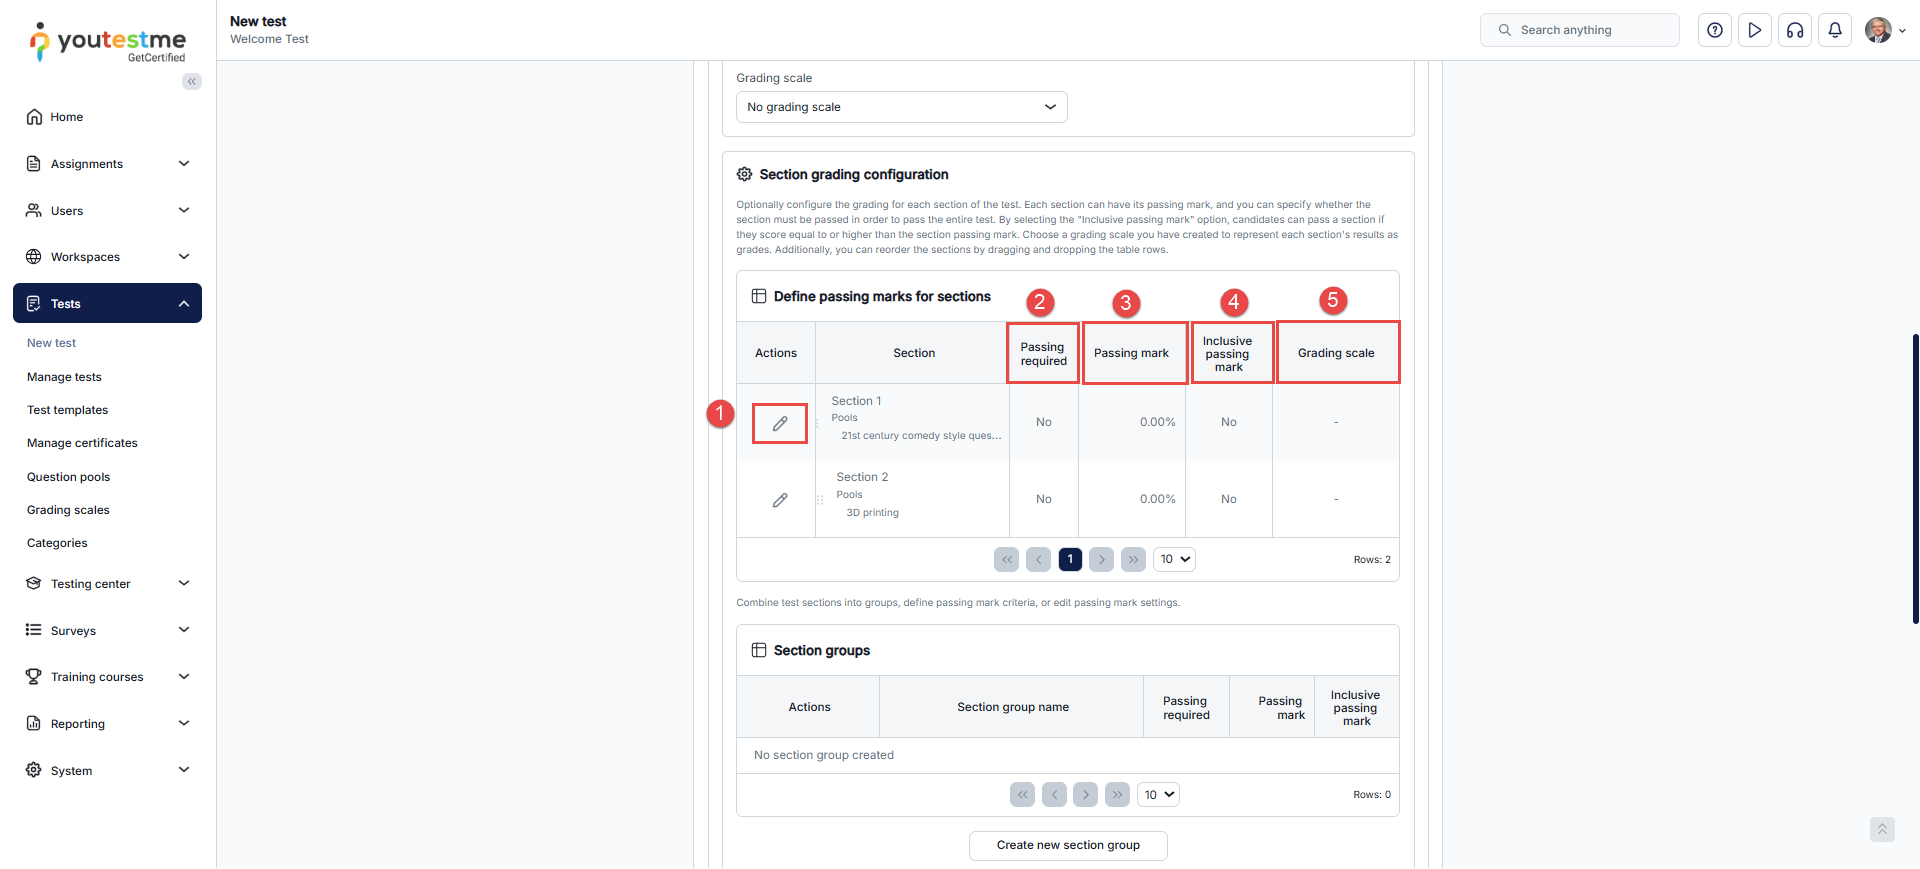
Note: You can change section order by dragging and dropping the table rows.
Configuring additional grading options
The advanced grading settings also include the following options:
- Grading scale – Represent scores using a previously created grading scale, such as letter grades.
- Section groups – Group sections and configure passing requirements for the group.
- Question attributes reports – Define descriptive passing criteria for the subject areas represented by question pools.
- Question property reports – Use dropdown custom question properties for reporting and, optionally, passing requirements.
Completing test setup
Adding certificates
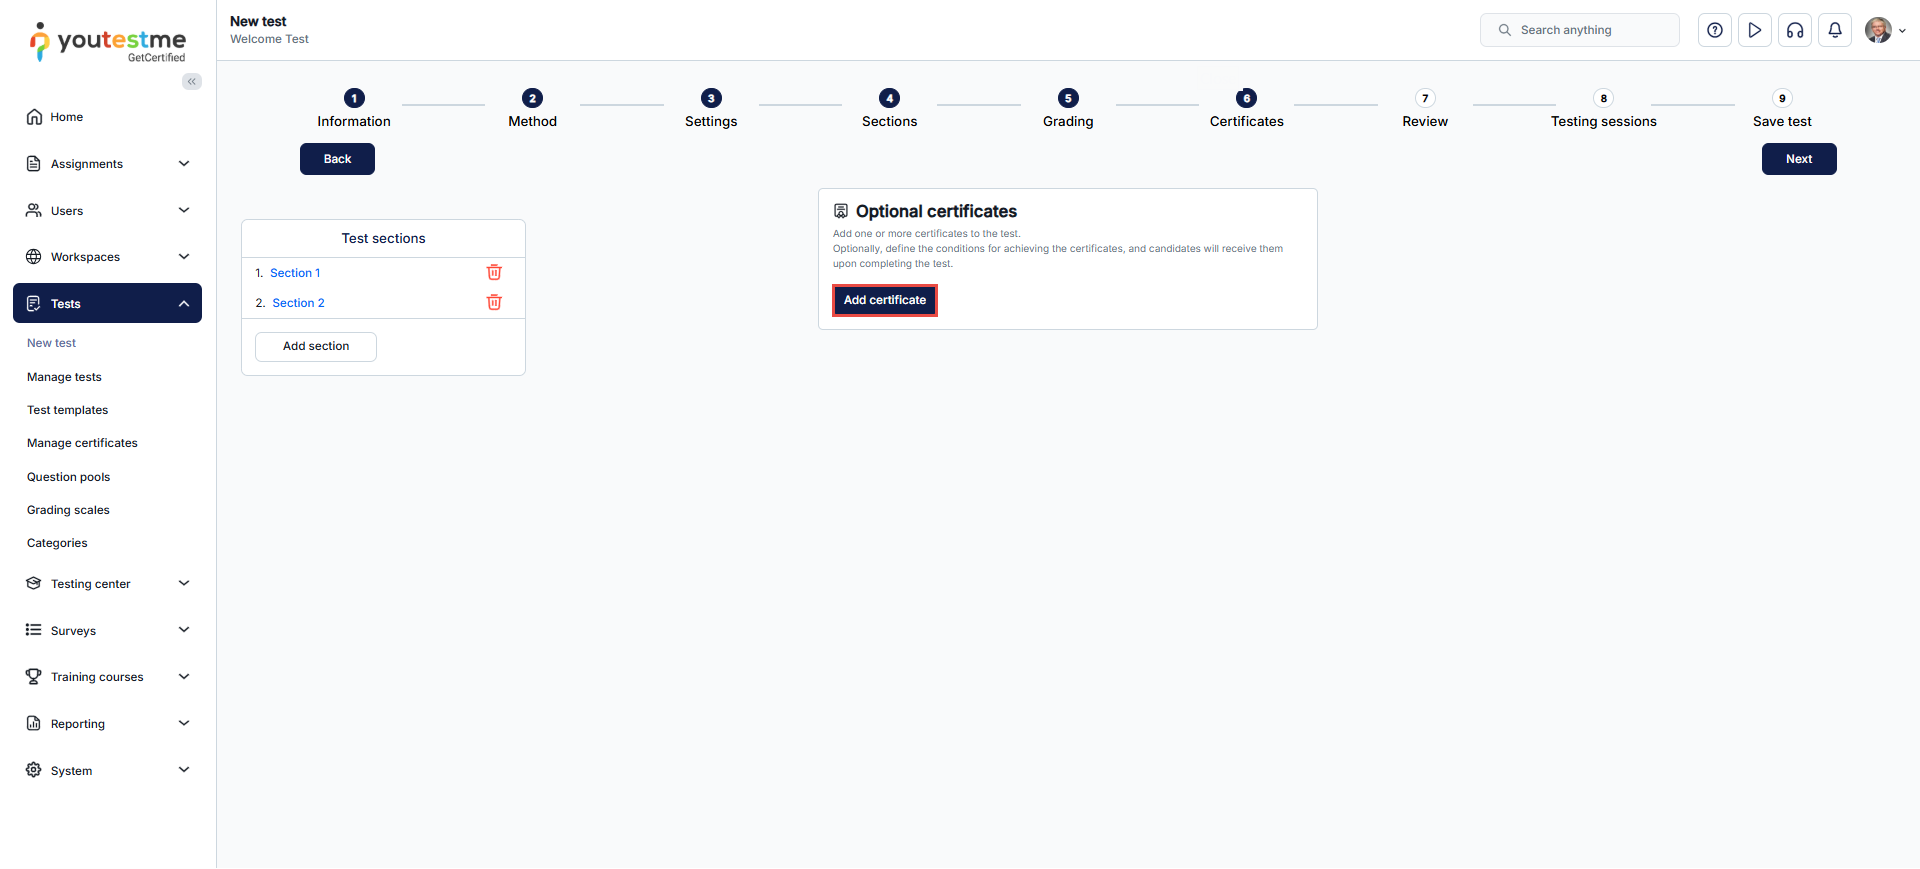
- At Certificates, click Add certificate when the test should include a certificate.
- Click Next to continue after configuring certificates, or to continue without adding one.
This step is optional. Certificates can also be added after the test is published. For instructions, see How to Create and Manage Certificates.
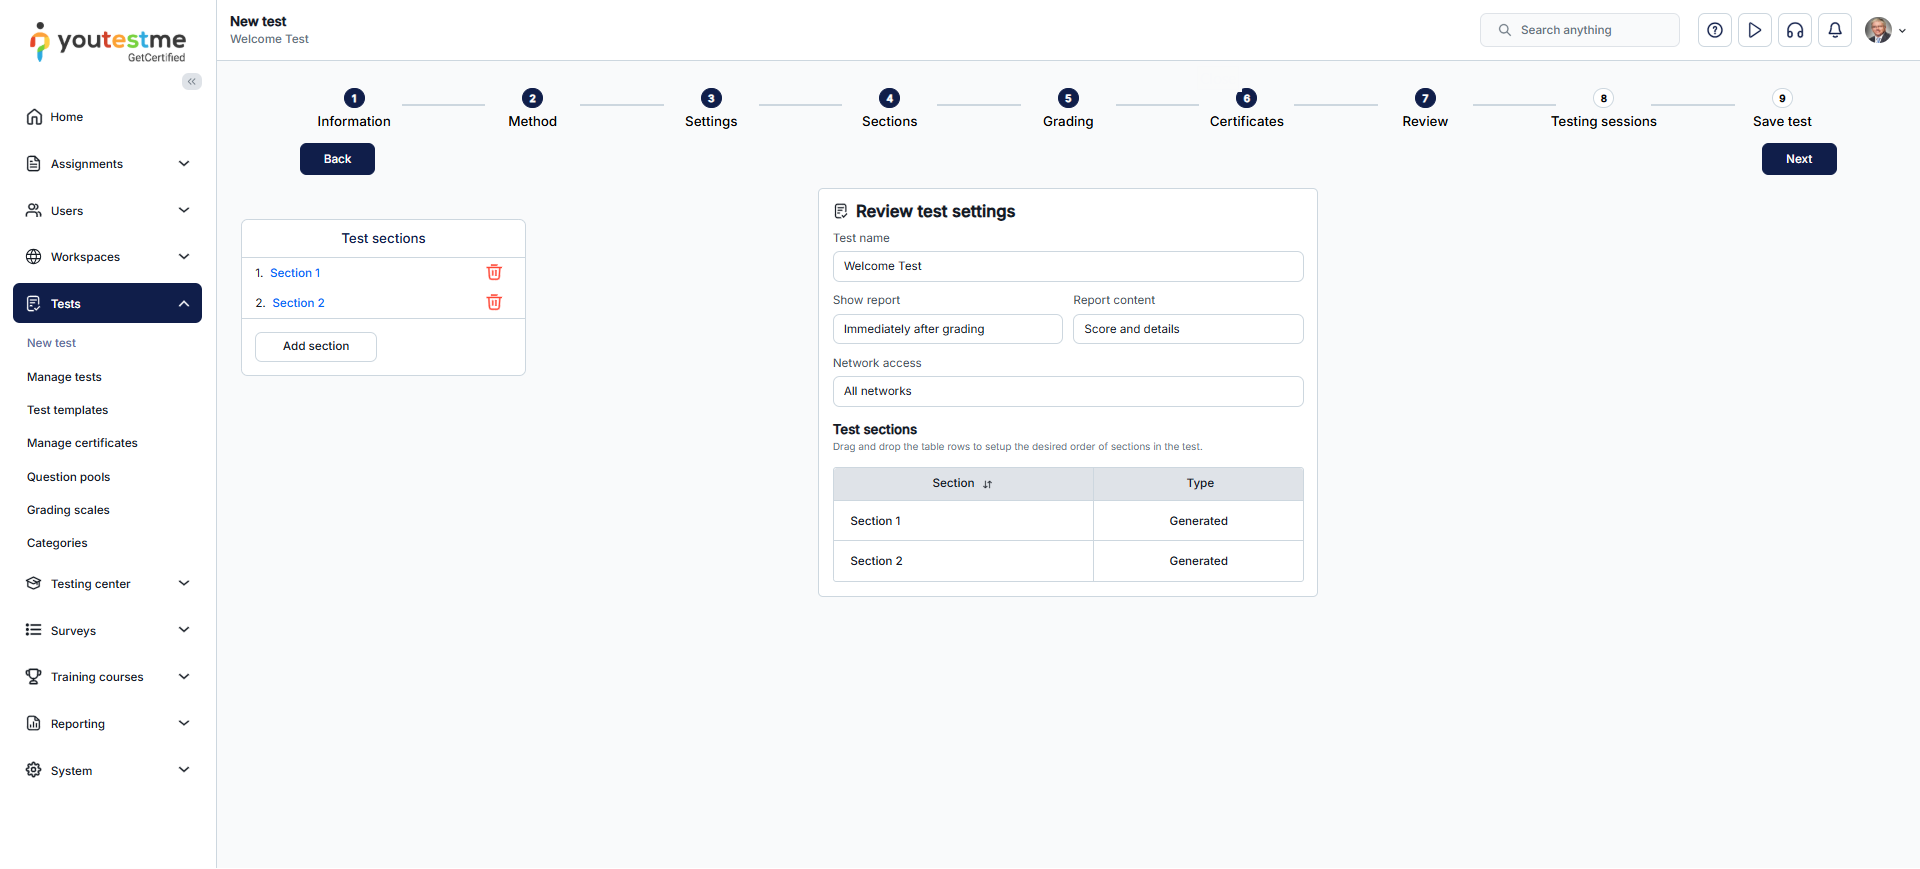
Reviewing the test
- At Review, check the overall test settings and section list.
- Confirm that the sections are in the intended order.
- Return to earlier steps to make changes, or click Next to continue.
Creating testing sessions
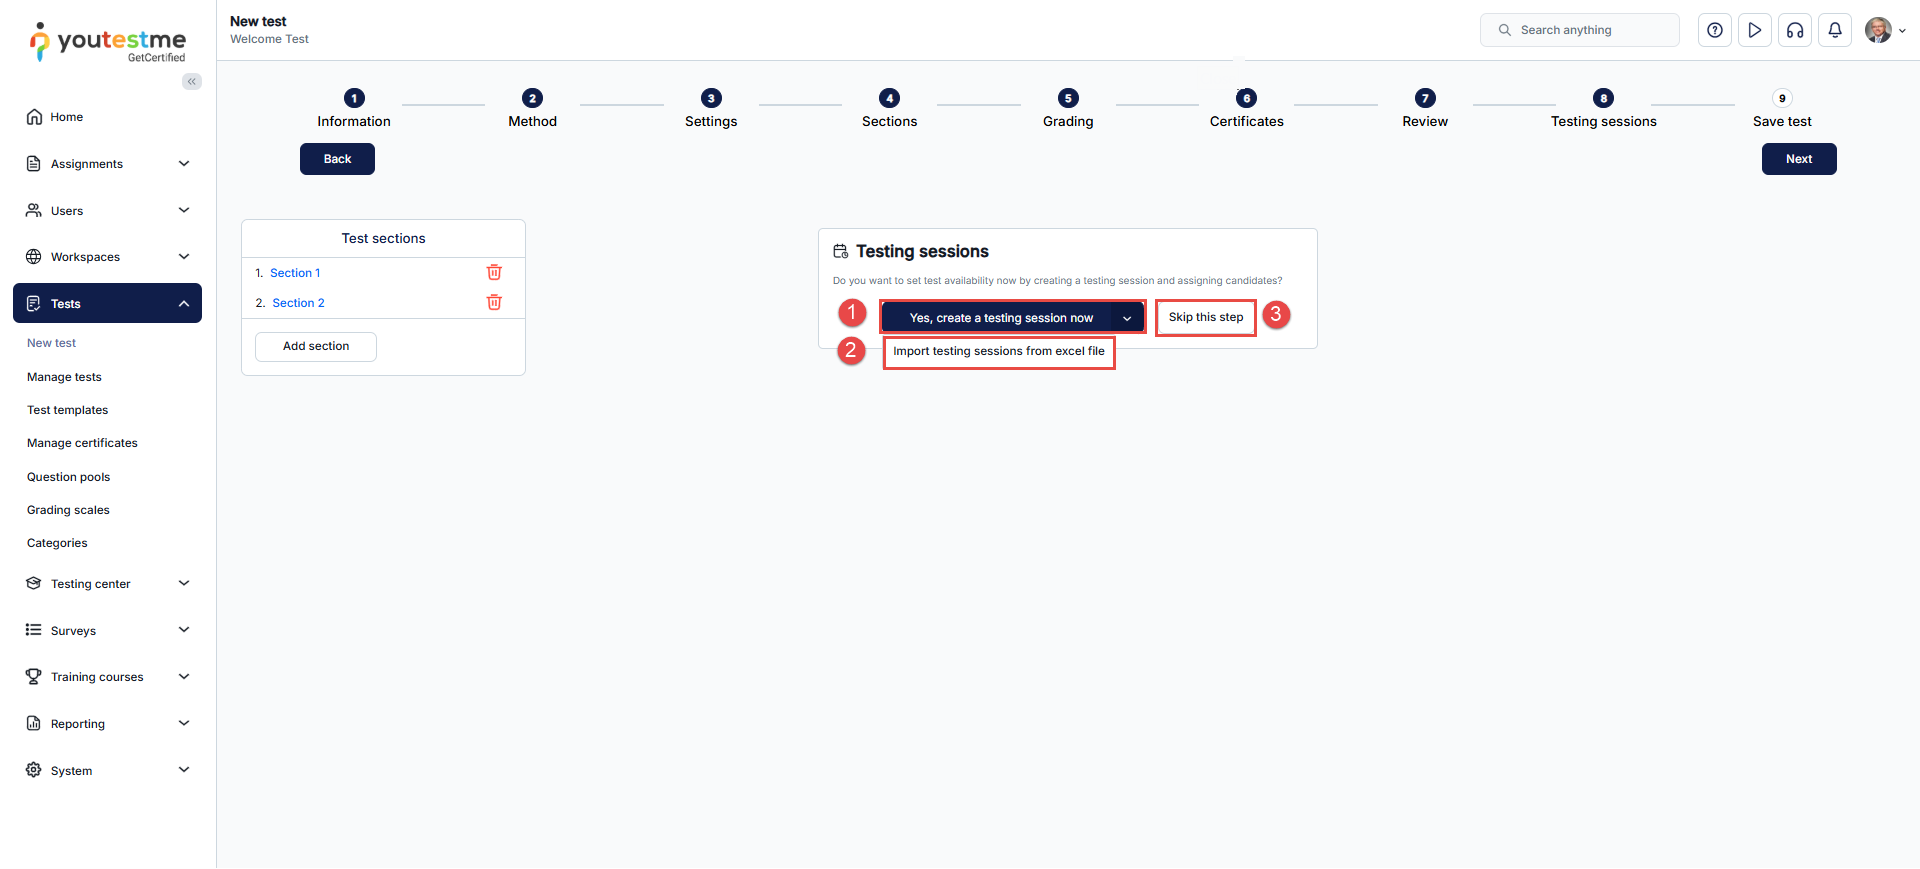
A testing session is used to configure test availability and assign candidates.
At Testing sessions, choose one of the following actions:
- Yes, create a testing session now – Configure a testing session during test creation.
- Import testing sessions from excel file – Import testing sessions from an Excel file.
- Skip this step – Finish creating the test and configure its sessions later.
For session setup and candidate assignment instructions, see How to Create a Testing Session.
Saving the test
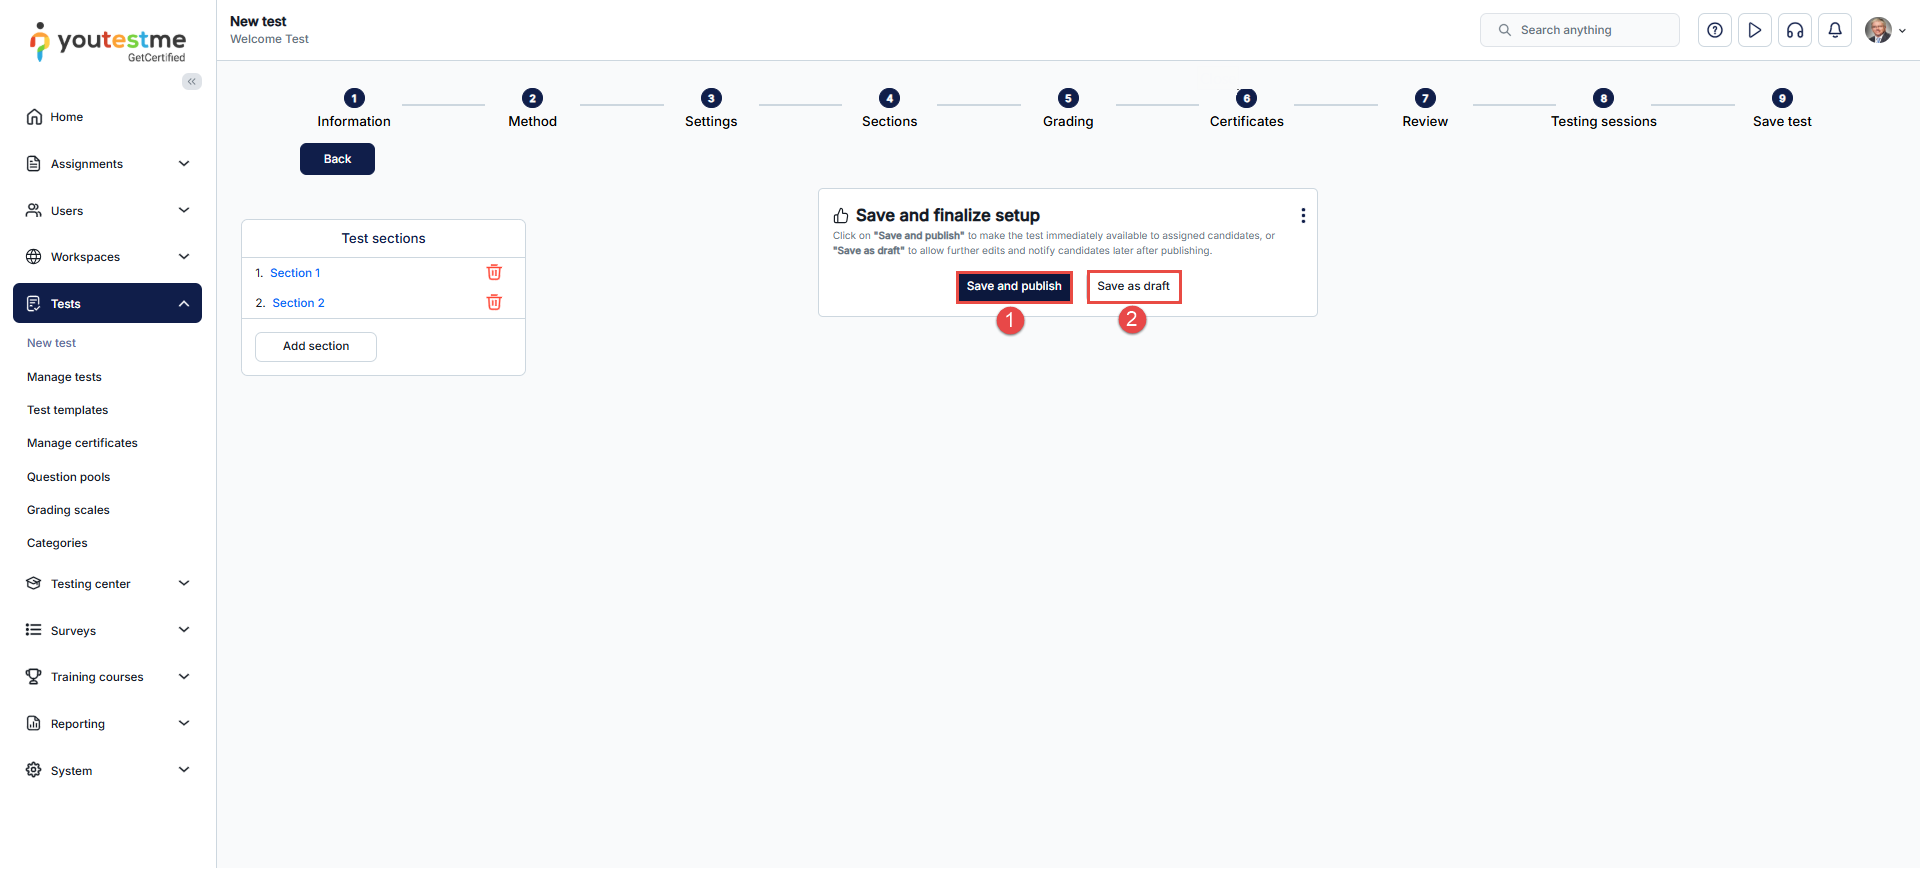
At Save test, choose one of the following actions:
- Save and publish – Publish the test when it is ready. Candidate access depends on the configured testing session.
- Save as draft – Save the test without publishing it. It remains unavailable to candidates until it is published.
Managing the saved test
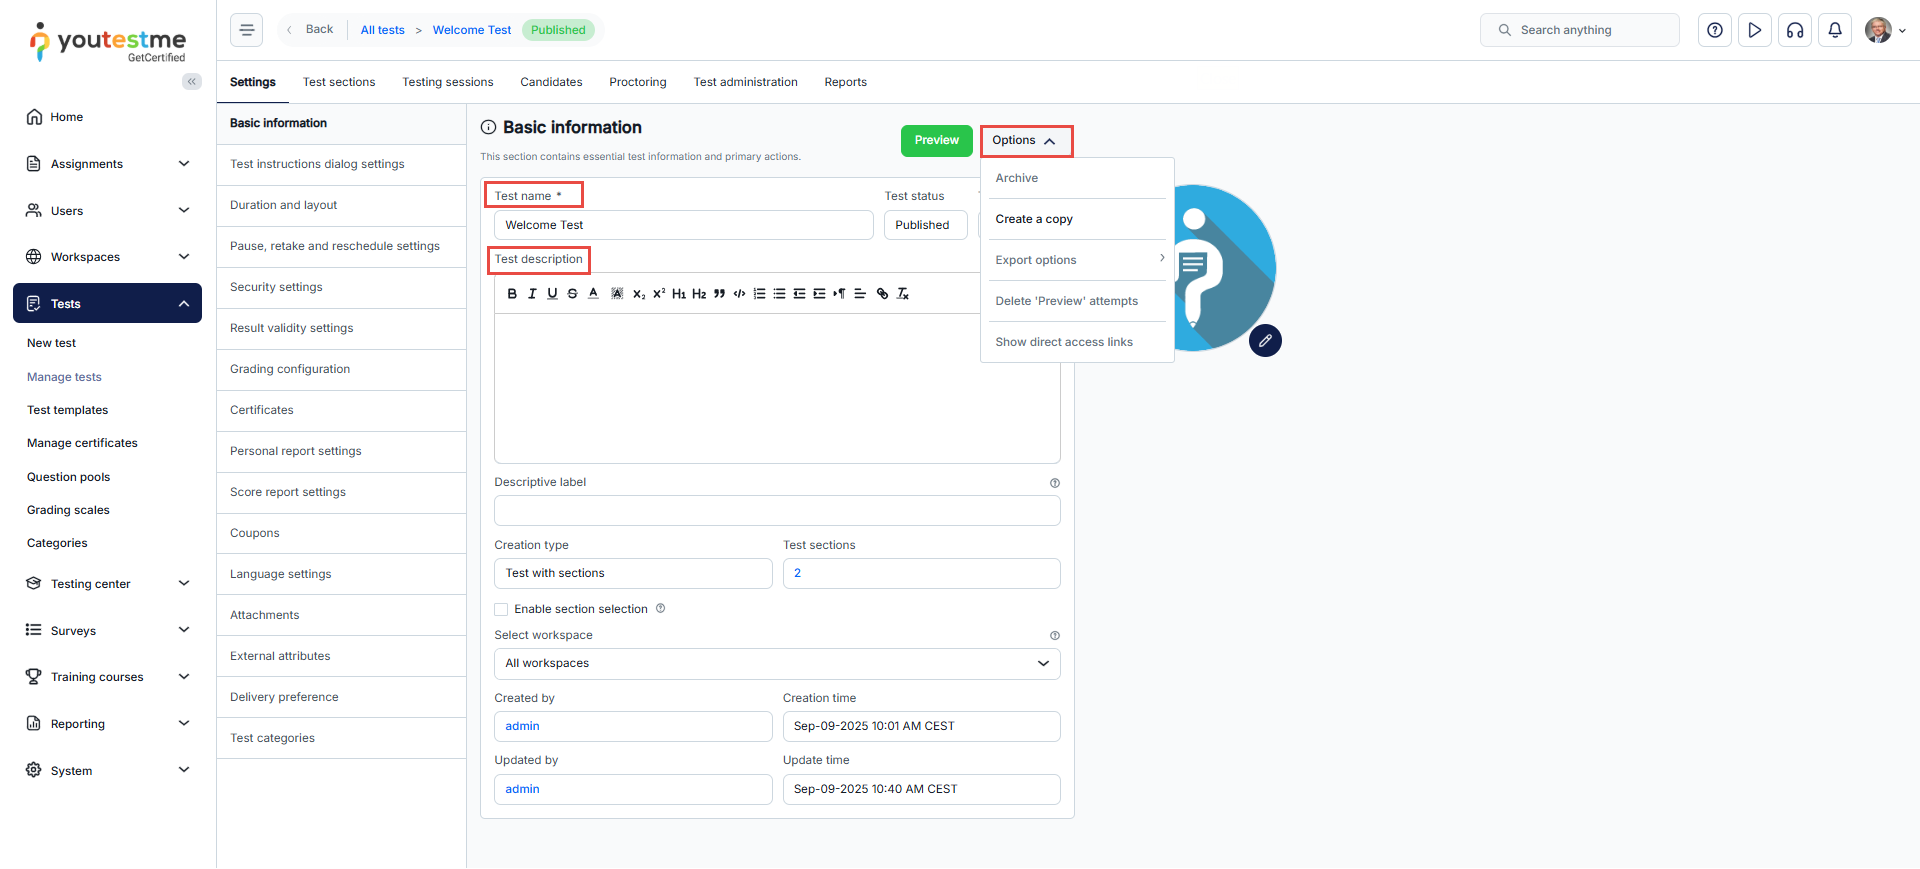
After saving, use Manage tests to continue managing the test, its sessions, and candidate assignments.
You can update the test name and description. The test’s Options menu also provides actions such as archiving, exporting, and creating a copy.
For more information, see How to Edit Published Test Settings.
Reviewing the candidate’s experience
The candidate’s navigation depends on the test and section settings you configured.
Starting a section
- On Section introduction, select an available section.
- Review the displayed section information and instructions.
- Click Start section.
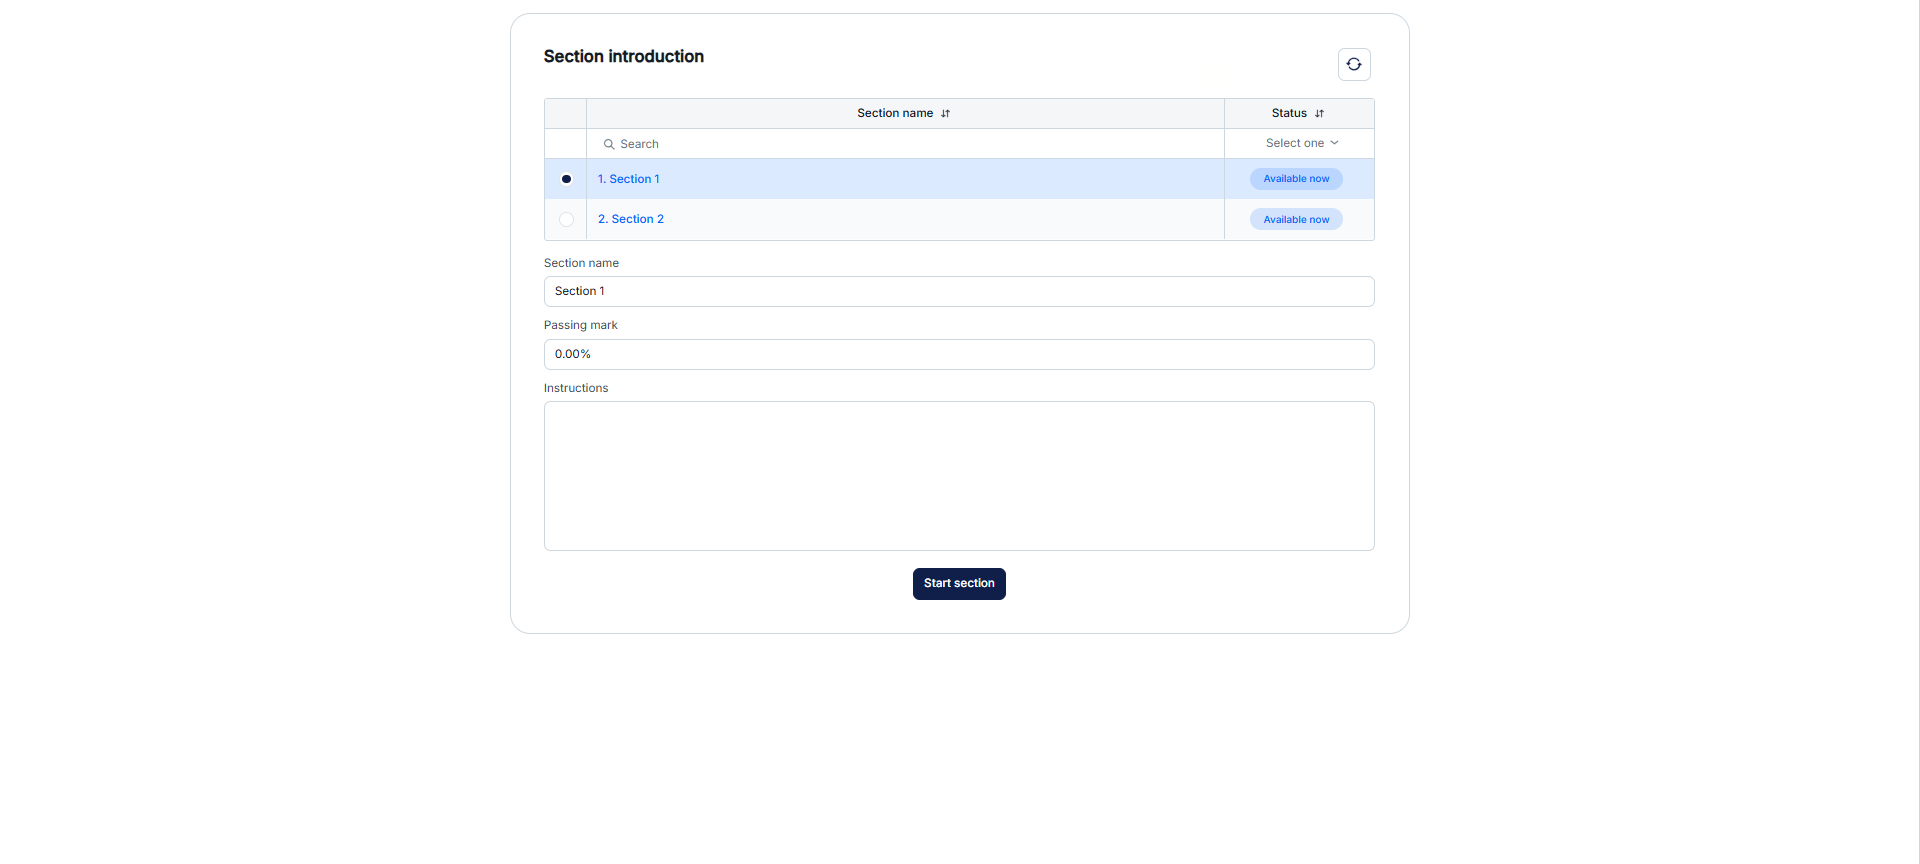
When Enforce section order is enabled, candidates must follow the configured order. Otherwise, their navigation depends on the section settings.
Answering questions and finishing a section
- Answer the section’s questions within the configured time limit, when a limit applies.
- When available, use Finish section to submit the current section.
- Continue with another available section.
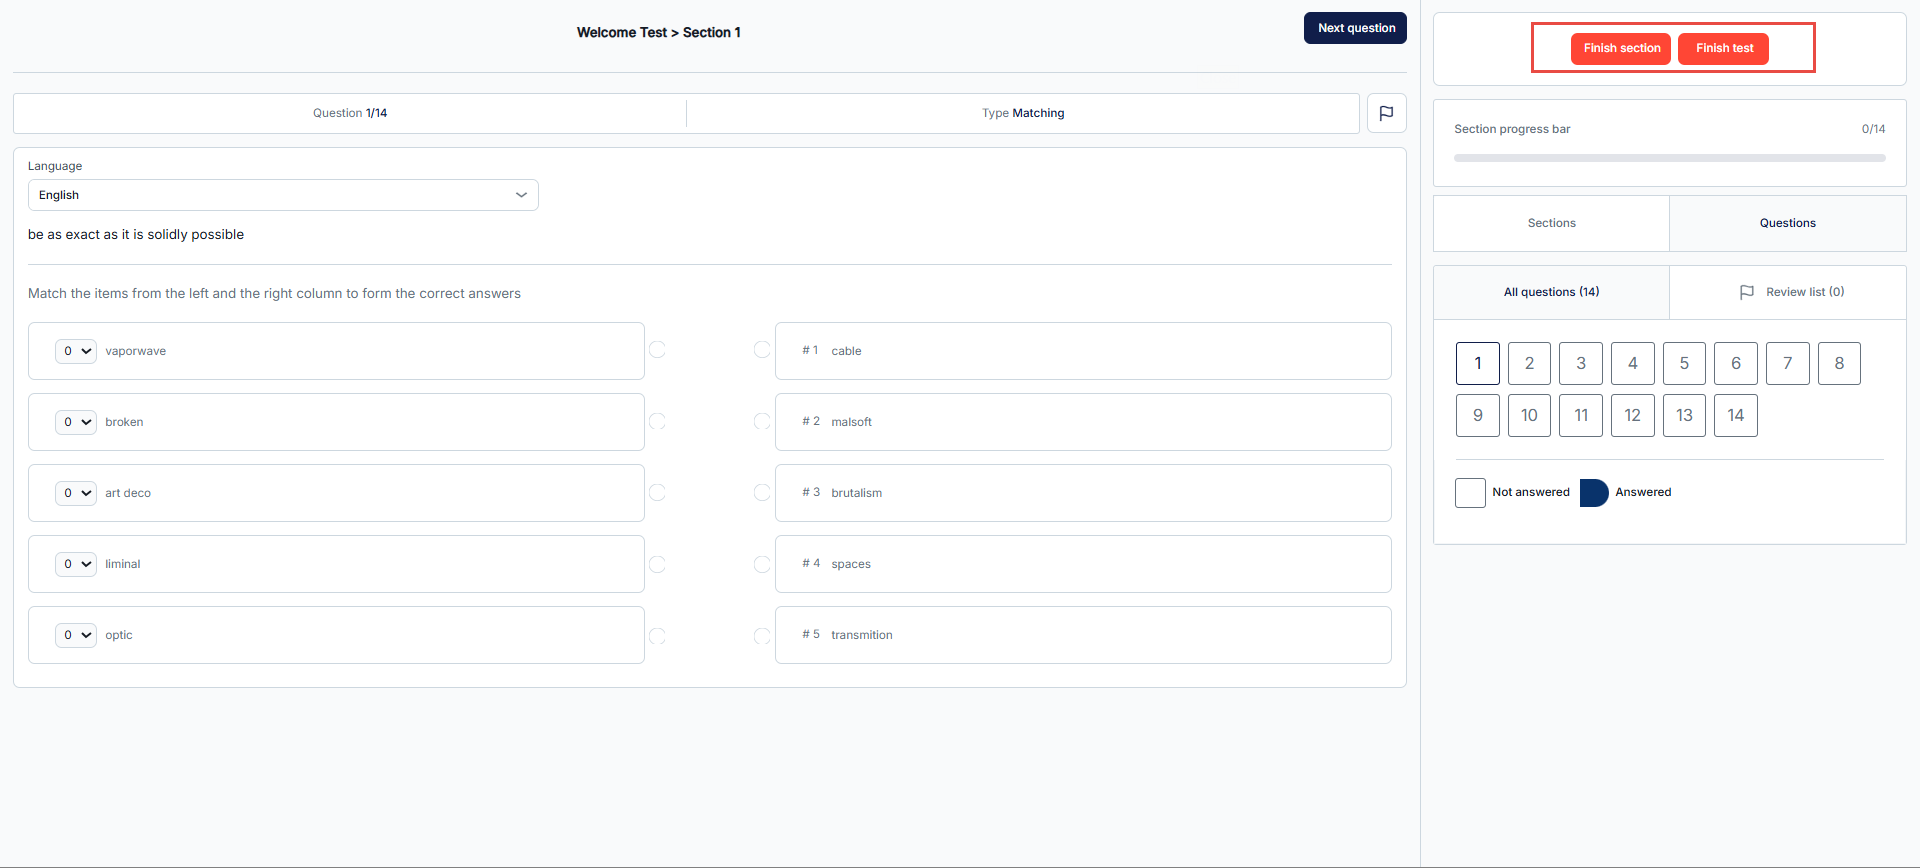
Note: Finish section submits the current section. Finish test submits the entire test. These buttons perform different actions.
When Enable revisiting section is enabled, candidates can return to the section before submitting it with Finish section.
Controlling the section submission button
An additional system module can hide Finish section for sections where revisiting is allowed. Ask your system administrator to review the related setting under System > System preferences > Additional modules setup.
Note: Confirm the required module before changing any settings. Hiding Finish section is different from hiding the answered-question counts in the final test dialog.

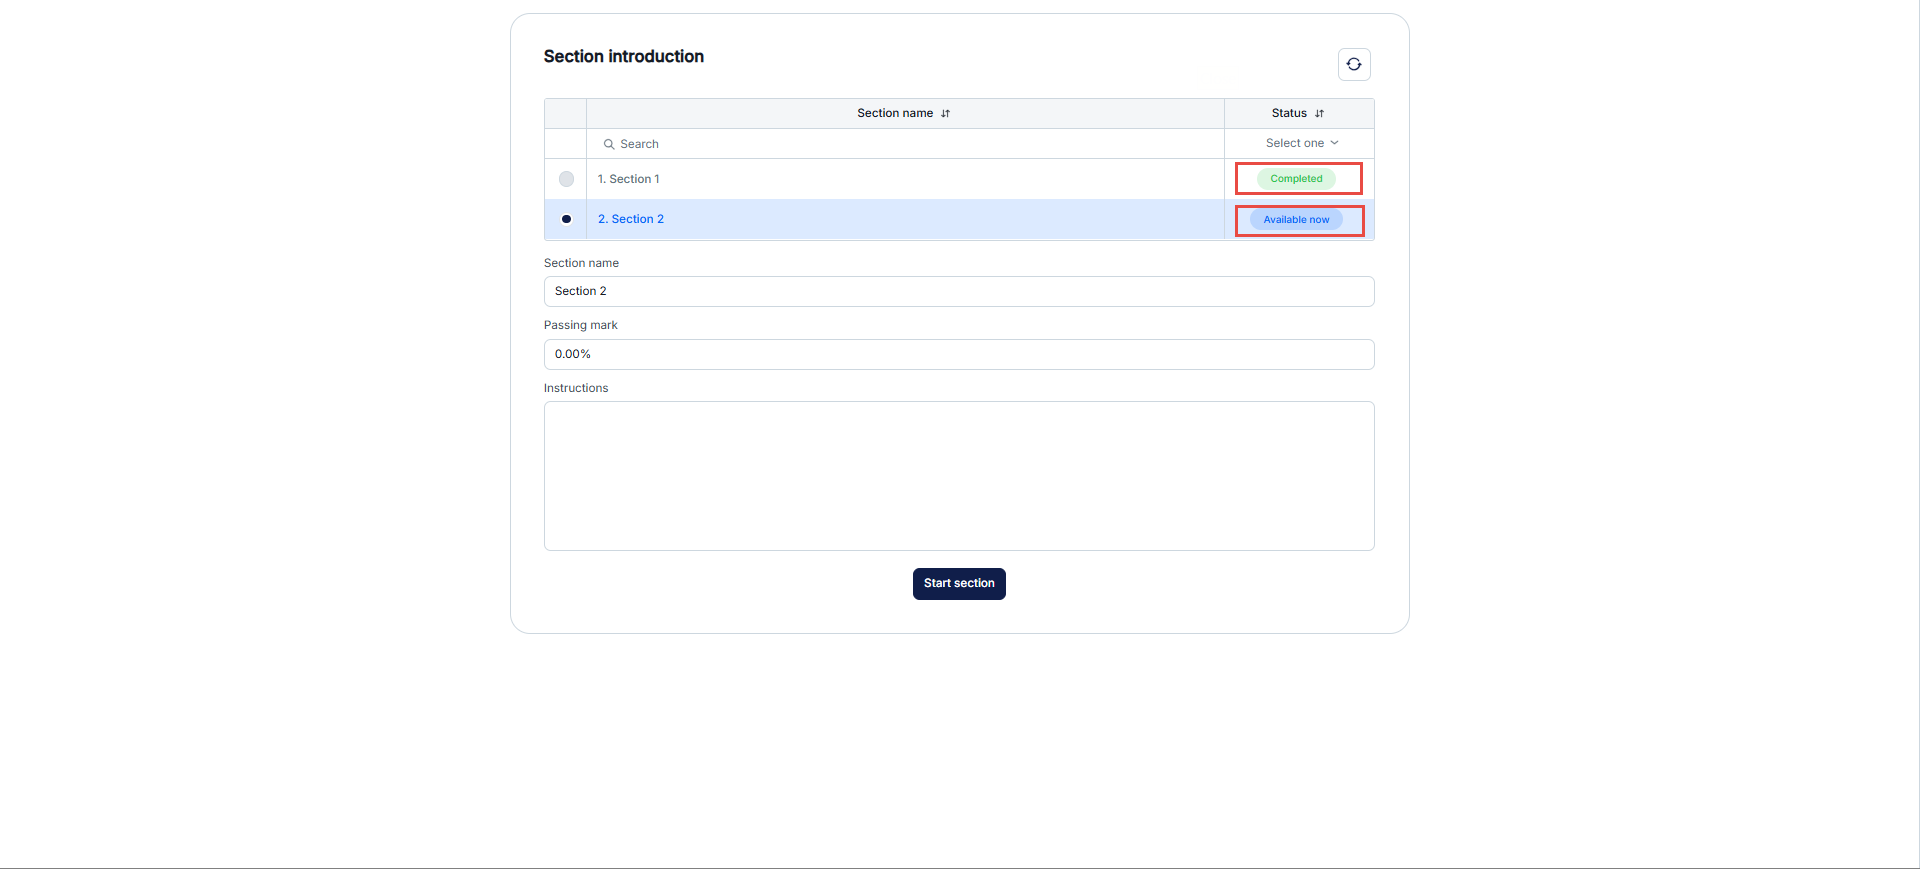
Checking section completion
After a section is submitted, its status changes to Completed. A section that can be started is marked Available now. The section list helps candidates track their progress.
Finishing the entire test
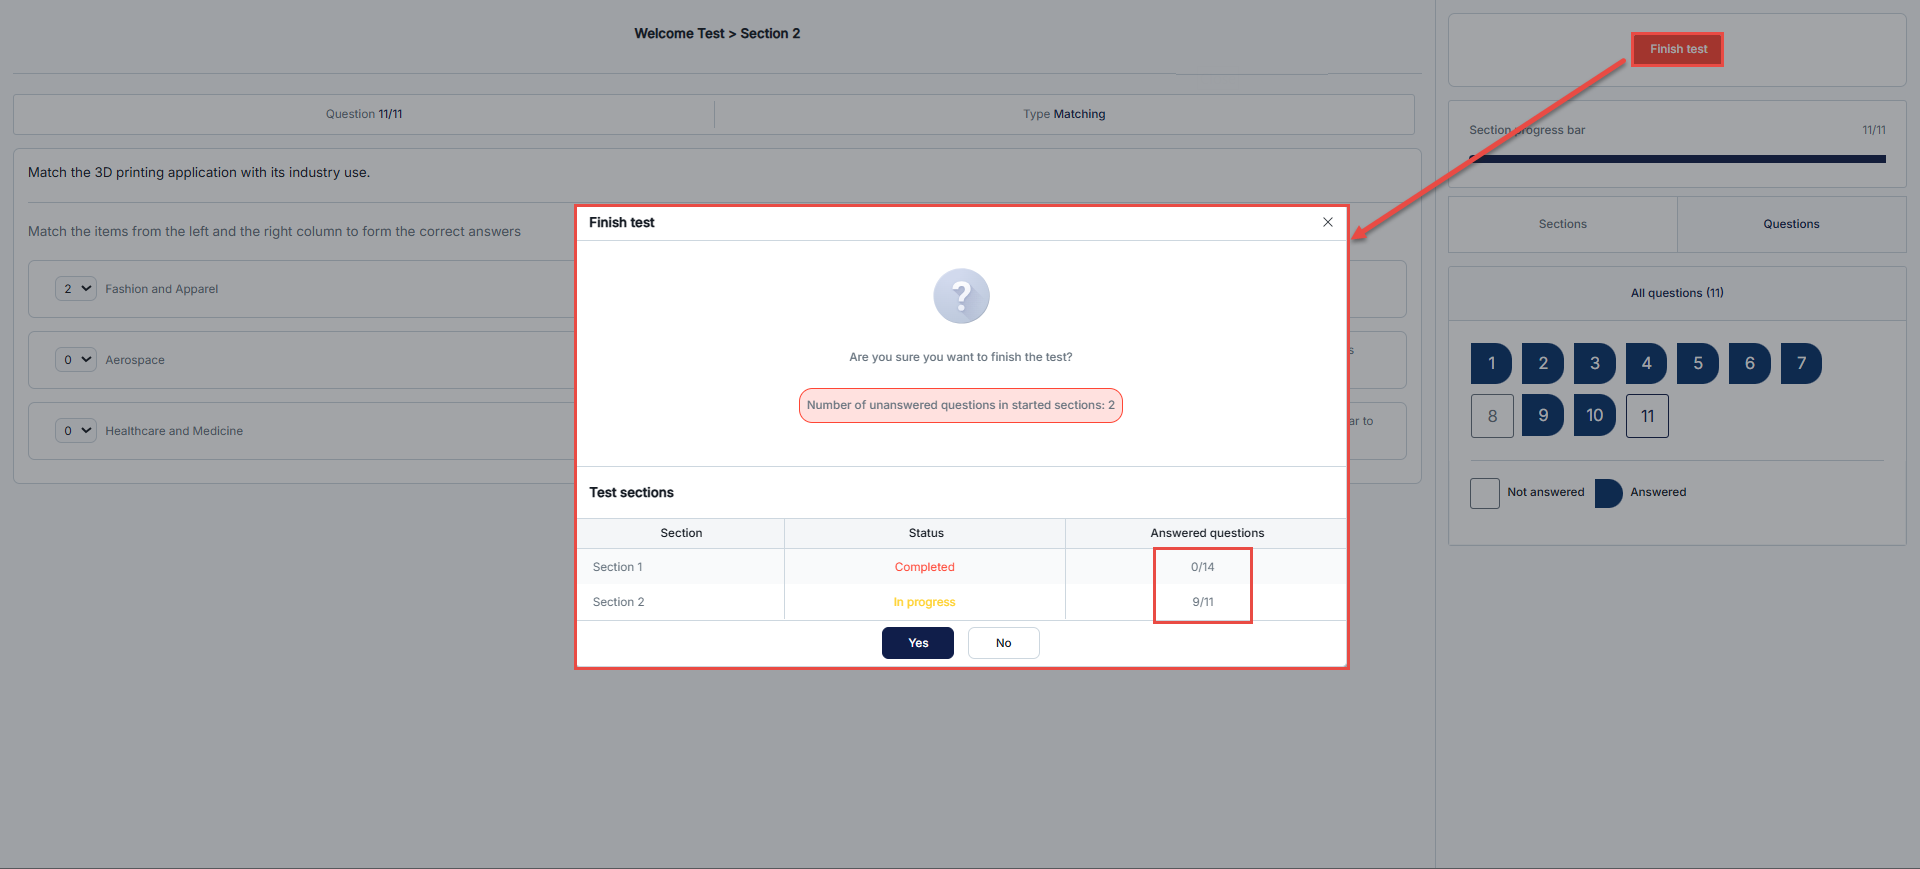
- Click Finish test when ready to submit the entire test.
- Review the confirmation dialog. Depending on the settings, it can show answered-question counts for each section.
- Click Yes to confirm submission, or No to return to the test.
Controlling answered-question counts
The finish dialog can show how many questions a candidate answered in each section.
To hide these counts:
- Go to System > Settings and Customization > System Preferences > Additional Modules.
- Turn off Display answered questions per section on finish dialog.
Completing the final check
You have now configured the overall test, created its sections, and defined the passing requirements. Before making the test available to candidates, check the section order, timing, question content, grading, and candidate experience.
For video tutorials, browse the YouTestMe videos about tests with sections.
For more related instructional materials, please visit:
- How to Choose the Right Test Creation Method.
- How to Define the Test Duration Settings.
- How to Create Multiple Test Versions.
- How to Create a Testing Session.