This article explains how to update your test’s settings after publishing. You can adjust various options, such as test configuration, security settings, or instruction settings, while keeping the test active.
Before publishing, it is recommended to use the preview option to simulate the test-taking experience and verify that all settings are correctly configured. Even after publishing, you can update these configurations without affecting the integrity of the test.
Editing and Previewing the Draft Version of the Test
- Basic information :This section contains essential test information and primary actions.
-
Preview button – Preview the test to simulate the test-taking process.
-
Publish button – Publish the test to make it available to candidates during the active testing session availability period. The test is not visible to candidates while it is in draft mode. Permission “Publish tests, surveys and training courses” is required on system or workspace role (for tests in a workspace) in order to publish the test.
- Return to Wizard: This option is available only for tests in draft status. It allows you to navigate back to the Test Creation Wizard to review or modify the setup process.
- Delete the test
- Create a Copy : Make a duplicate with the same questions and settings.
- Export options : Located in a dropdown menu, this feature allows you to export the test in various formats, including PDF, JSON, SCORM, and xAPI.
- Delete ‘Preview’ attemps :Delete preview attempts generated by clicking the Preview button

Editing of published test settings
If the test has already been published and you need to make updates, go to the Manage Tests page, locate the test within the Tests Table, and select it to access and modify its settings.
- Basic information:This section provides essential test information and key actions. For more details, watch this video .
- Test instructions dialog settings :This page allows you to customize the information displayed to candidates in the pop-up dialog when starting the test.For more details, read this article.
- In-test configuration:Manage permissions and restrictions during the test. Choose whether candidates can view additional options or if specific actions are mandatory.Refer to this video for a detailed explanation.
- Duration and layout:In this section, you can configure the test layout and duration settings , including how questions are displayed (one per page or all on one page), the duration type, and optional features such as hiding metadata, the calculator, or the ‘Finish test’ button.
Note: Duration type can be modified only in the test wizard. - Pause, retake and reschedule settings:This section allows you to manage test pause, retake, and reschedule options. You can enable test continuation within the availability period, set conditions for retaking (such as number of attempts, intervals, and whether only failed attempts are eligible), and define rescheduling rules, including limits on free reschedules and requests beyond the cancellation deadline. For a detailed walkthrough, please check this article.Note:that enabling test continuation disables browser lockdown.
- Security Settings : this section allows you to enforce measures that ensure test integrity. You can enable browser lockdown using built-in restrictions or the Safe Exam Browser, activate proctoring via camera and microphone, restrict access based on network settings, and automatically log candidates out after test completion. Additionally, you can require candidates to review and update their profile before starting the test. For a step-by-step explanation, watch this video.
- Result validity settings:You can set the validity period for test results in days, starting after the completion of the test. After this period expires, the results are no longer considered valid, and the test attempt will be marked as Suspended.
- Grading configuration: This section allows you to define the passing criteria for the test. You can use advanced options to set passing marks for individual sections or groups of sections and apply a custom grading scale (e.g., A to F) to display results. For a detailed walkthrough, watch this video .
- Certificates:This section allows you to add certificates to a test, which candidates can receive upon successful completion and download or share in various formats. For a detailed walkthrough, watch this video .
- Personal report settings:Customize the content of candidates’ reports for tests. Adjusted report settings will be applied only on the candidates’ side while the test managers will see the entire content. Refer to this video.
- Score report settings:The score report is an advanced version of the personal report intended for export. Customize the content of the score report for a particular test
- Coupons :This section enables you to generate single-use coupons that grant users discounted access to paid testing sessions; for detailed instructions, refer to this article.
- Language Settings:This section allows you to define the default language for the test interface, which overrides the user’s account language preference (excluding user-generated content such as question text and descriptions); see this video tutorial for more information.
- Attachments:This section allows you to add and manage instructional attachments for the test, which can be shown at specific times and are separate from question-level materials.
- External Attributes :This section allows you to enter reference details if the test is linked to an external system, including the system’s unique test ID and its name as the data source.
- Delivery preference is a descriptive label aiding filtering for tests distributed through different methods, such as online tests with AI/live proctoring, online tests without proctoring, or paper-based tests.
- Test Categories:This section allows grouping tests by shared characteristics like subject or difficulty; categories can be added, selected, modified, or created via the Test Category Types page

Editing configuration of the sections
If the test contains sections, once you create a draft version of the test, you will be able to change the configuration for each section.
To edit the section configuration, follow the next steps:
Once you open the desired test:
- Select the Test sections tab.
- Click the Details icon in the Actions column.

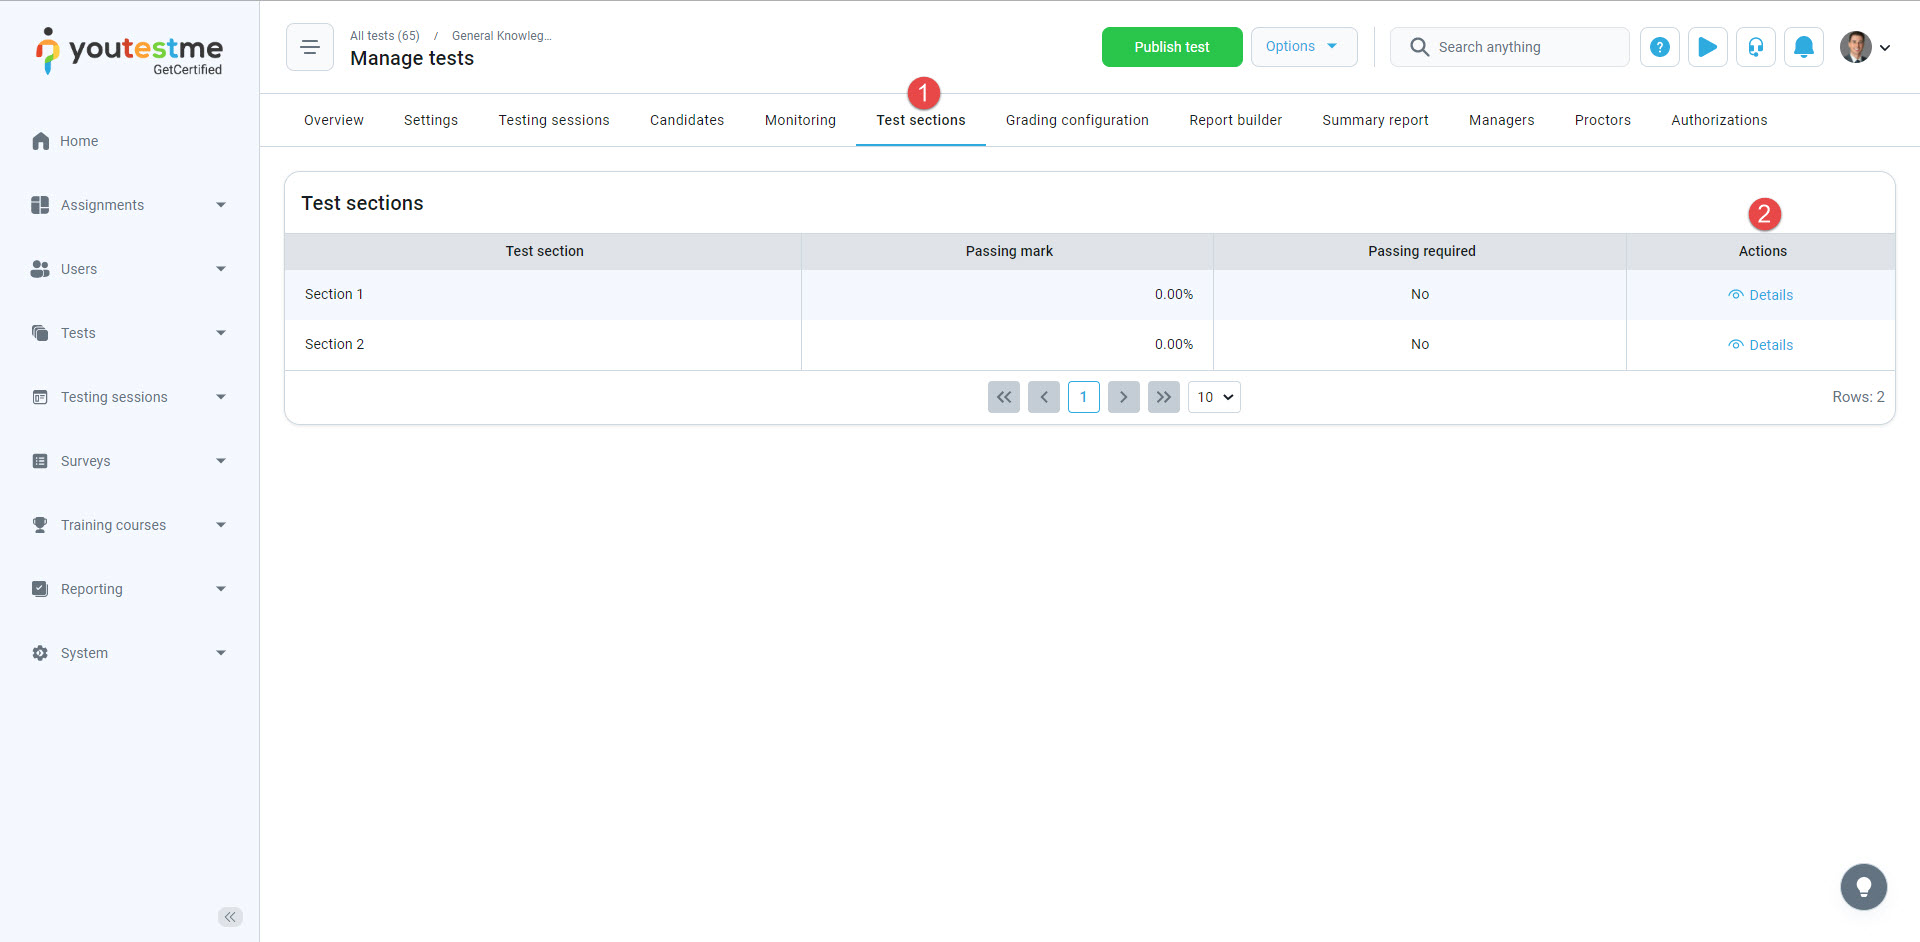
Once you open the Setting tab you can edit the configuration regarding the section.
Editing of published test settings
In case you have already published the test, but want to make changes, you can do so as follows:
Questions editing
Once you open the test that you want to edit, you should:
- Click the Test sections tab. In case the test is without sections, click the Questions tab.
- Click the Details icon in the Actions column.
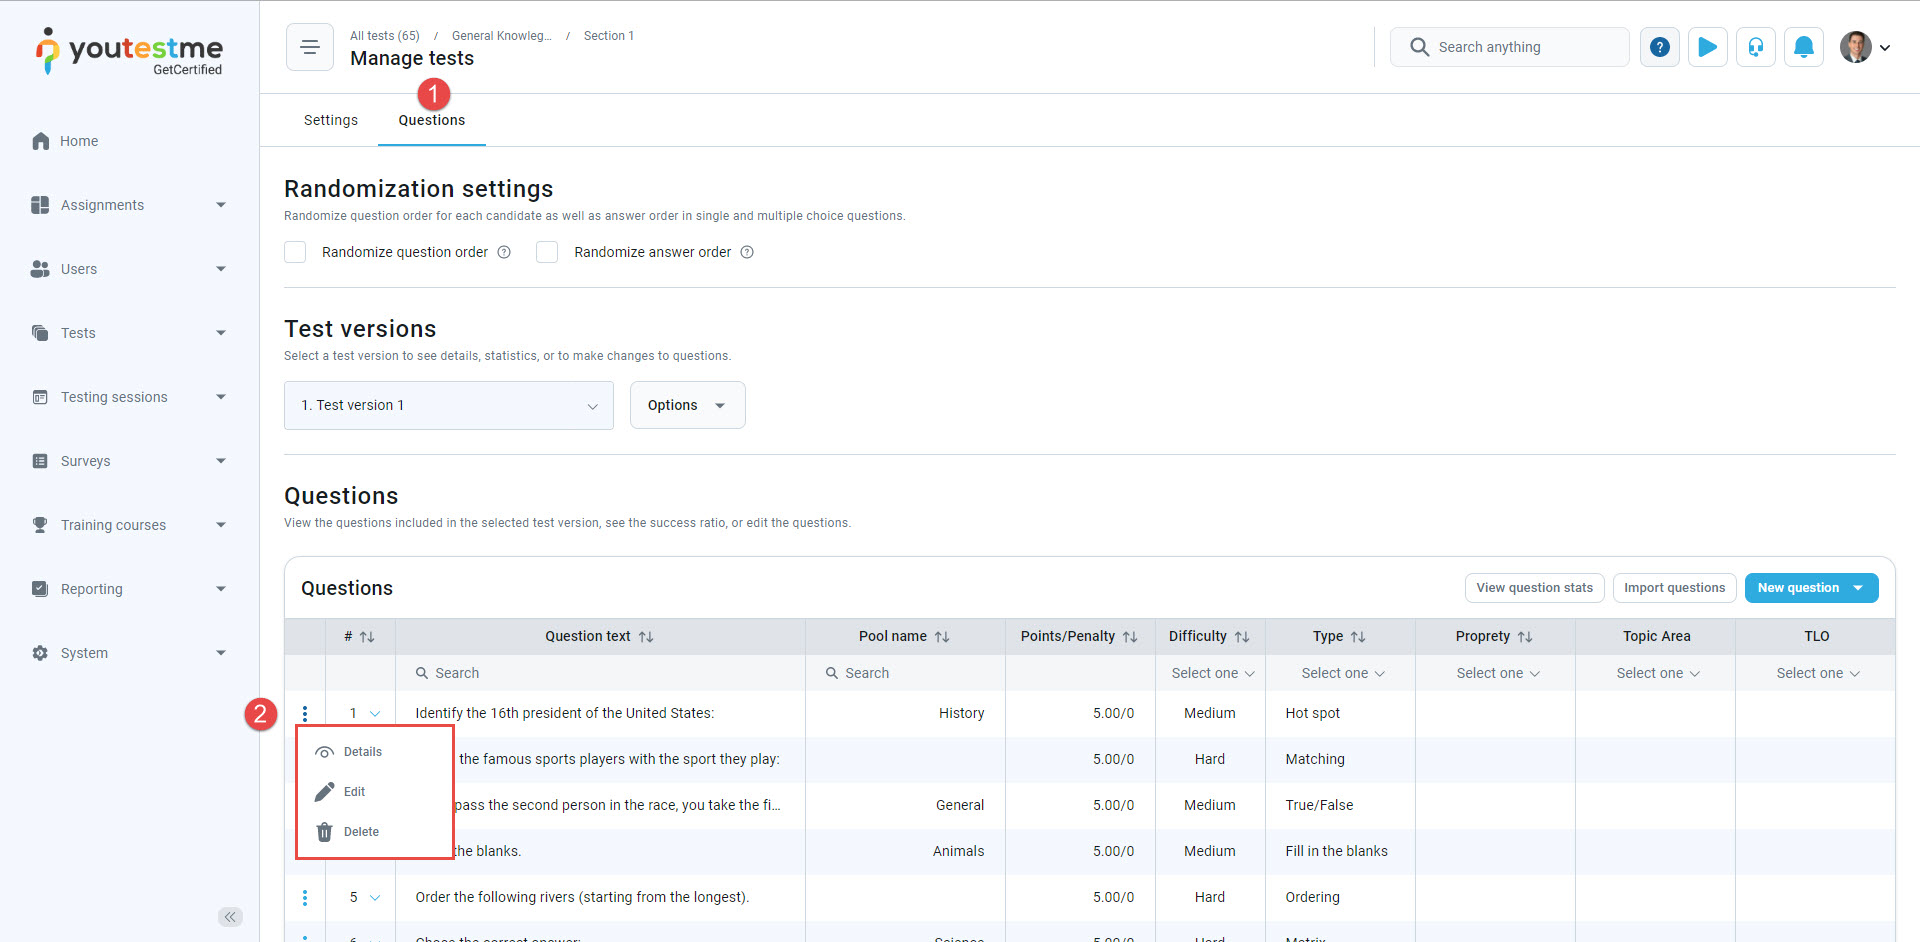
You can edit or delete questions of the published test by doing the following:
- Click the Questions tab.
- Click the Actions button next to the desired question and chose the desired action.
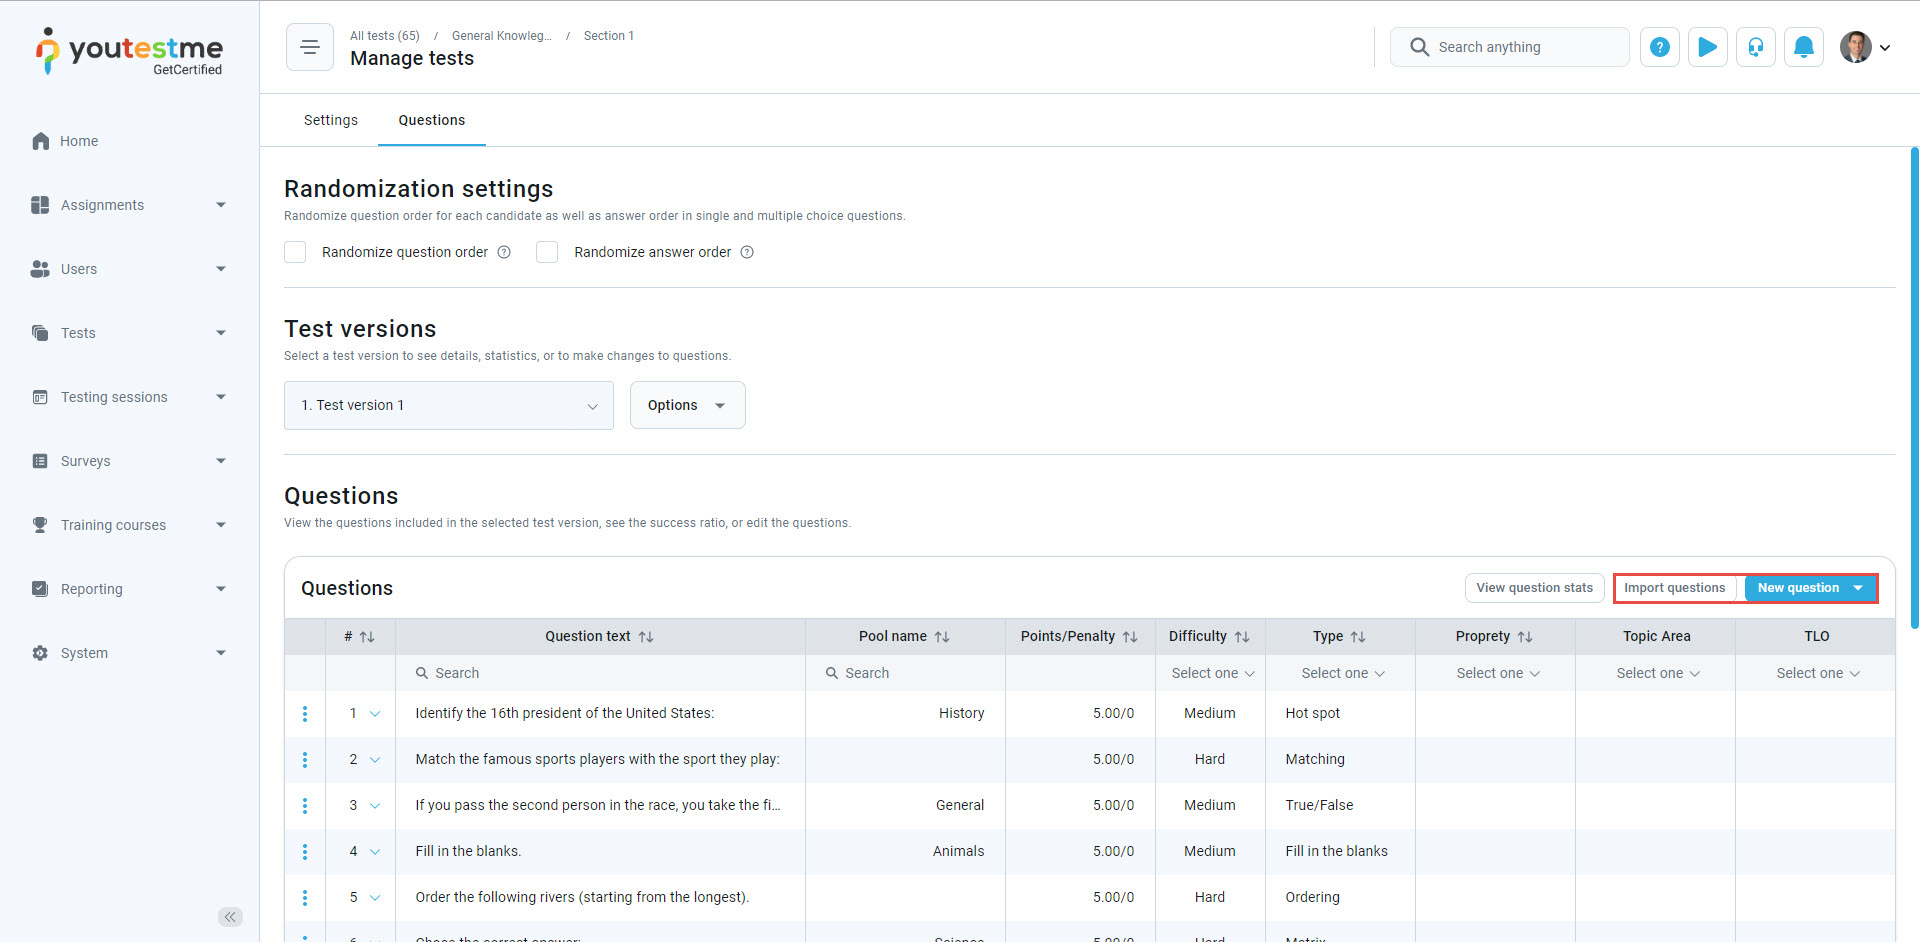
To add new questions, click either the New question button to manually create a question or the Import questions button to add questions from an existing question pool.
Note: Editing questions will not create a copy of the whole test. Instead, a copy of the question will be created, allowing you to save the score and results of the candidates who already completed the test. The updated questions will be presented to candidates who attempt the test after it has been edited.
Grading editing
You can fully edit the grading configuration, and change the passing mark for the entire test, section, and group of sections. Changing the grading configuration will affect only the users whose results are not verified.
To see how to verify results for a candidate, please take a look at the “Verifying candidates’ results” chapter.
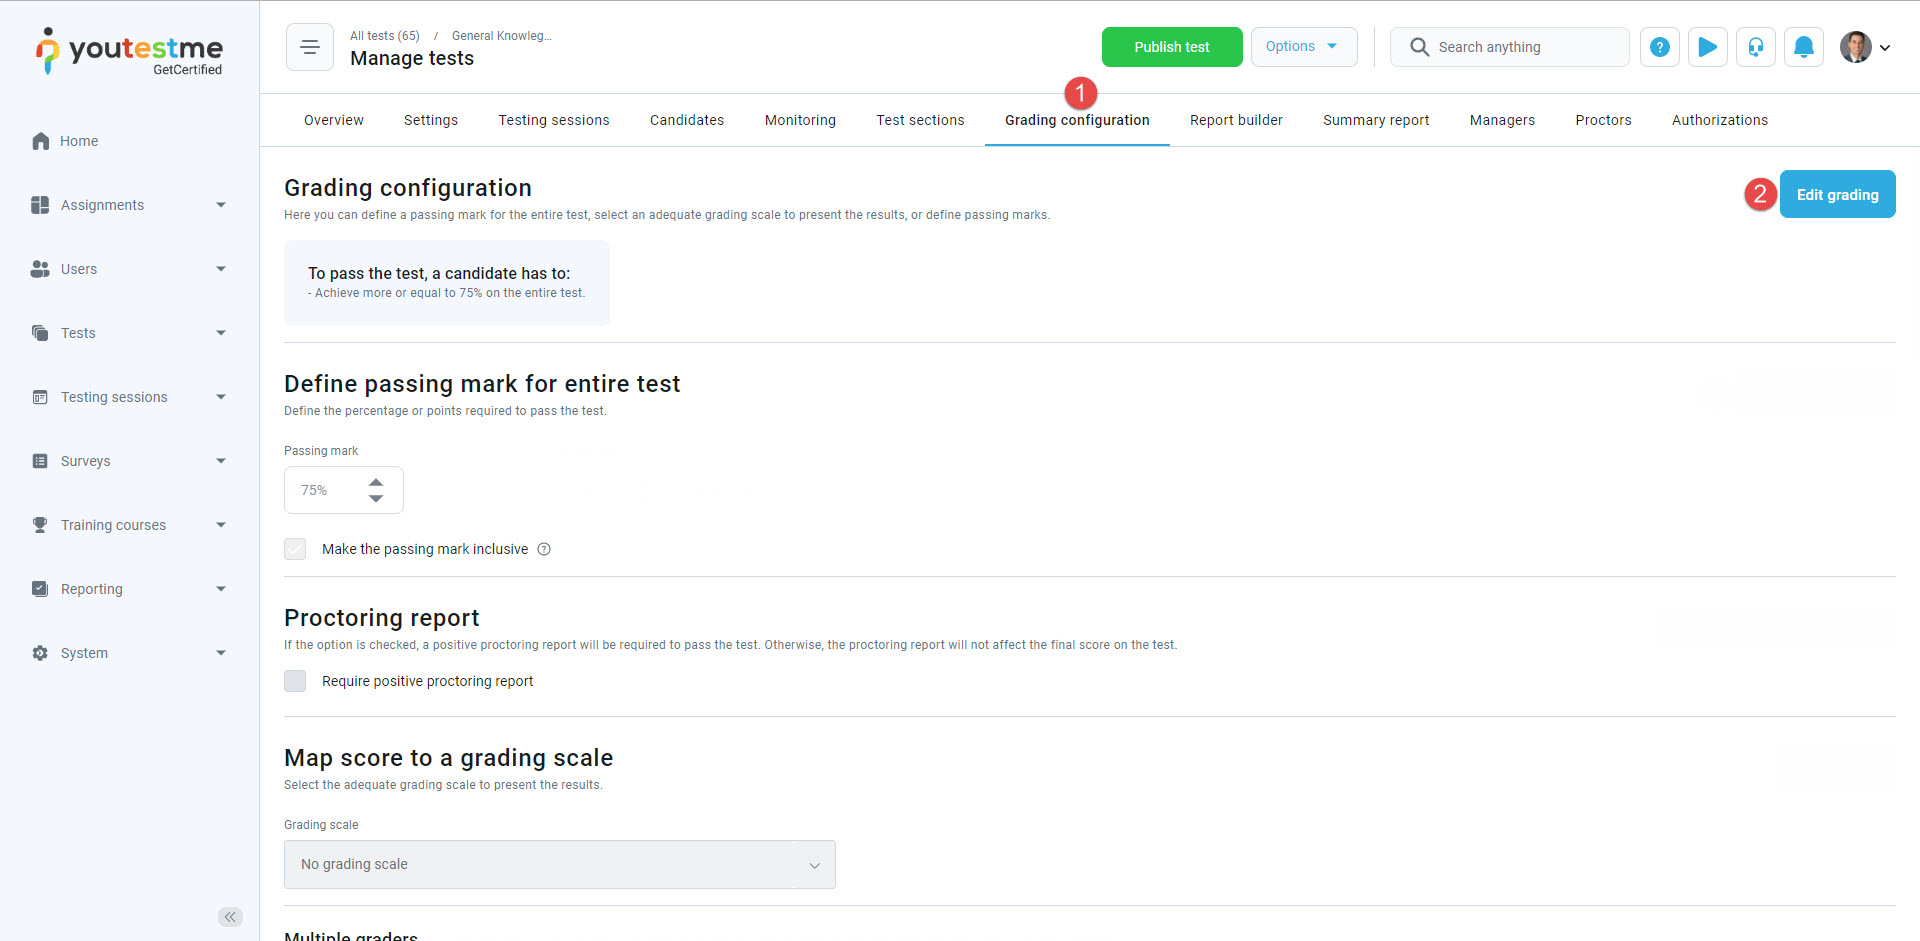
- Click the Grading configuration tab.
- Click the Edit grading button.
 A confirmation dialogue will appear informing you that the change of grading configuration will only affect unverified reports.
- Click the Yes button to proceed with the editing of the grading configuration.
- Click the No button to cancel.

Once you access the editing mode, you can:
- Change the passing mark for the entire test.
- Require a positive proctoring report.
- Add or change the grading scale for the test.
- Click the Edit icon to change the passing mark for the section.
- Click the Create new section group button to create and set the new section group’s passing mark and
- Click on the Edit icon to change the section group’s passing mark.
- Click on the Edit icon to change the passing mark for the question pool.
- Click the Create question property report button.


Verifying candidates’ results
You can verify candidates’ results by doing the following:
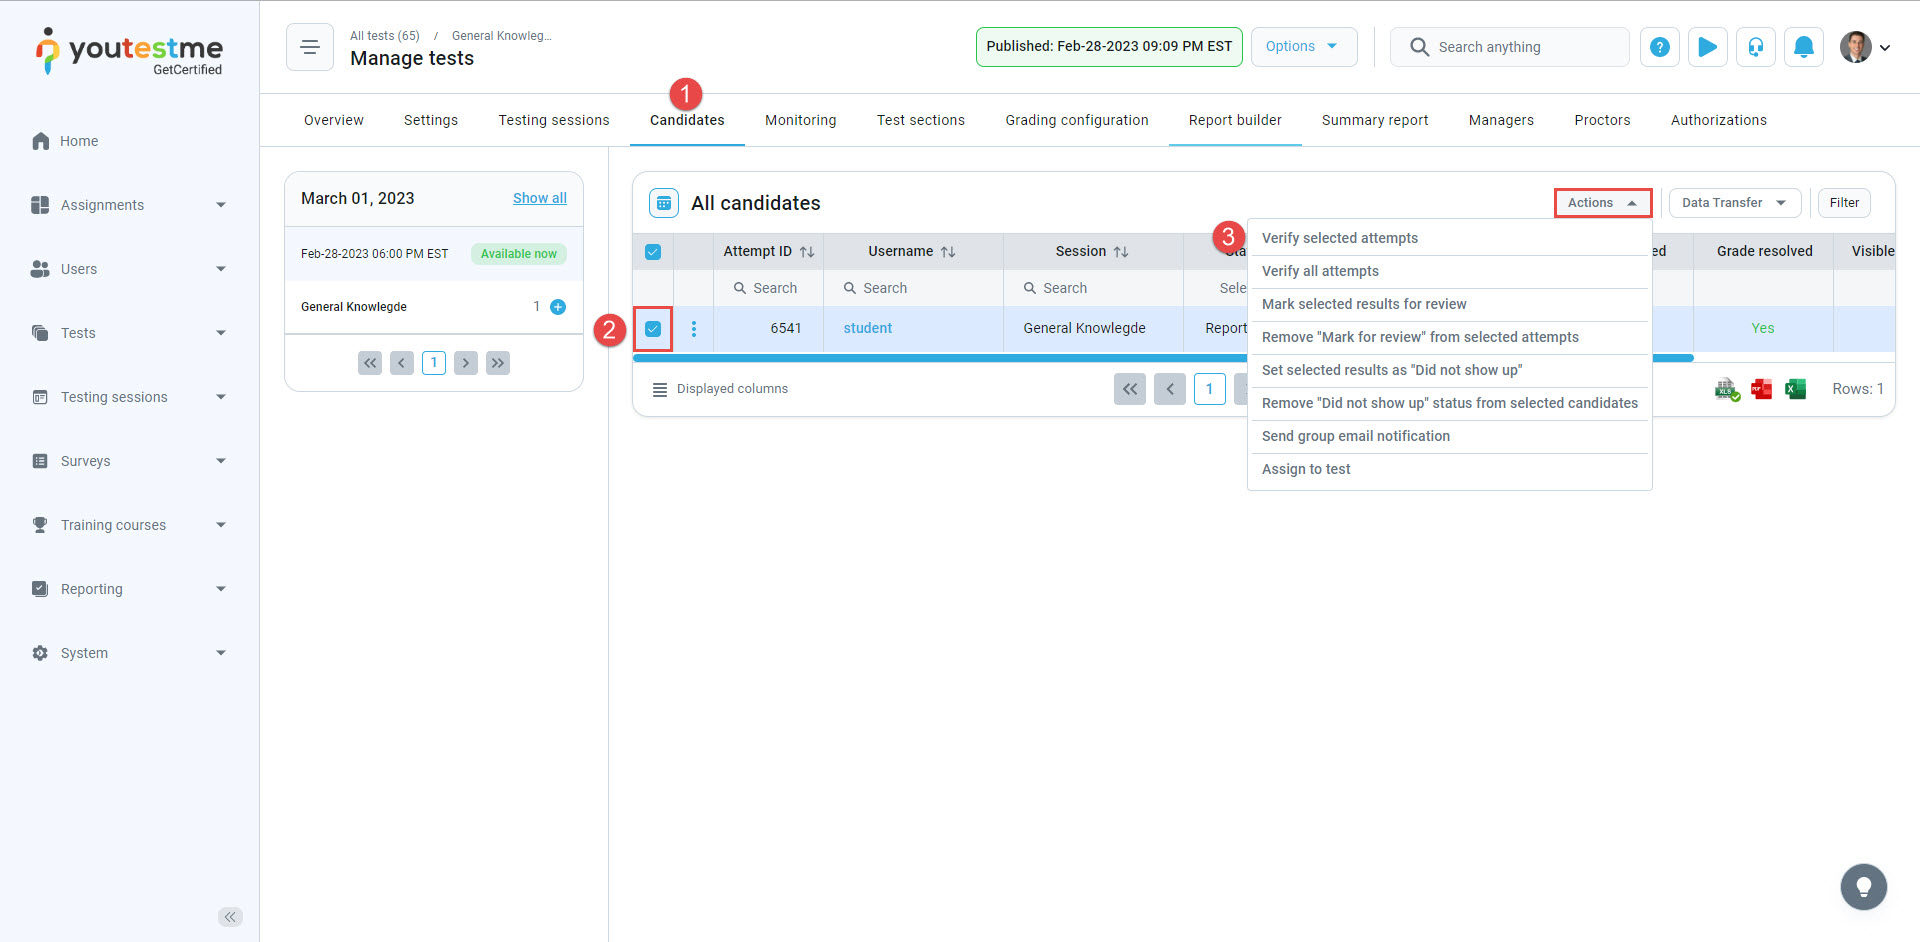
- Click the Candidates tab.
- Select the candidates whose results you want to verify.
- Click the Actions button and from the dropdown menu select Verify selected attempts.
Example of how the editing of grading affects verified and unverified candidates
In this example, two candidates completed the test—one with 80% and the other with a 90% score. Both candidates passed the test. Once we verified one candidate’s results, no changes on the grading part will affect it.
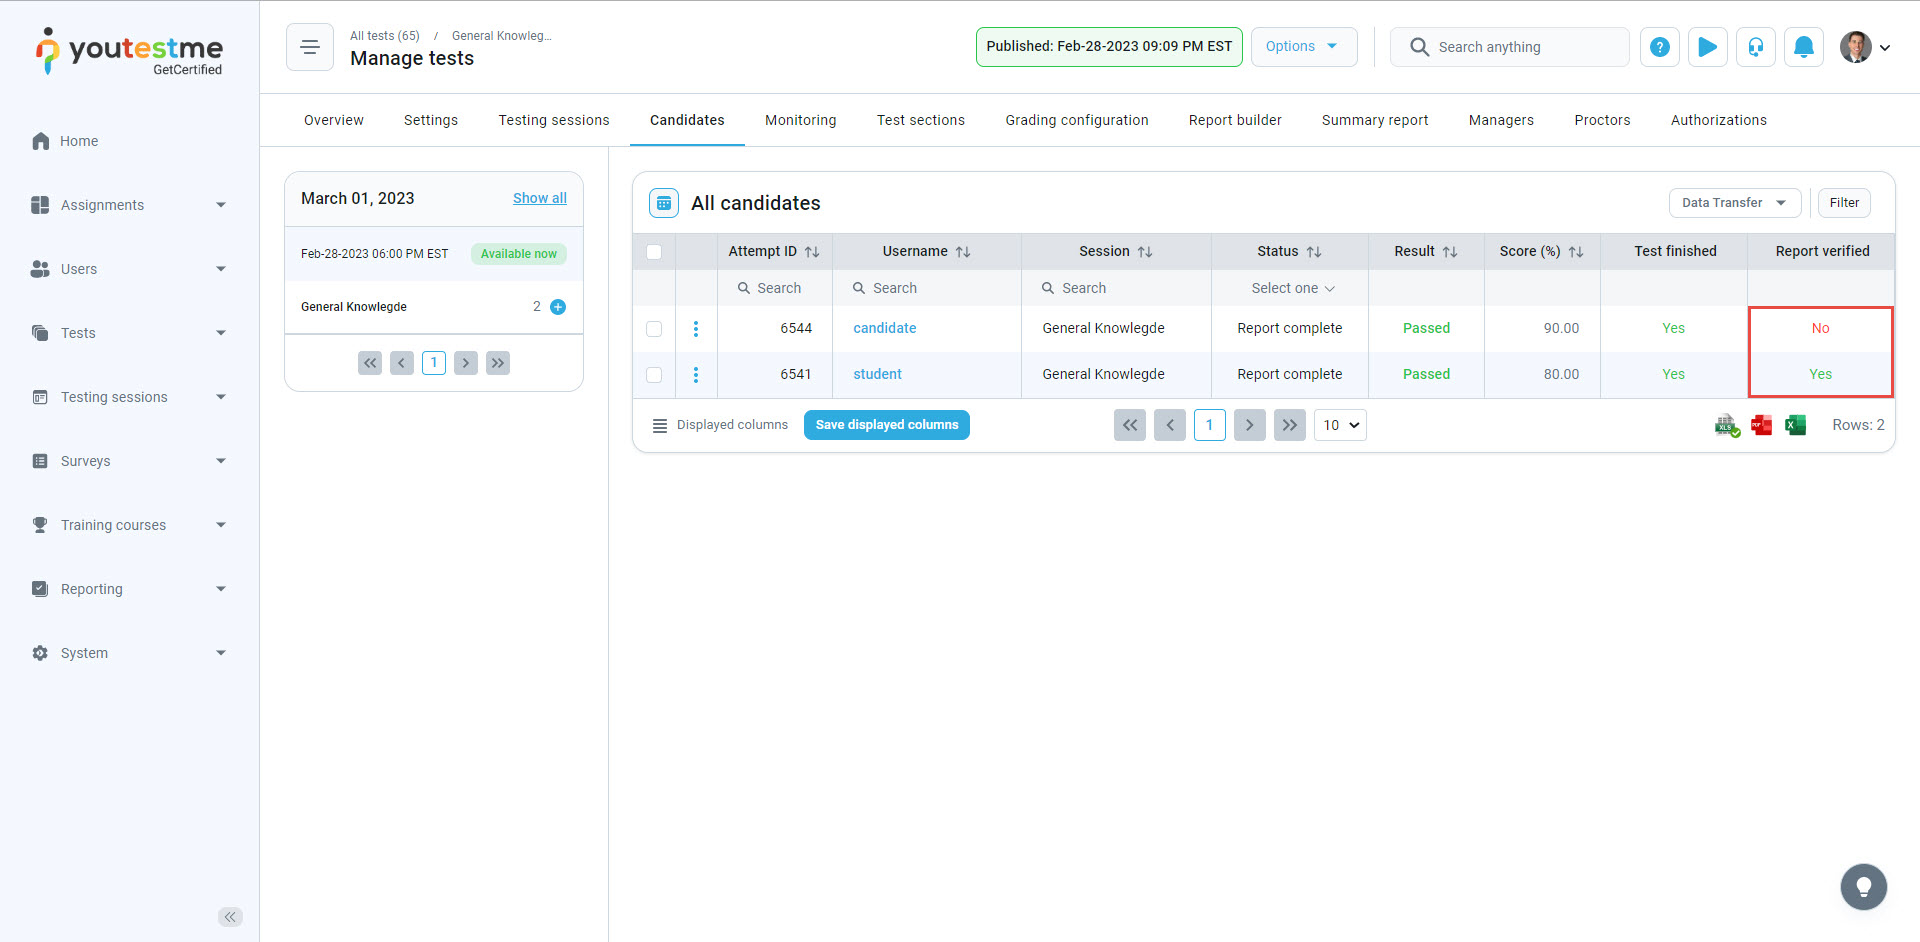
We will change the passing mark for the whole test to 90% and not make the passing mark inclusive.

As you can see, the passing mark change affected only the candidate whose result is not verified.

For more useful instructional materials, please visit:


