
Article verified for Release 15.2 on November 14, 2025.
This article provides a comprehensive, step-by-step guide on creating a testing session and assigning test-takers using the YouTestMe Testing Sessions feature.
Testing Sessions Overview
When creating a test, you can define its availability period and specify who can access it by setting up a testing session. Through the testing session, you can configure various settings, including but not limited to:
- Test Availability Period: Set the time frame during which the test will be accessible. Outside this period, the test will no longer be available to test-takers.
- Access Control: Determine who can find and take the test. You can make the test available to specific users, a user group, or all users within the application.
- Booking Settings: Manage the number of available seats (once the limit is reached, no additional users can book the test), set booking and cancellation deadlines, and define a booking price if you’re using the YTM application to handle payments.
- Security Settings: Customize security measures for the specific session, independent of the test-level settings. Options include enabling proctoring, browser lockdown, and password protection.
For detailed instructions on how to create a test, please refer to the following articles:
You can set up a testing session for a single test or for multiple tests, provided they share the same availability, conditions, fees, and booking settings.
Creating a Single Test Session
YouTestMe allows you to create testing sessions either manually for a specific test or in bulk using the Import Sessions feature.
You can set up testing sessions during the test creation process or after the test has already been published. This section provides step-by-step instructions on how to manually create testing sessions during test creation, for a published test, and how to bulk upload sessions.
Creating a Testing Session from the Test Creation Wizard
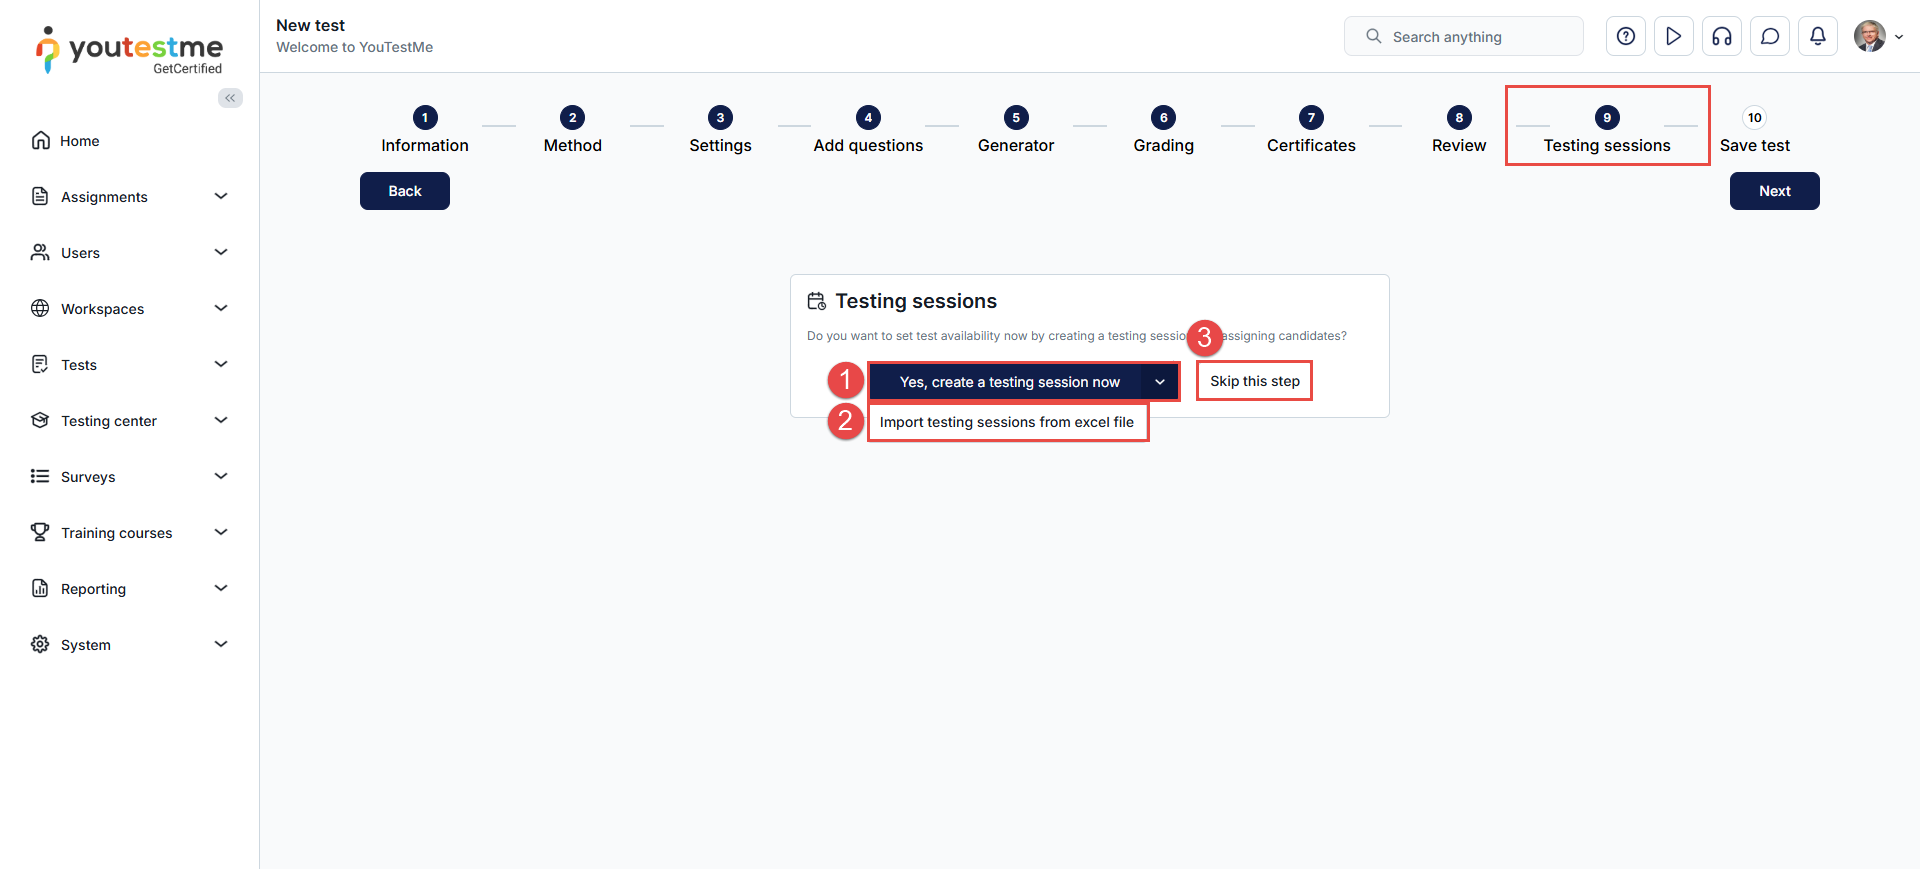
At the Testing Sessions step of the test creation wizard, you will be prompted to add testing sessions before saving and publishing the test. This step is optional and can be skipped if you prefer to create sessions later.
At this stage, you can:
- Click “Yes, create a testing session now” to manually create a session.
- Select “Import testing sessions from Excel file” from the dropdown menu to bulk import multiple sessions.
- Click “Skip this step” to finish creating the test and set up sessions later.
Creating a Single Test Session from the Manage Tests module
You can create testing sessions for a specific test, whether it is published or in draft status, from the Manage Tests module.
To create a testing session for a specific test:
- Navigate to Tests and select the Manage Tests tab.
- Click the Schedule button in the Actions column.
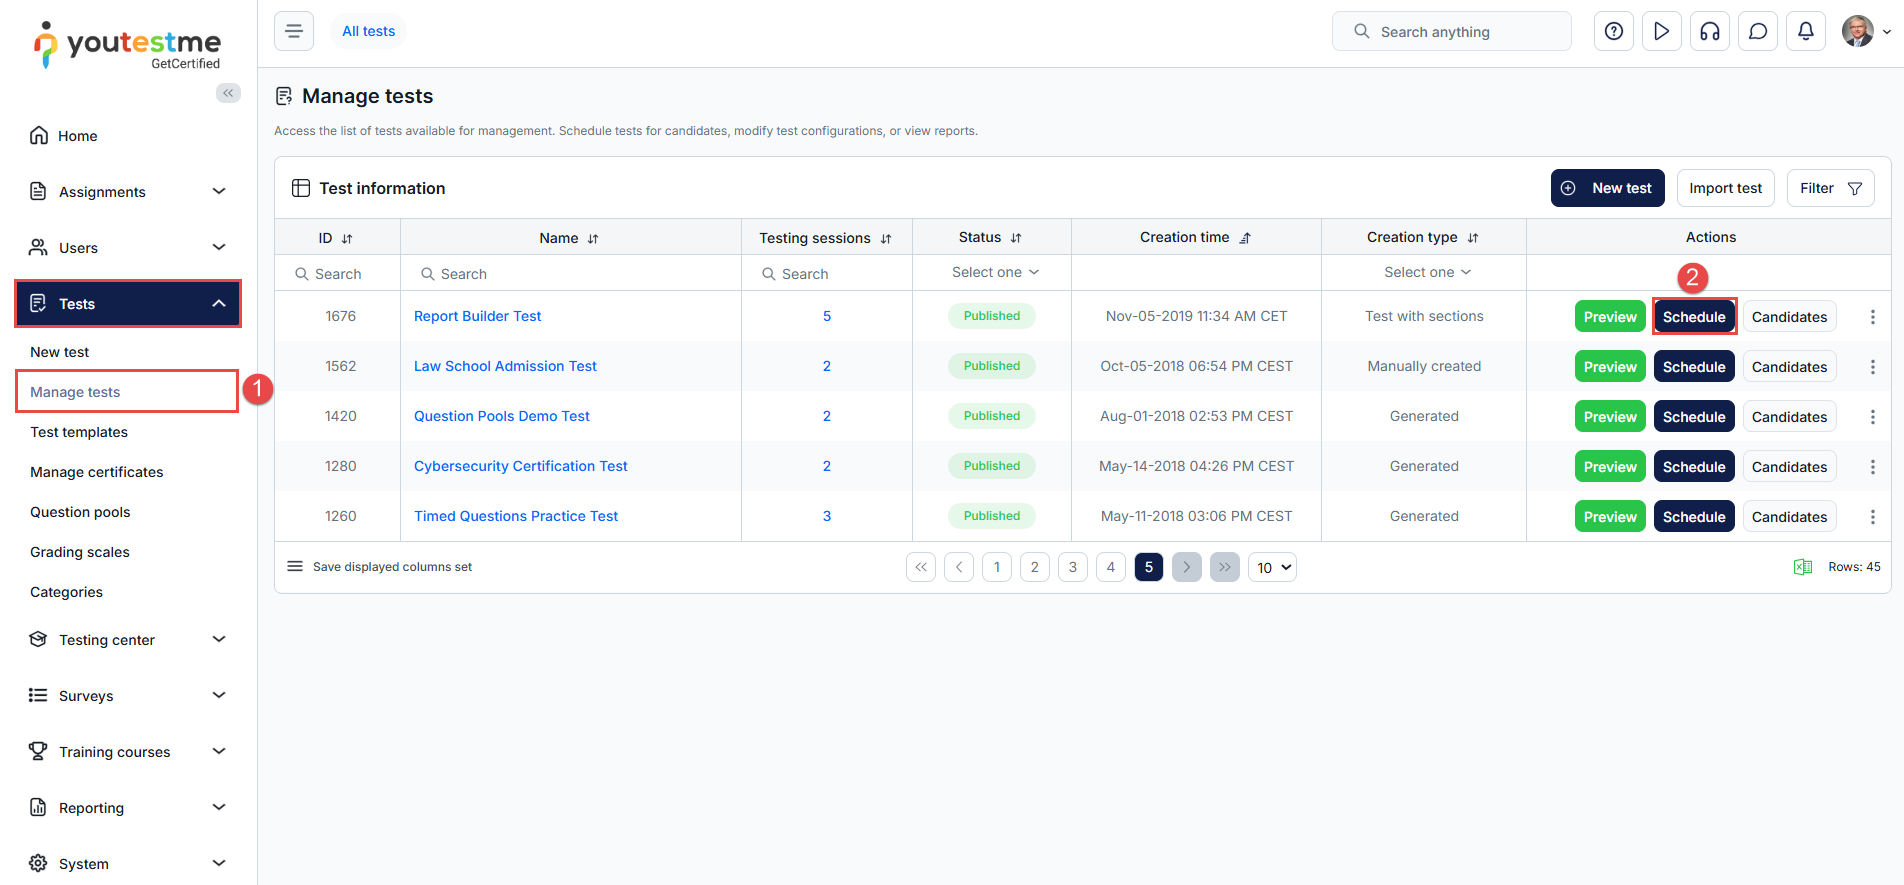
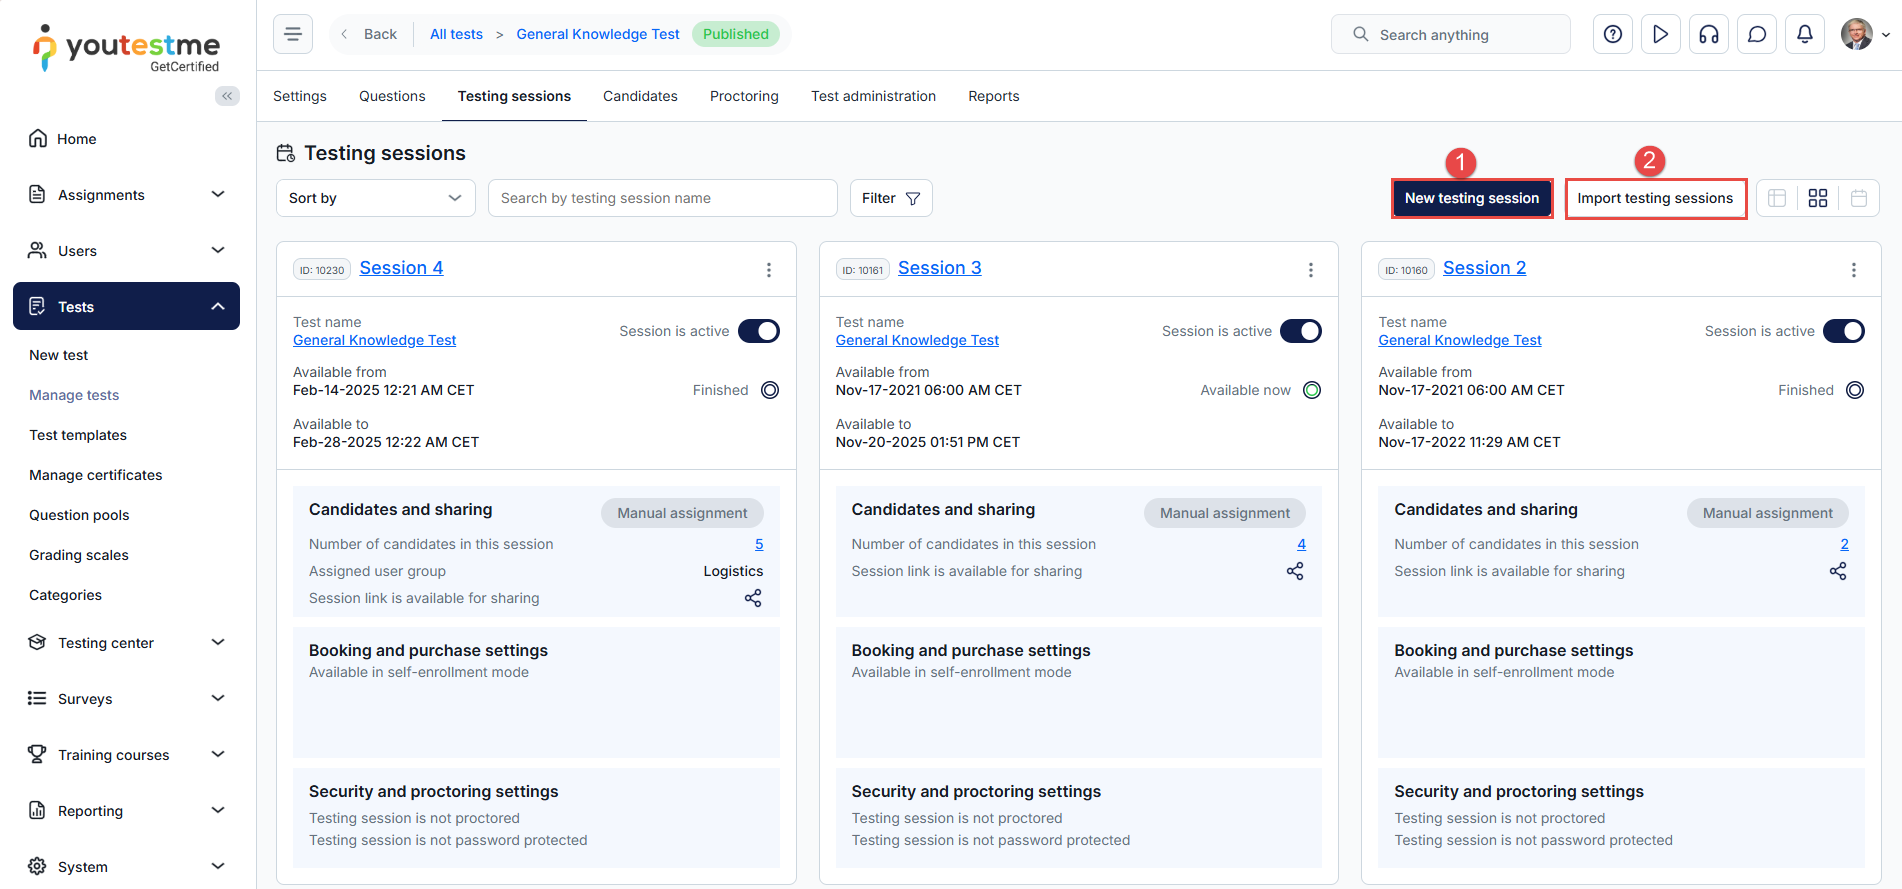
You will be redirected to the Testing Sessions tab, where you can:
- Manually create a testing session using the New Testing Session button
- Bulk Import testing sessions using the YouTestMe Excel template
Creating a Multiple-Test Session
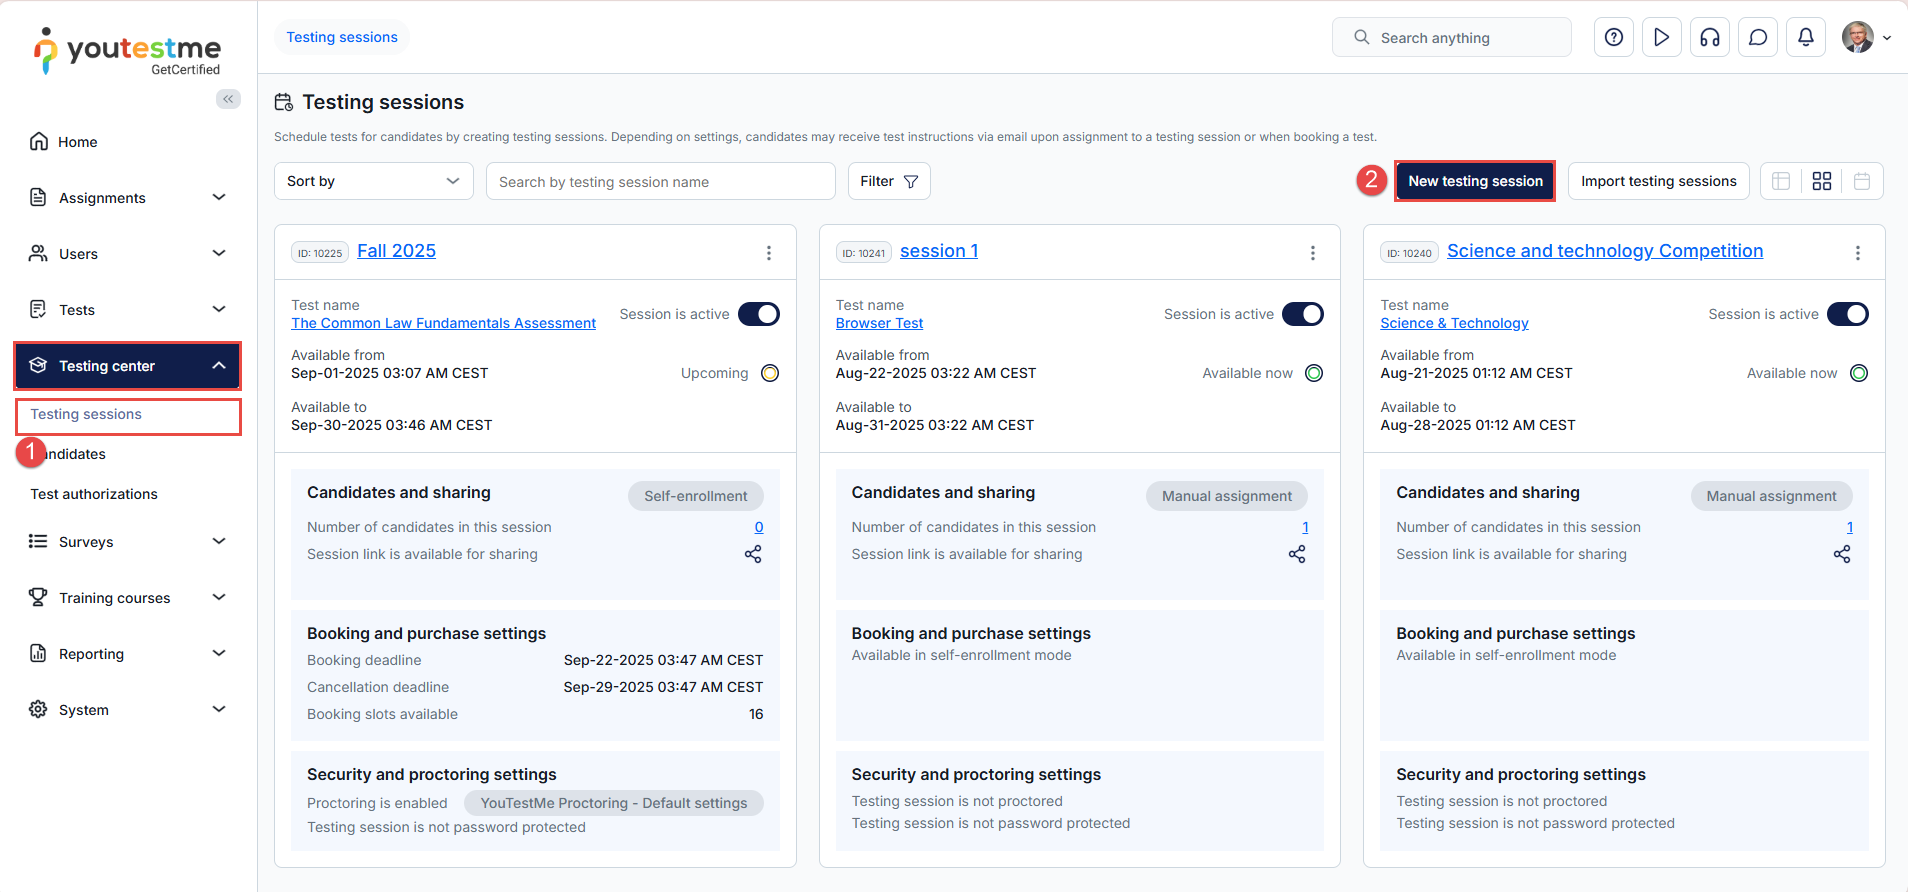
The Testing Center module in YouTestMe allows users to create testing sessions, either for a single test or for multiple tests.
To manually create a testing session from the Testing Center:
- Navigate to the Testing Center module and select the Testing Sessions tab.
- Click the New Testing Session button.
You will be presented with the option to Select One or More Tests in the New Testing Session dialog.
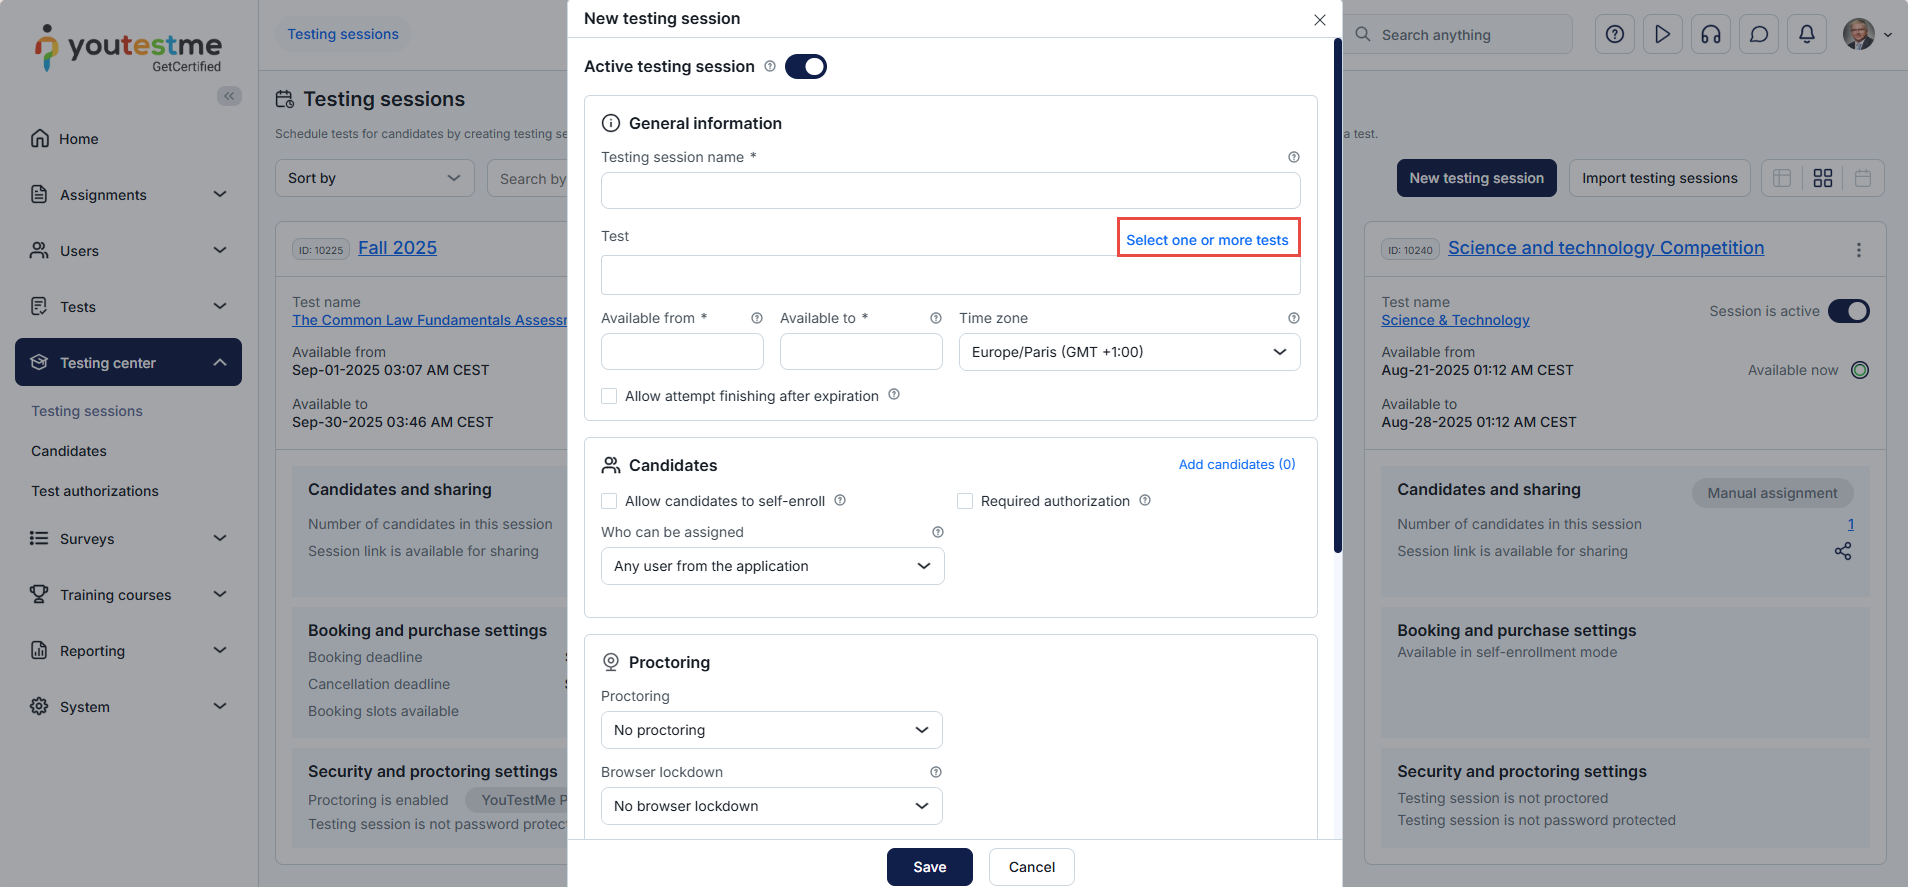
By clicking the “Select one or more tests” option, you will be presented with the list of all available tests in the system:
- Select the desired tests
- Click the Confirm button to save

Testing Session Settings
In the New Testing Session dialog, you have the following settings:
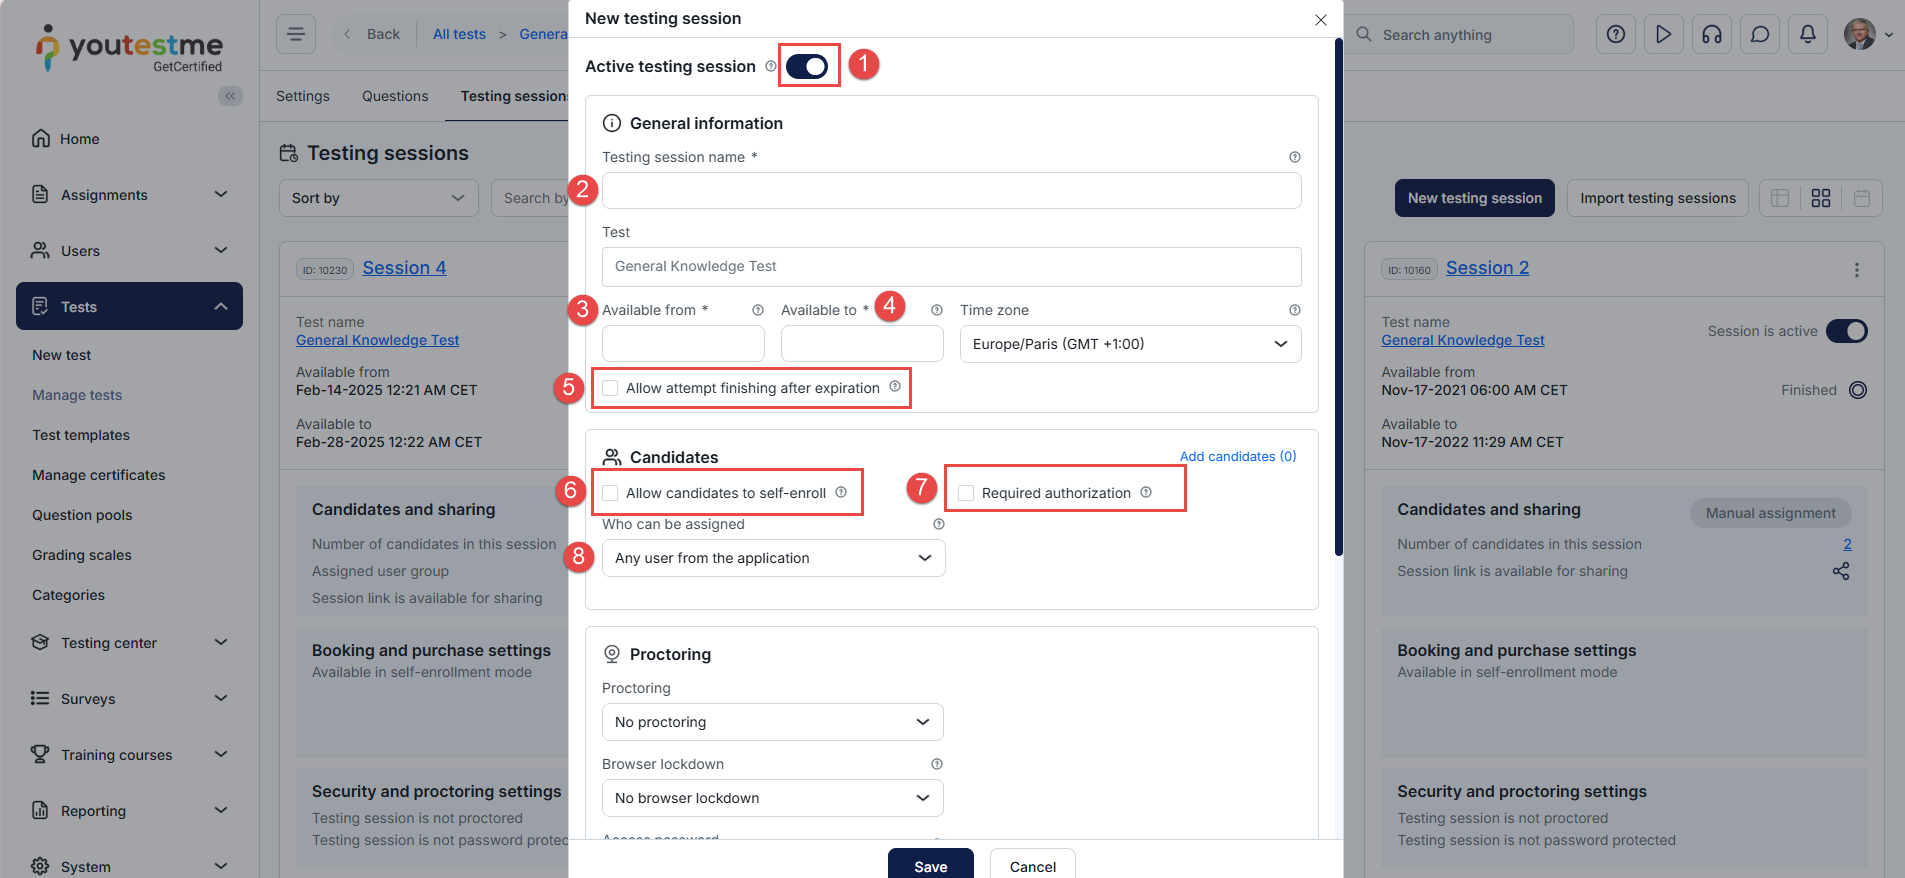
- Session Status: Choose whether the session is active or inactive. An active session will be visible to candidates once it is published, while an inactive session will remain hidden until it is manually activated.
- Session Name: Enter a name for the session to identify it easily.
- Availability Period: Define the time frame during which the test will be available for taking.
- Time Zone: Set the time zone for the session. The availability period will be automatically converted and displayed to test-takers based on the time zone defined in their profile settings.
- Allow attempt finishing after expiration: When this option is enabled, test-takers are permitted to continue the exam even after the session has expired.
- Required Authorization: Activate this option if authorization is required for test-takers to access and take the test. For more details on the authorization feature, please refer to this article.
- Access Control: Specify who can find and take the test:
- Any user from the application: The test will be available to all users.
- Member of a user group: Select this option to restrict access to specific user groups. You will be prompted to choose the desired group.
- Member of a training course: Select this option to limit access to users enrolled in a specific training course. You will be prompted to choose the course.
- Member of a workspace: Select this option to limit access to users who belong to a specific workspace. You will be prompted to select the workspace.
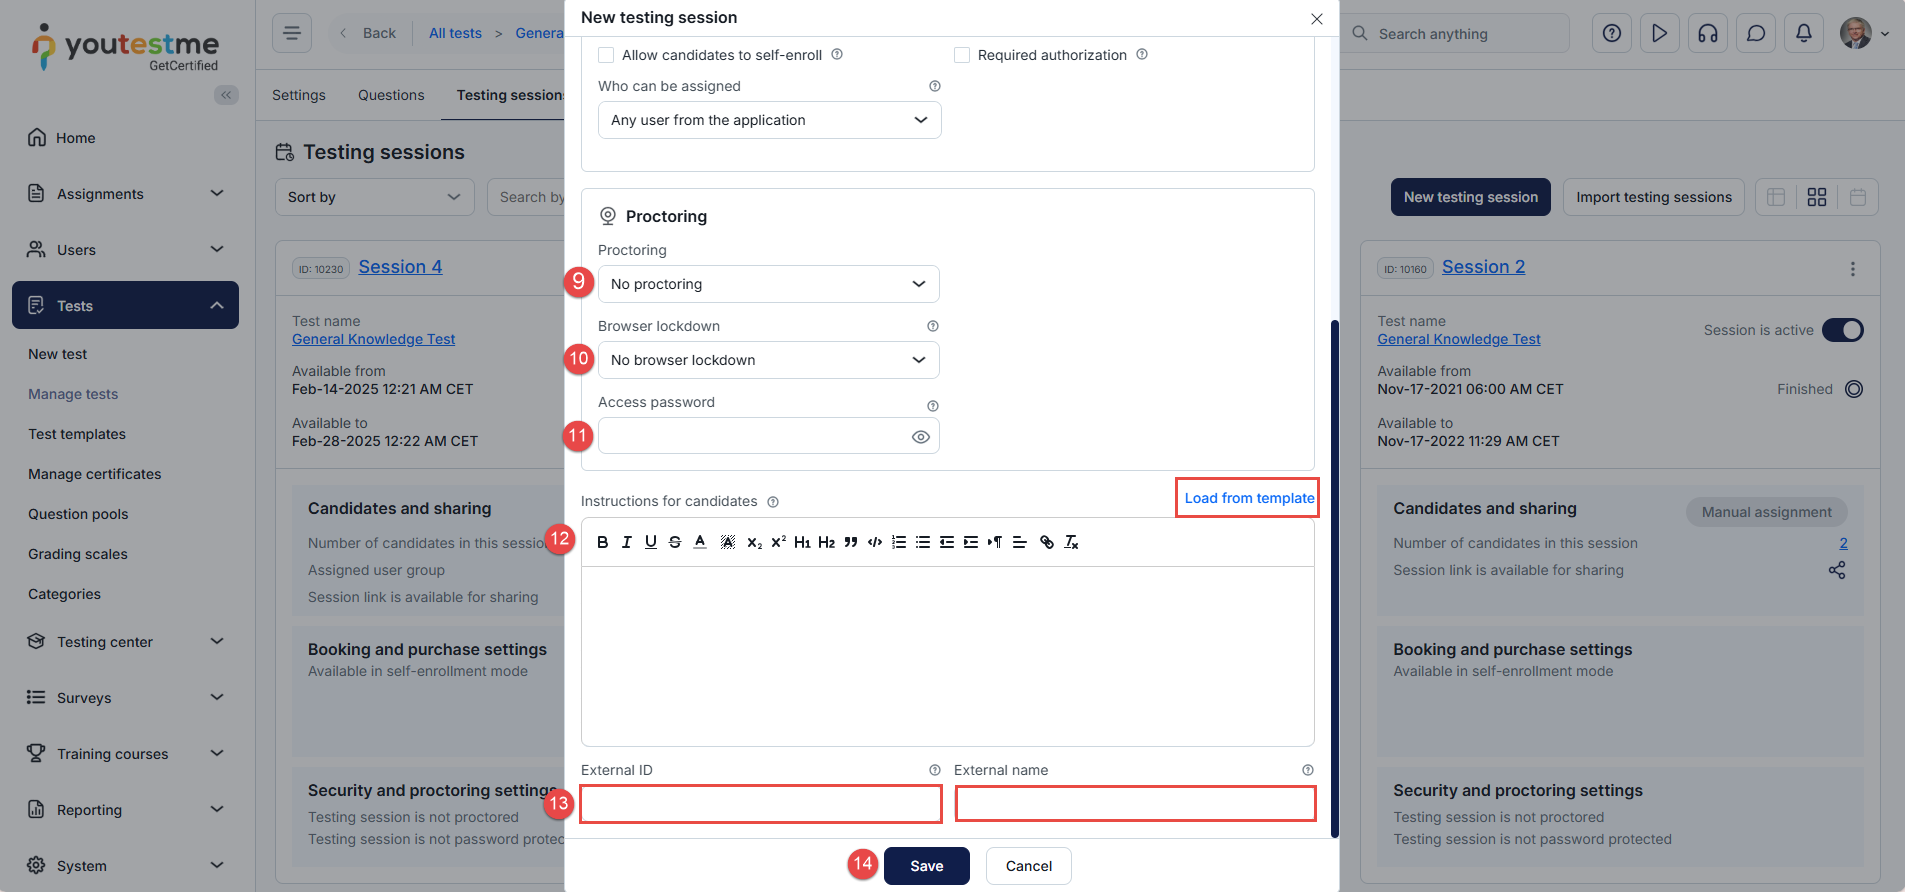
- Proctoring: From the drop-down menu, you can choose one of the following options:
- No Proctoring: Select this option if you do not require proctoring for the test.
- AI Professional Proctoring: Select this option to enable AI-based proctoring for the session if you would like to create a live, proctored exam or an AI-monitored exam.
- Proctoring Using Conferencing Tools (Google Meet, WebEx, etc.): Select this option if you prefer to monitor candidates using third-party conferencing tools.
- Browser Lockdown: From the drop-down menu, you can select one of the following options:
- No Browser Lockdown: Choose this option if you do not wish to enable browser protection.
- Built-in Protection: Select this option to use the YouTestMe Browser Lockdown feature. For more details, please refer to this article.
- Safe Exam Browser: Opt for this option if you want to conduct the exam using the Safe Exam Browser. For more information, refer to this article.
- Access Password: You can choose to secure the session with a password. Test-takers will need to enter the password to start the test. Ensure the password is communicated to candidates beforehand or at your discretion. This feature is particularly useful for exams conducted in testing centers or classrooms.
- Testing Session Instructions: Enter the testing session instructions in this field. You can customize the email notification sent by the system upon enrollment by including a variable that will automatically be replaced with the session instructions. Additionally, you can load a predefined instructions template if one has already been created in the system. For guidance on creating instruction templates, please refer to this article.
- External ID and Name: Here, you can enter the external session ID and name to cross-reference with any external system.
- Finally, click Save to publish the session.
Test Booking Settings
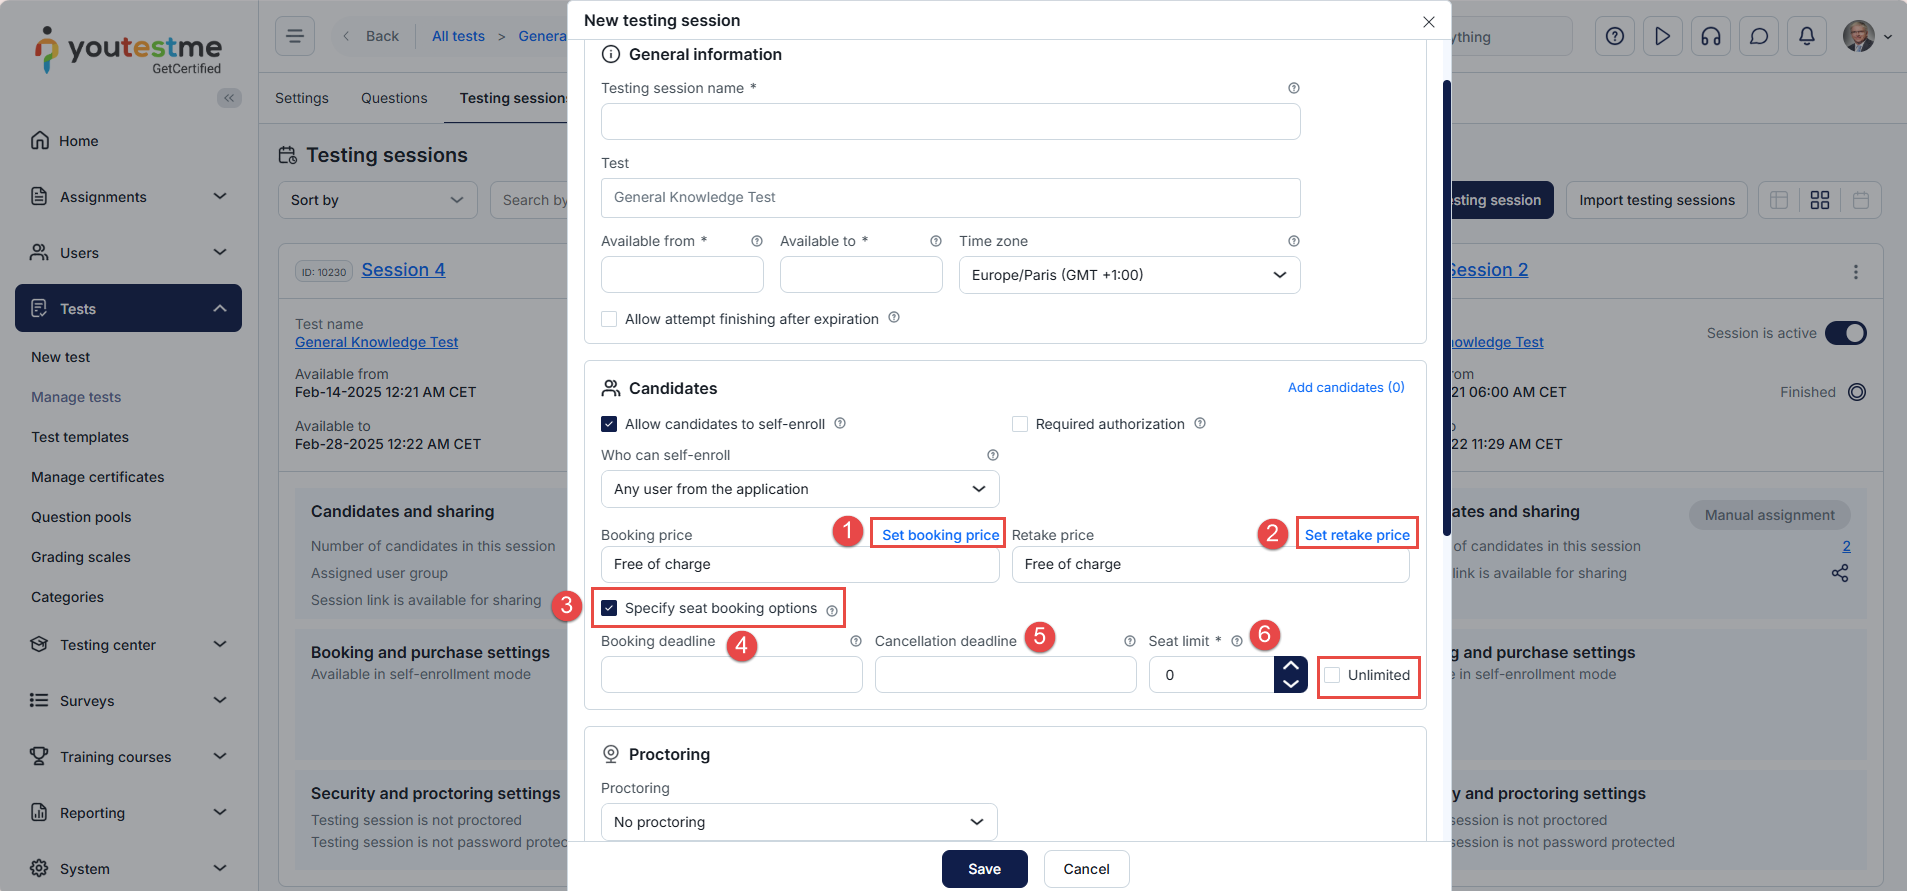
When the self-enrollment option is enabled, you will be presented with the following booking settings:
- Booking Price: Set the required booking fees for the session.
- Retake Price: Define the fees for retakes, if allowed.
- Specify Seat Booking Options: Enable this option to configure additional booking details, including the booking deadline, cancellation deadline, and seat limit.
- Booking Deadline: Set the date by which candidates must book the exam.
- Cancellation Deadline: Define the date by which candidates can cancel their booking.
- Seat Limit: Specify the maximum number of available seats. Once this limit is reached, no further bookings will be allowed. If no limit is required, you can enable the Unlimited option.
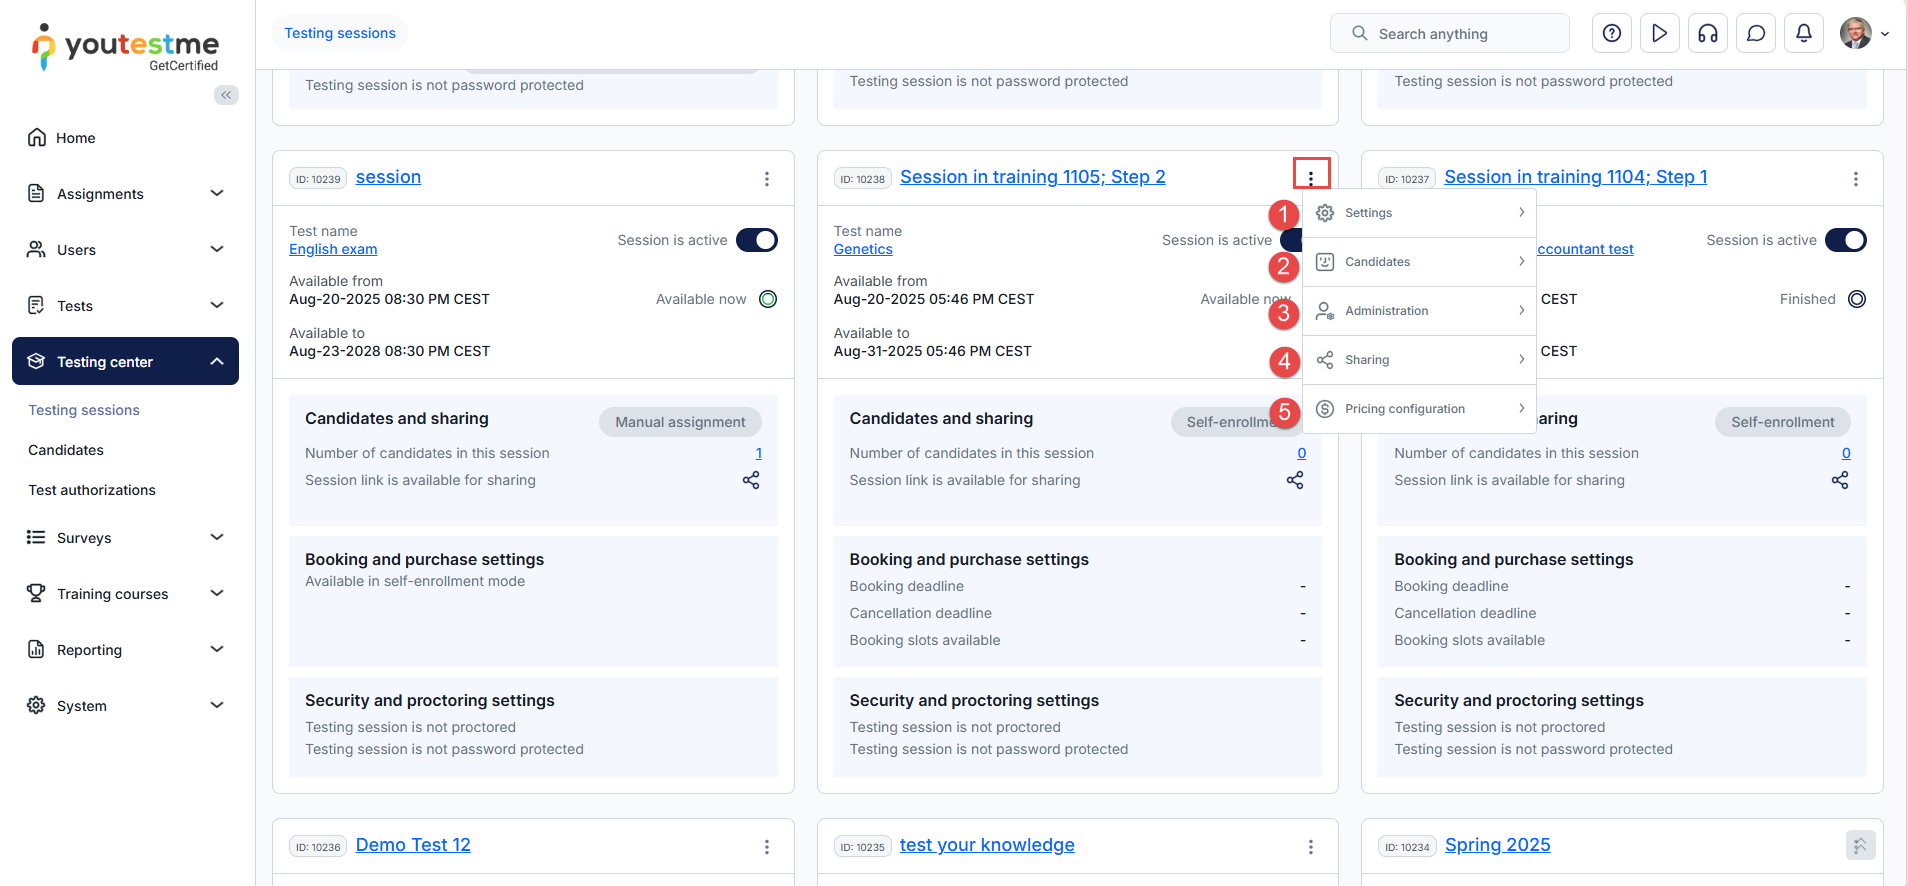
Editing The Testing Session Settings
To edit the session settings, click on the three dots in the top right corner of the session card and select the desired action:
- Settings: Select this option to edit, lock, or delete the session.
Note: The availability period of a testing session can be edited at any time. Any updates to the availability will automatically apply to all users in the system. - Candidates: Select this option to assign and manage candidates, add special accommodations, or requests.
- Administration: Select this option to assign test managers and proctors, as well as add or remove tests linked to the session.
- Sharing: Select this option to export the paper-based version of the test or to copy and share the direct and guest links.
- Pricing Configuration: Use this option to edit the session fees.
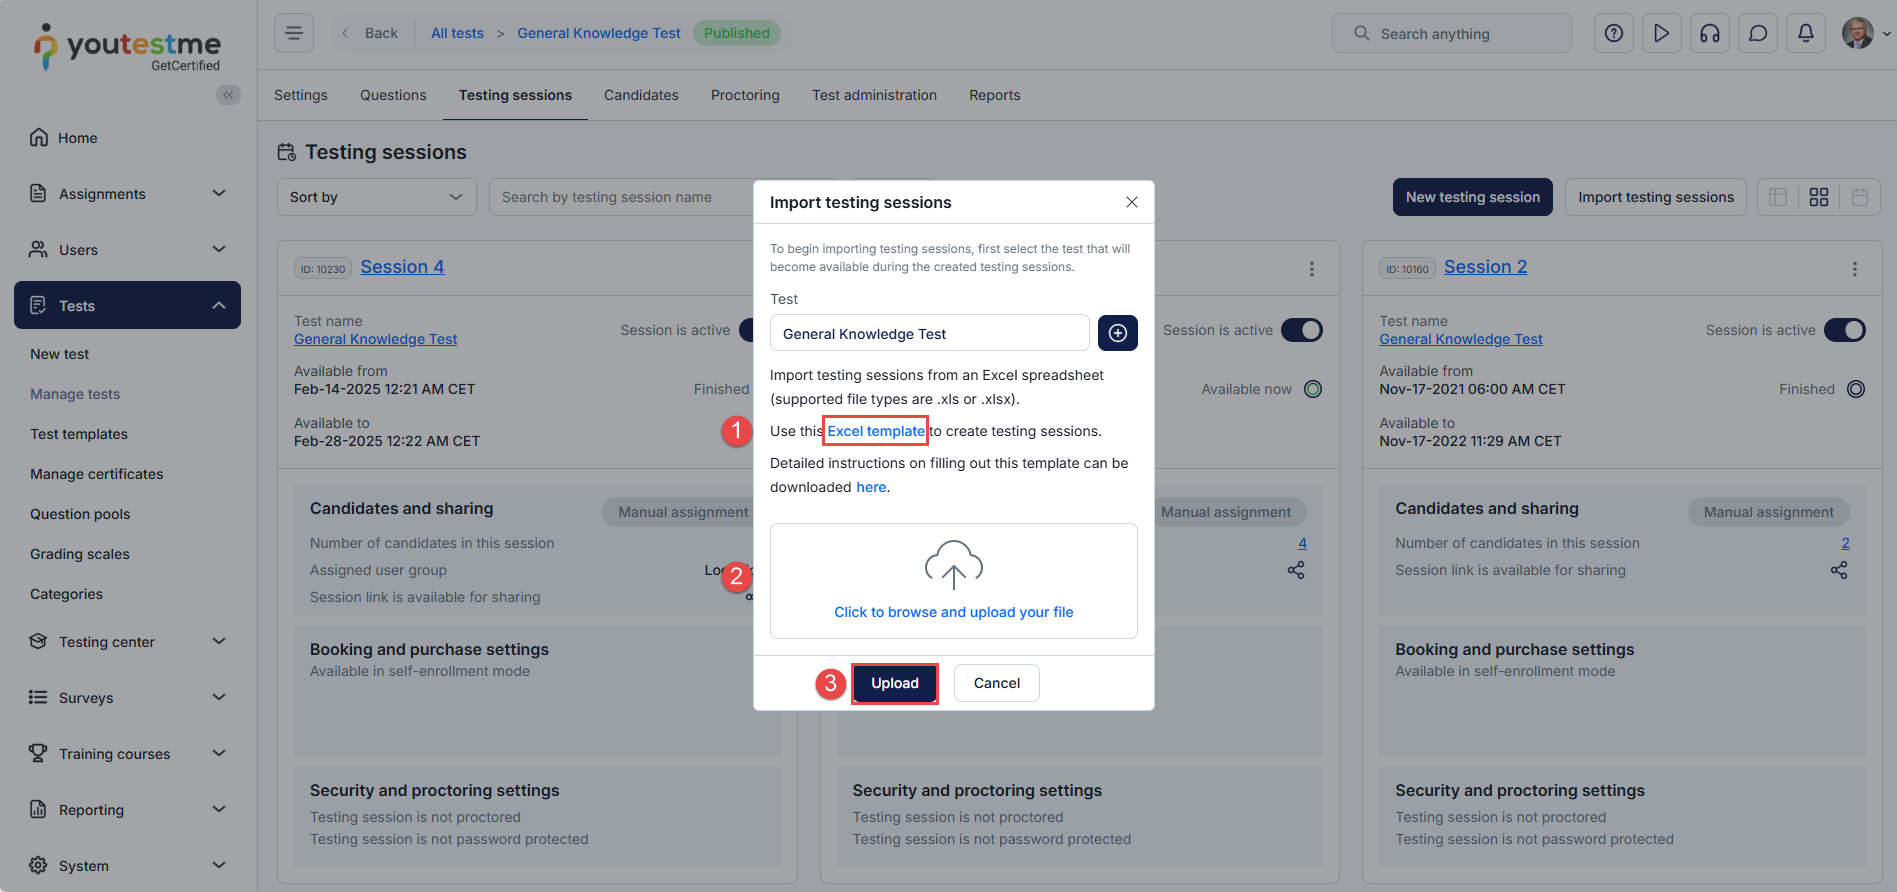
Importing Testing Sessions Using the YouTestMe Excel Template
Once you click the Import Testing Sessions button, you will be prompted with a dialog where you can:
- Download the Excel template and populate it according to the instructions outlined here.
- Once the template is ready, click the “Click to browse and upload your file” and select the created template
- Publish the testing sessions using the Upload button.
For more related instructions, please visit the following articles:
