
Article verified for Release 15.1 on September 13, 2025.
This article explains how to create and use both test and session instructions. Test instructions define the rules and guidelines candidates must acknowledge before starting a test, while session instructions provide additional information about the testing session and can be standardized with templates.
How to Add Test Instructions
Test instructions define specific rules and guidelines that candidates must acknowledge in a pop-up dialog before starting the test, such as rules about breaks, calculator usage, or permitted materials. These instructions can be added either during test creation or later, for a Created Test
Adding test instructions during test creation
At the Test Settings stage of the Test Creation Wizard, test creators can configure additional settings, including those for test instructions; please check this article for more details on how to create a test:
- Require Instructions Acknowledgment: Enabling this option requires test-takers to acknowledge the test instructions before starting the test.
- Test Instructions: This section allows the test creator to input and format the instruction text as needed.
- Preview Instructions: The preview button allows you to view how the instructions will appear to test-takers.
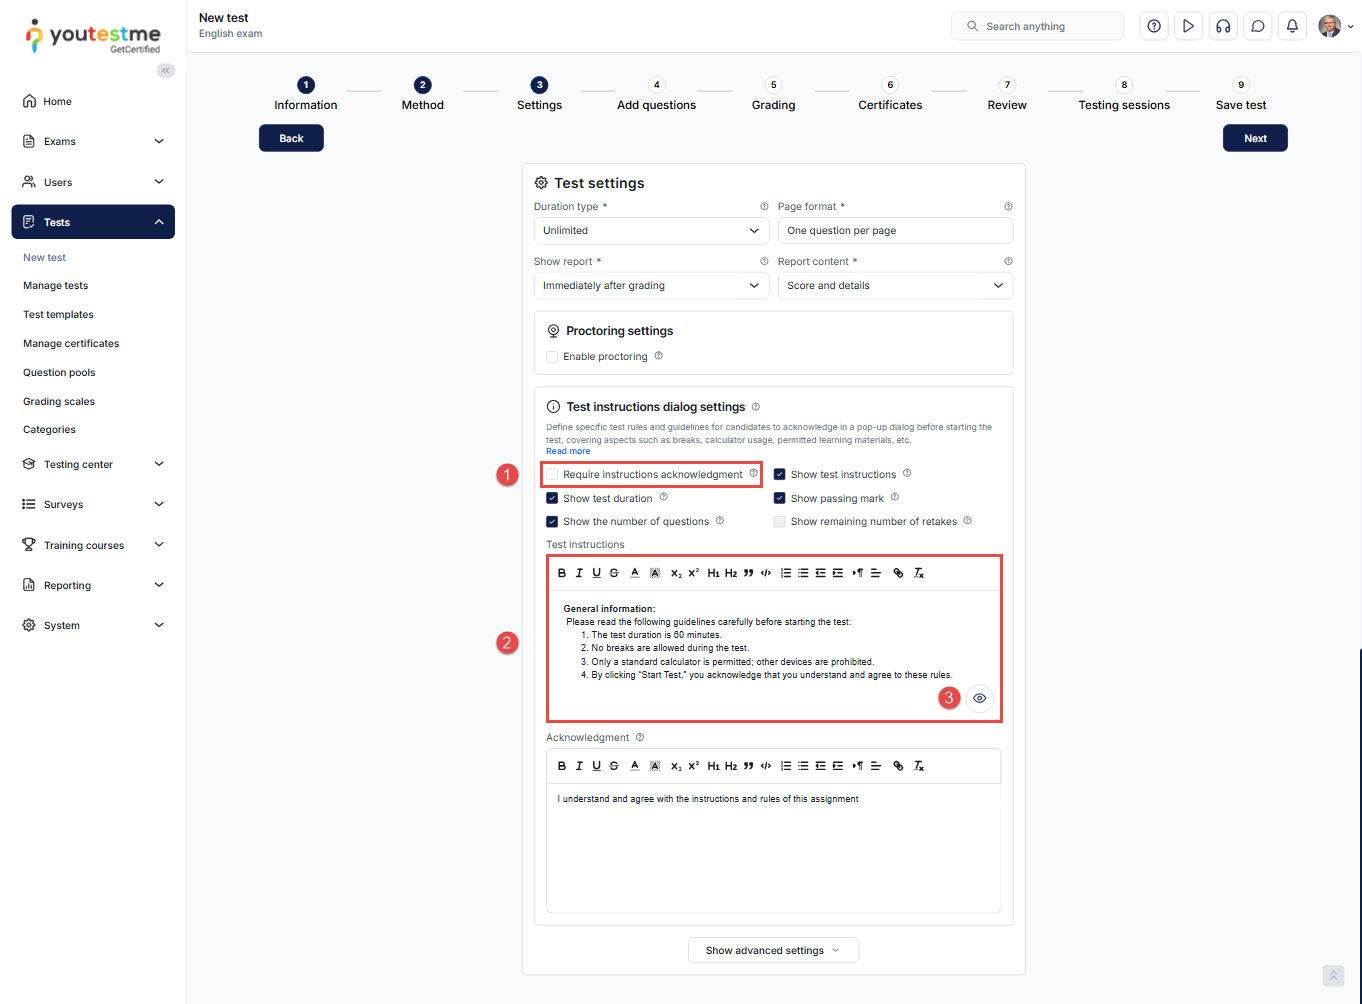
Note: You can add hyperlinks to the test instructions by selecting any portion of text and using the Link option. This is especially useful when you want candidates to review external resources, such as terms and conditions or testing guidelines, before starting the test.
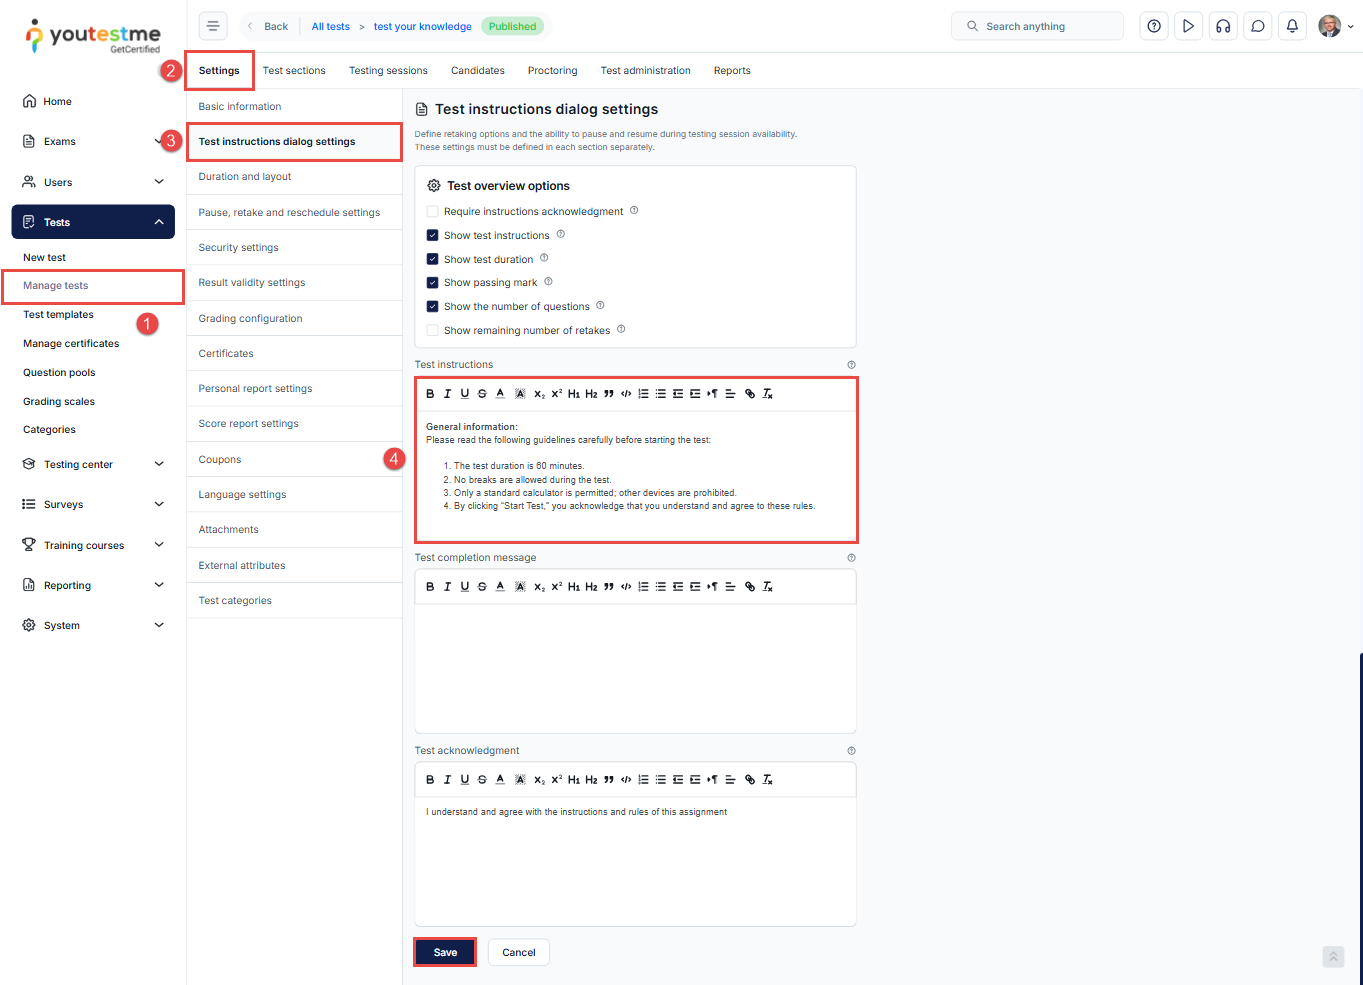
Adding or Editing Test Instructions for Published Tests
Test instructions can be added or modified even after the test has been published. Follow the steps below to add or edit instructions for an existing test:
- Navigate to the Tests module and select Manage Tests.
- Choose the desired test and go to the Settings tab.
- Select Test Instructions Dialog Settings.
- Edit or add the instructions text in the Test Instructions section and click the Save button to apply and save your changes.
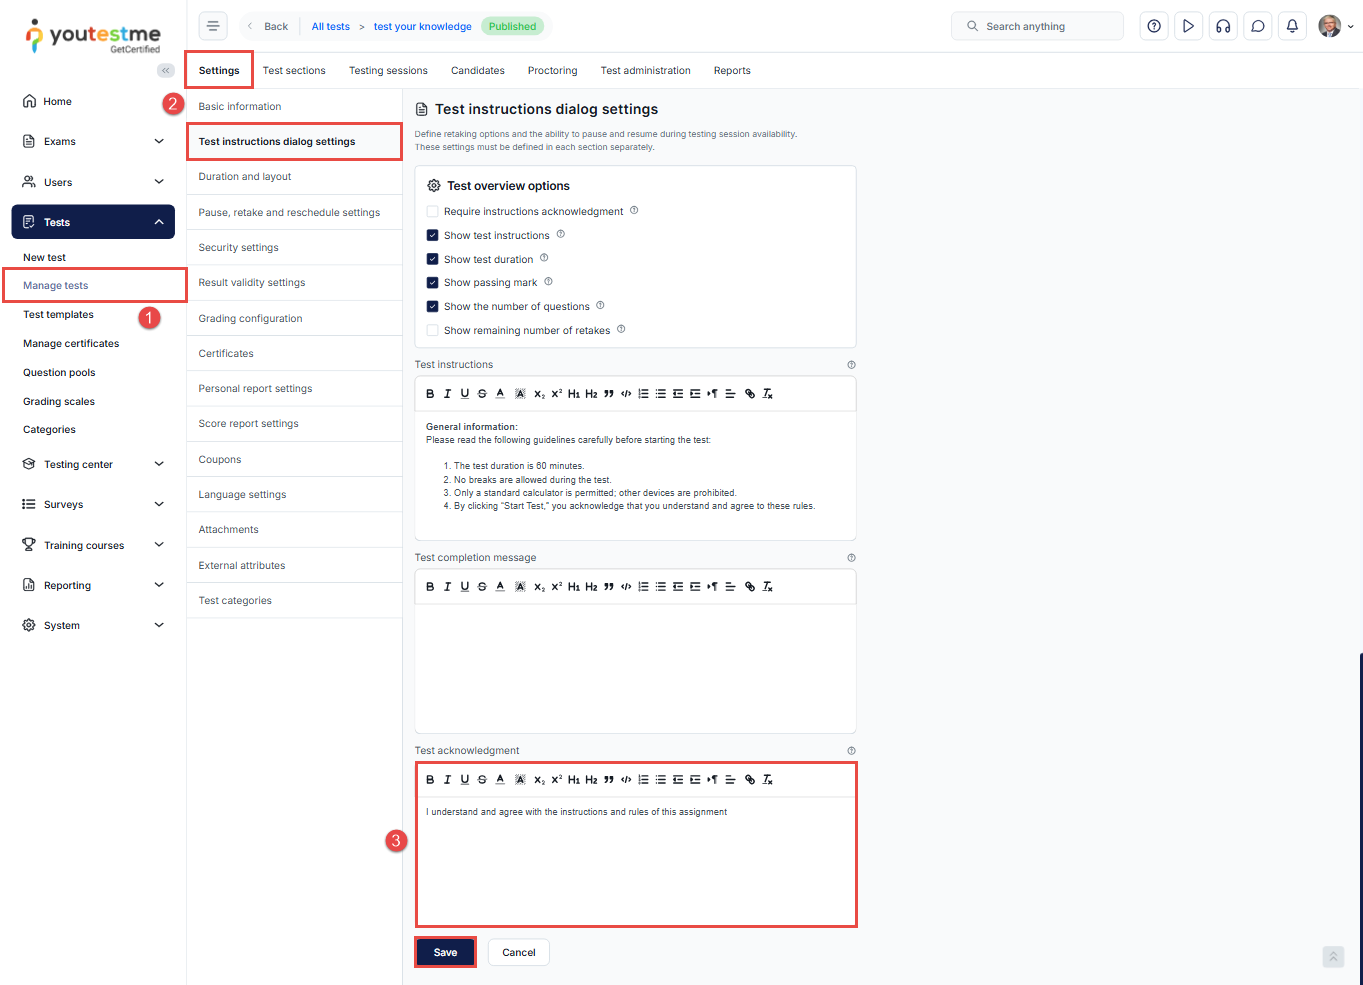
 Editing the instruction acknowledgment text
By default, the test acknowledgment text is “I understand and agree with the instructions and rules of this assignment.” However, this sentence can be customized to meet the test creator’s requirements and may differ for each test.
To edit the test acknowledgment text, follow the steps below:
- Navigate to the Tests module and select Manage Tests.
- Choose the desired test and go to the Settings tab.
- Select Test Instructions Dialog Settings, edit the instructions text in the Test Acknowledgement, and click the Save button to apply and save your changes.
Note: When previewing a test, the Instructions dialog does not appear, so instructions and acknowledgments will not be visible.
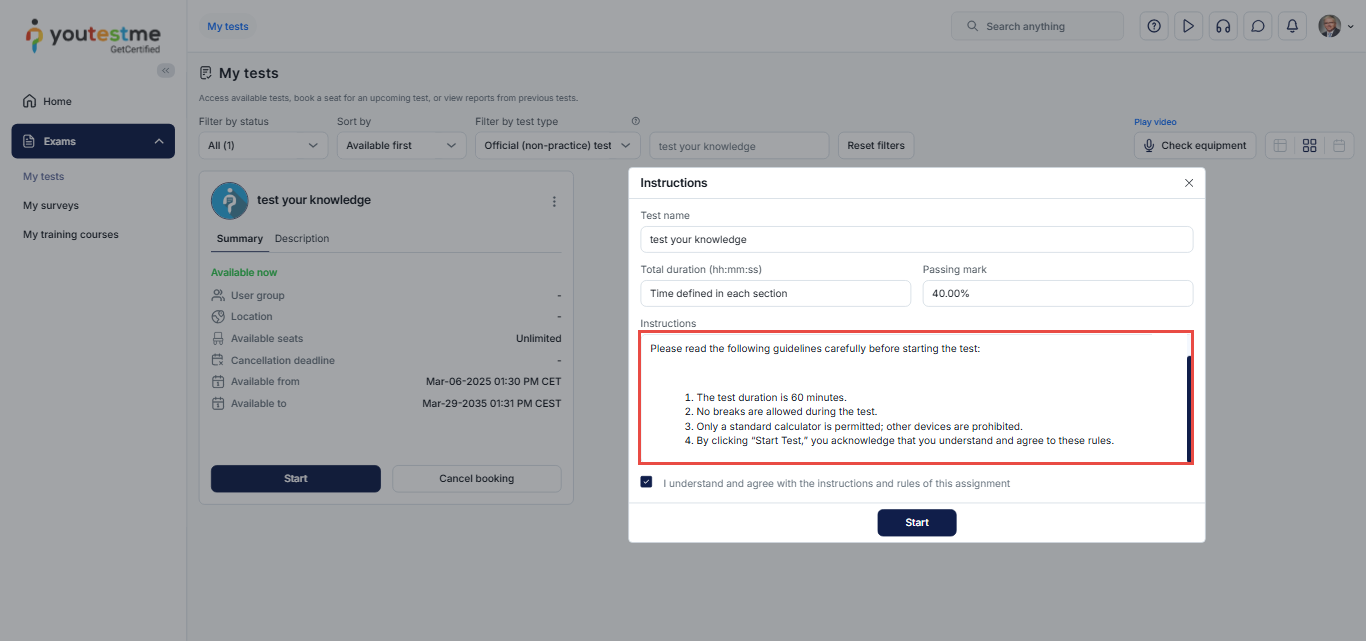
Candidates’ perspective
From the candidate’s perspective, the instructions dialog will be displayed when the user clicks the start button. If the instructions acknowledgment is required, the start button will become available only when the candidate checks the box “I understand and agree with the instructions and rules of this assignment.”
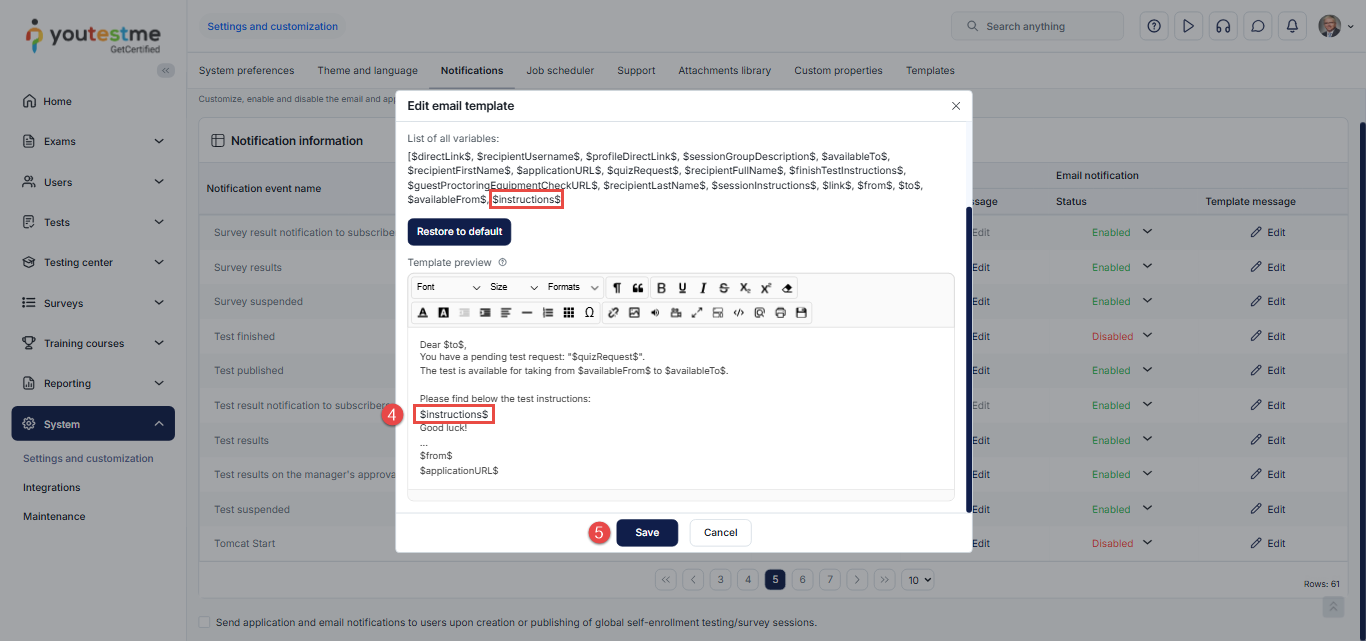
Including Test Instructions in Email Notifications
The YouTestMe system allows test creators to include test instructions in the email notification automatically sent to candidates upon enrollment. To include these instructions, follow the steps below:
- Navigate to the System section in the left-side menu and select Settings and Customization.
- Go to the Notifications tab, where you can customize, enable, or disable email and application notifications.
- Locate the Test Published notification event, and click the Edit button in the Template Message column under Email Notification. A pop-up window will appear, allowing you to preview and edit the email template.
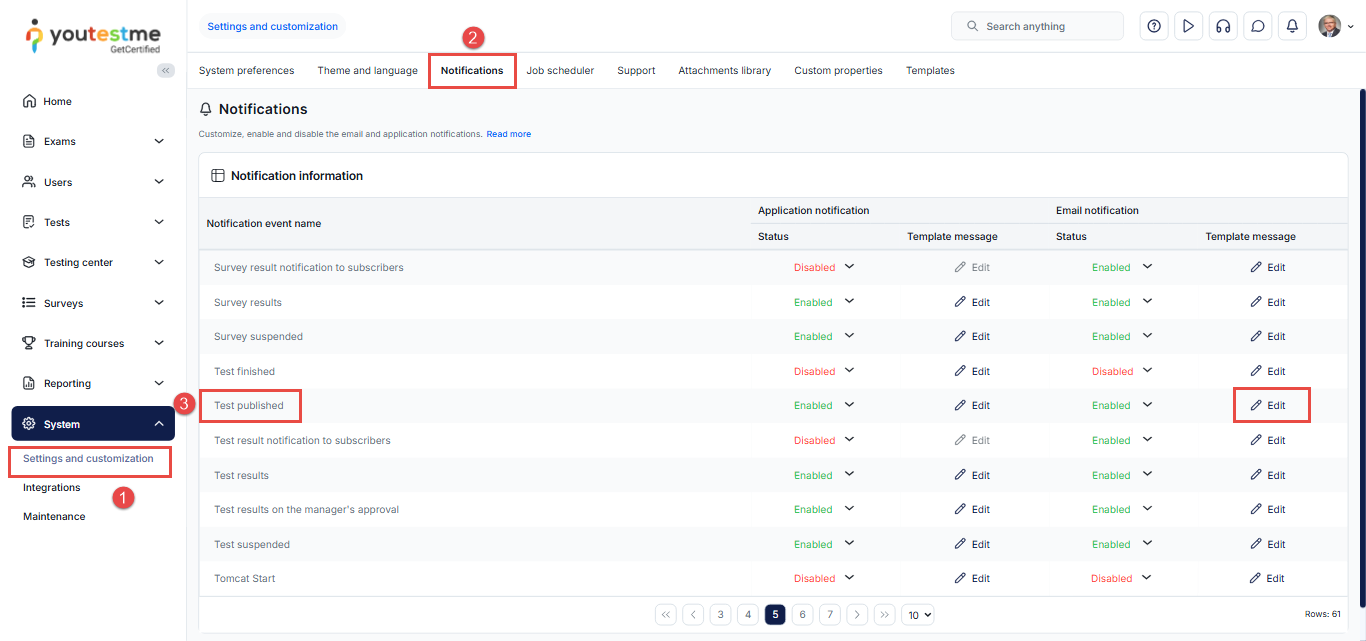
- Add the $instructions$ variable to the email template to ensure the test instructions are included in the notification sent to candidates.
- Click the Save button to apply and save your changes.
Note: The email notification status should be enabled to send the email to the test takers.
How to add Session Instructions
Session instructions allow you to provide additional guidelines or rules that candidates must follow during a testing session. These instructions can be added directly for each session or applied using a predefined template.
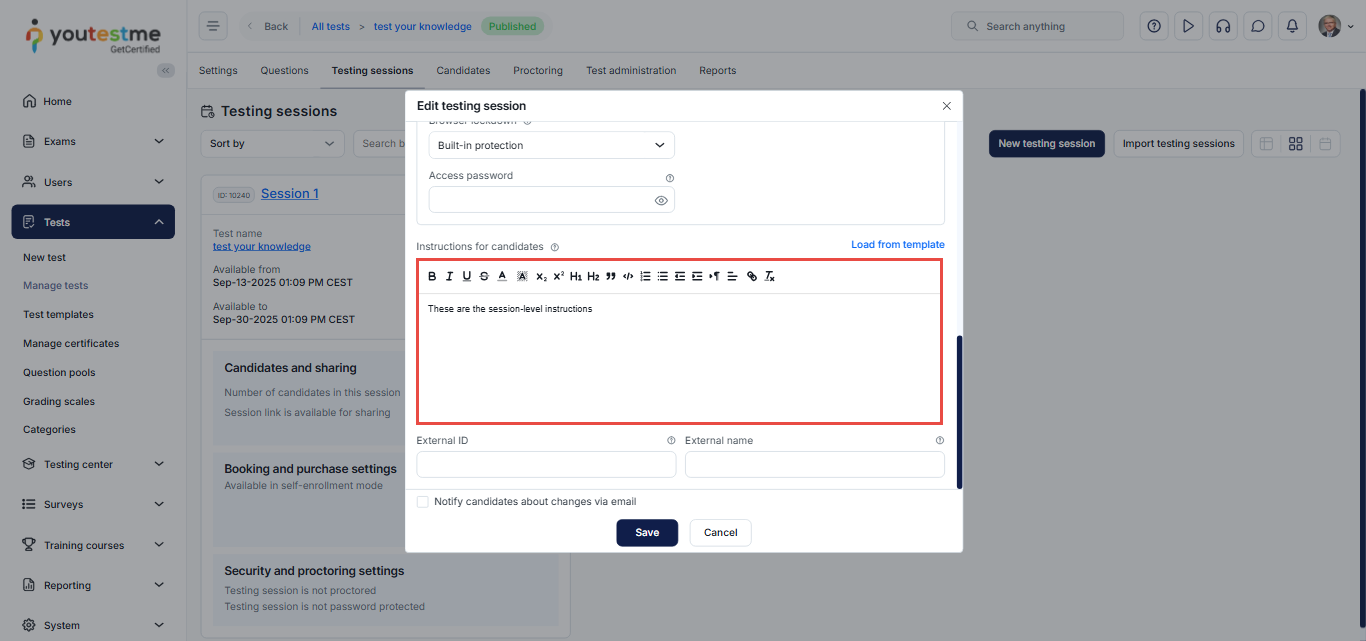
Adding Instructions During Session Creation
During the session creation process, you can add session instructions for candidates.
To do so:
- Scroll down to the Instructions for Candidates section.
- Type your instructions in the provided field.
For more information on how to create a session, please visit this article
You can also create and use session instruction templates to quickly apply predefined instructions during session setup, eliminating the need to re-enter the same information each time
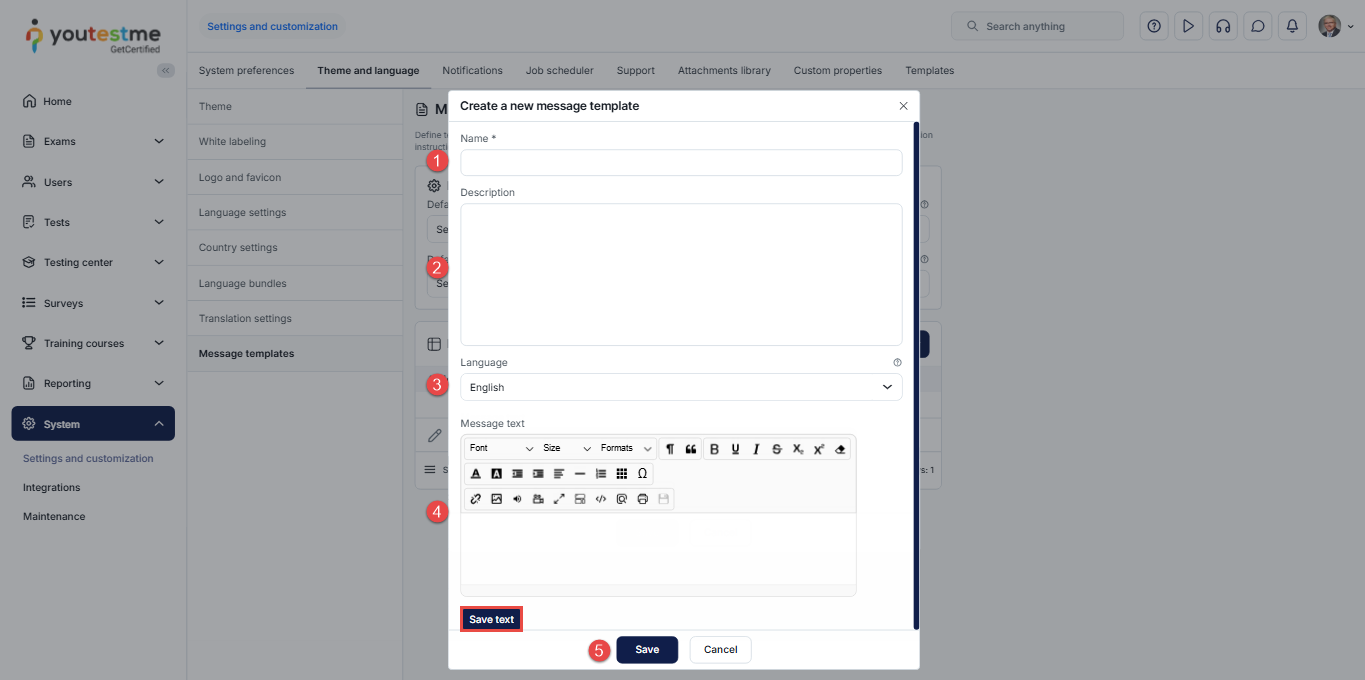
Creating a Session Instructions Template
Follow the steps below to create a session instructions template:
- From the main menu, navigate to System and choose Settings and Customization.
- Open the Theme and Language tab.
- From the left-hand menu, select Message Templates.
- Click the Create New button. A pop-up window will appear where you can configure the template.
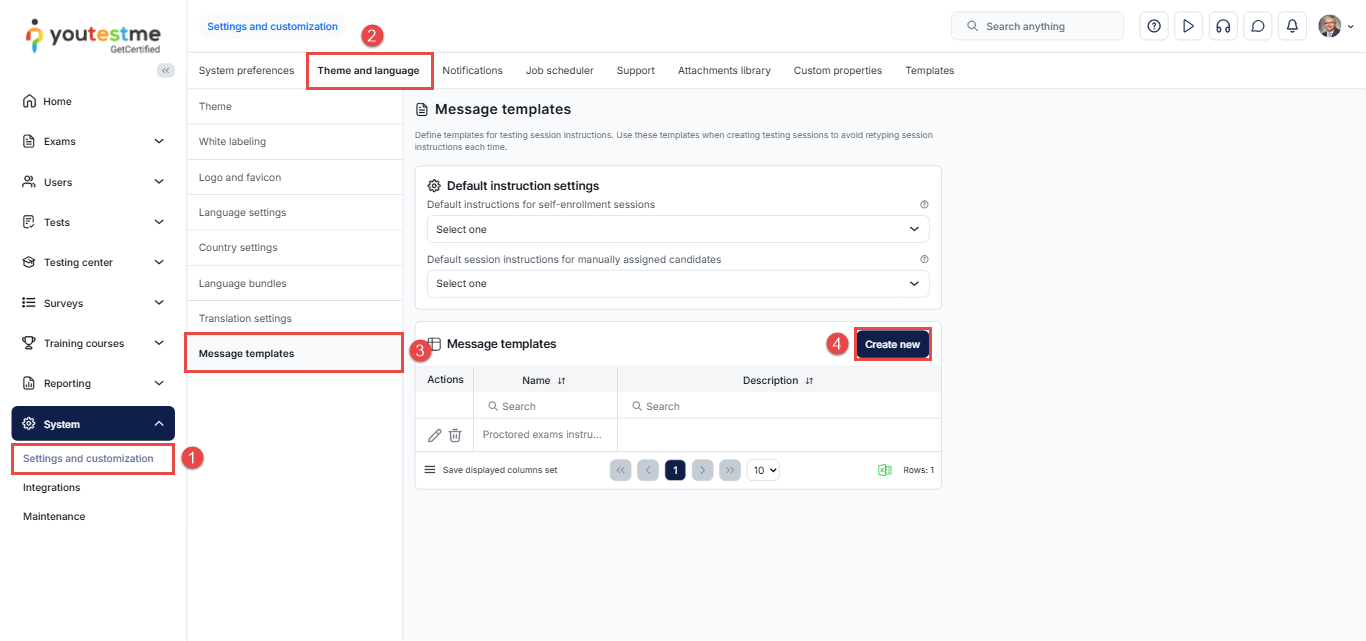
In the pop-up window, complete the following fields:
- Name: Enter a name for the message template.
- Description (optional): Provide a brief description to help identify the purpose or use of the template.
- Language: Select the language for the message text. The message will be shown to candidates based on the language preferences set in the system.
- Message text: Enter the content of the session instructions to be saved in this template.
- Saving Instructions in Multiple Languages:
If your test is offered in more than one language (e.g., English and French), you can create different message versions for each language:- Select English from the Language dropdown, type the English message, and click Save Text.
- Switch to French (the message field will be empty) and enter the French version, then click Save Text.
- Repeat for any additional languages as needed.
- Once all versions are added, click Save to finish creating the template.
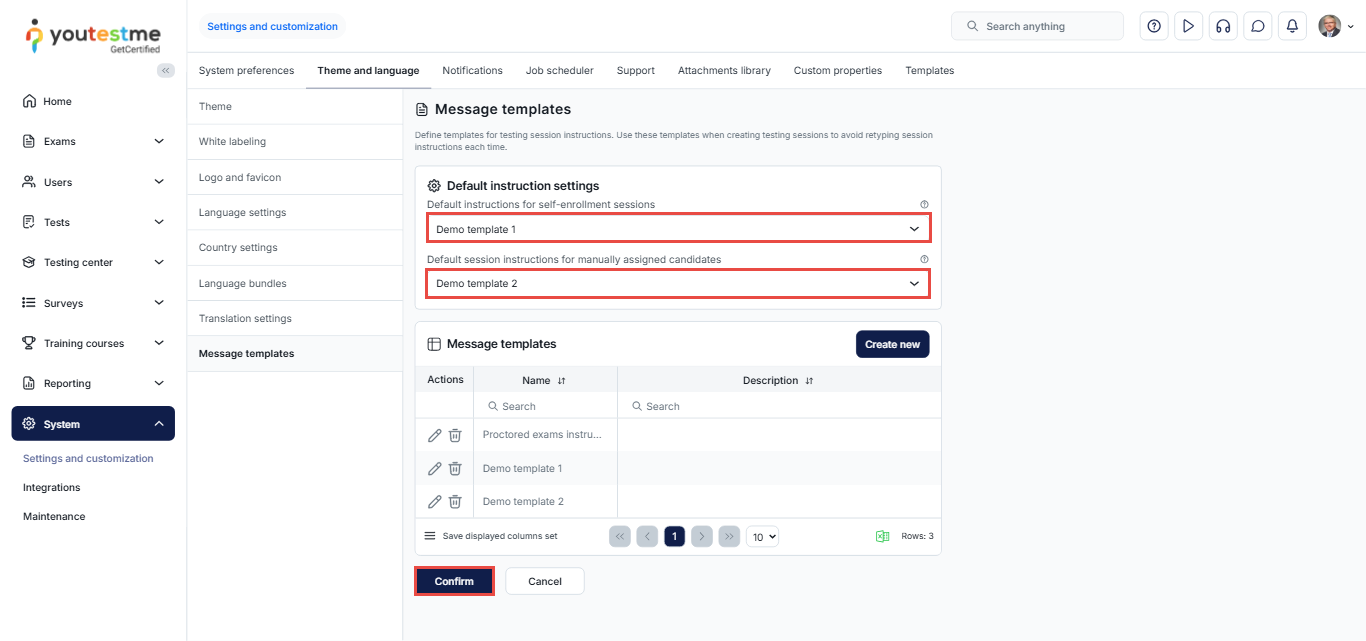
Setting the Default Session Instructions Template
In addition to selecting a session instructions template during session creation, you can set a default template for both self-enrollment and manually assigned sessions.
To set a default template:
- Click the drop-down menu in the relevant section.
- A list of all previously created templates will appear.
- Select the desired template.
- Click Confirm to save your choice.
- Once set, the selected template will automatically be applied to new sessions based on the session type.
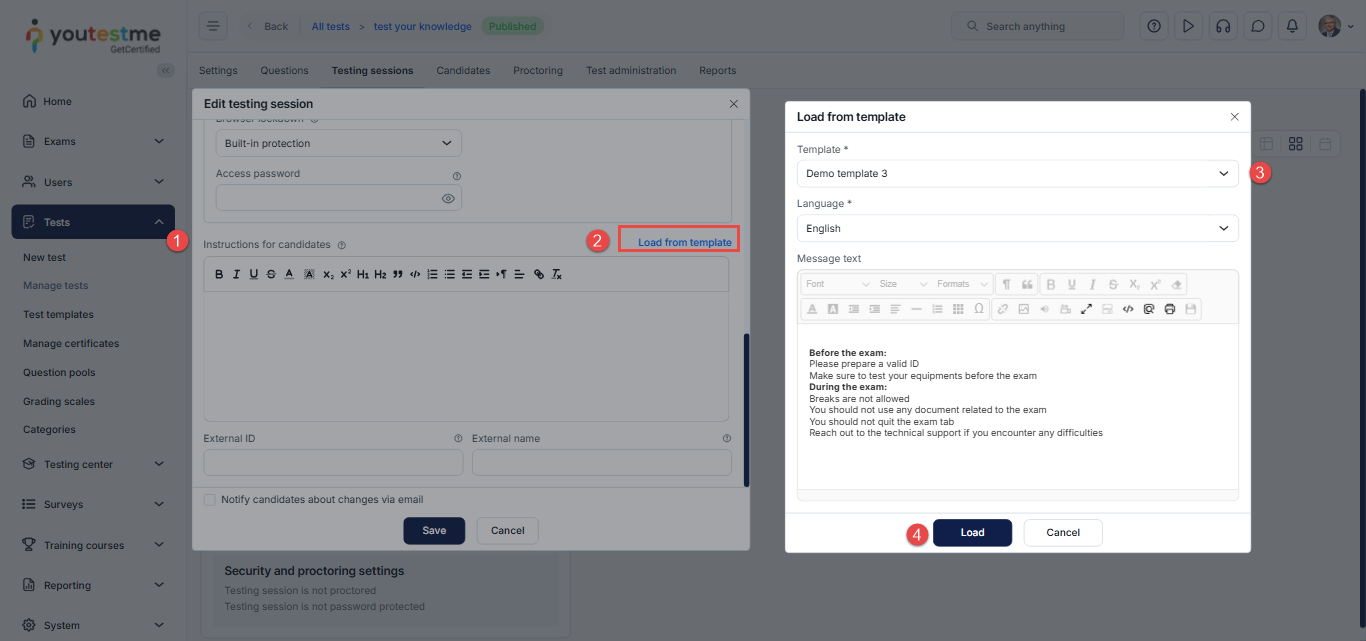
Applying an Instruction Template During Session Creation
During the session creation process, you can apply a predefined session instructions template instead of typing the instructions manually.
To apply a template:
- Navigate to the Instructions for candidates section.
- Click the Load from template button.
- Select your preferred template from the dropdown menu.
- Click Load to apply the selected template.
The selected message will be automatically inserted into the instructions field.
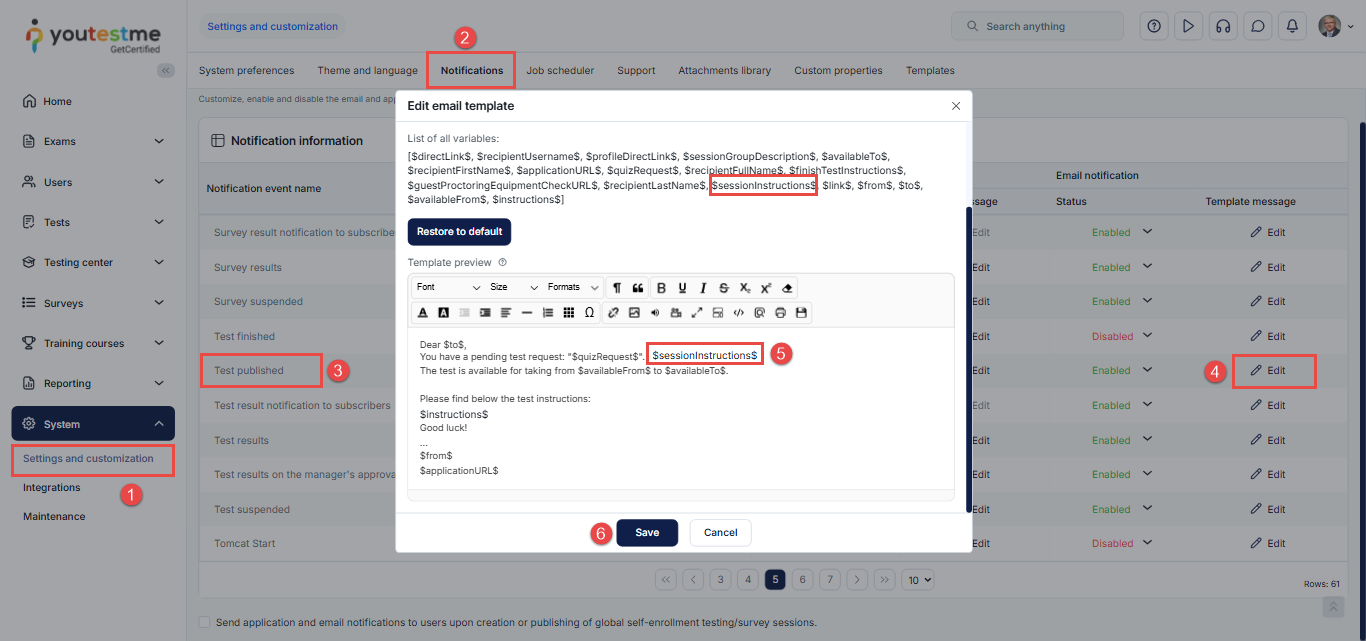
Including Session Instructions in Email Notifications
If you need to differentiate between users and provide specific instructions based on the session they are assigned to, you can use the Session instructions variable in the email notification template. This allows the system to dynamically insert the relevant session instructions into the email, rather than manually including them in the message.
To do so, follow these steps:
- Navigate to the System page and select Settings and Customization.
- Go to the Notifications tab.
- Locate the desired notification – Test Published.
- Ensure that the email notification is enabled, then click Edit.
- In the message body, add the content common to all recipients, and insert the Session instructions variable where the session-specific content should appear (as shown in the image below).
- Click Save.
For more related instructional materials, please visit:
