
Article verified for Release 15.2 on February 14, 2025.
This article explains how to use the special accommodations feature that helps administrators support candidates with specific needs, such as medical conditions. It allows for managing requests like extra time, breaks, paper-based exams, or one-on-one live proctoring to ensure flexibility and accessibility.
Accommodation Types
Special accommodations are tailored support measures provided to candidates with specific needs during a test. These adjustments apply only to the specific test attempt for which they are set.
YouTestMe offers the following accommodation types:
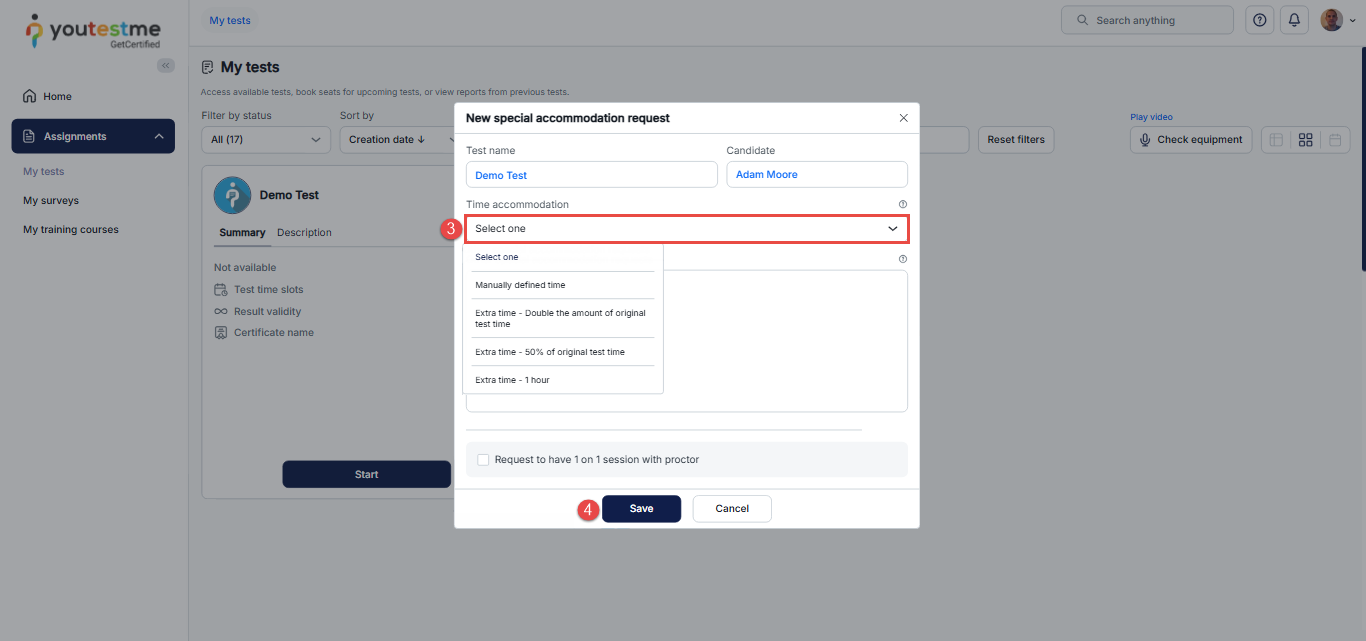
- Time Accommodation – Available only if the test has a time limit for the entire test. The available time accommodations are:
- Custom – Manually defined time.
- Extra time – Double the amount of the original test time.
- Extra time – 50% of the original test time.
- Extra time – 1 hour.
Note: Time accommodation can only be applied if the test has a defined time limit. If the test duration is set to Unlimited or configured as a Deadline to answer all questions, time accommodation will not be available.
- Other Accommodations – Custom requests entered in free-form text, such as allowing a break or using a specific device.
- 1-on-1 Proctored Session – Allows the candidate to take the test in a private session monitored by a dedicated proctor.
Enabling the Special Accommodations Feature
Before special accommodation requests can be created, the feature must be enabled in the system.
To do so:
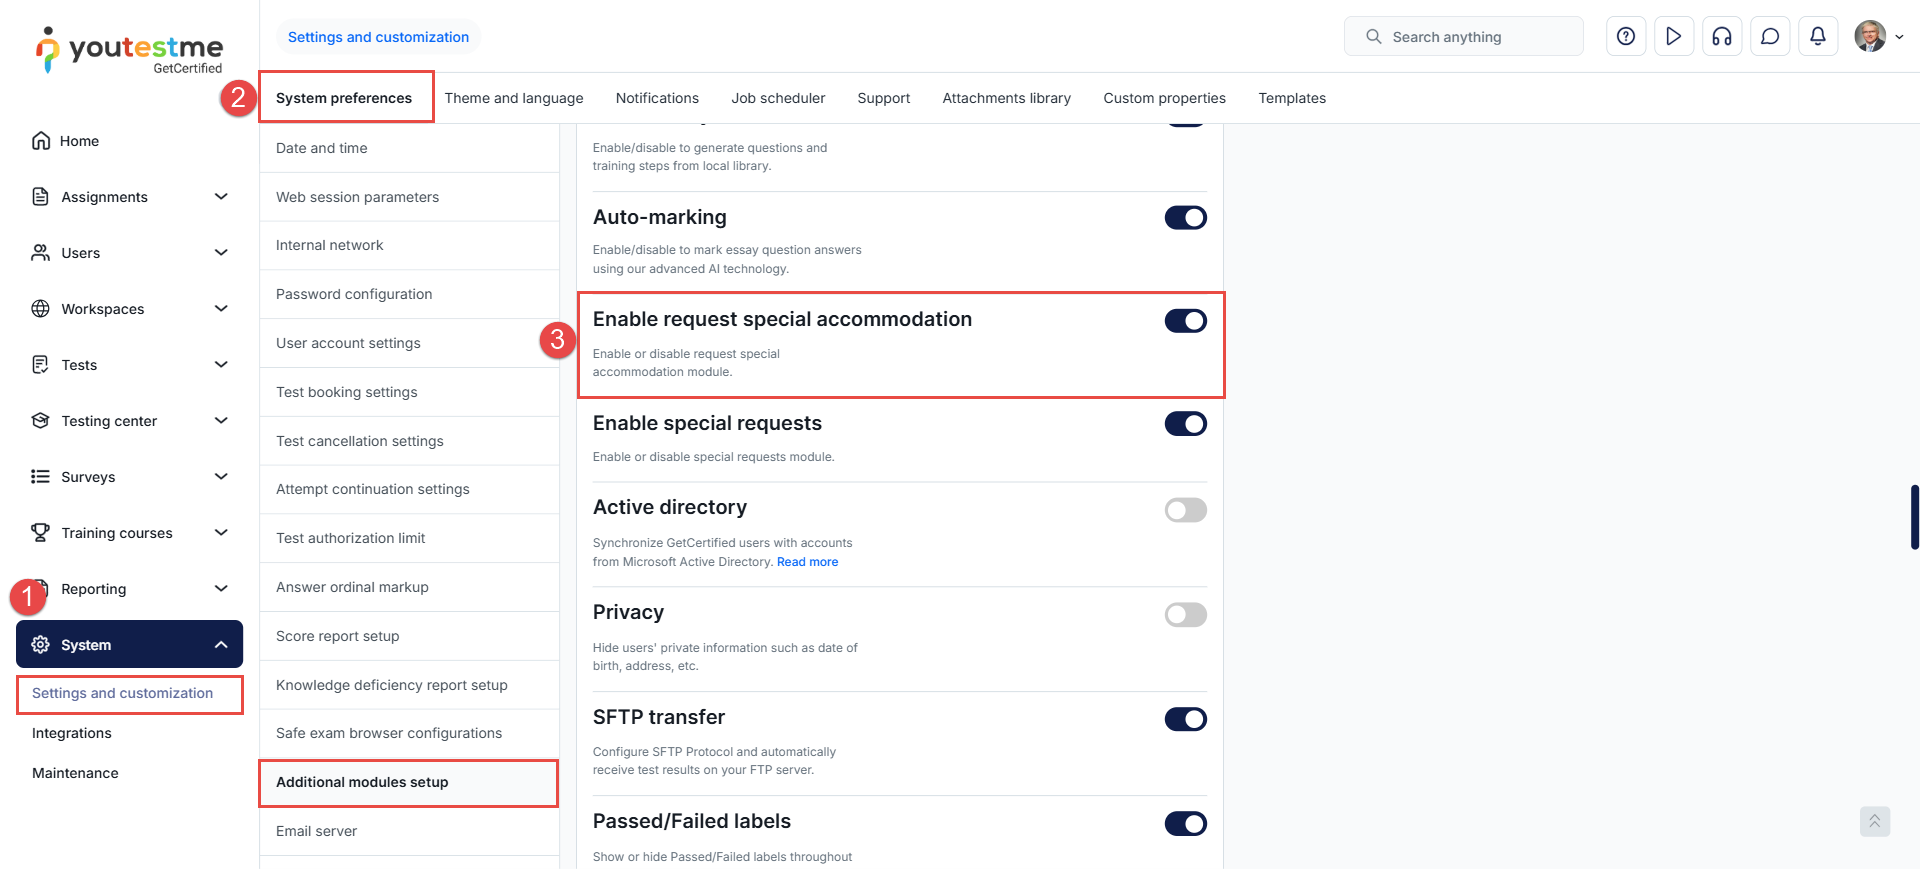
- In the main menu, select System and then navigate to Settings and Customization.
- Go to the System Preferences tab and select Additional Modules Setup.
- Scroll down and enable the option labeled Enable request special accommodation.
Once enabled, this option will become available to users depending on their role permissions.
Allowing Candidates to Request Special Accommodations
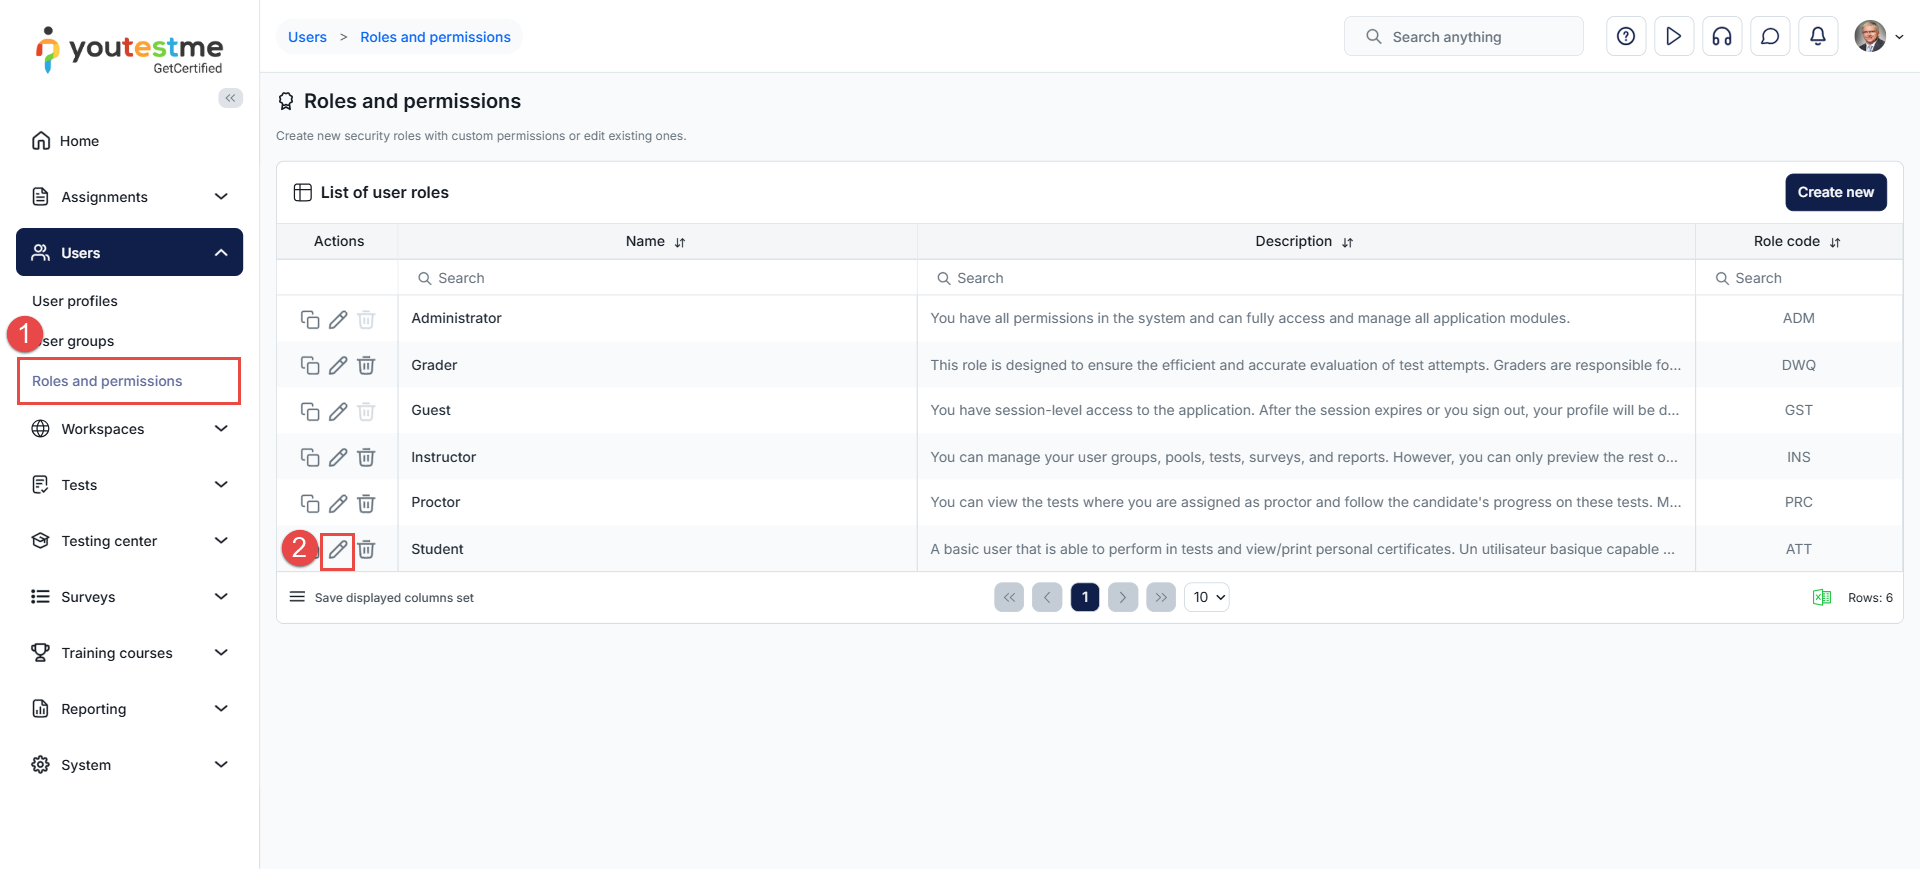
Administrators have the option to either create special accommodations on behalf of candidates or allow candidates to submit their own requests. To allow candidates to submit special accommodation requests, the appropriate permission must be granted to the Student role. To enable this:
- Go to Users and select Roles and Permissions.
- Click the Edit option next to the Student role.
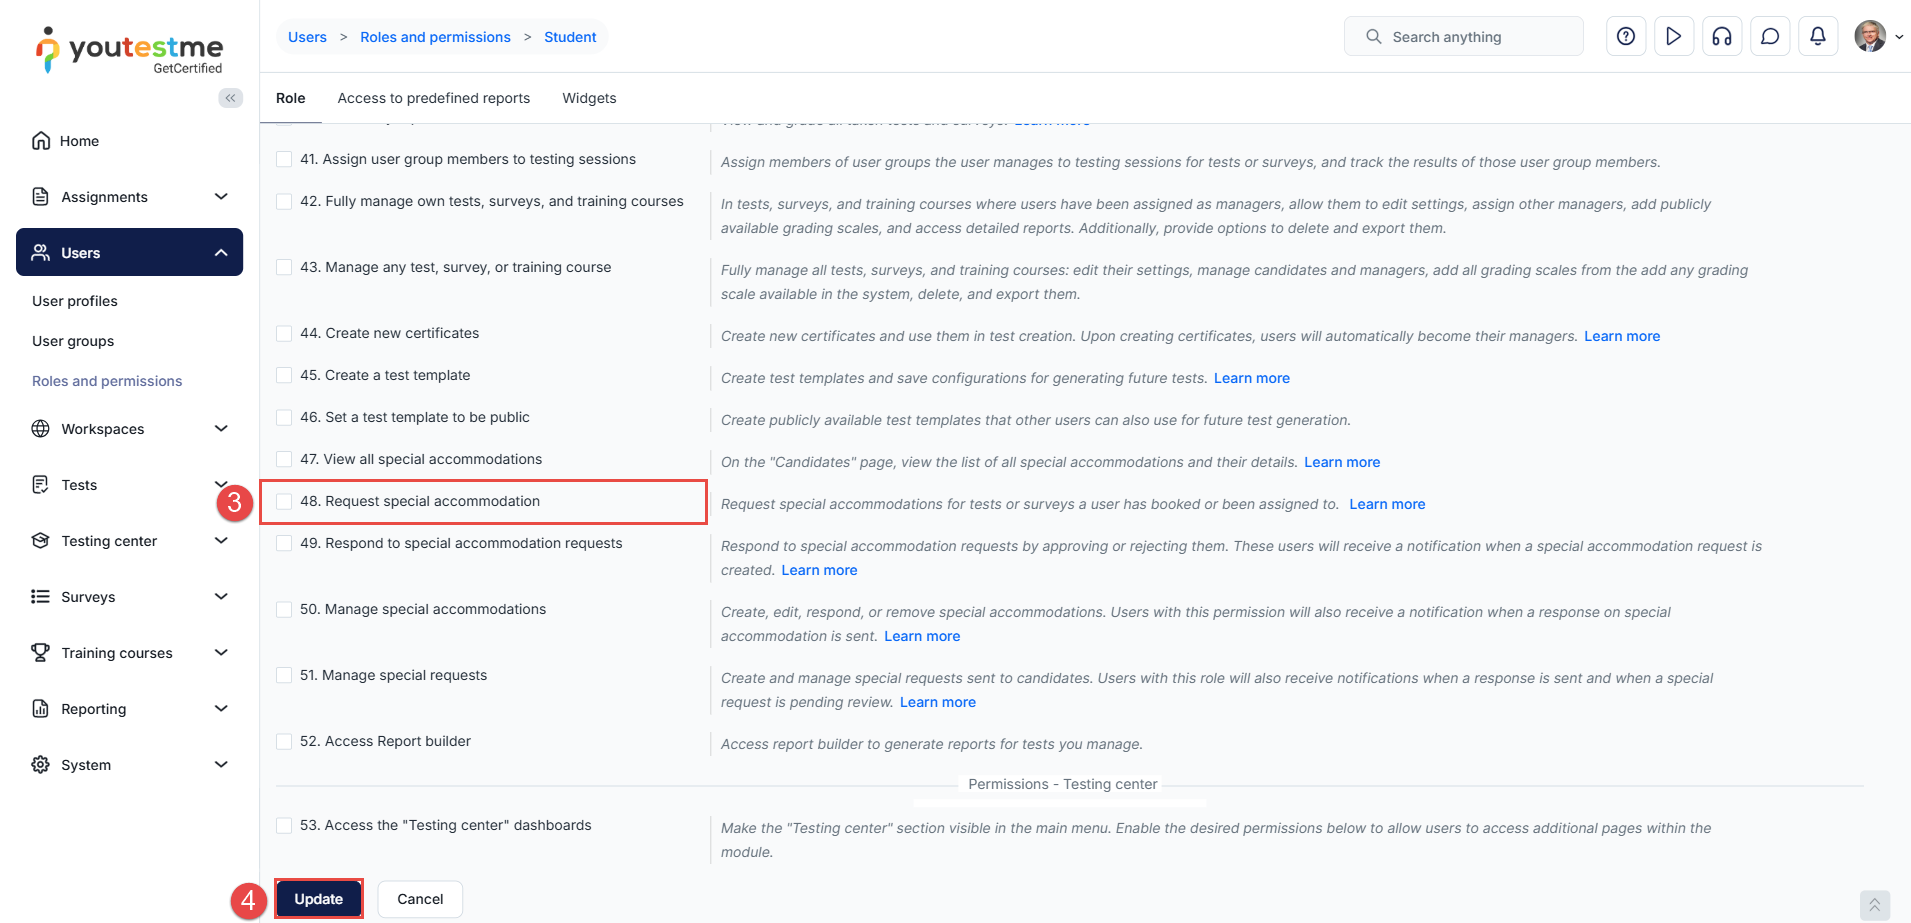
- Scroll down to Permissions and enable the Request special accommodation permission.
- Click Update to save changes.
For more information on managing roles and permissions, please visit this article.
Enabling Notifications
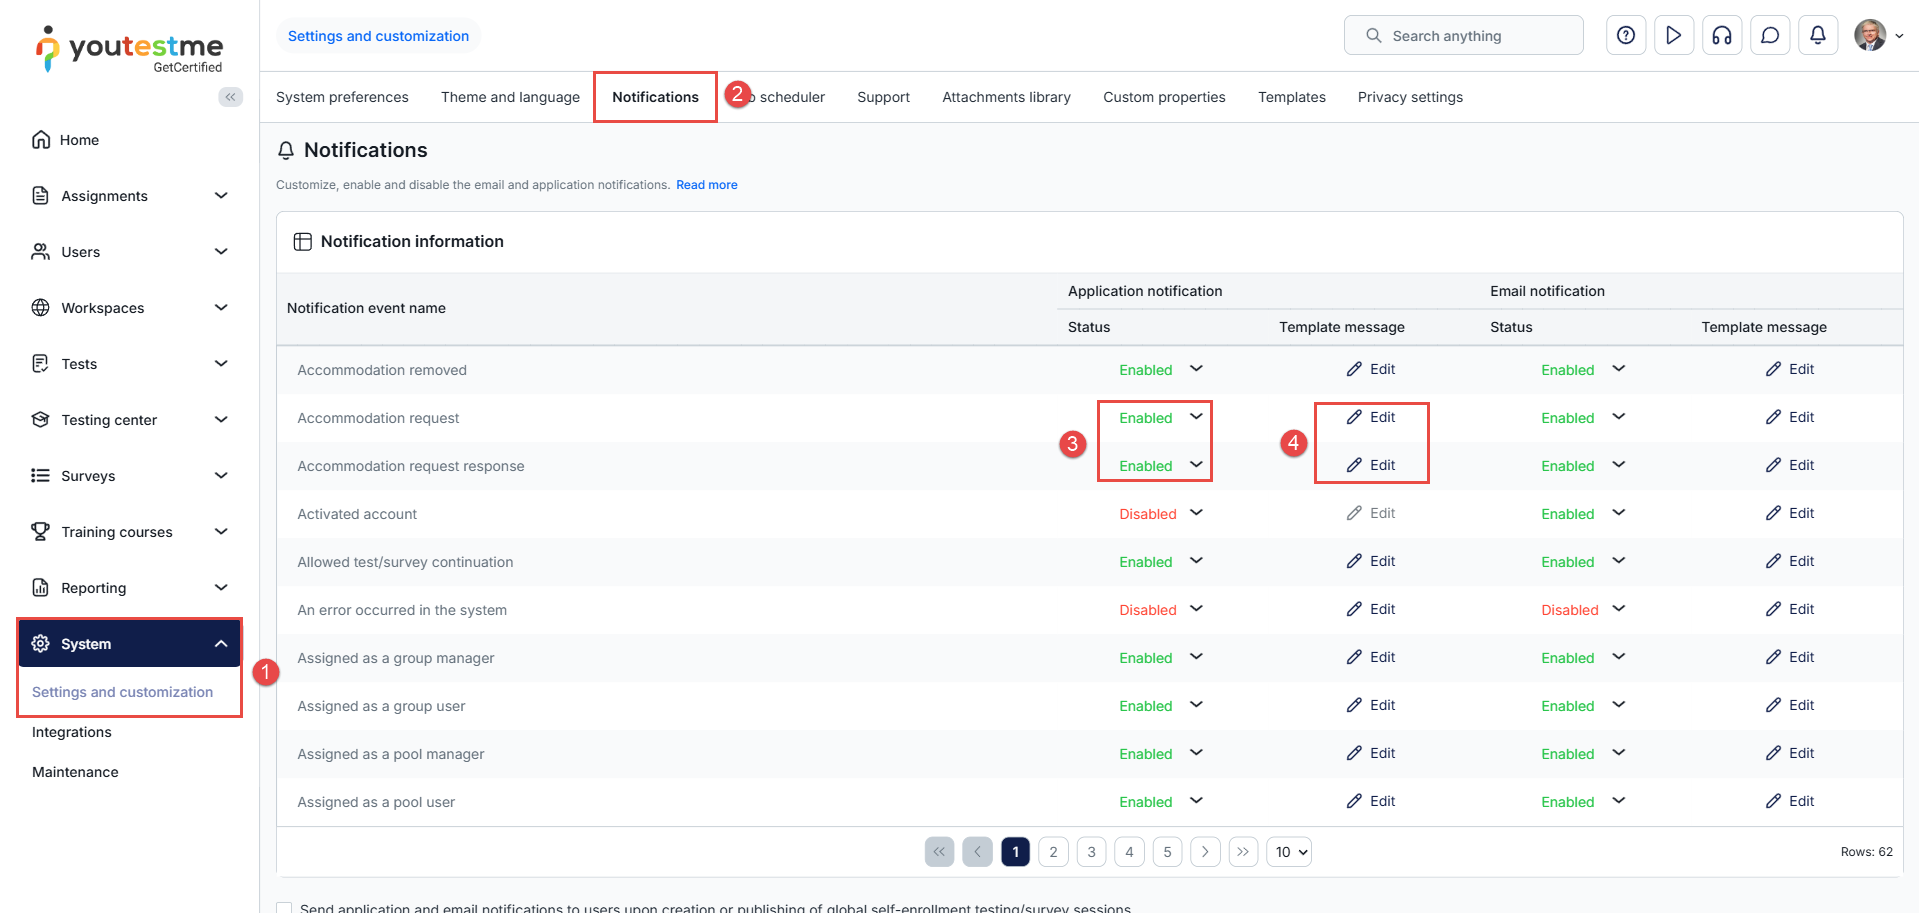
To receive accommodation requests and responses, you need to enable the appropriate notifications. To do so, follow the steps below:
- Navigate to System > Settings and customization.
- Go to Notifications.
- Under the Status column, select Enabled from the dropdown.
- Edit the content of the application notification as needed. For more information, please refer to this article.
The same steps can be applied to enable and configure email notifications as well.
Submitting a Request (Candidate Perspective)
Candidates can request accommodations after being manually assigned to a test by following these steps:
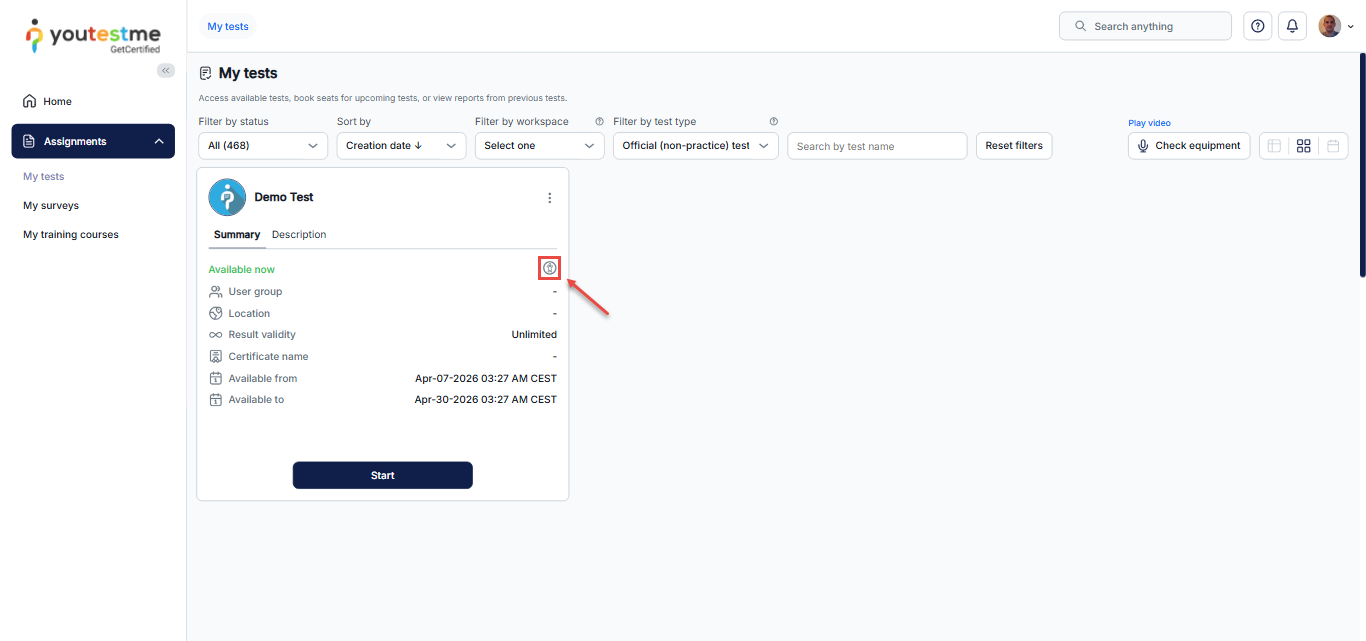
- From the main menu, navigate to the Assignments section, then select My Tests.
- Click the three-dot menu (⋮) next to the test name and select Request Special Accommodation from the dropdown menu.

- Select the type of accommodation.
- Provide additional notes or justification (if applicable) and click Save to submit the request.
Once the exam administration approves the accommodation, an icon will appear next to the test name to indicate that a special accommodation request has been granted.
If system notifications for special accommodations are enabled, the candidate will be notified via the application and email about the status of their accommodation request.
Special Accommodation for Self-Enrolment Sessions
- If a testing session is set to self-enrollment, the candidate must book the exam first before requesting a special accommodation.
- If the candidate clicks the three-dot menu before booking the exam, the “Request Special Accommodation” option will not be available.
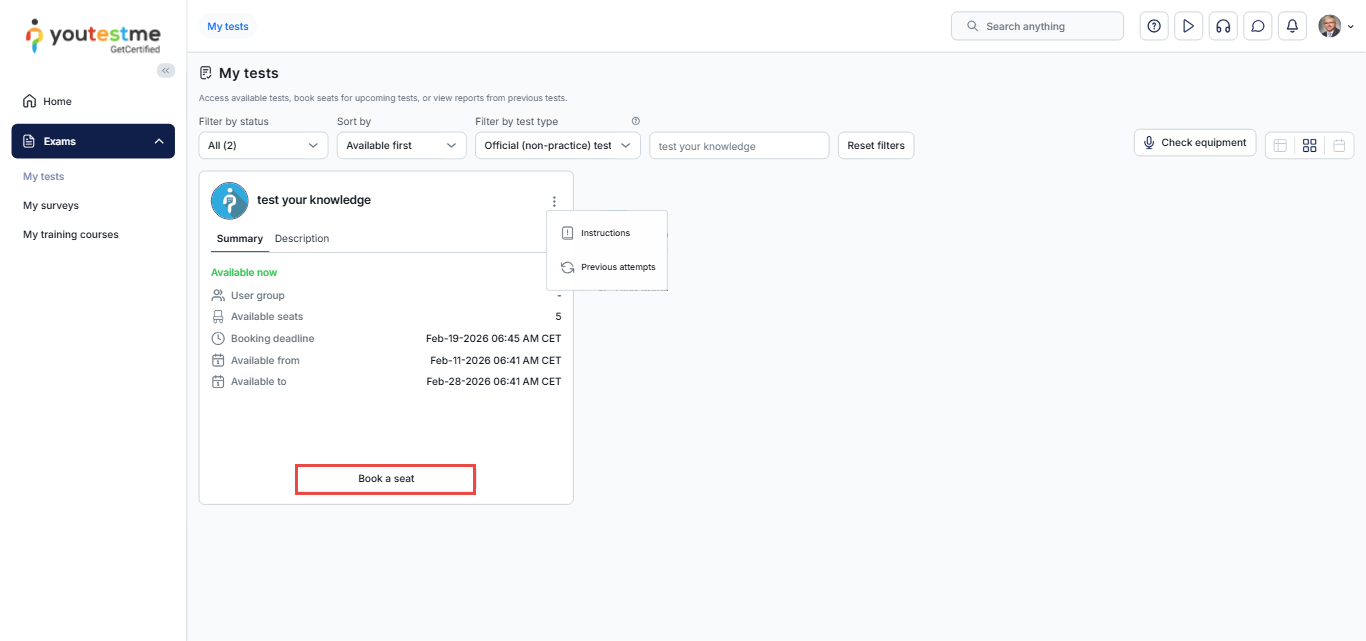
Steps to Request Special Accommodation
- Book the exam and select the desired session.
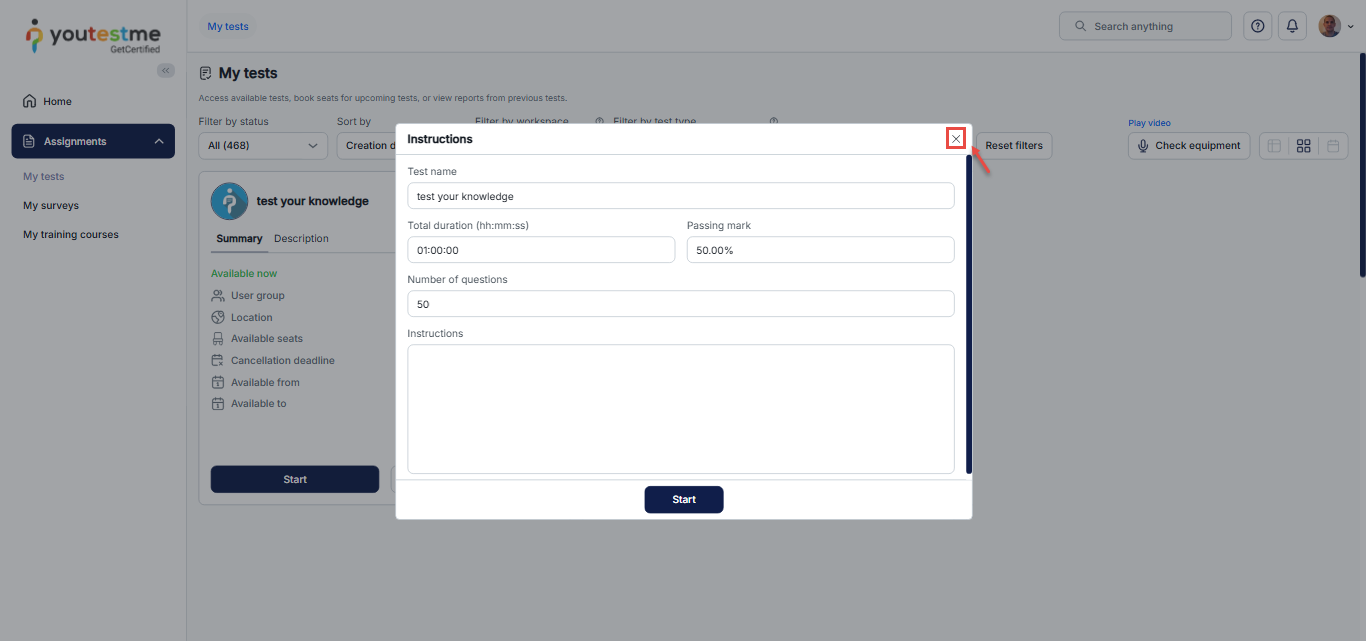
- Click the Start button to open the instructions dialog.
- This action enables the accommodation feature.
- Close the instructions dialog by clicking the X.
- Submit the special accommodation request before starting the exam.
Important Restrictions
- If the candidate has already started the exam, paused it, or been disconnected, they will no longer be able to submit a special accommodation request.
- The request must be submitted before the exam begins.
Managing Special Accommodation Requests
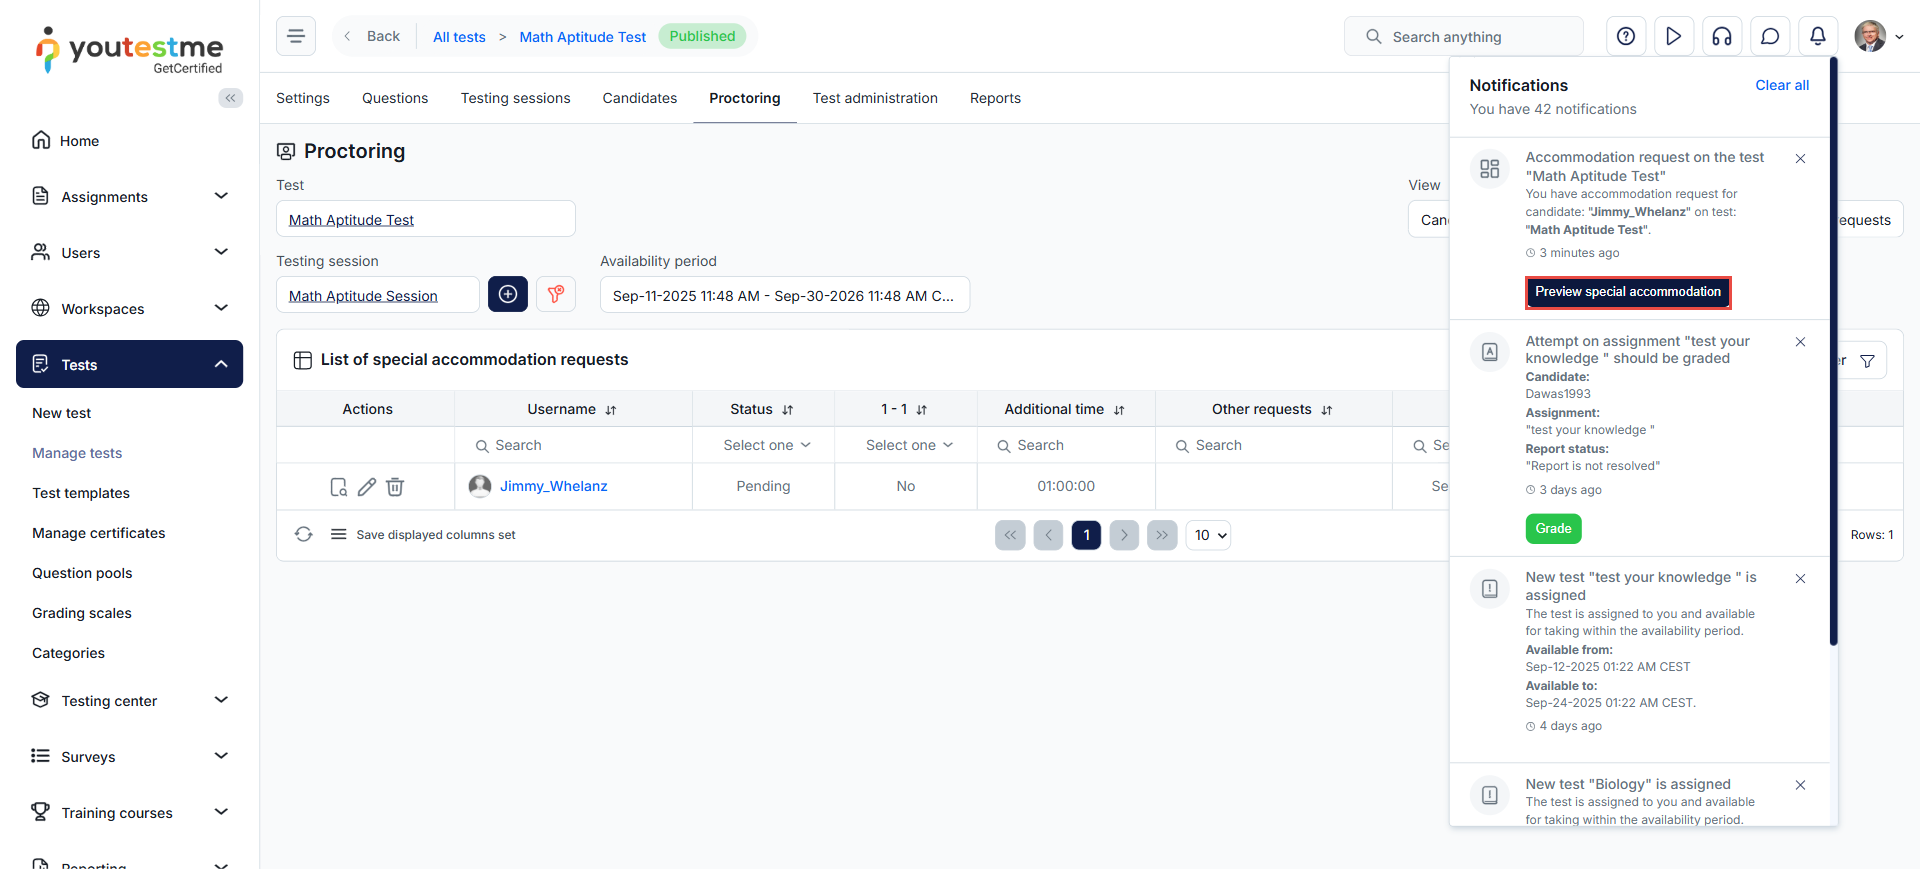
When a candidate submits a special accommodation request, the test manager is notified through the application and email, depending on the system notification settings. The test manager can review and respond to the request directly by clicking the Preview Special Accommodation button in the notification.
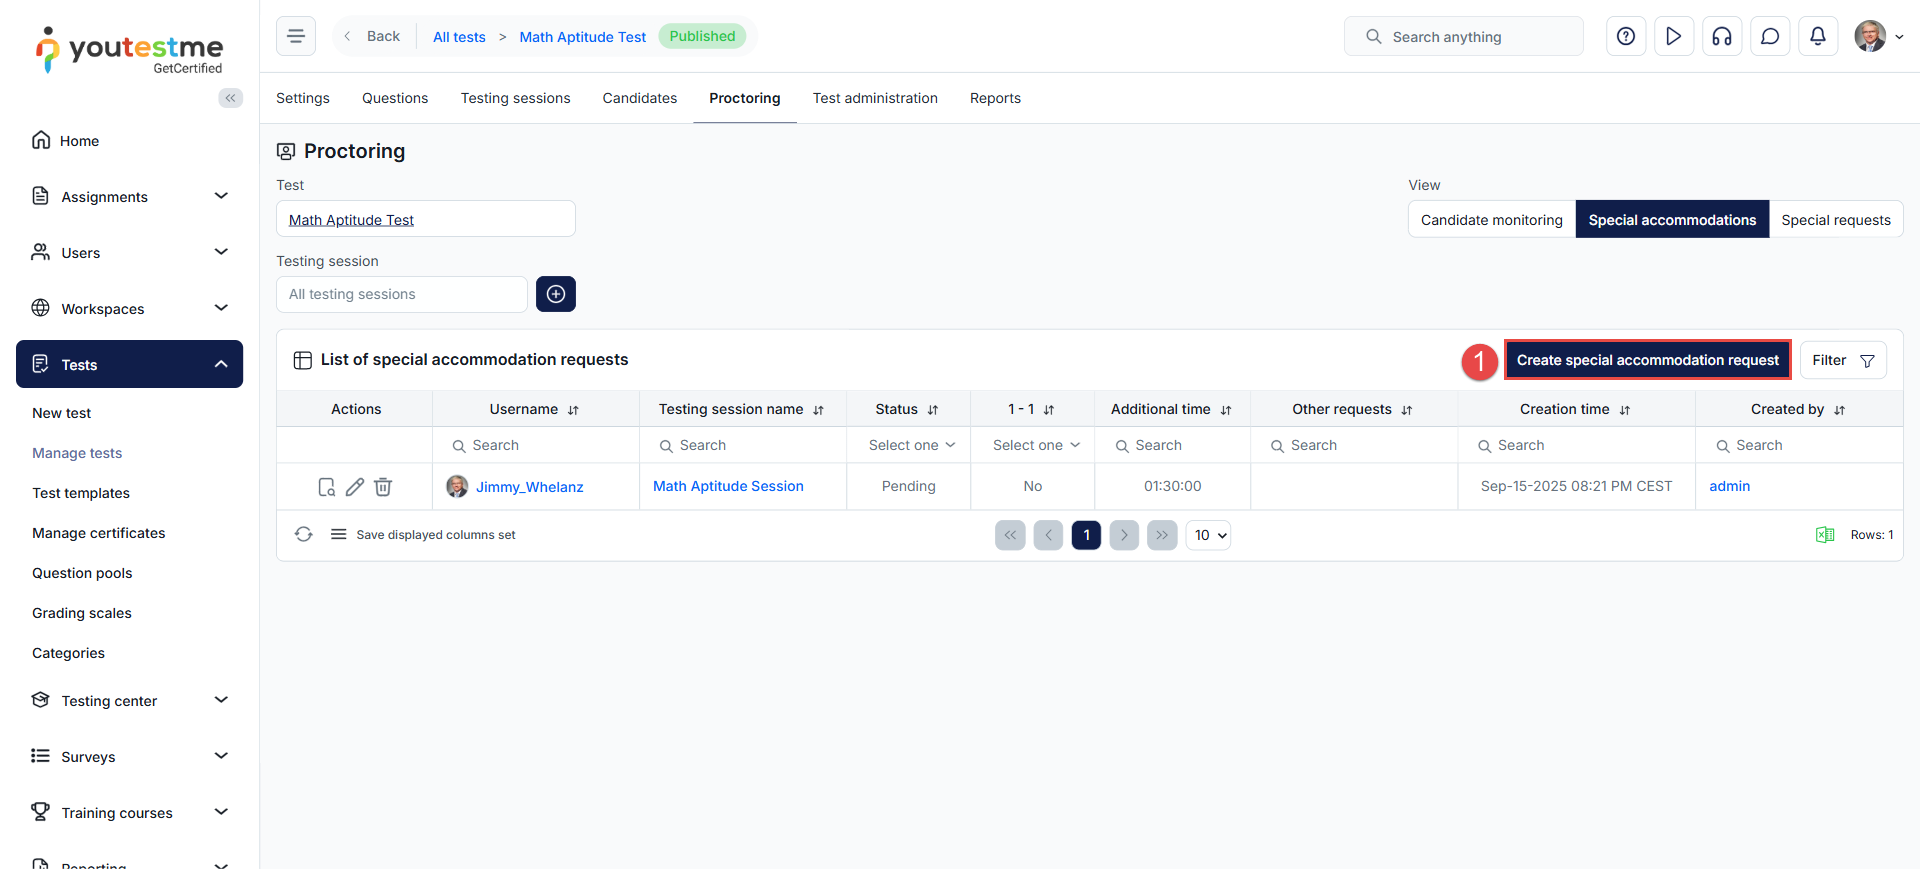
Alternatively, to find and manage special accommodation requests from the Manage Test module, follow these steps:
- From the main menu, navigate to Tests, then click on Manage Tests.
- From the list of tests, select the desired test.
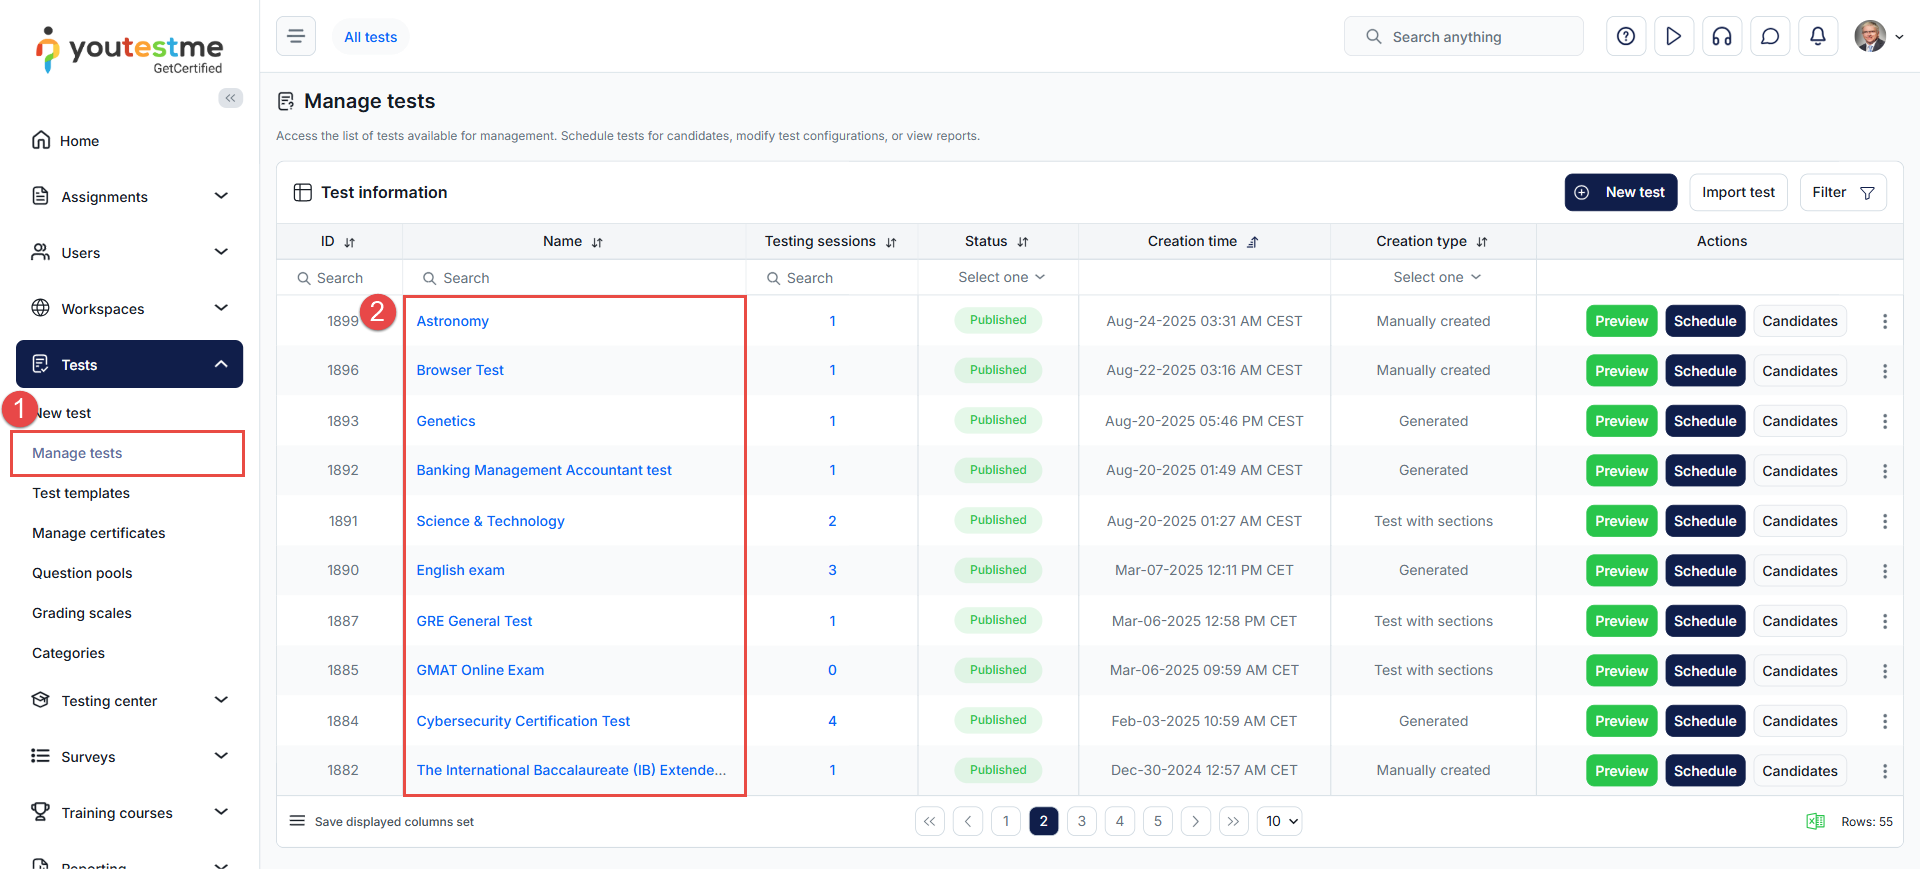
- Navigate to the Proctoring tab and click on the Special Accommodations view.

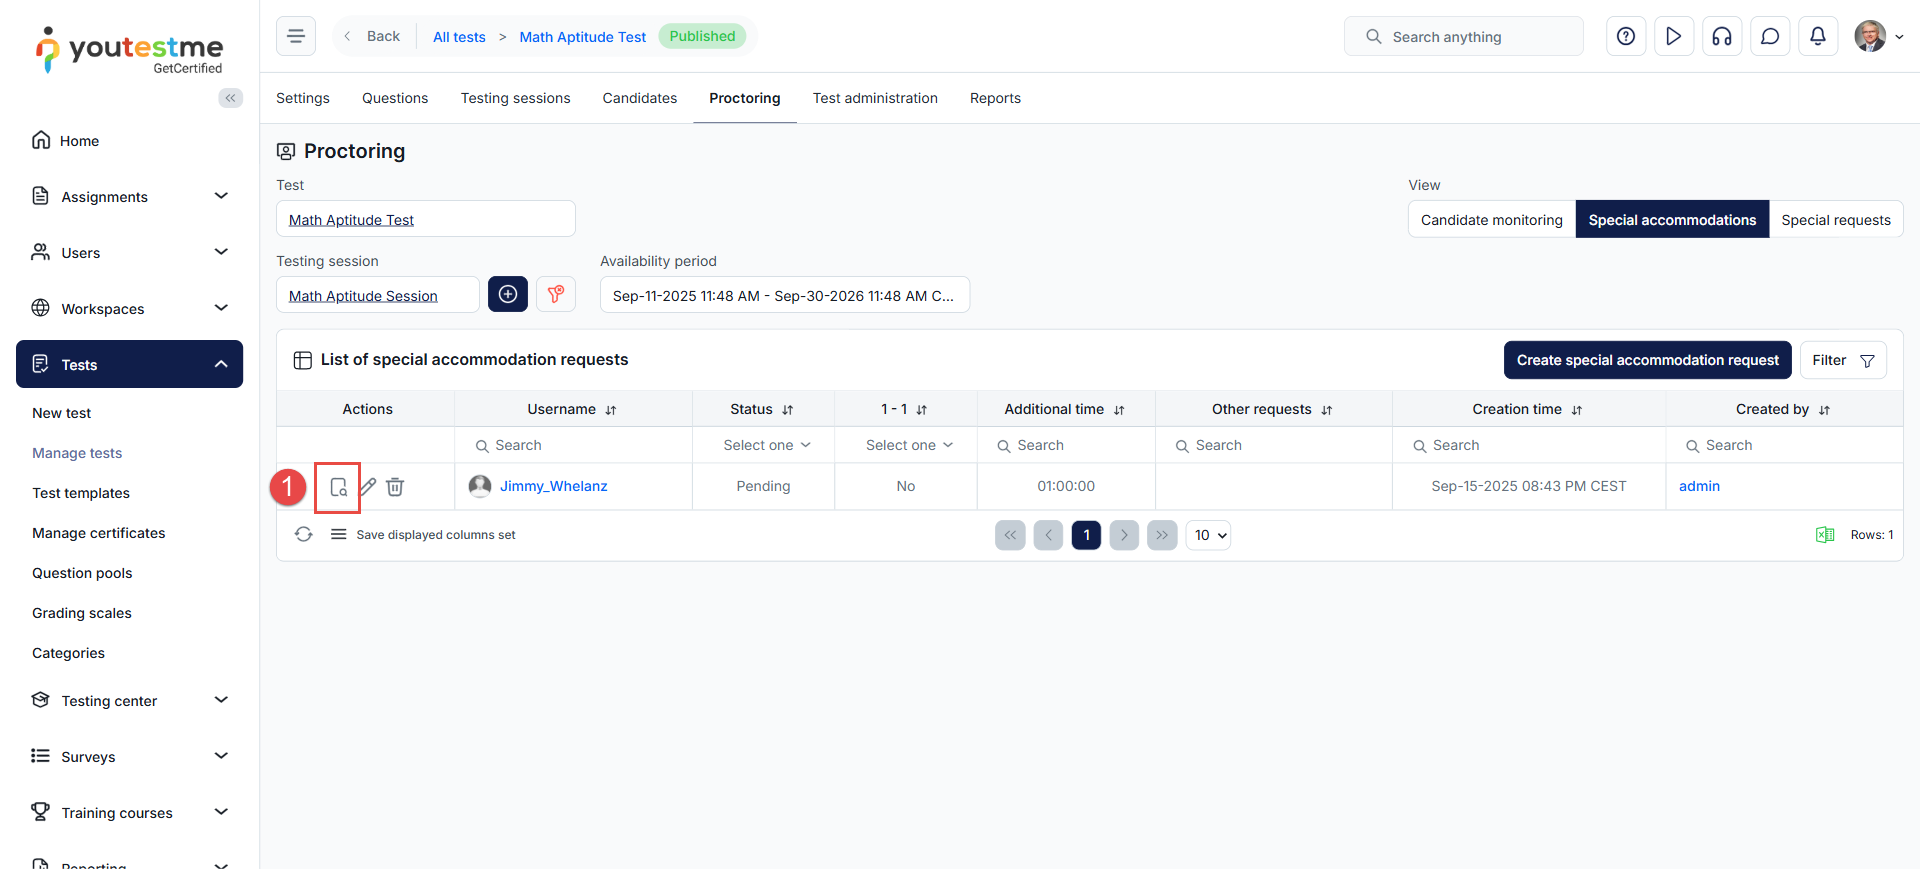
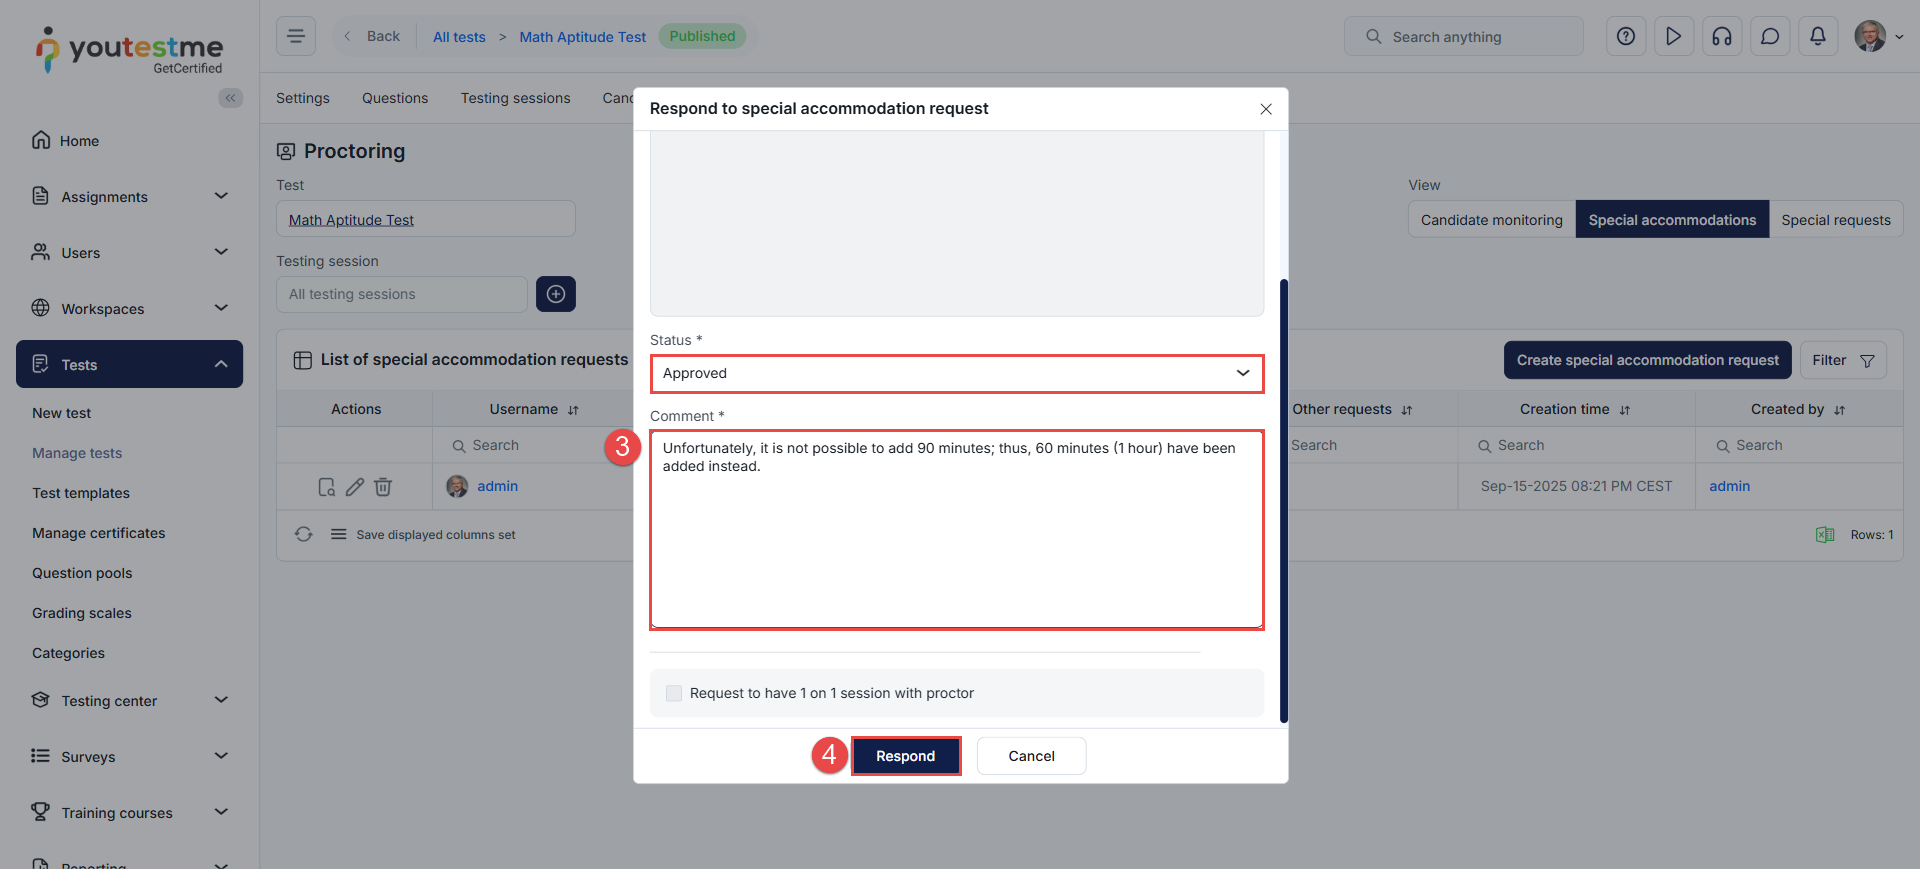
Here, you will see a table listing all special accommodation requests created for this exam. To respond by declining or approving the request:
- In the Actions column, click Manage Special Accommodation Requests for the desired request.
- You will be presented with the details of the request. The status of the request is initially Pending. Click the drop-down menu to Approve or Reject the request.
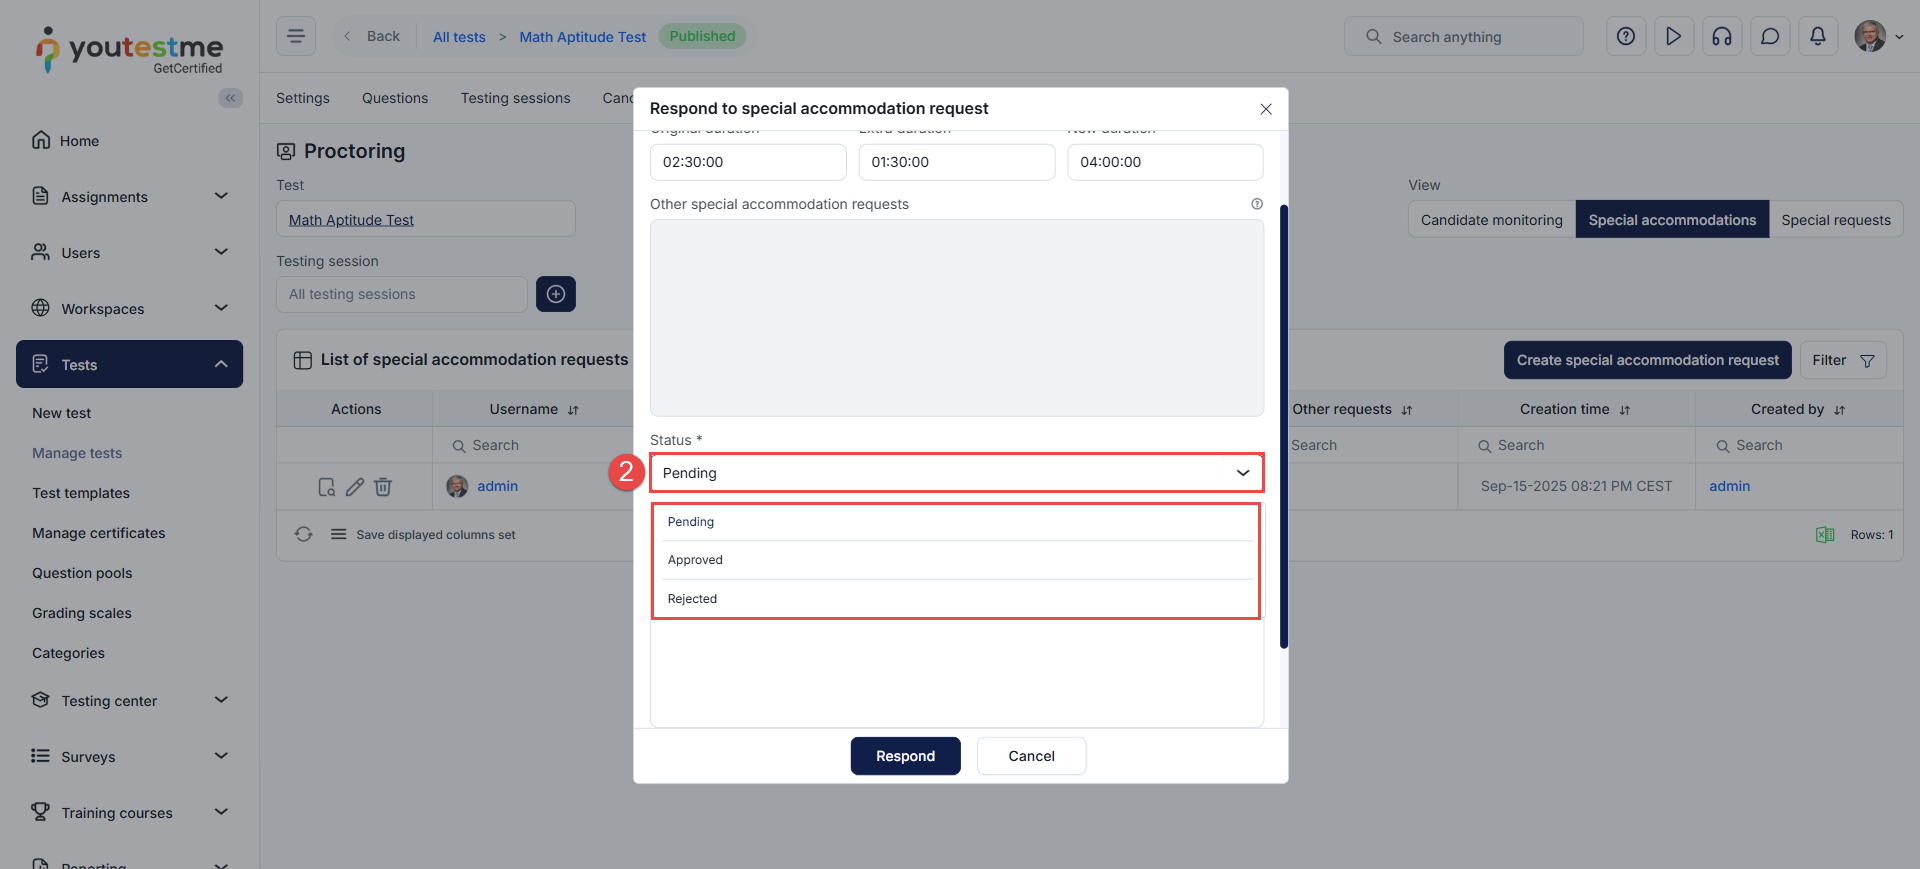
- Enter a response message. In the message, you can provide the candidate with any additional details or instructions.
- Click the Respond button to save.
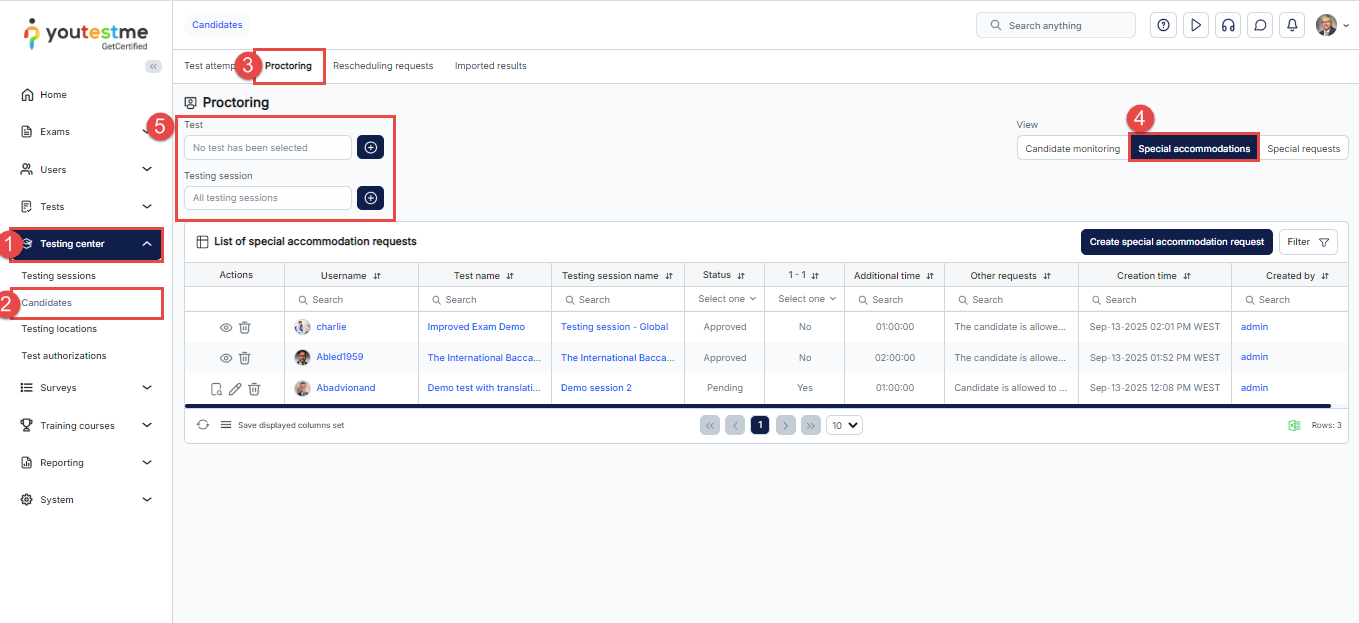
Managing Special Accommodation Requests from the Testing Center
In addition to managing special accommodations through the Manage Tests module, administrators with access to the Testing Center can also create and manage special requests within this module. The Testing Center provides a dedicated interface for viewing and managing all special accommodation requests within the system.
To access this interface, follow these steps:
- From the main menu, click Testing Center.
- Select Candidates.
- Navigate to the Proctoring tab.
- Click on the Special Accommodations view.
- You will see a list of all special accommodations in the system, where you can filter requests by test name and session.
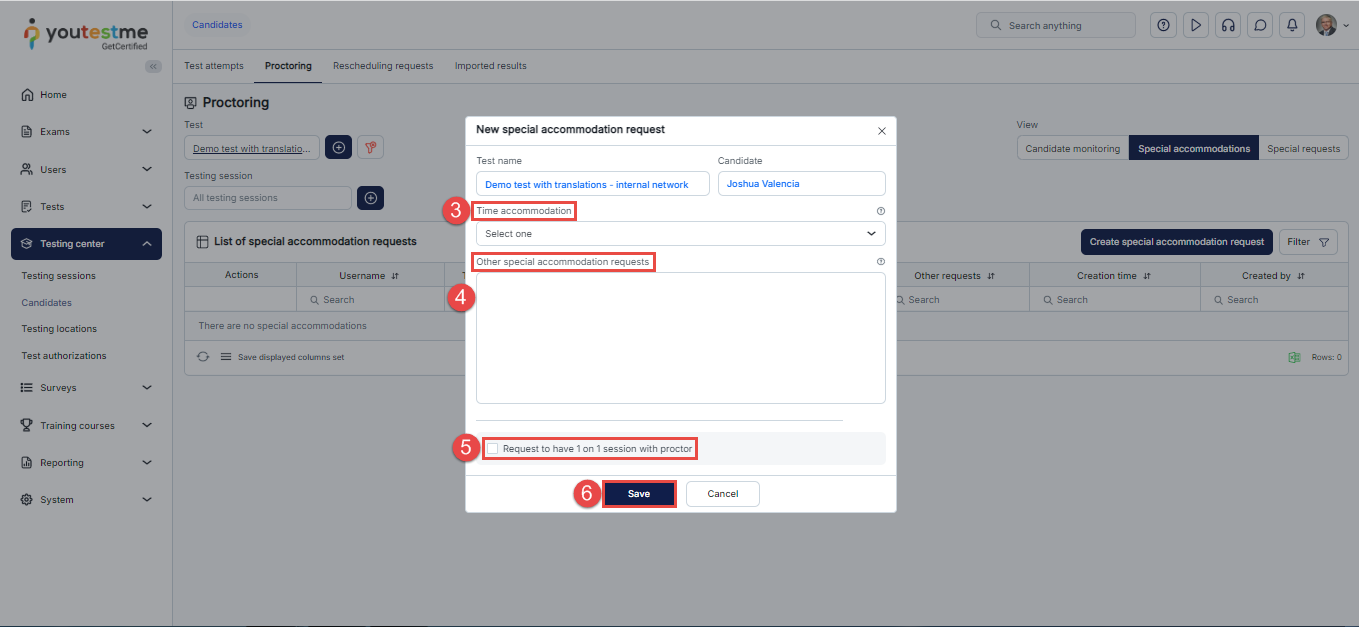
Setting Up Special Accommodations for a Candidate
Administrators can manually create special accommodation requests on behalf of candidates from the Special Accommodations view.
To create a special accommodation request, follow these steps:
- Click the Create Special Accommodation Request button.
- In the pop-up window, select the candidate for whom you want to create the accommodation.
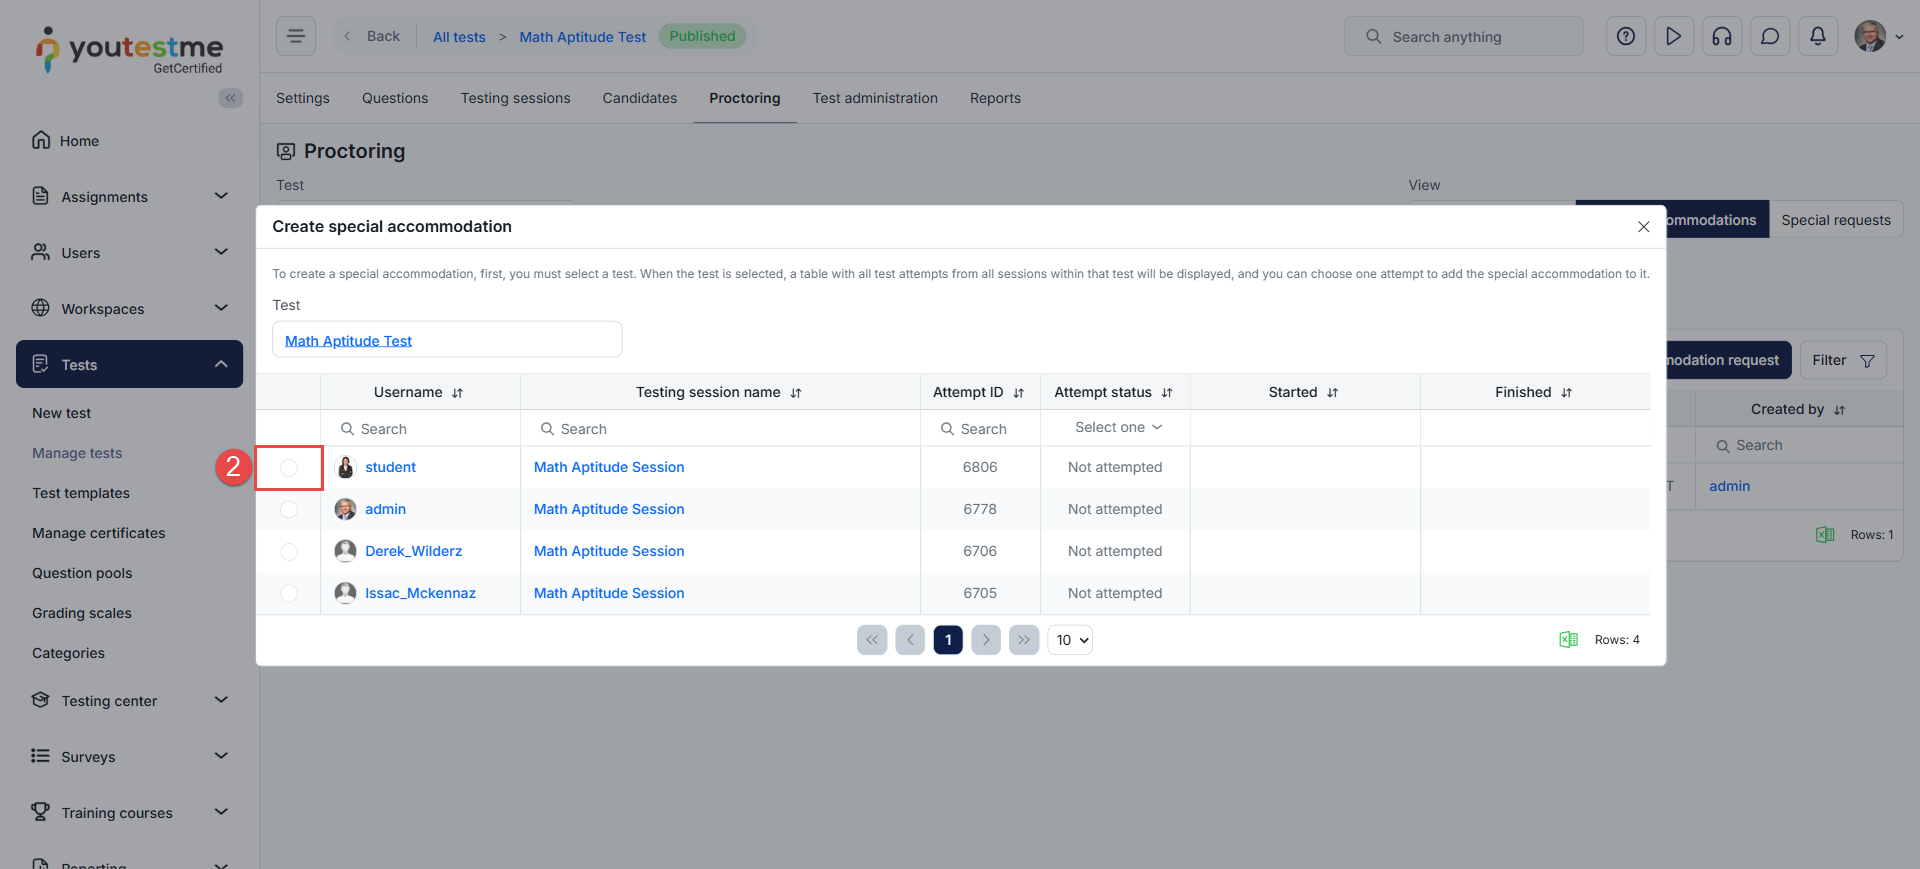
After selecting the candidate, a new pop-up window will appear where you need to define the accommodation details:
- Choose a time accommodation option (e.g., extra time, 1 hour).
- Specify typically restricted behaviors allowed for this attempt only.
Enter any custom accommodation text if applicable (e.g., “allow water bottle”) - Optionally, check the box to assign a 1-on-1 session with a proctor.
- Once all details are entered, click Save to submit the request. Note: The created request will be in the Pending status and needs to be approved or rejected following the same steps outlined above.
Note: Accommodations are specific to each exam attempt. If a candidate needs to retake the exam, a new accommodation request must be submitted. For candidates with disabilities, the accessibility feature should be used instead, eliminating the need to create a special accommodation request.
For additional related topics, please refer to the following articles:
- How to Assign Default User Roles and Create New Custom Roles
- How to Assign Candidates to a Testing Session
