In this article, we will explain how to enable or disable the self-registration option. This feature allows users to create accounts and submit registration requests.
Steps to Enable or Disable Self-Registration
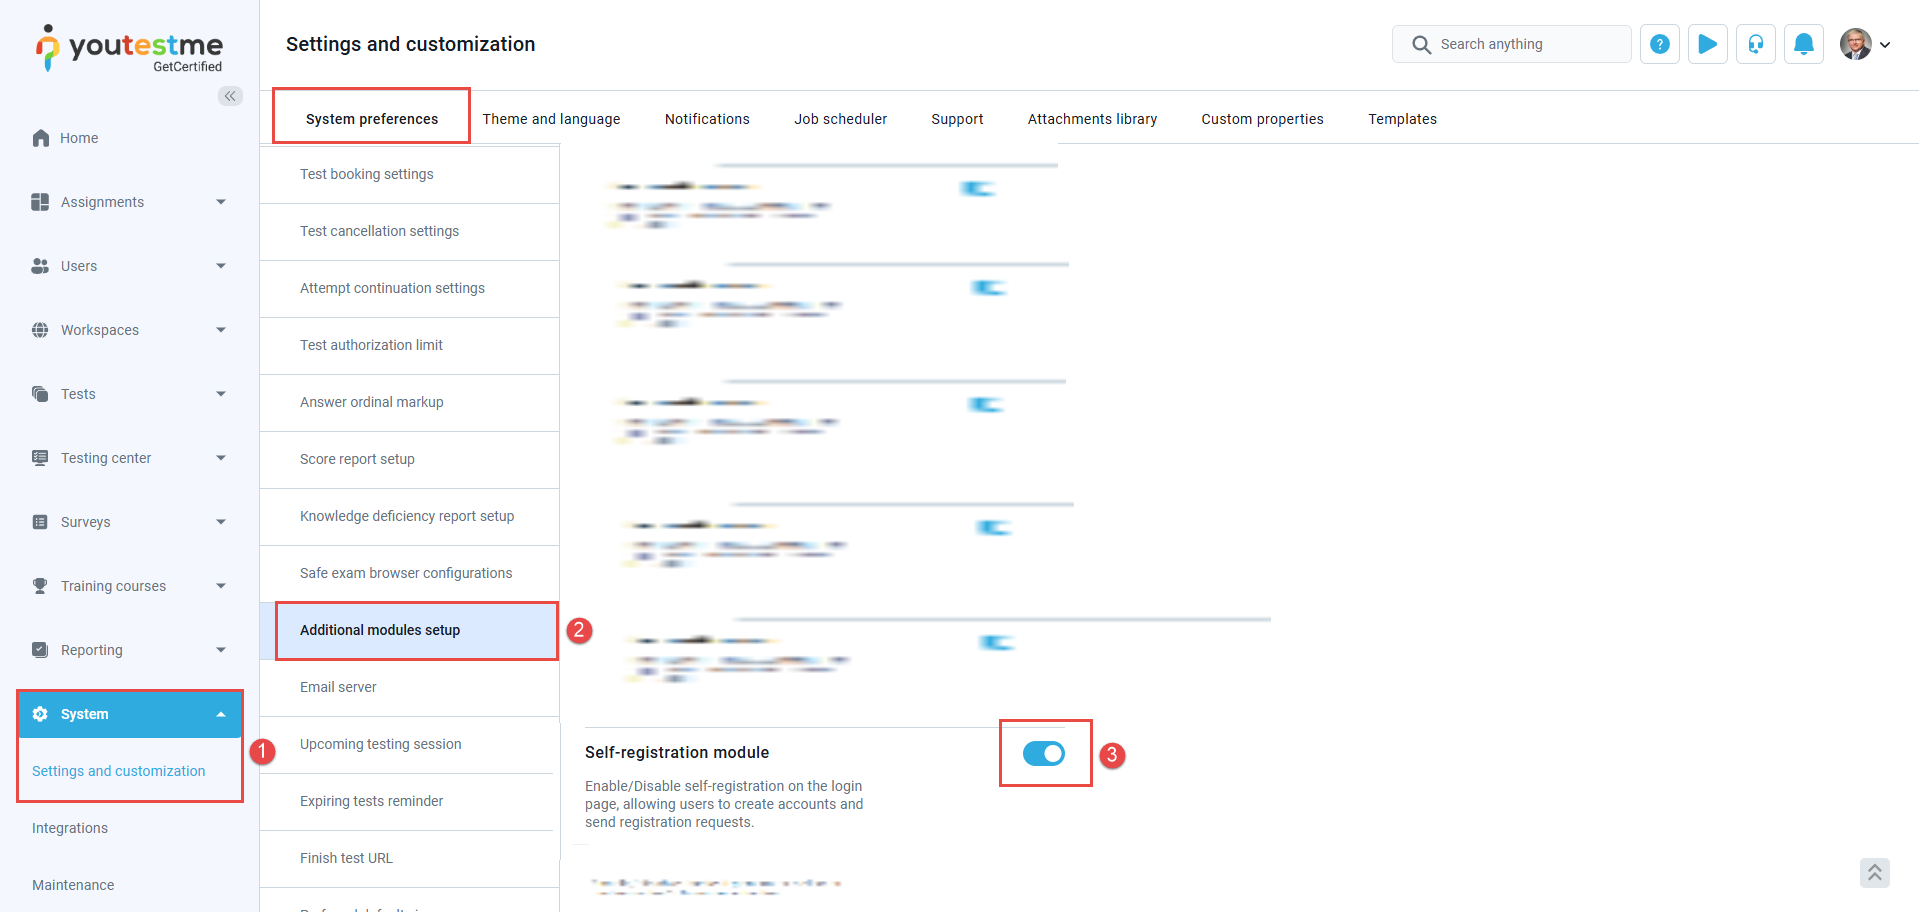
- Navigate to System > Settings and Customization
- Under System Preferences, navigate to Additional Modules Setup.
- Search for the Self-Registration module and enable/disable the module as needed.
Creating registration links
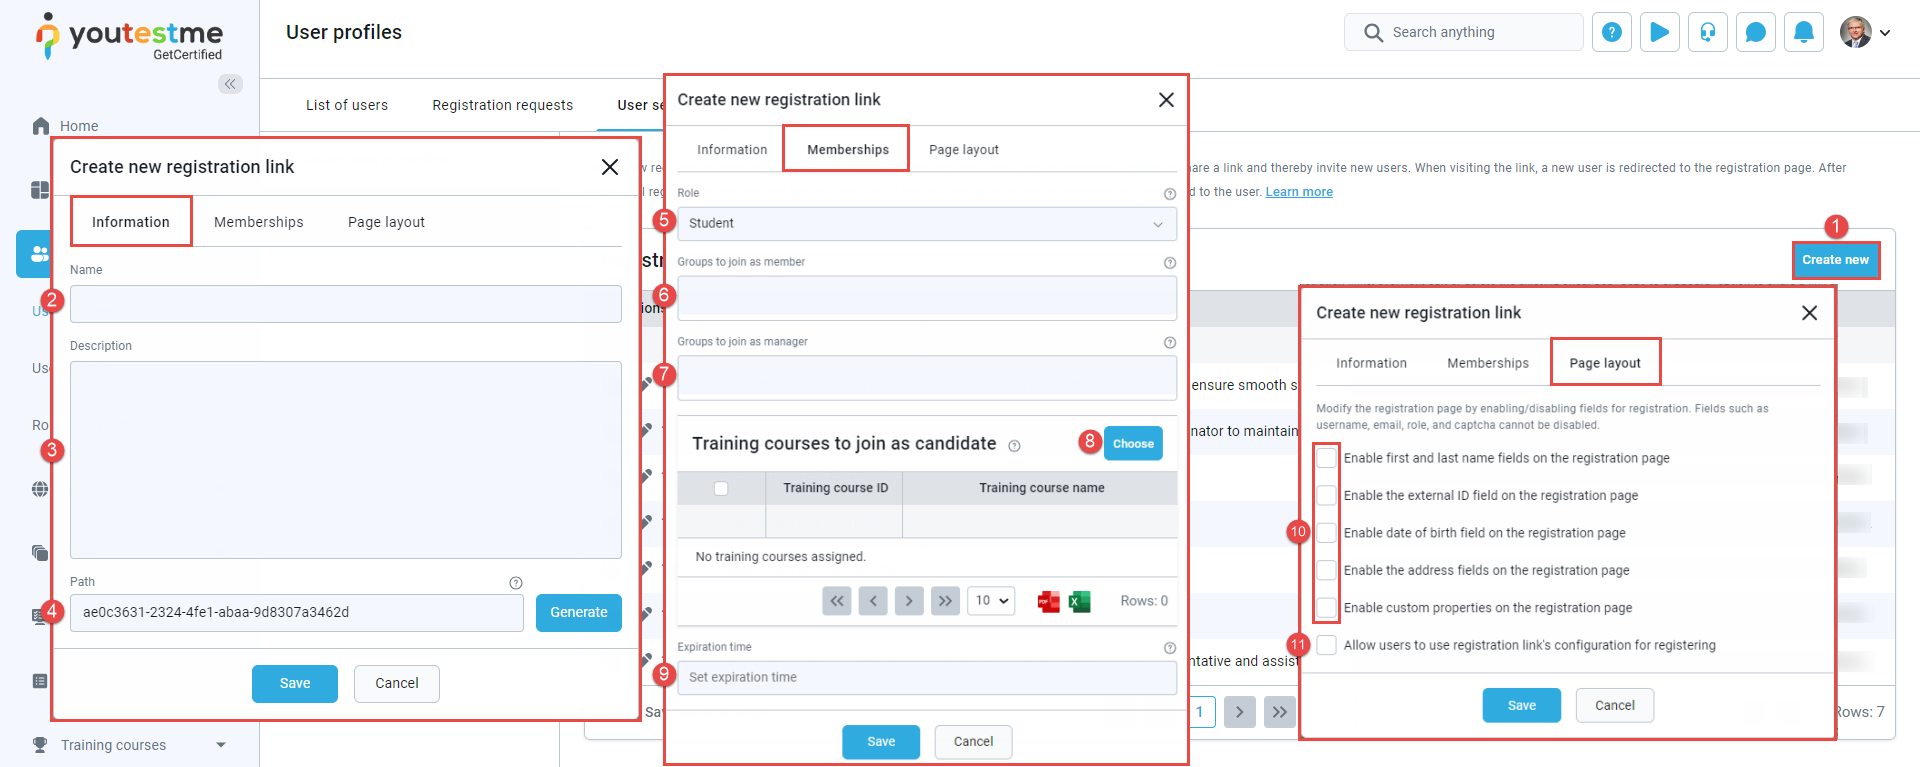
To create a new registration link, navigate to Users/ Users profile and go to the User settings tab. Click on the Registration links.

- Click the Create new button. The creation dialog is split into three sections, each displaying a different group of settings. In the Information tab, we can do the following:
- Enter the registration link Name.
- Enter a Description, additional information about the purpose of the registration link.
- Insert a random Path to be used as a unique link identifier. It must consist of only letters, numbers, and hyphens. Alternatively, the registration link automatically generates a unique path upon clicking the Generate button.
The Memberships tab determines which role the newly registered user will get and which groups and training courses they will be assigned to. - Select the user role that a user registering through this link will be assigned.
- Designate user groups to which the user will be automatically enrolled as a member.
- Designate groups to which the user will be automatically enrolled as a manager.
- Select training courses that a user who registers using this link will be automatically assigned to as a candidate.
- Define the Expiration time of the link. If set, the link will be valid until the specified time.
Note: Expired registration links can still be edited and shared, but users cannot use them to register for the application.The page Layout tab is used to configure which fields will be displayed to the user during registration using the provided registration link. - Configure displayed registration page fields for users when registering using the link.
- Optionally, allow users to use the displayed fields configuration of this link when registering. However, note that this option will only be available during self-registration and not when not using a registration link.
- Click the Save button.
Available Actions on the Registration links page are:
- Copy the link path.
- Edit registration link.
- Permanently Delete the registration link.

You can easily copy the registration link and send it to candidates.
Important note: If the Self-Registration module is disabled, candidates will be redirected to the login page instead of the registration page.
How to register when the Instant self-registration module is enabled
Users can register their accounts without requiring administrator approval if the Instant Self-Registration option is enabled.
To enable this feature, follow the steps in Chapter 1 to activate the Self-Registration module. Once enabled, the Instant Self-Registration module will be automatically activated, though it can be disabled independently without affecting the Self-Registration module.
Note: Instant Self-Registration is only available if the Self-Registration module is enabled.
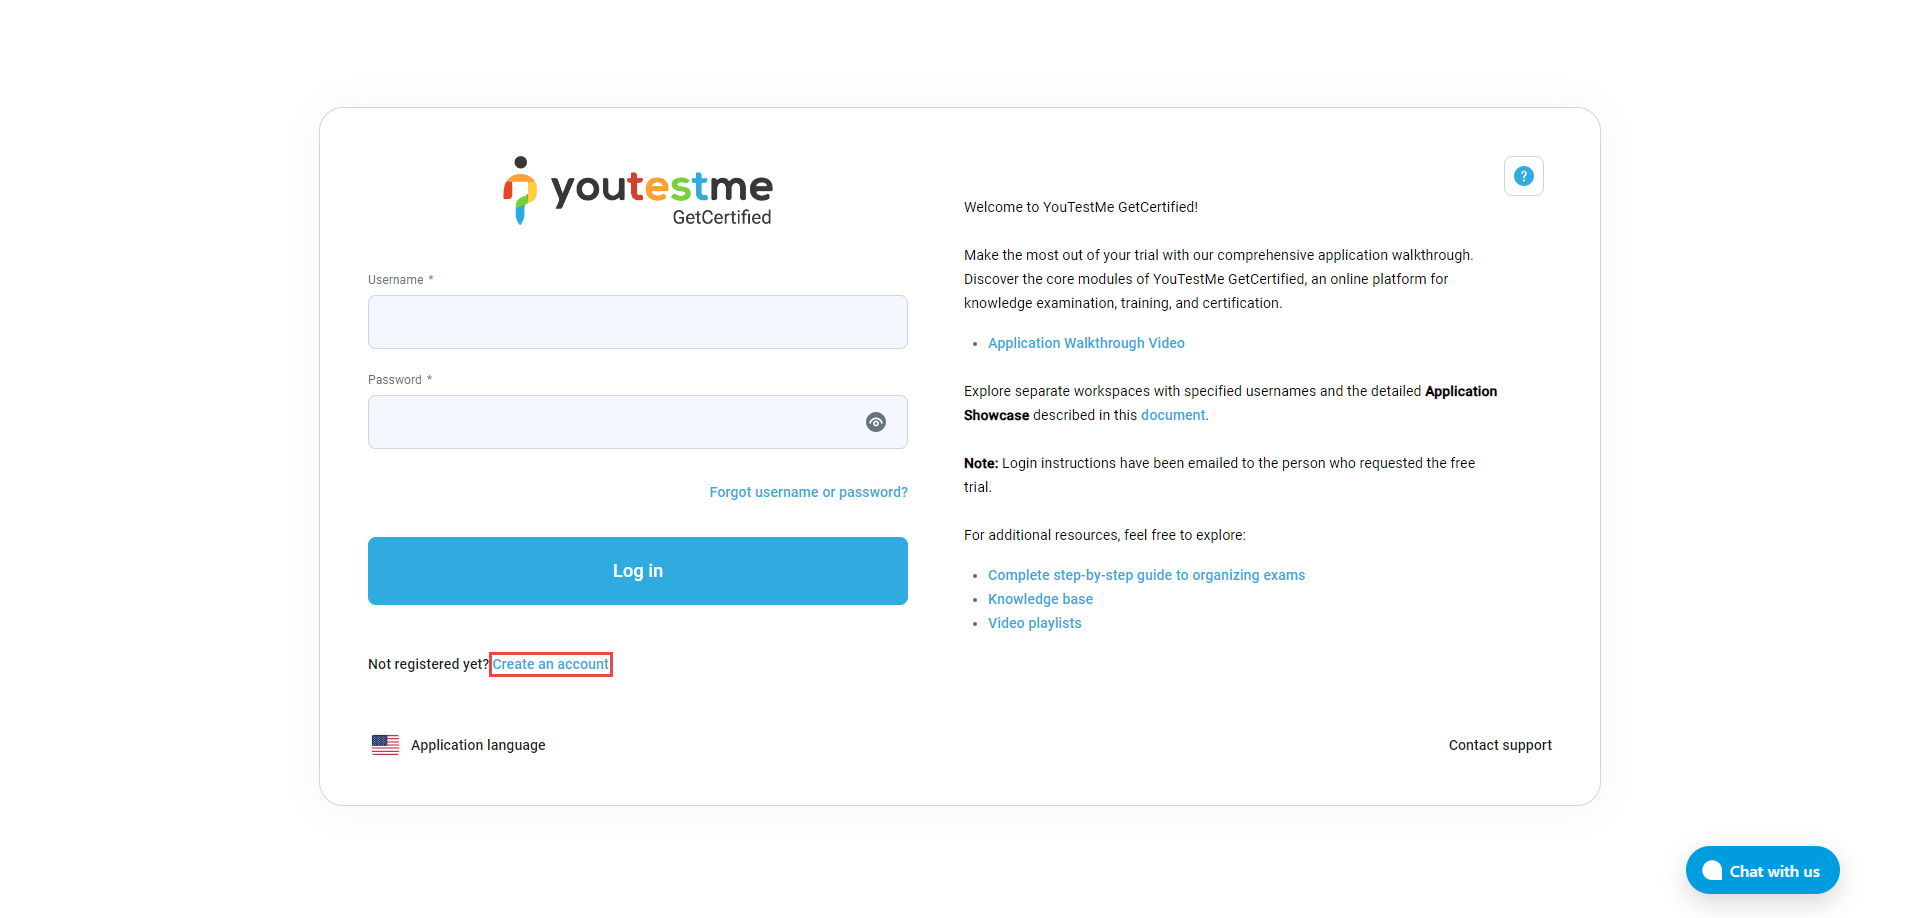
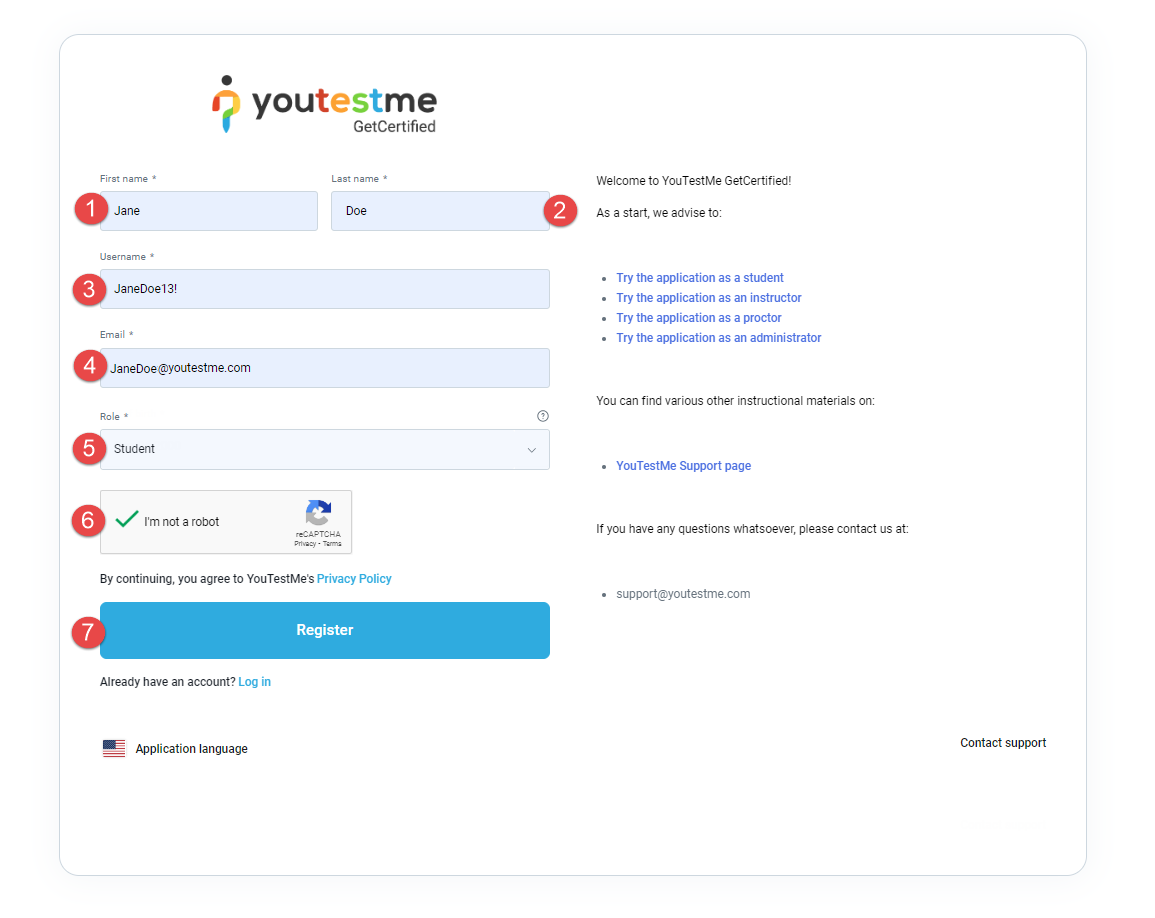
On the login page, click the Create an account option.
The registration form will show up, and you need to fill in all the necessary information:
- Enter the First name.
- Enter the Last name.
- Enter the Username.
- Enter the Email address.
- Confirm your human identity by ticking the I am not a robot checkbox.
- Click the Register button.

After clicking the Register button, the user will be automatically redirected to the application and receive an email confirming the creation of their new user profile creation.
The recommendation is to change the password by following the next steps:
- Go to the View profile page.
- Click on the Information tab.
- Open Password settings.
- Click the Change password button to update the password.

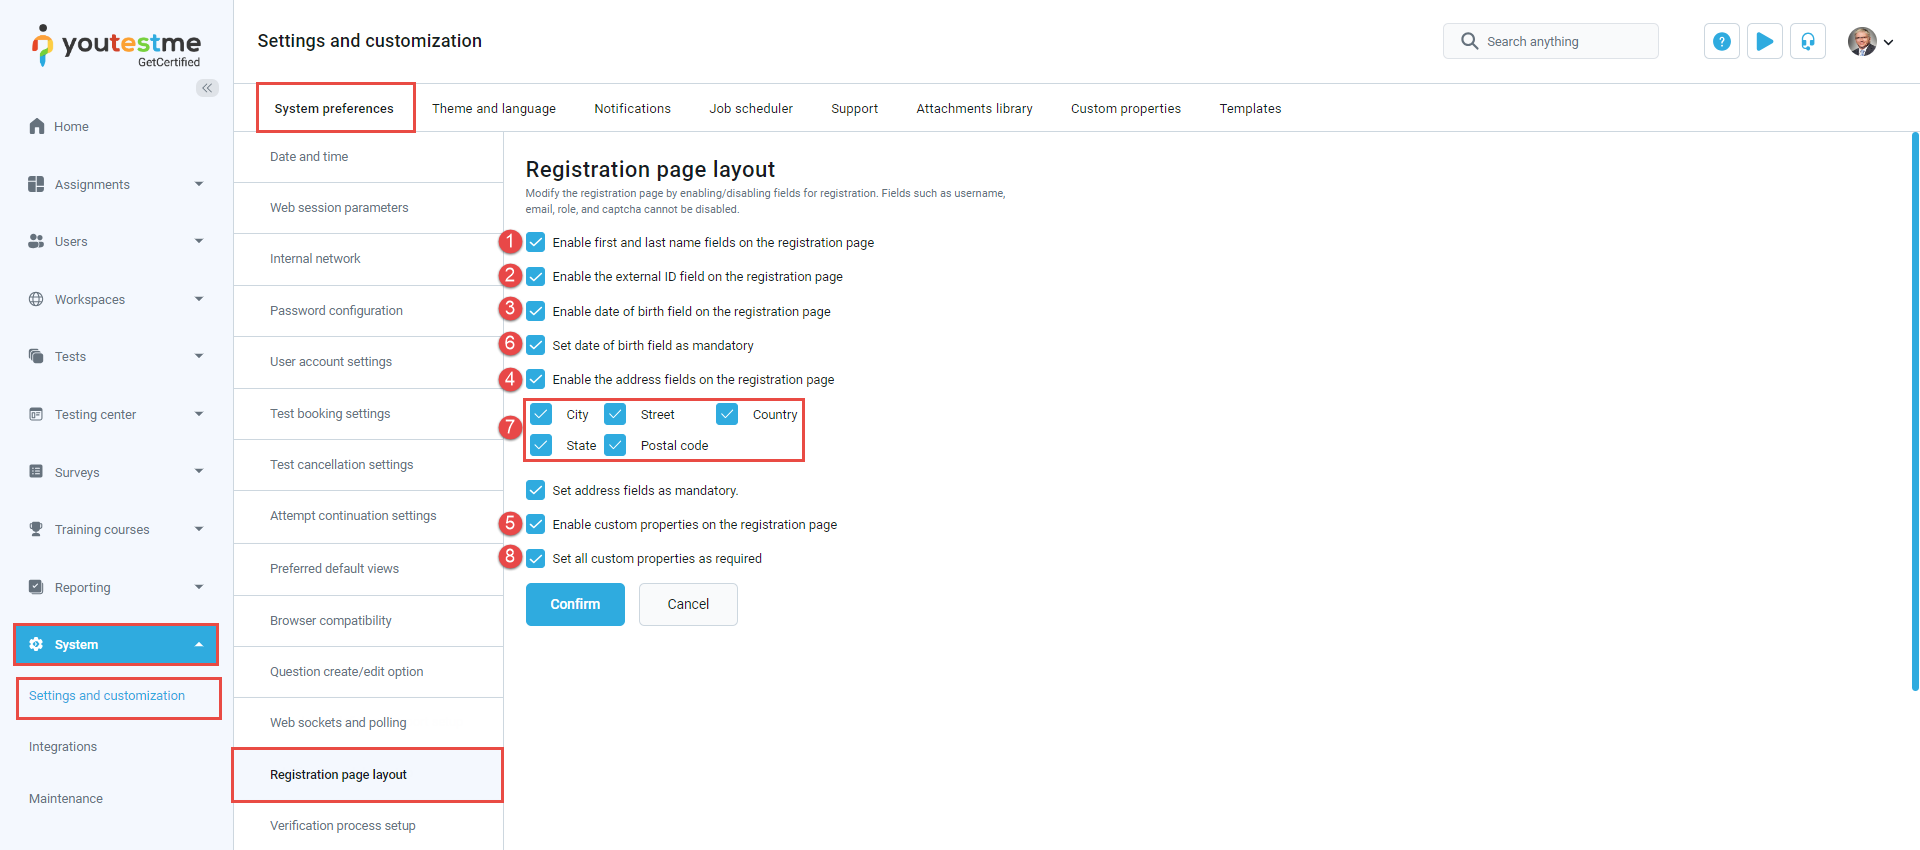
Changing the registration page layout
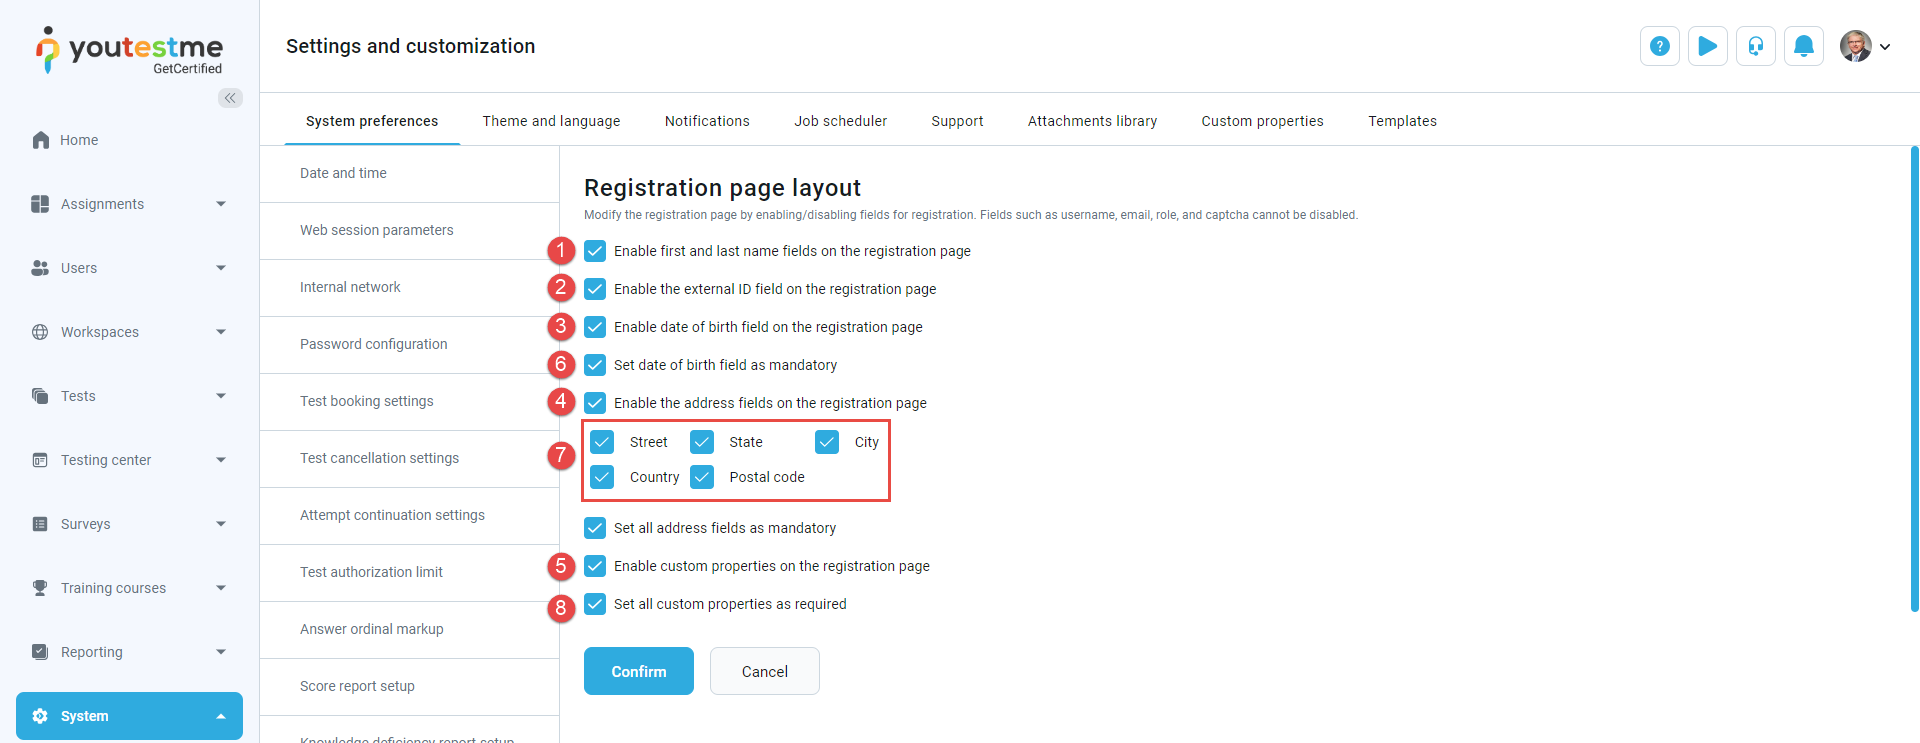
On the System/System and customization/System preferences/Registration page layout tab, you can customize the user registration page by selecting the fields to display or hide during the registration process. It’s important to note that username, email, role, and captcha fields cannot be disabled.
You can choose to display/hide the following options:
- First and last name
- External ID
- Date of birth
- Address fields
- Custom user properties.
Additionally, you can choose to:
- Set the date of birth field as mandatory. This option is available only when the Enable date of birth field on the registration page option is enabled.
- Define which address fields will appear on the registration page. You can show/hide Country, Street, City, Postal code, and State fields. This option is available only when the Enable custom properties on the registration page option is enabled.
- Set all custom properties as required. This option is available only when the Enable custom properties on the registration page option is enabled.
Additionally, by selecting the Edit option for the desired registration link under the Users/User Profiles/User Settings/Registration links tab, you can configure which fields will be displayed to the user during registration. This can be done by navigating to the Page layout tab.
- Configure the displayed registration page fields for users when registering using the link.
- Optionally, allow users to register using the displayed fields configuration of this link. Note that this option will only be available during self-registration and not when not using a registration link.
- Click the Save button.

Benefits of Enabling Instant Self-Registration
- User-Friendly: Users can easily sign up independently, saving time and effort.
- Quick Access: Users can start using the system immediately.
- Flexible: Anyone can join.
- Grows Easily: Makes it simple to expand the user base without admin involvement.
How to register when the Instant self-registration module is disabled
If the Instant self-registration option is disabled, the administrator should approve or decline the registration request.
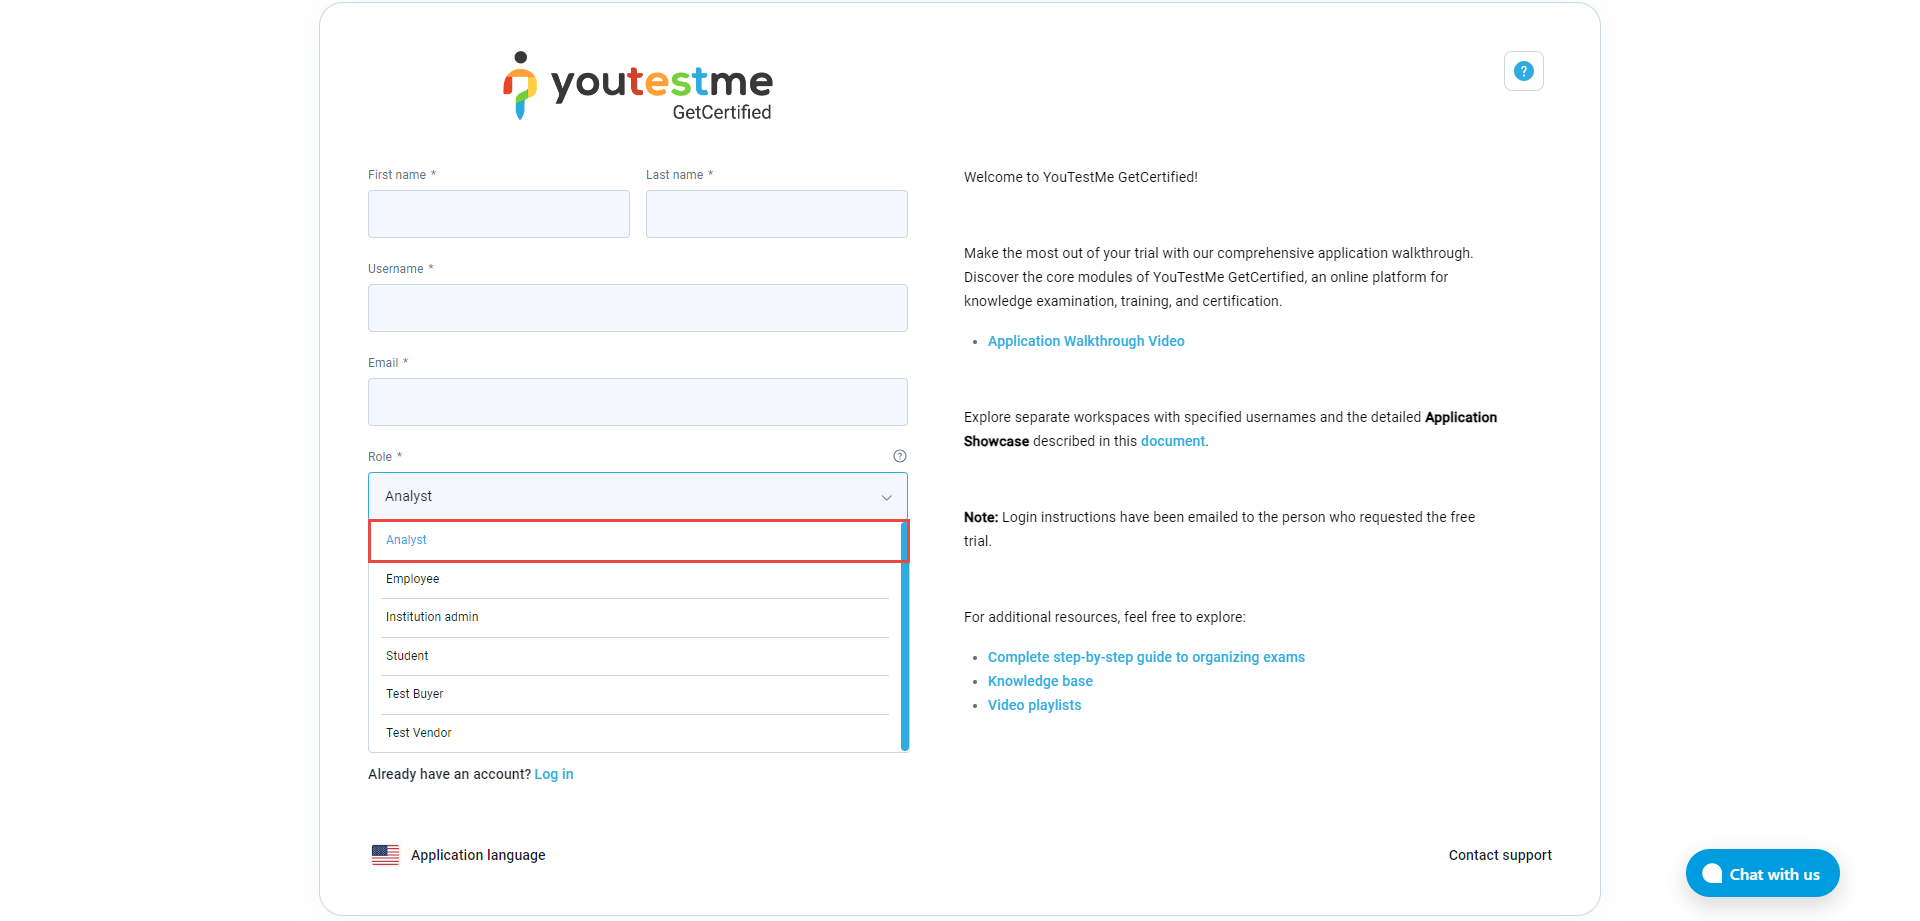
On the login page, click the Create an account option.
The registration form will show up, and you need to fill in all the necessary information:
- Enter the First name.
- Enter the Last name.
- Enter the Username.
- Enter the Email address.
- Select the preferred Role for your account.
- Confirm your human identity by ticking the I am not a robot checkbox.
- Click the Register button.
After clicking the Register button, users won’t be directed to the application. Instead, they must wait for the administrator to approve or decline their registration request.
If approved, users will receive a confirmation email and a password to access their account. If the request is declined, users will be notified via email about their registration status.
To make a user role appear in the registration application drop-down list, go to the Users/Roles and Permissions tab. Choose a role and enable the Grantable role permission.

If you wish to prevent users from selecting this role during registration, disable the option. The role will no longer be visible in the drop-down list.

Important note: If the Self-Registration module is disabled, candidates will be redirected to the login page instead of the registration page.
Benefits of Disabling Instant Self-Registration
- More Control: Admins have full say on who gets access, boosting security.
- Verified Users: Admins can check and approve users, ensuring quality.
- Customizable: You can design specific registration processes as needed.
- Compliance-Friendly: Ideal for systems with strict rules or authorization requirements.
Approve/decline registration requests (admin’s perspective)
When the self-registration module is disabled, administrators can decide which users to approve or decline registration requests.
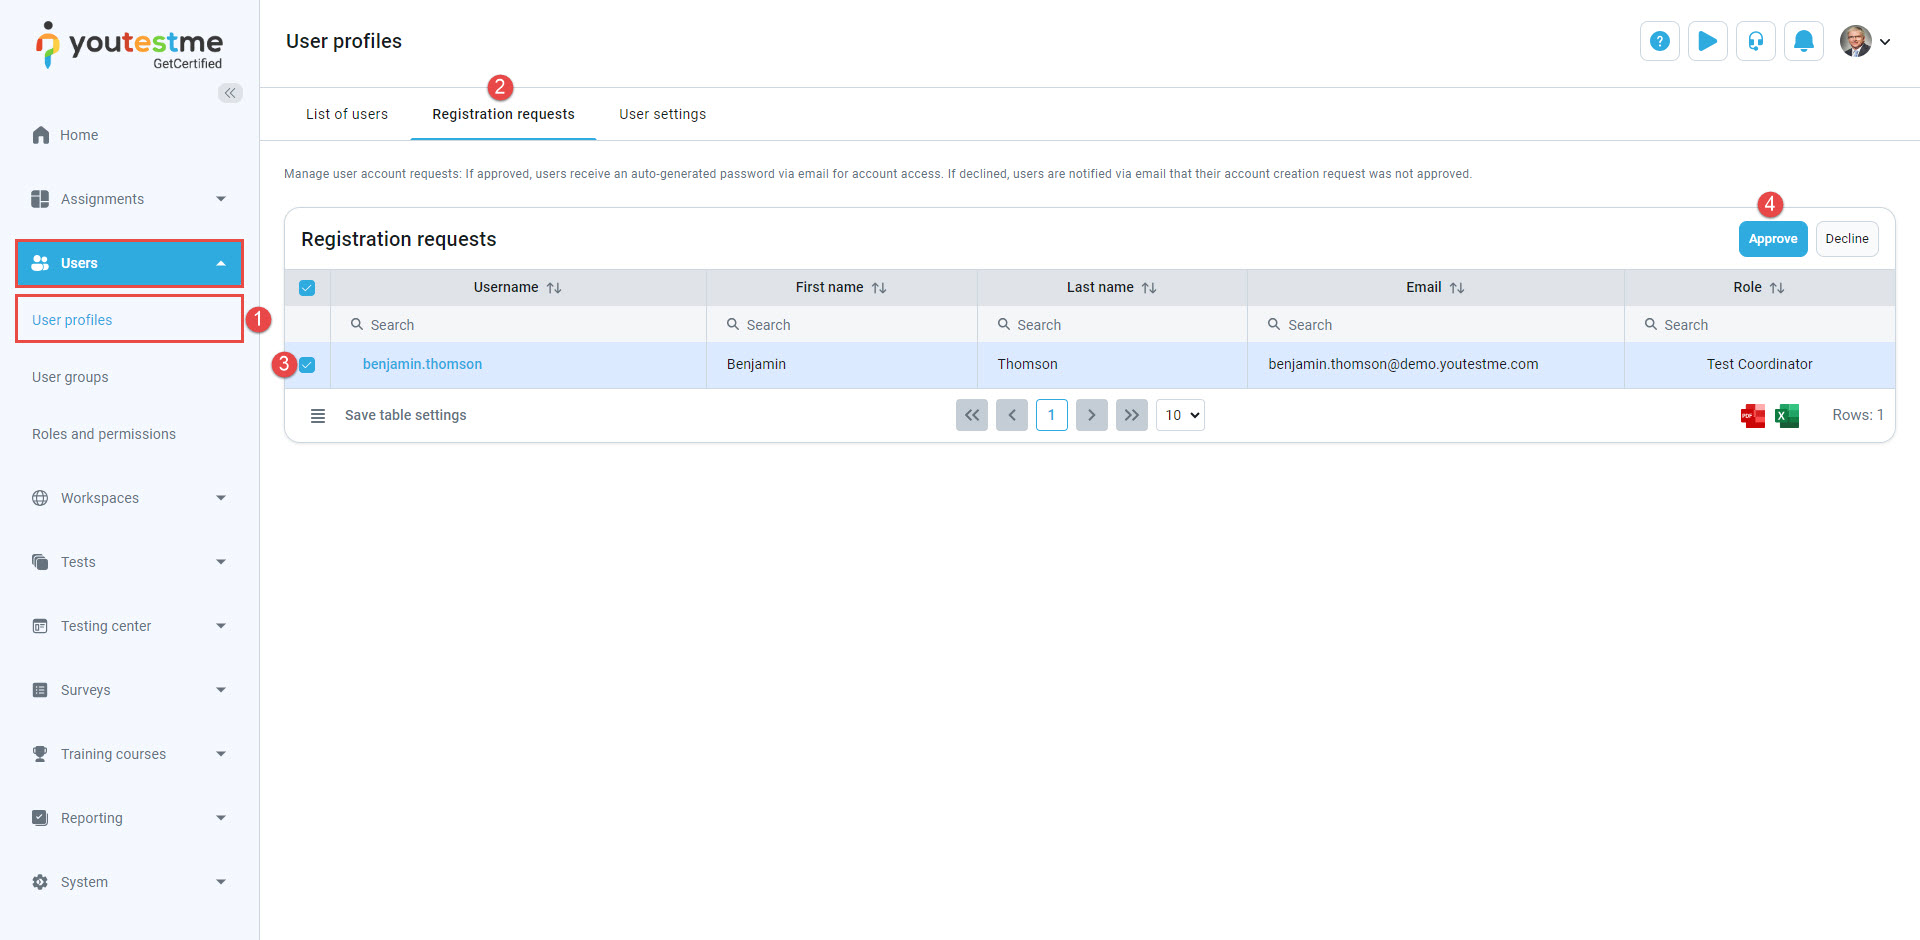
The first method is directly from the User profiles page:
- Access User profiles on the Users page.
- Navigate to the Registration requests tab.
- Select the users they want to approve for registration.
- Click the Approve button to finalize the process.
Another way to handle registration requests is to:
- Click on Notifications in the top right corner.
- Approve or decline the newly received registration request.


