Article verified for Release 15.0 on August 20, 2025.
This article provides a comprehensive overview of the process for creating and structuring a training course within the YouTestMe platform. It covers the step-by-step creation of training course components, including individual course steps, and explains how to integrate candidates into the training efficiently. Training courses consist of organized lessons divided into steps, each of which may include assignments such as tests or surveys, as well as supplementary materials in various multimedia formats.
Training Courses Overview
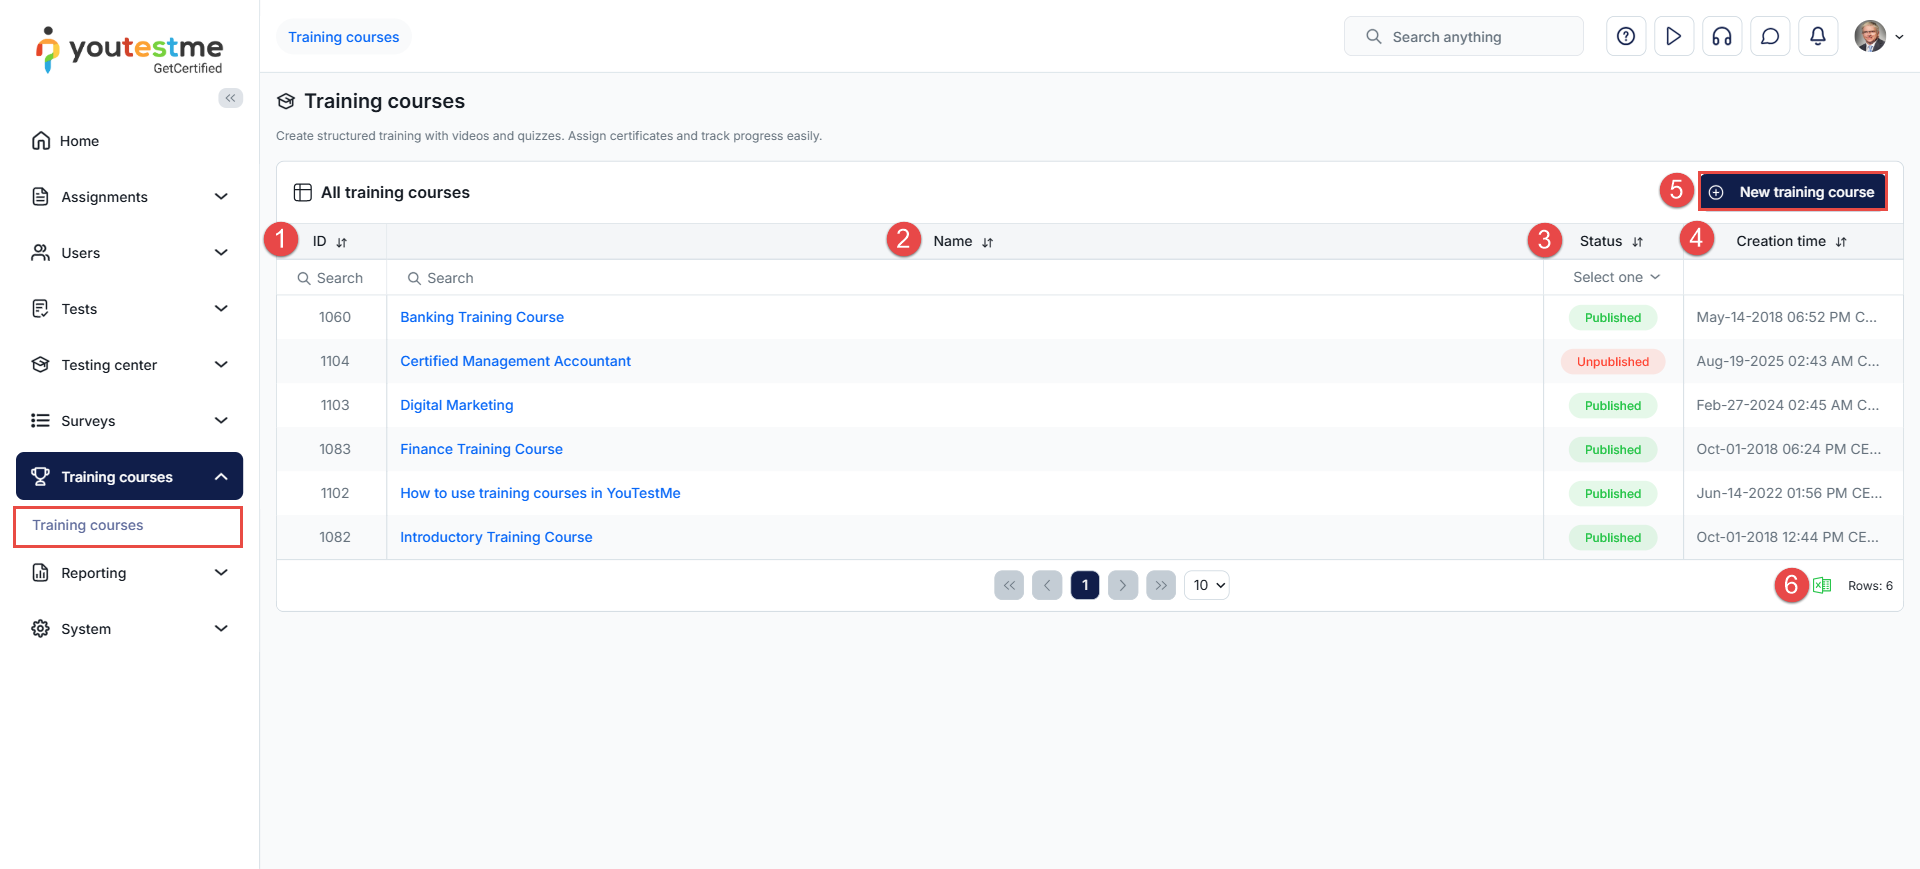
When accessing the Training courses module, users are presented with a complete list of all available training courses in the system. This view provides key details for each course, including:
ID: The unique ID number of the training course, used to identify it and cross-reference with any external system, if applicable.
Name: The name or title of the training course.
Status: The current status of the training course, which can be Published, Unpublished, or Suspended.
Creation time: The date and time when the training course was created.
Additionally, on this page, you can:
Use the New Training Course button to add a new training.
Download the list of available training courses in Excel format.
Creating a new training course
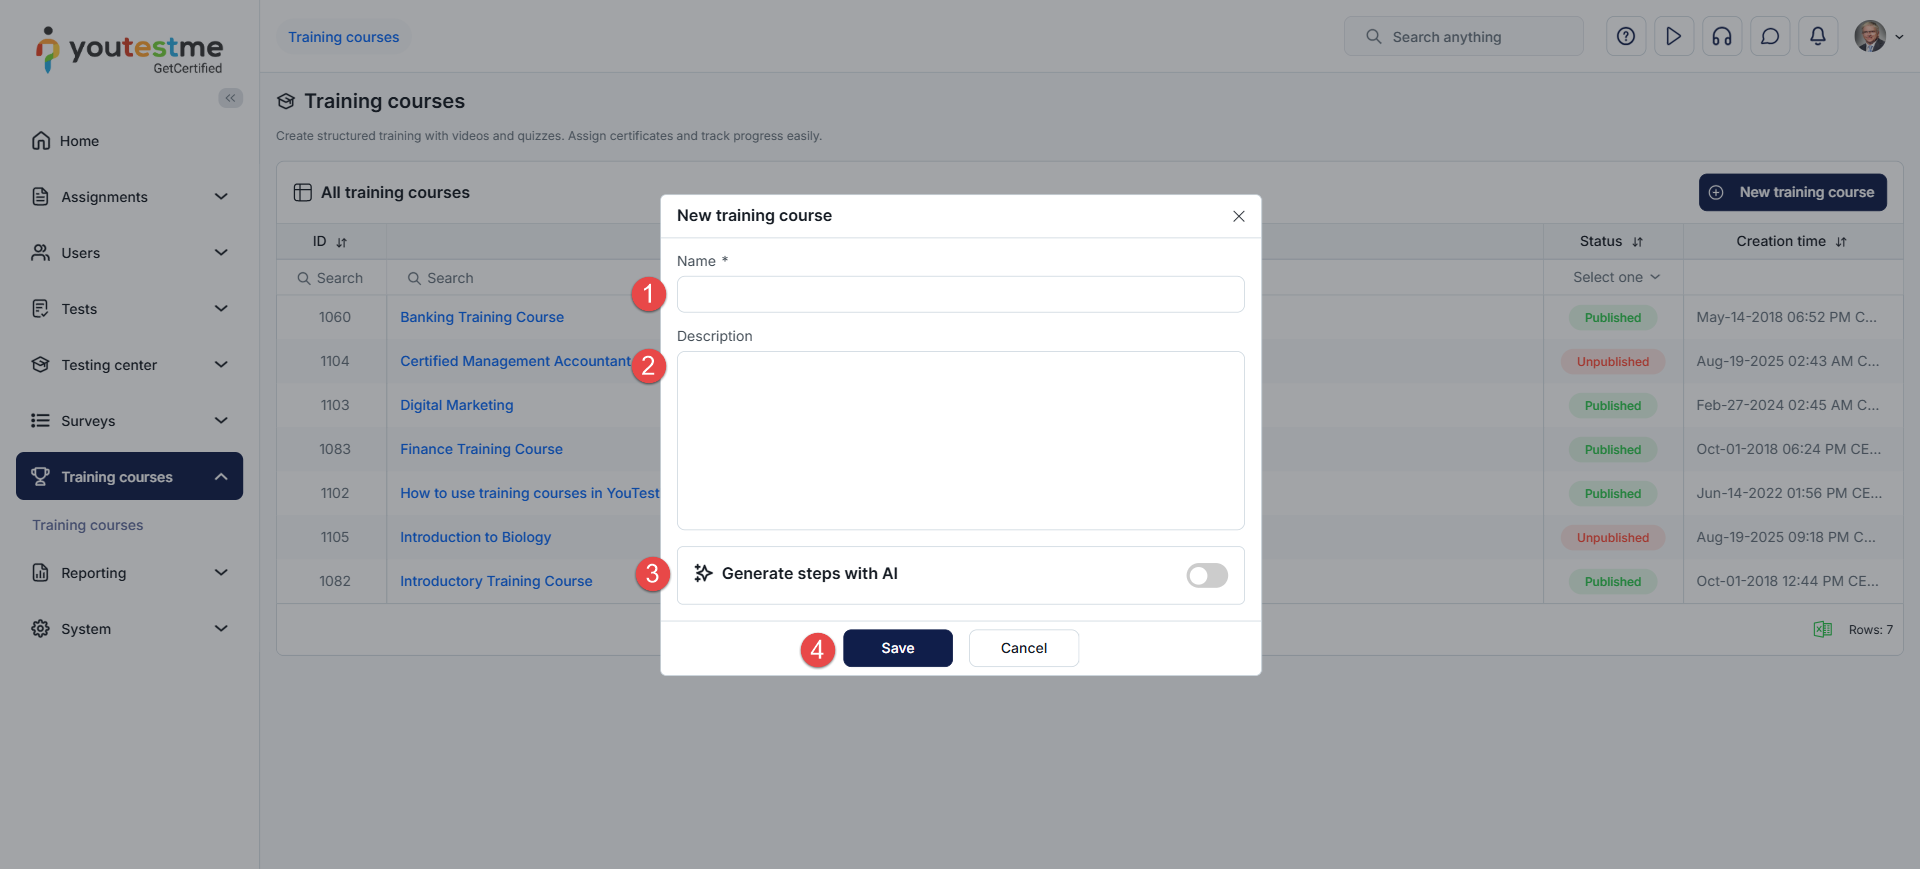
To create a new training course, click the New Training Course button and, in the dialog:
Enter the Name of the training course.
Enter a Description to provide additional information about the purpose or content of the training course.
Enable the Generate Steps with AI option to generate the training steps using artificial intelligence automatically.
Click the Save button to add the training course and begin creating its content.
Defining the Training Course Settings
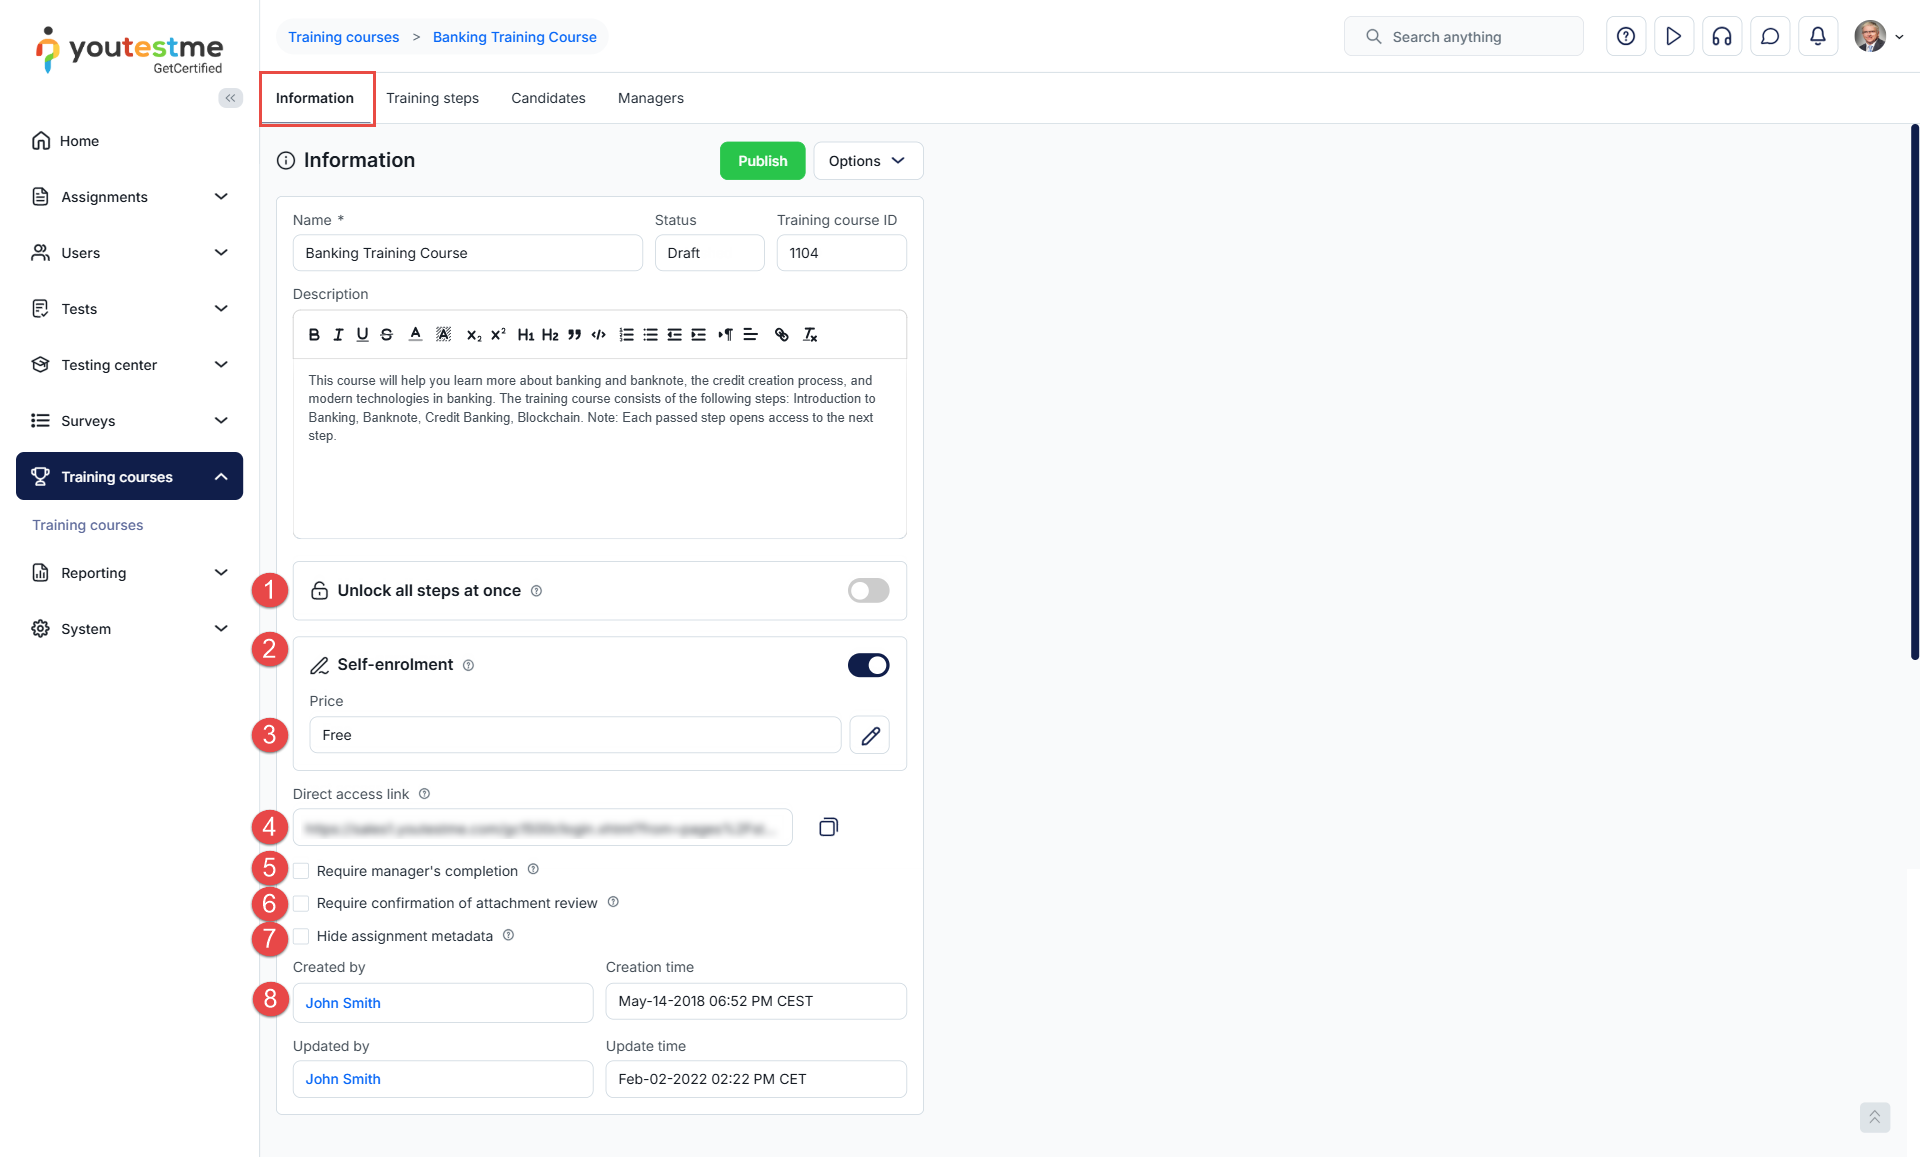
Once the training course is created, it will be in Draft status, and you will be redirected to the Information tab, where you can:
Unlock All Steps at Once: Enable this option to allow trainees to navigate between training steps freely. Trainees must still successfully complete any tests attached to the steps to complete the training course.
Enable Self-Enrollment: Enable this option to make the training available to all users in the system, eliminating the need for manual trainee assignment.
Define Enrollment Fees: When Self-Enrollment is enabled, you can specify the price users must pay to enroll. Note: To set up a training course fee, the YouTestMe GetCertified application must be integrated with E-commerce. For more information, please refer to this article.
Direct Access Link: Copy and share the direct access link externally. Users can access the training directly through the link after logging in. Note: It is recommended to use this option with instant self-enrollment. For more details on how to enable it, please refer to this article.
Require Manager’s Completion: When enabled, the training will only be marked as complete upon manager approval. The course manager must manually mark each trainee’s training as complete.
Require Confirmation of Attachment Review: When enabled, trainees cannot proceed until they review the attachments in each step.
Hide Assignment Metadata: Enable this option to hide training course details (such as number of steps and tests) from the trainees’ My Training Courses tab.
Created By / Updated By: Displays the course creation time, the user who created it, and details of the last update (time and user).
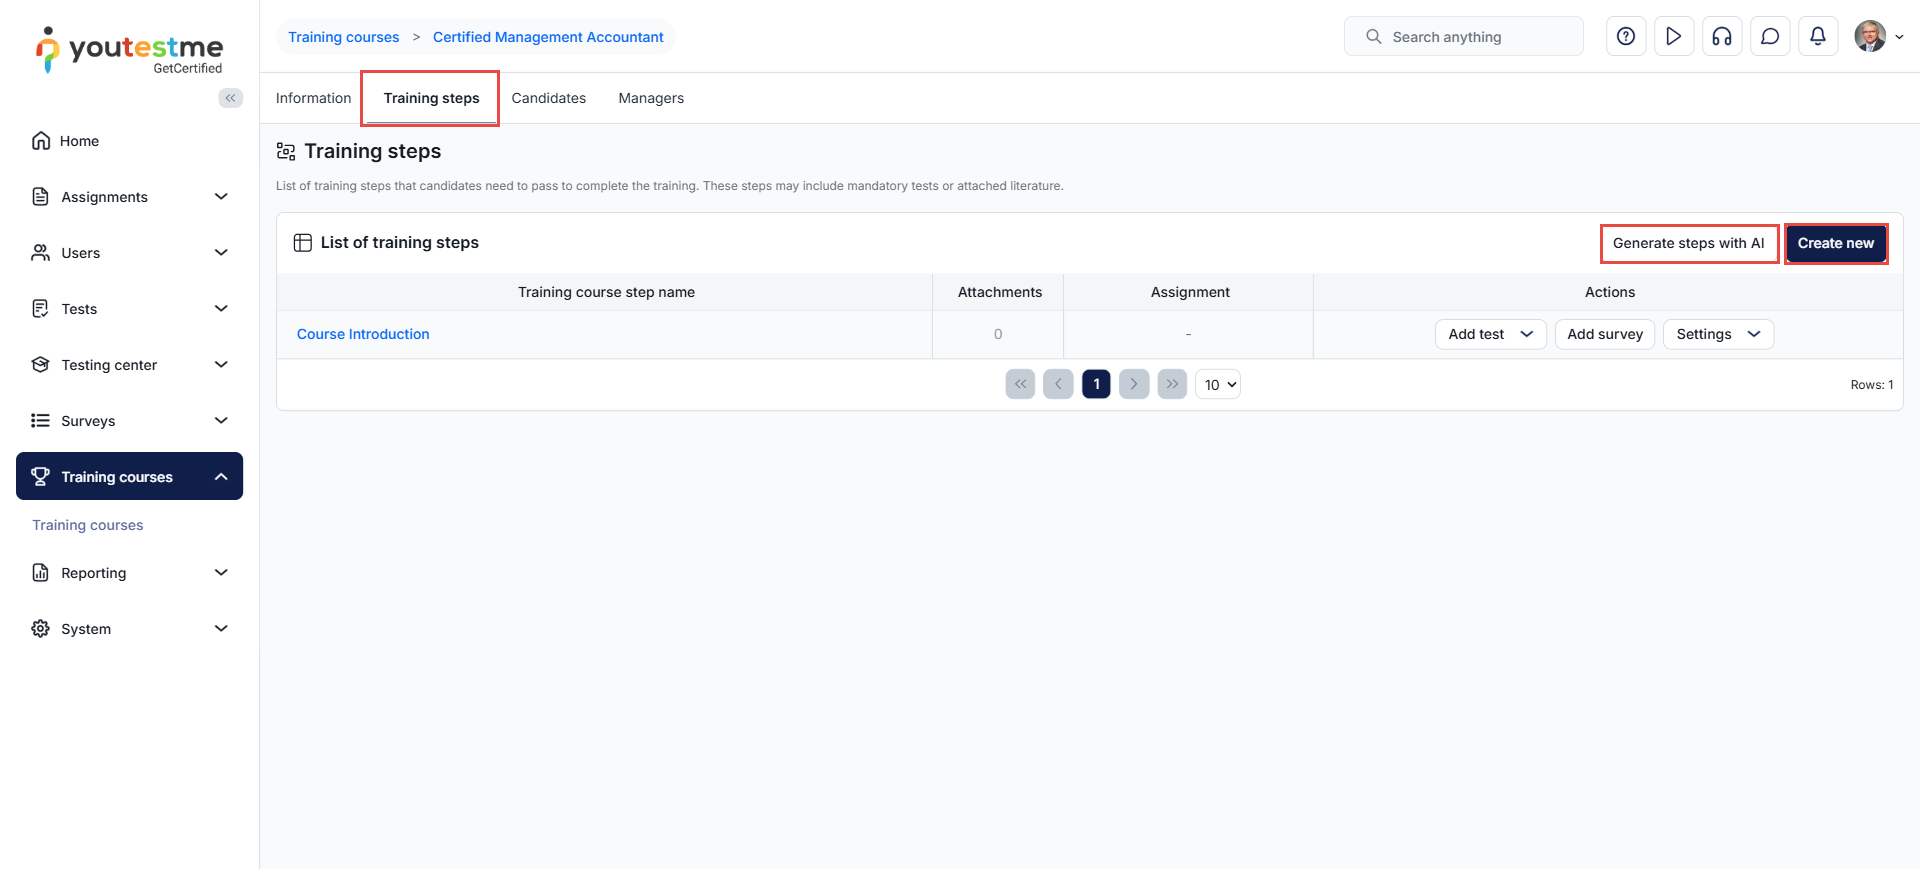
Adding Training Course Steps
To add the training course steps, navigate to the Training Steps tab. In this tab, you have the option to manually add a training step using the Create New button or generate steps using artificial intelligence.
All created steps will be listed in the List of Training Steps.
Manually Creating Training Course Steps
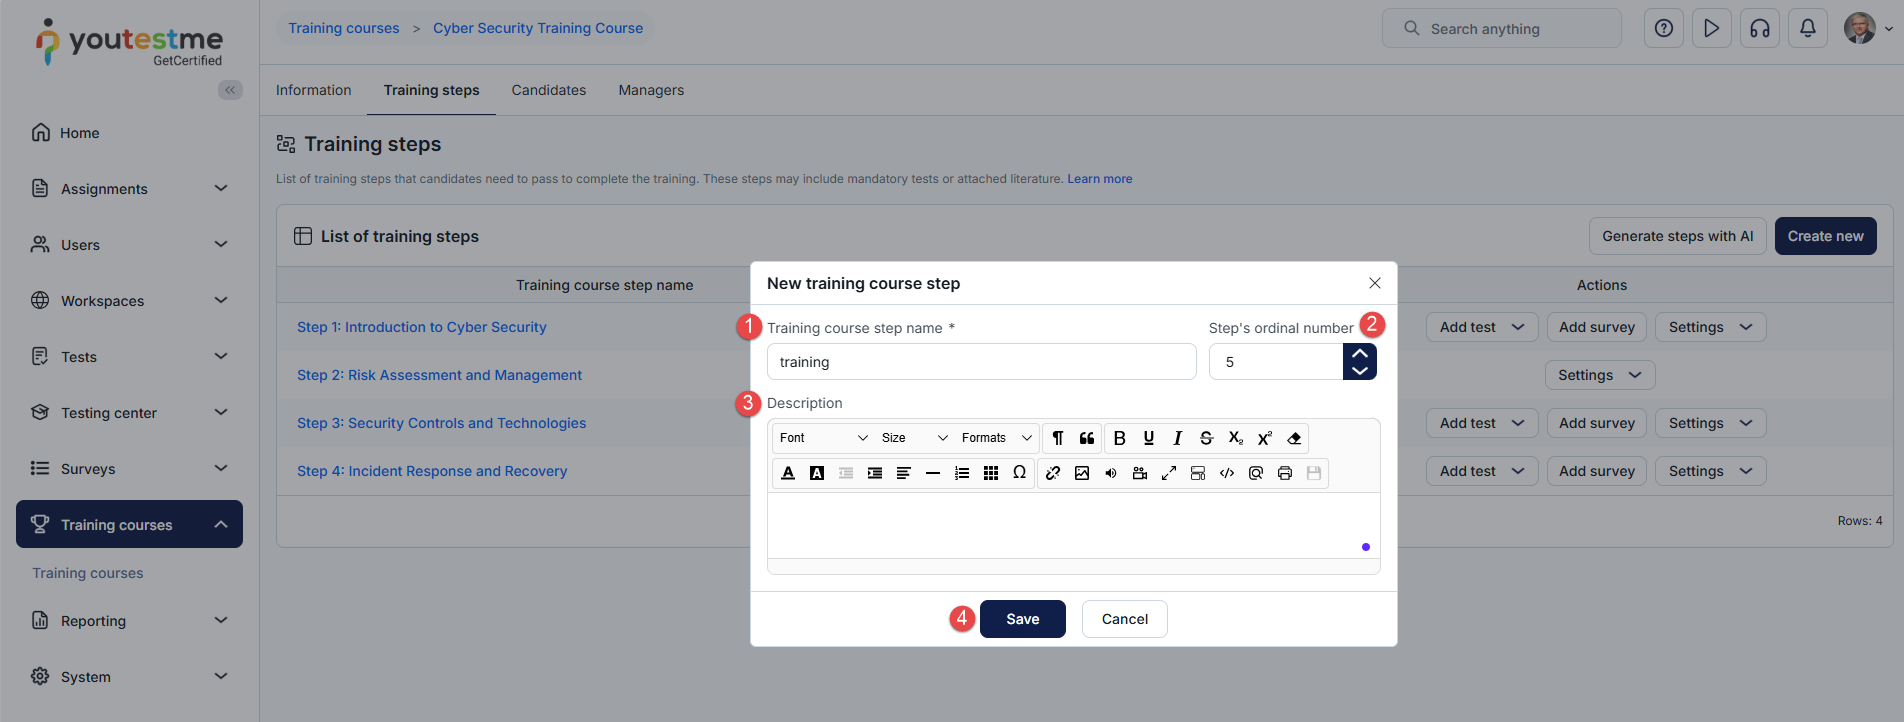
To manually add a new training course step, click the Create New button, and in the new training course step dialog:
Enter thenameof the training course step.
Define thestep’s ordinal number.
Enter the step’sdescription– You may describe the learning content of this step.
Click theSavebutton to add the step.
Generating Training Course Steps using AI
You can generate training course steps with artificial intelligence either during course creation or later from the Training Steps tab. In both cases, the generation process operates in the same manner.
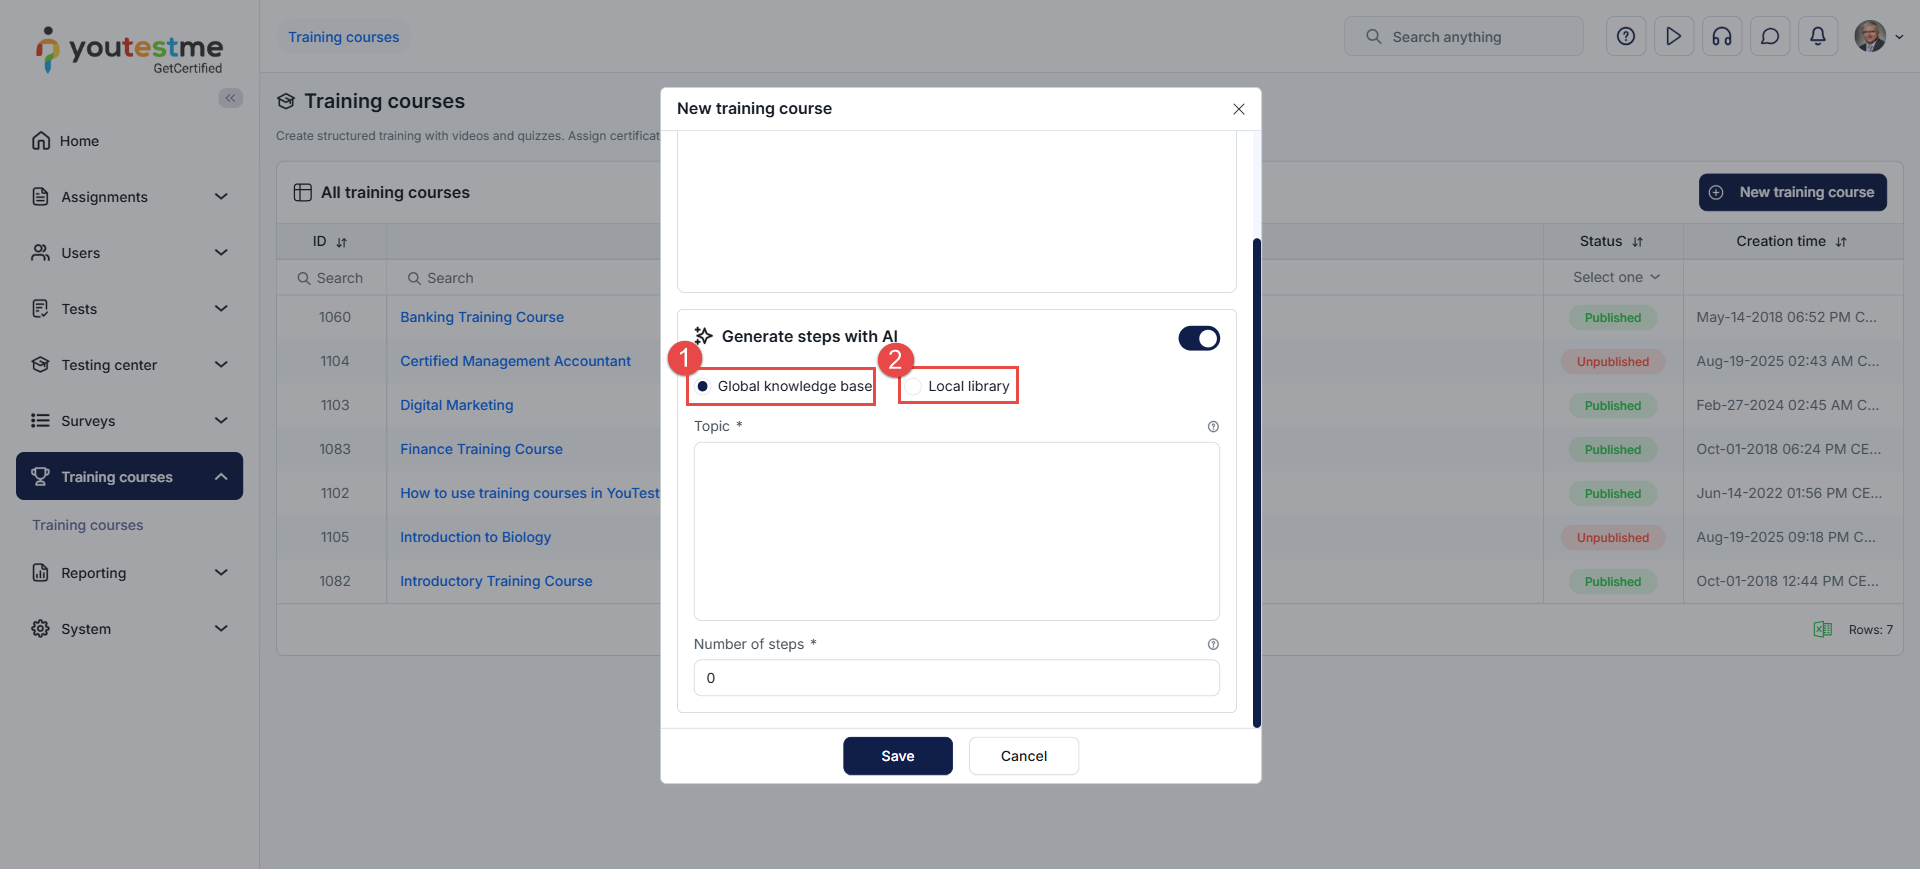
When the Generate Steps with AI option is enabled, you will need to select one of the following methods:
Global Knowledge Base: Select this option to generate training course steps from the ChatGPT global database.
Local Library: Select this option to generate training course steps using a document from the application library.
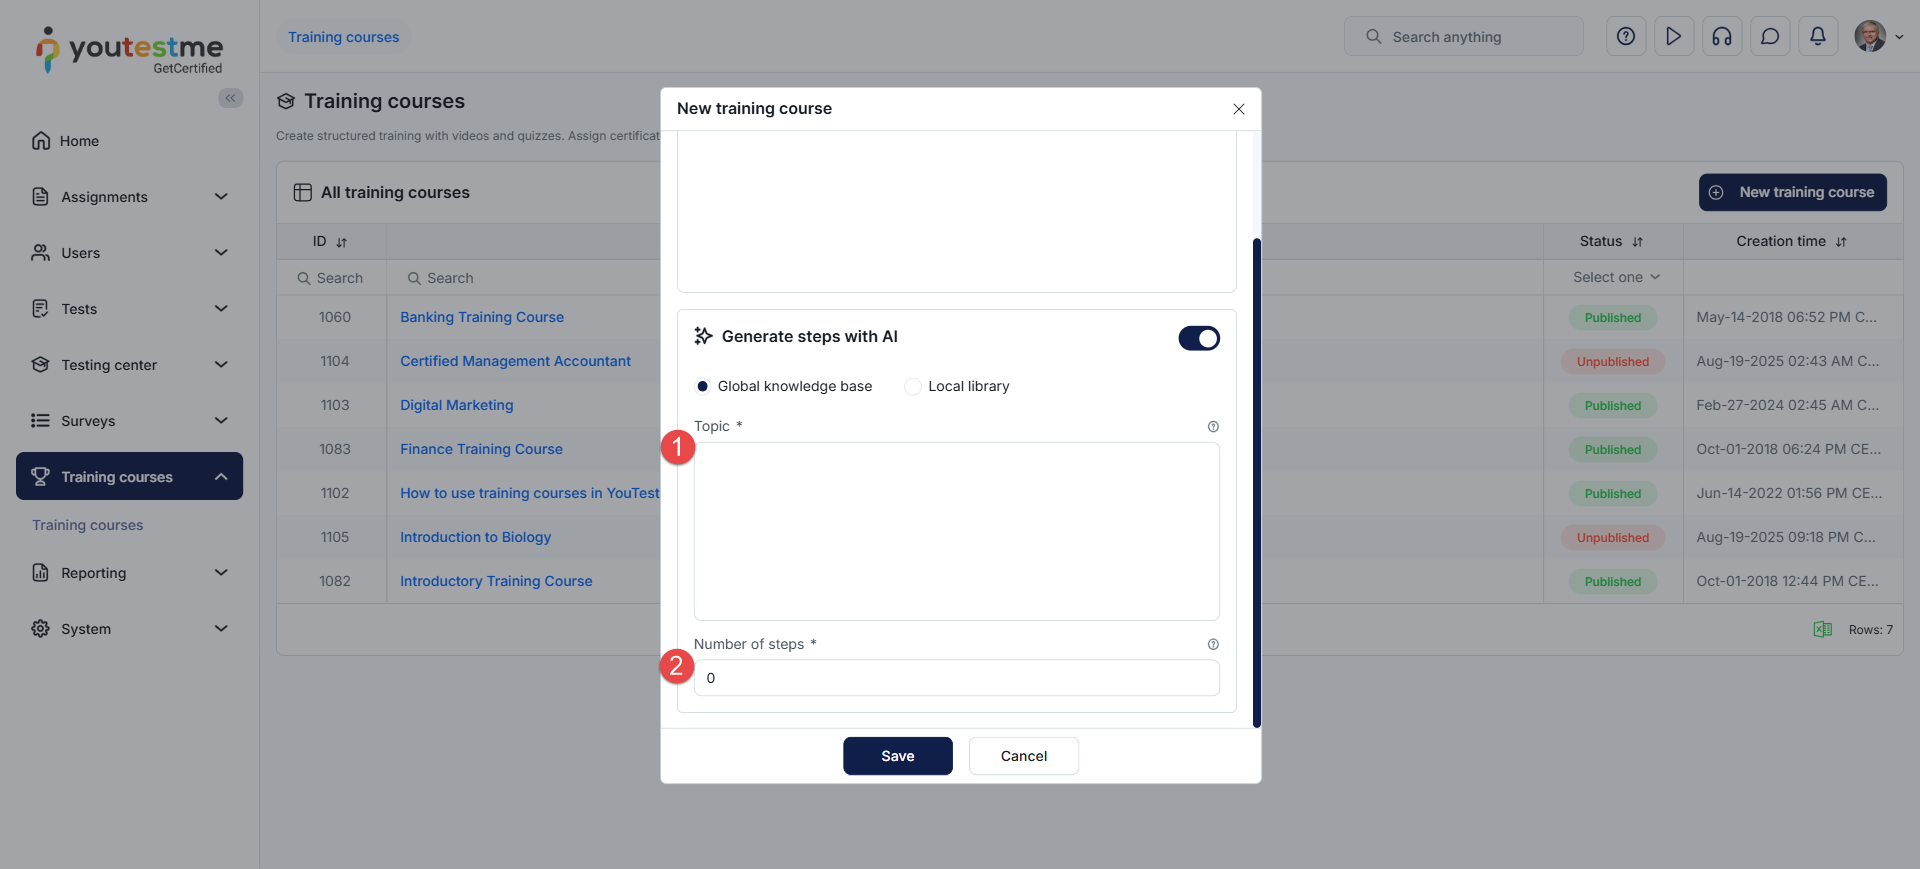
When the Global Knowledge Base method is selected, you will need to:
Enter the prompt or topic for which you would like the AI to generate steps.
Enter the number of steps to generate.
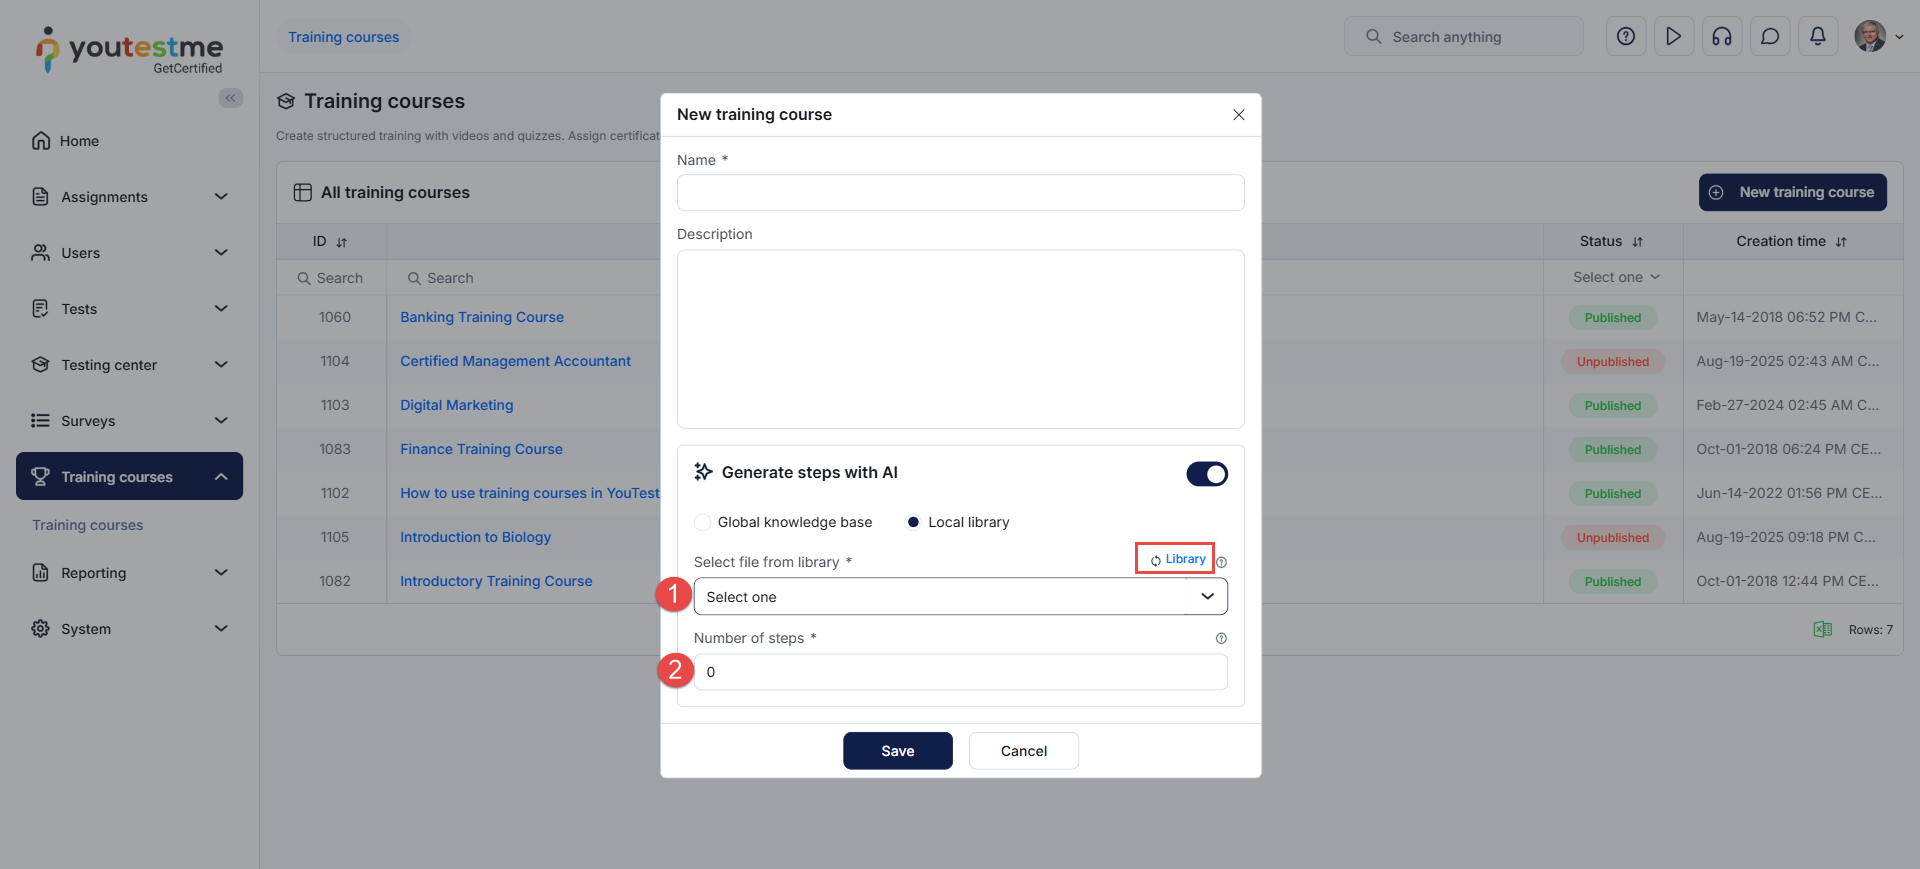
When the Local Library method is selected, you will need to:
Select the file you want to use, or upload a new one by clicking the Library link.
Enter the number of steps to generate.
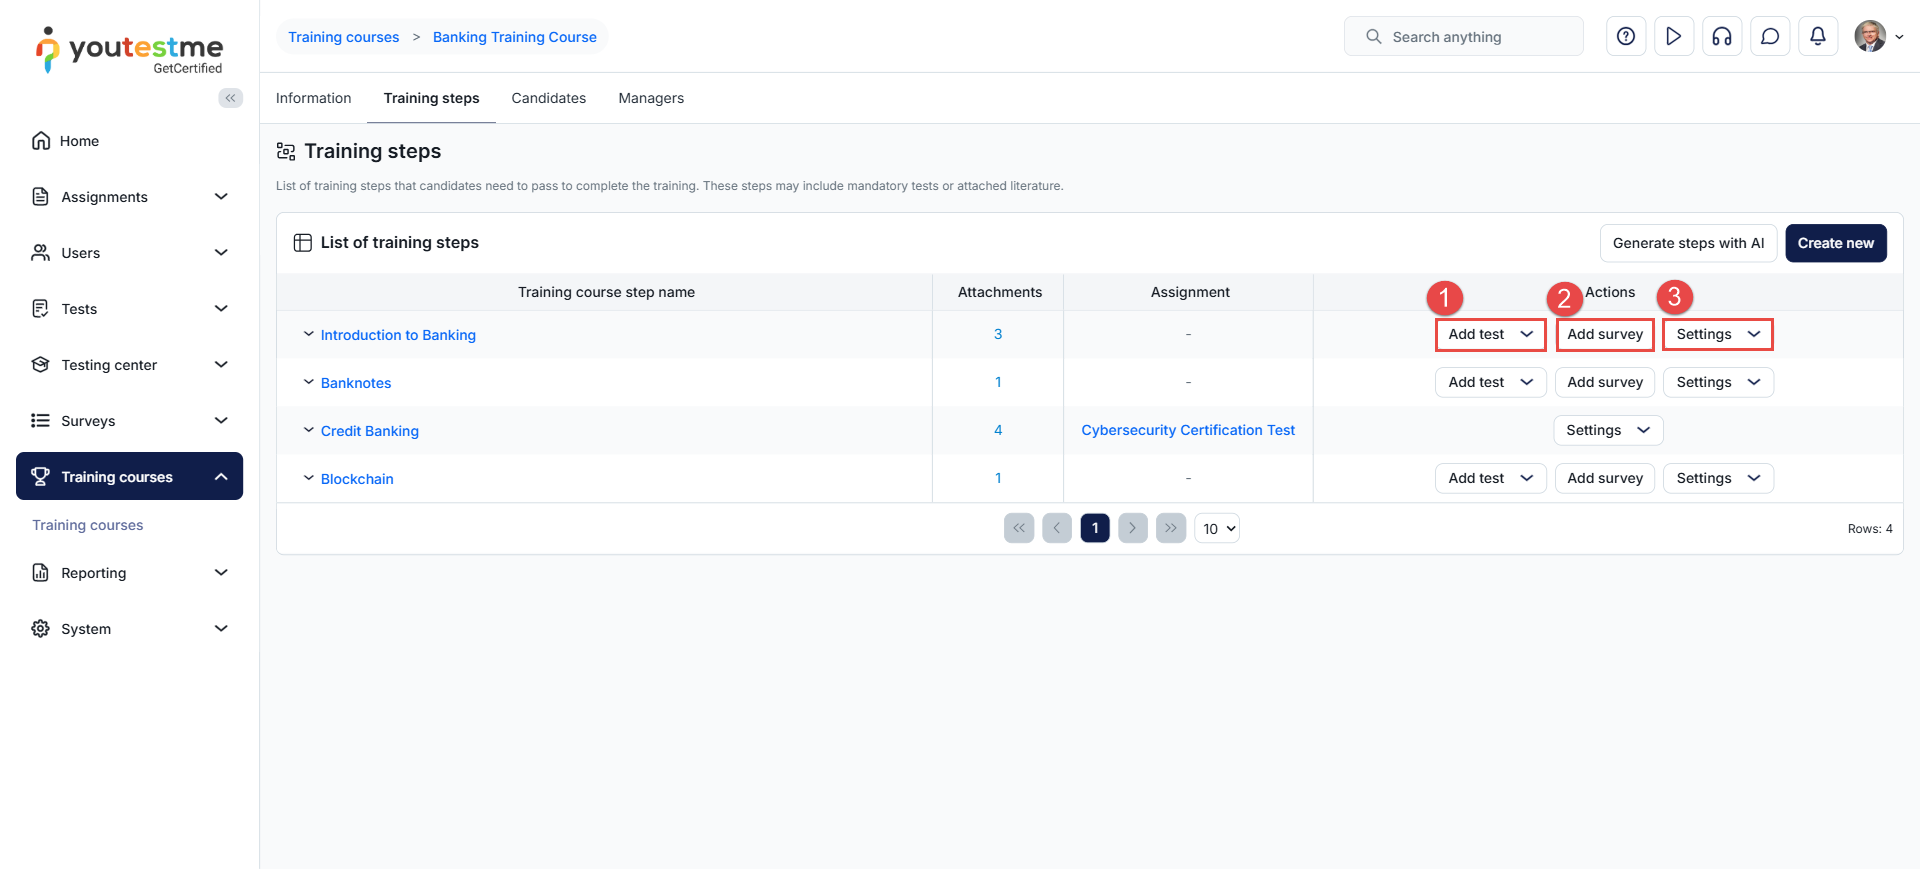
Adding Test, Survey, and Attachments to the training course step
Once a training course step is created, you can perform the following actions:
Add Test: Attach an existing test or create a new ad-hoc test that trainees must pass to continue.
Add Survey: Attach an existing survey to gather feedback from trainees.
Settings: Edit or delete the step, import attachments from the library, or upload new ones. Please refer to this article for instructions on adding attachments to a training step.
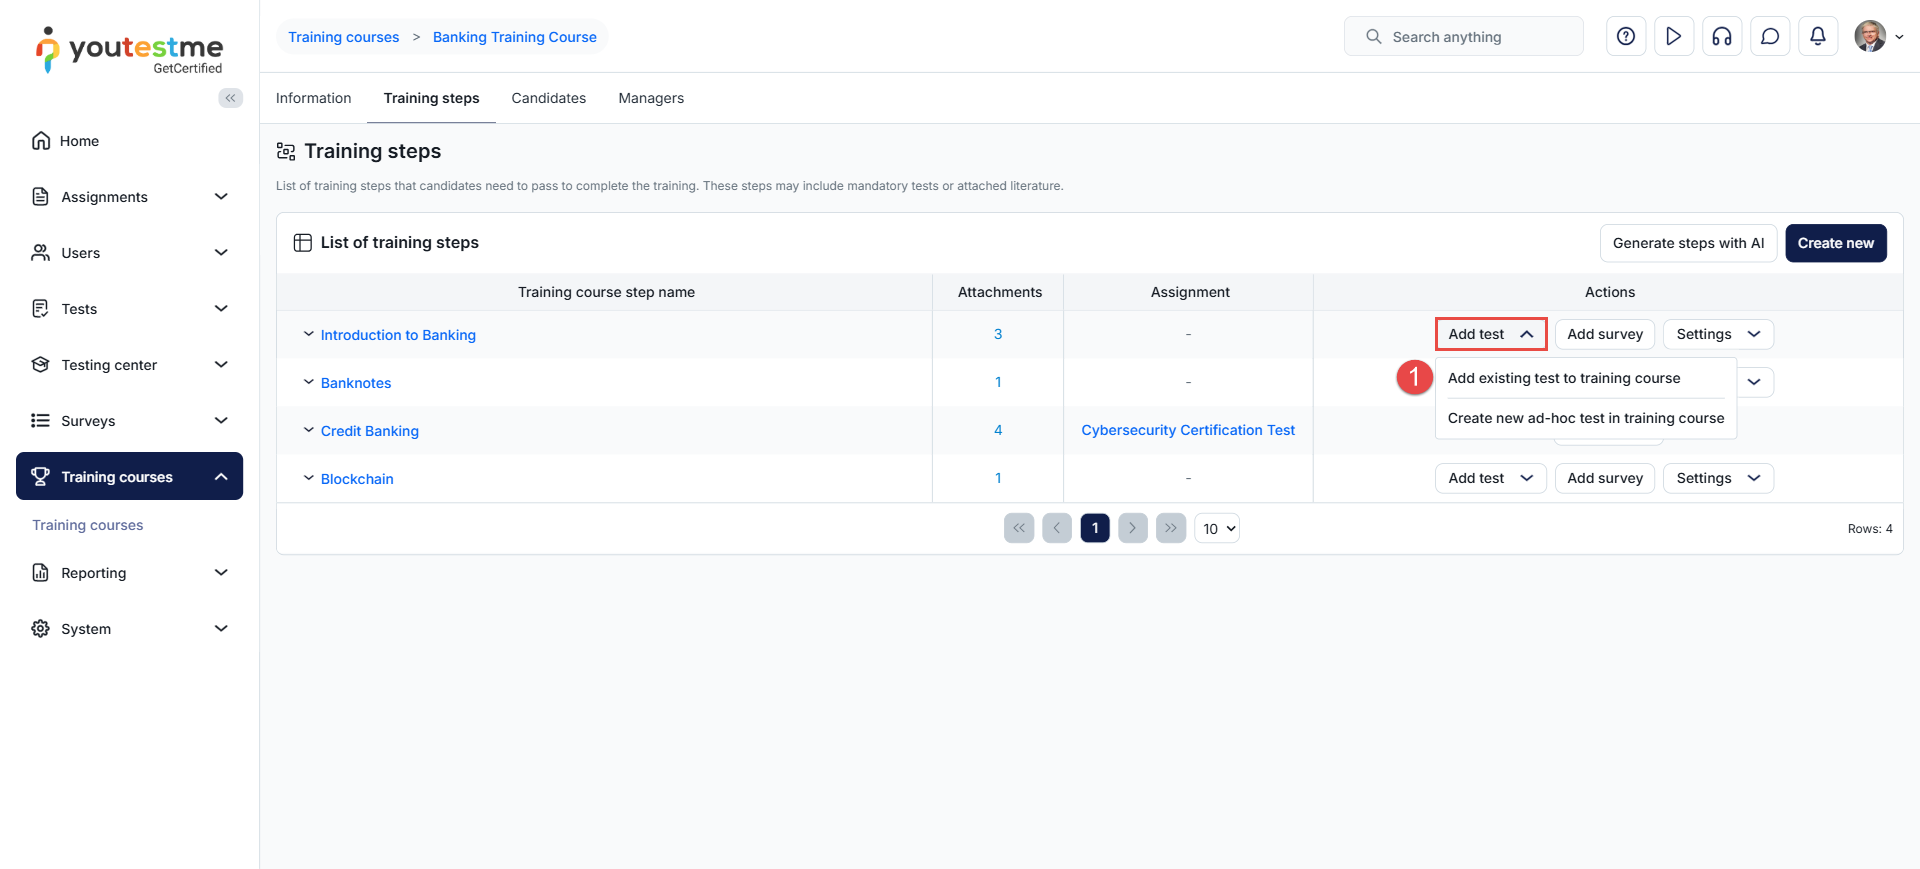
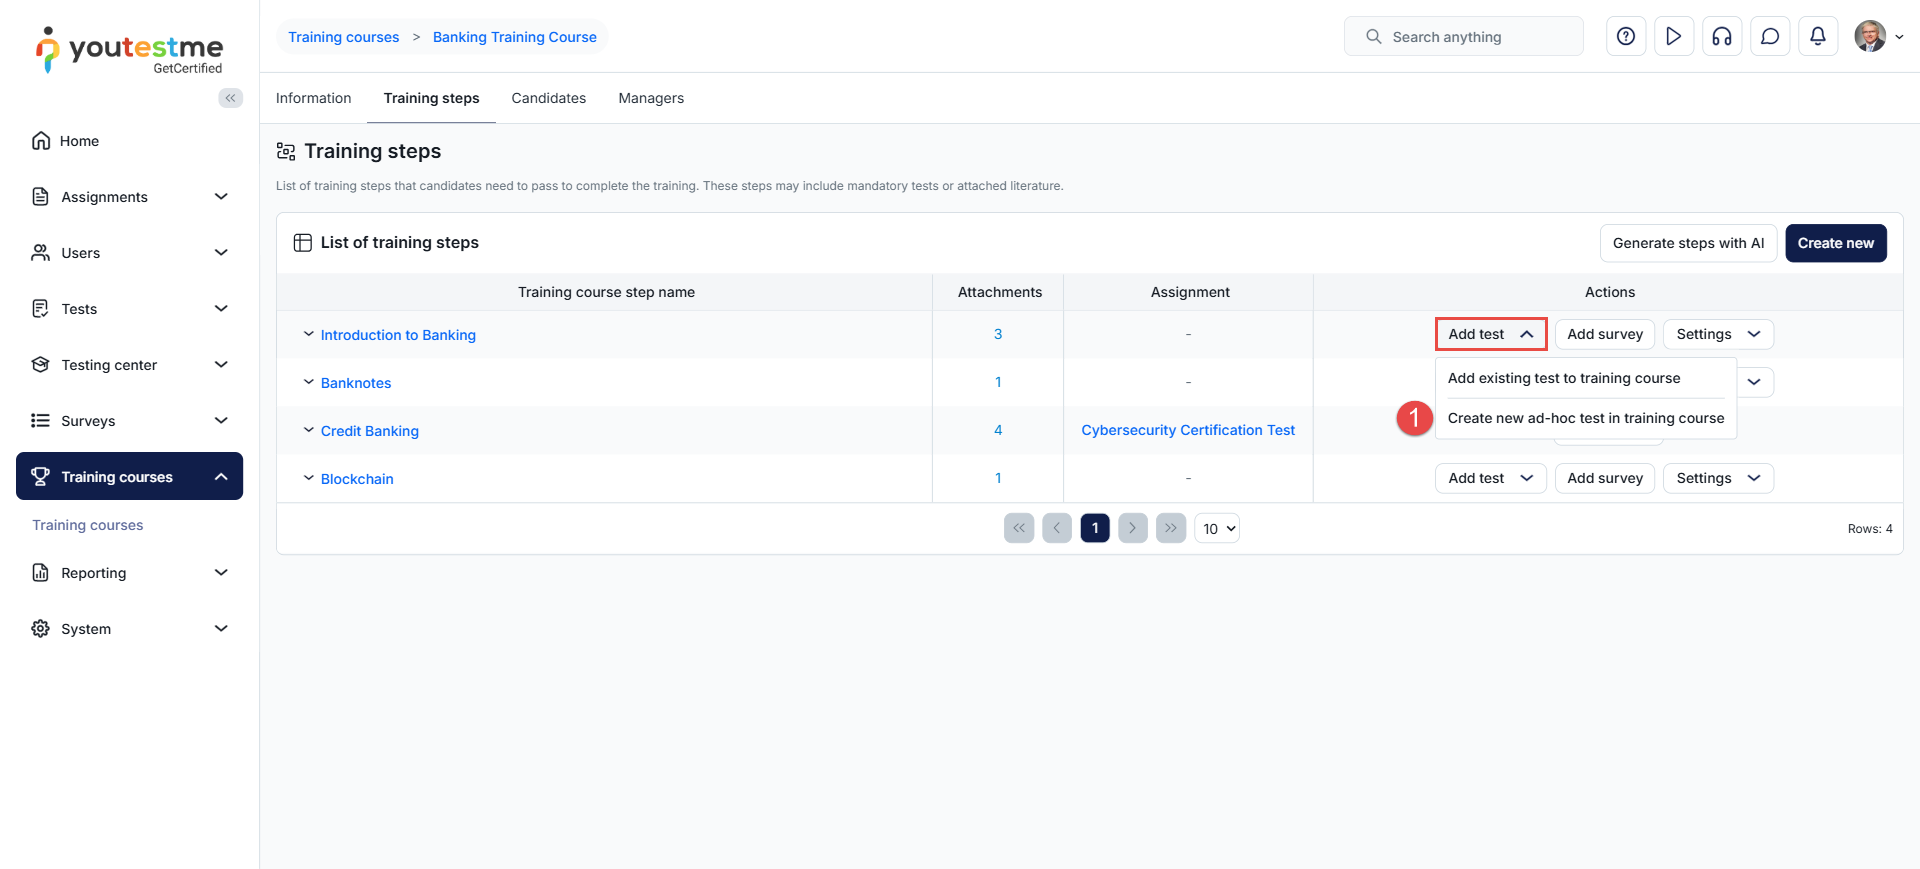
Adding a Test to a Training Course Step
Adding an existing Test
To add an existing test to a training step:
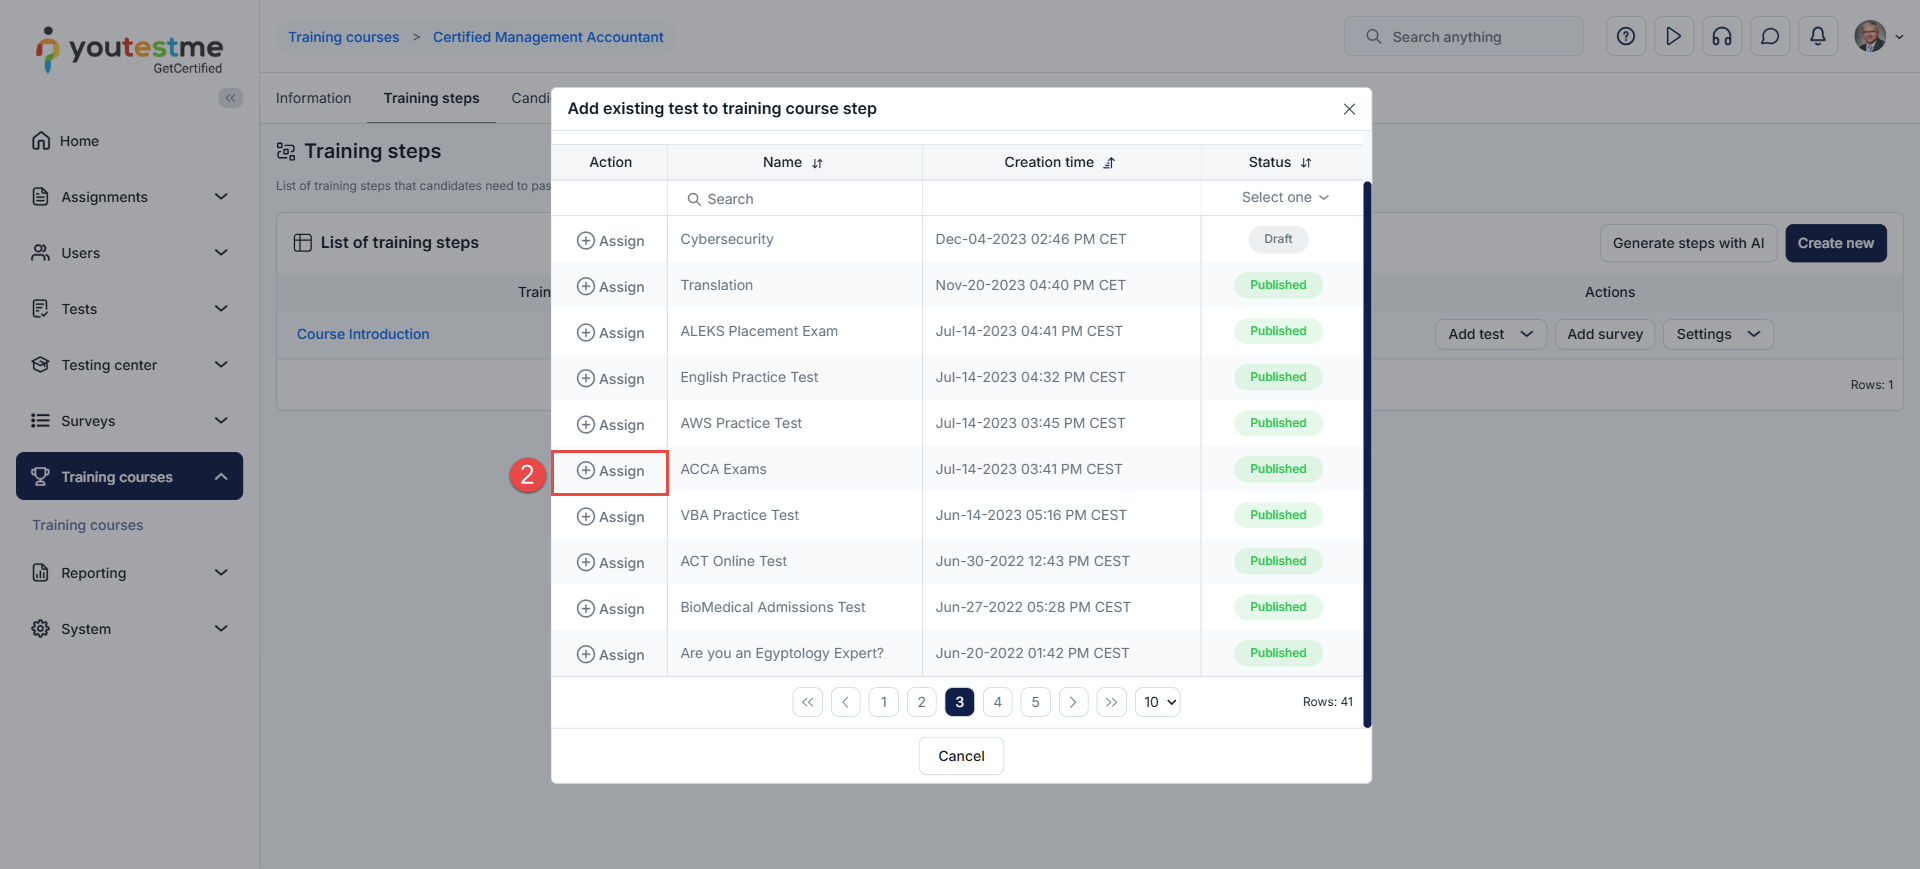
Click the Add Test button and select Add Existing Test to a Training Course from the dropdown menu.
A list of all available tests in the system will be displayed. Click the Assign button next to the test you want to add.
Note: A testing session must be explicitly created for the training course with the Self-Enrollment option enabled. This allows trainees to take the test without needing to be manually assigned to the session.
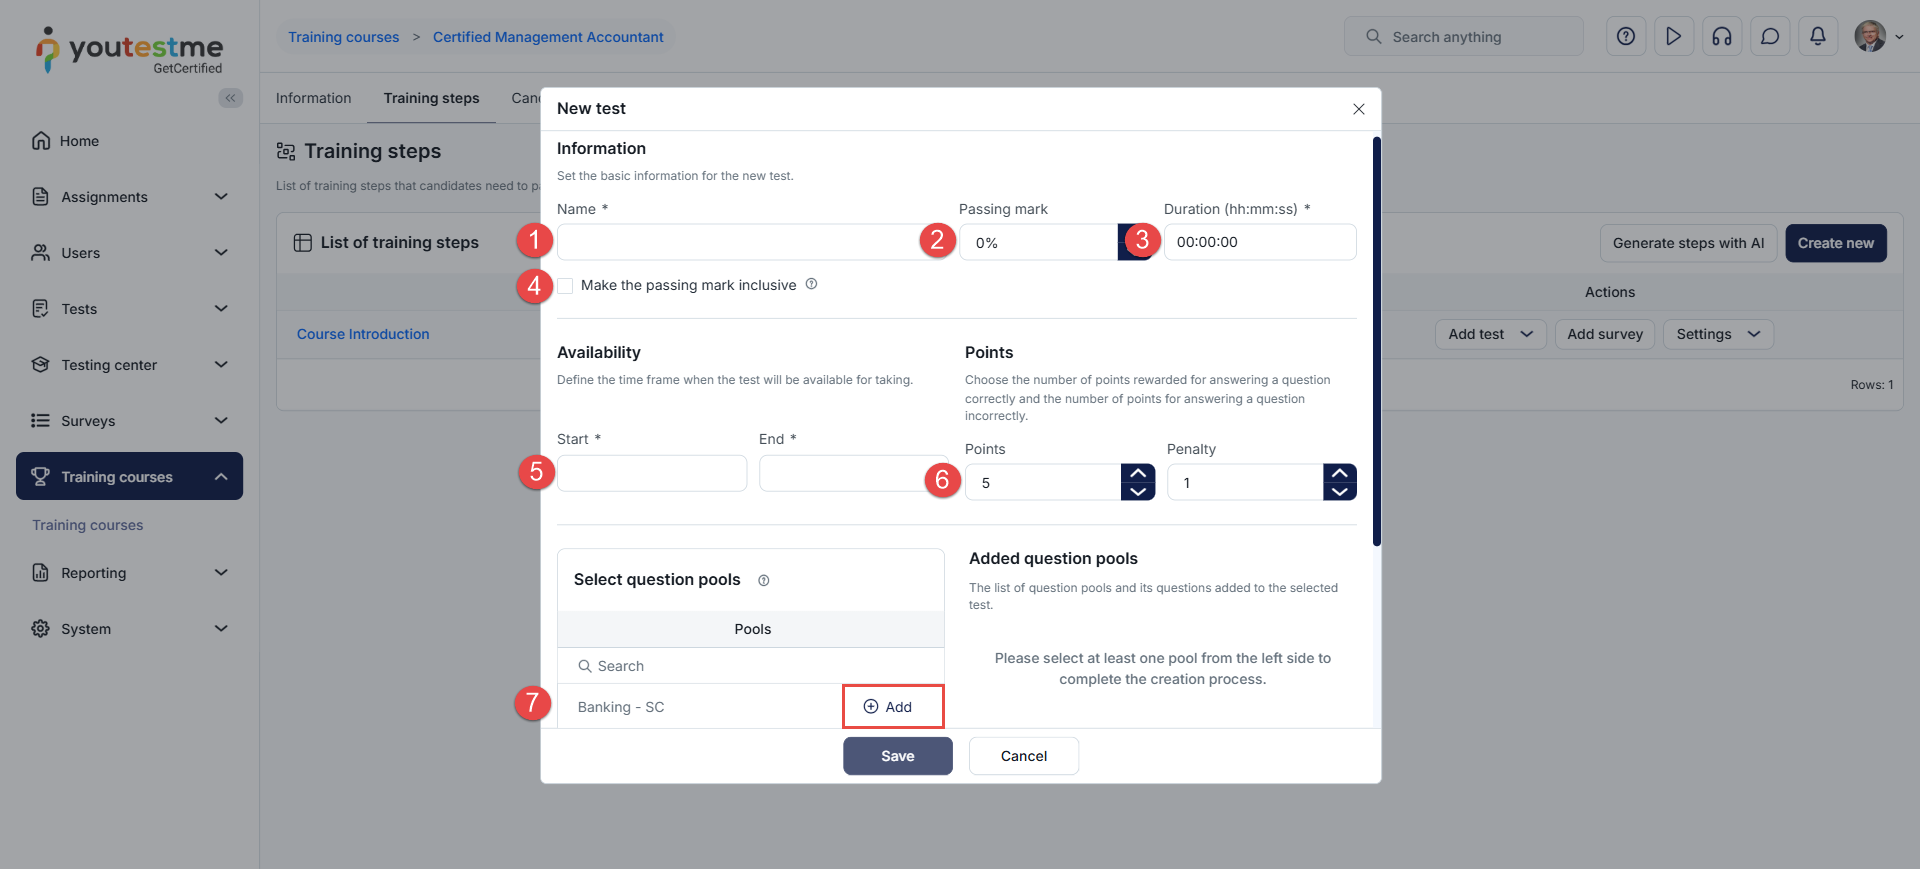
Creating a New Ad-hoc Test
To create a new ad-hoc test, follow the steps below:
Click the Add Test button and select the ” Create new ad-hoc test in training course” option from the dropdown menu.
In the New Test dialog, you will need to configure the following:
Name: Enter the test name.
Passing Mark: Specify the minimum score required to pass.
Duration: Set the test duration.
Inclusive Passing Mark: Enable this option if the passing score should be inclusive.
Availability: Define the start and end dates and times when the test will be available.
Scoring: Specify the number of points awarded for a correct answer and the penalty (if any) for a wrong answer.
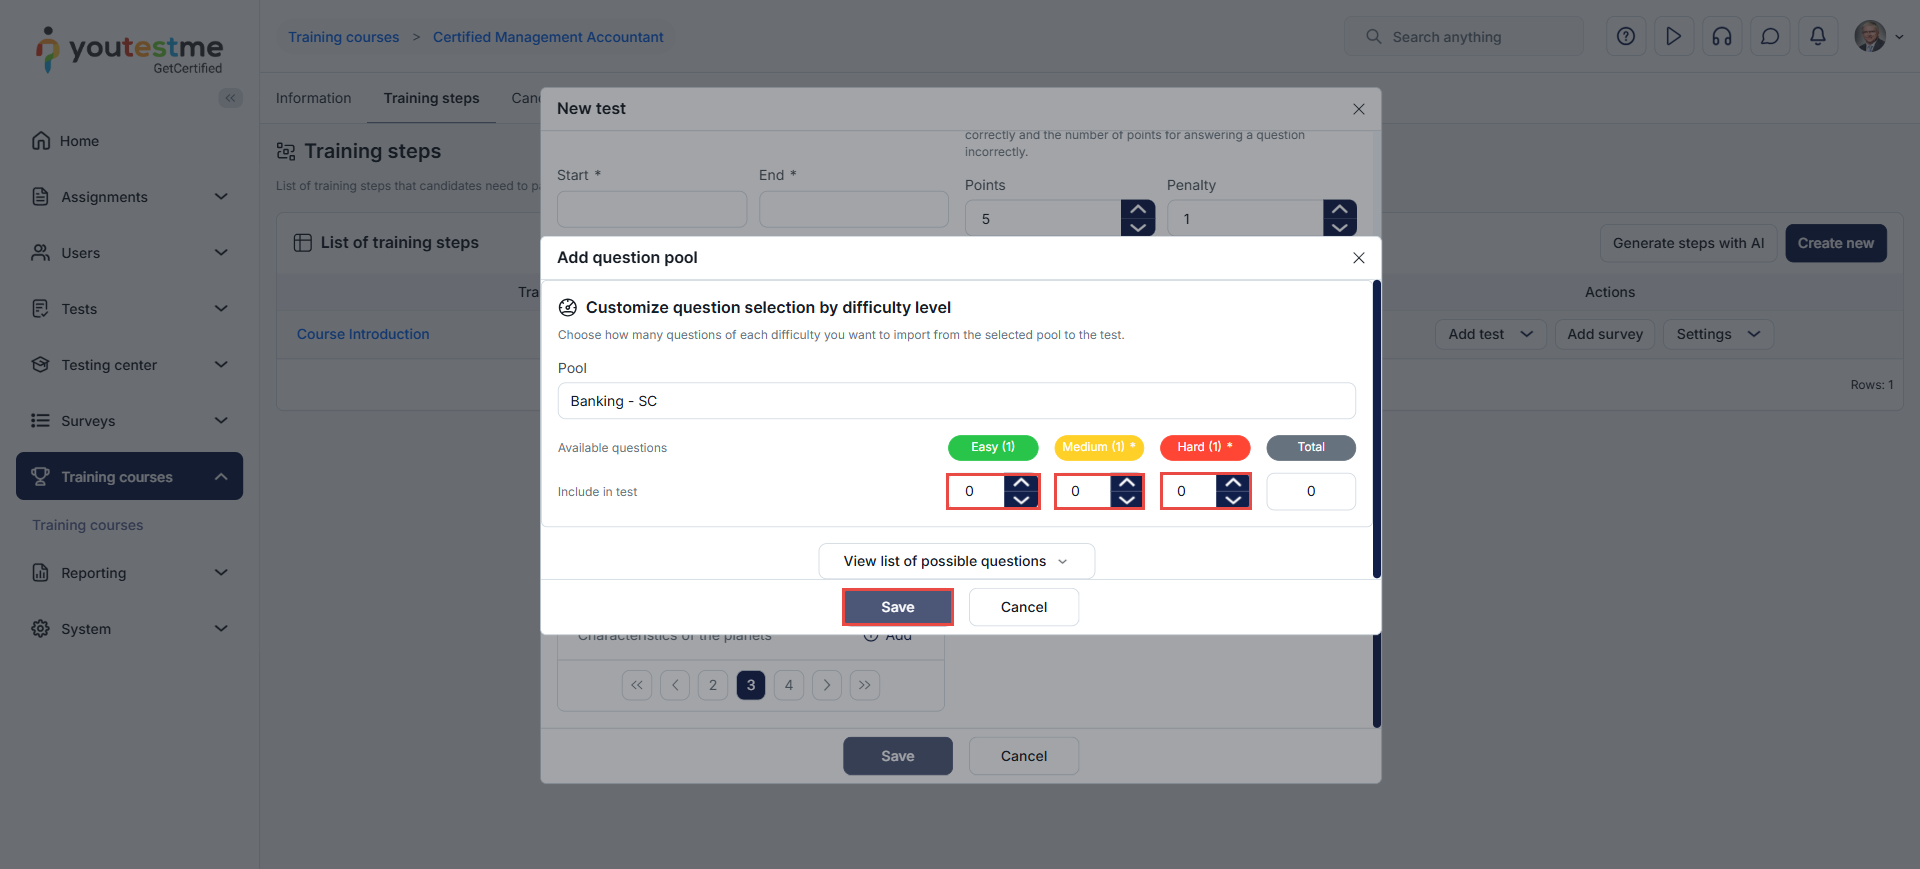
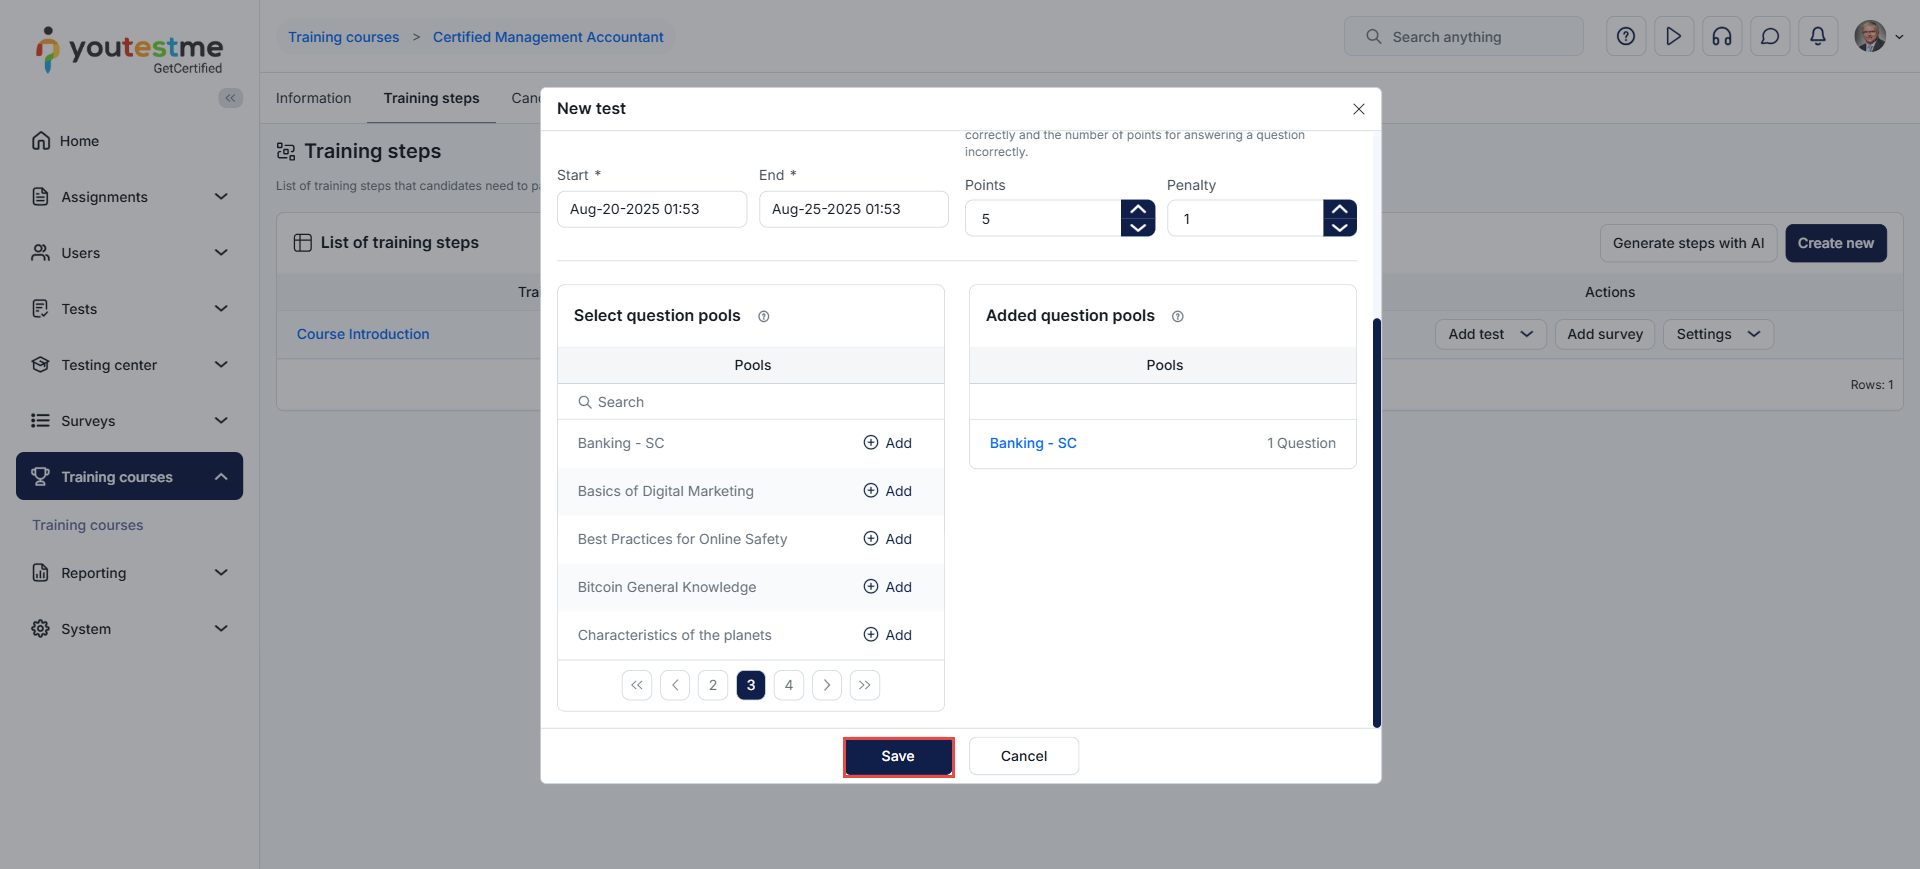
Question Pool: Select the question pool to generate the test from by clicking the Add button next to the desired pool.
When you add a question pool to a test during its creation, a pop-up dialog will appear allowing you to specify the number of questions for each difficulty level. Click Save to add them to the test.
You can add as many question pools as needed. Once the Ad-Hoc test settings are defined, click the Save button to add the test.
Note: This approach does not allow you to select specific questions manually. The Ad-Hoc test uses the generator to create a test based on question difficulty. If you would like to manually choose specific questions or create a certified test with a certificate, please create the test through the Tests module and then assign it to the training step.
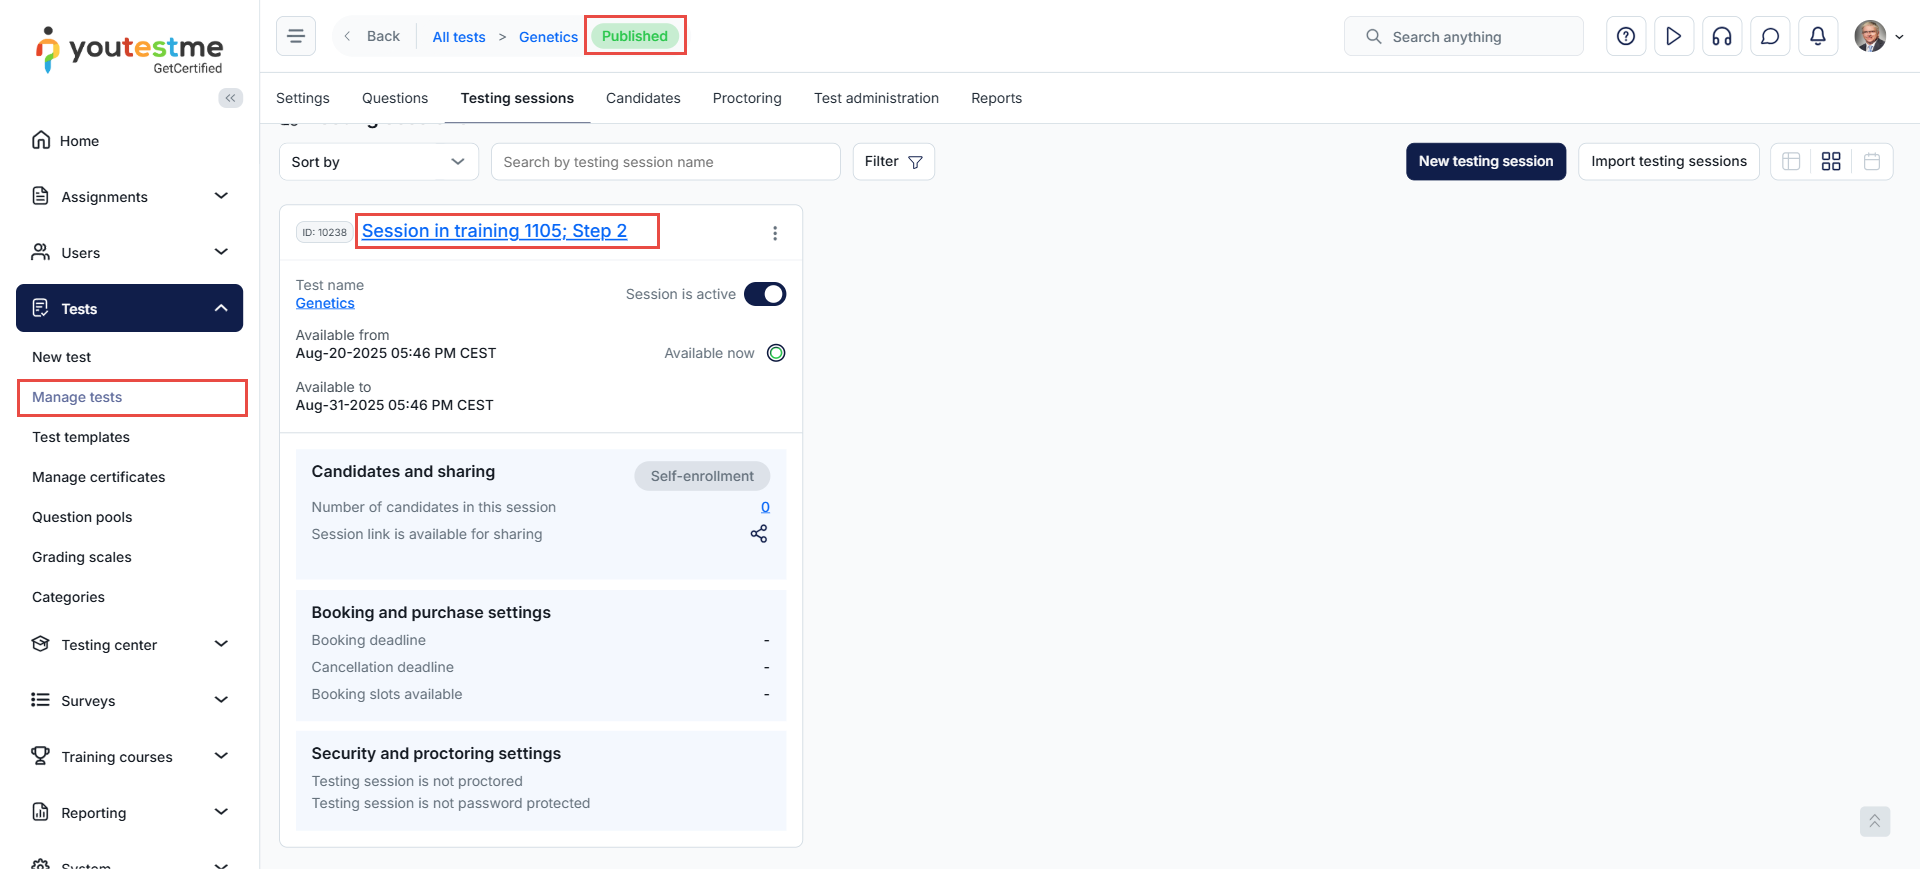
The created test will be added to the list of all tests in the Manage Tests module. It will be automatically set to Published, and the session will be set to Active with Self-Enrollment enabled.
Note: To adjust the test or session settings, access the test from the Manage Tests module.
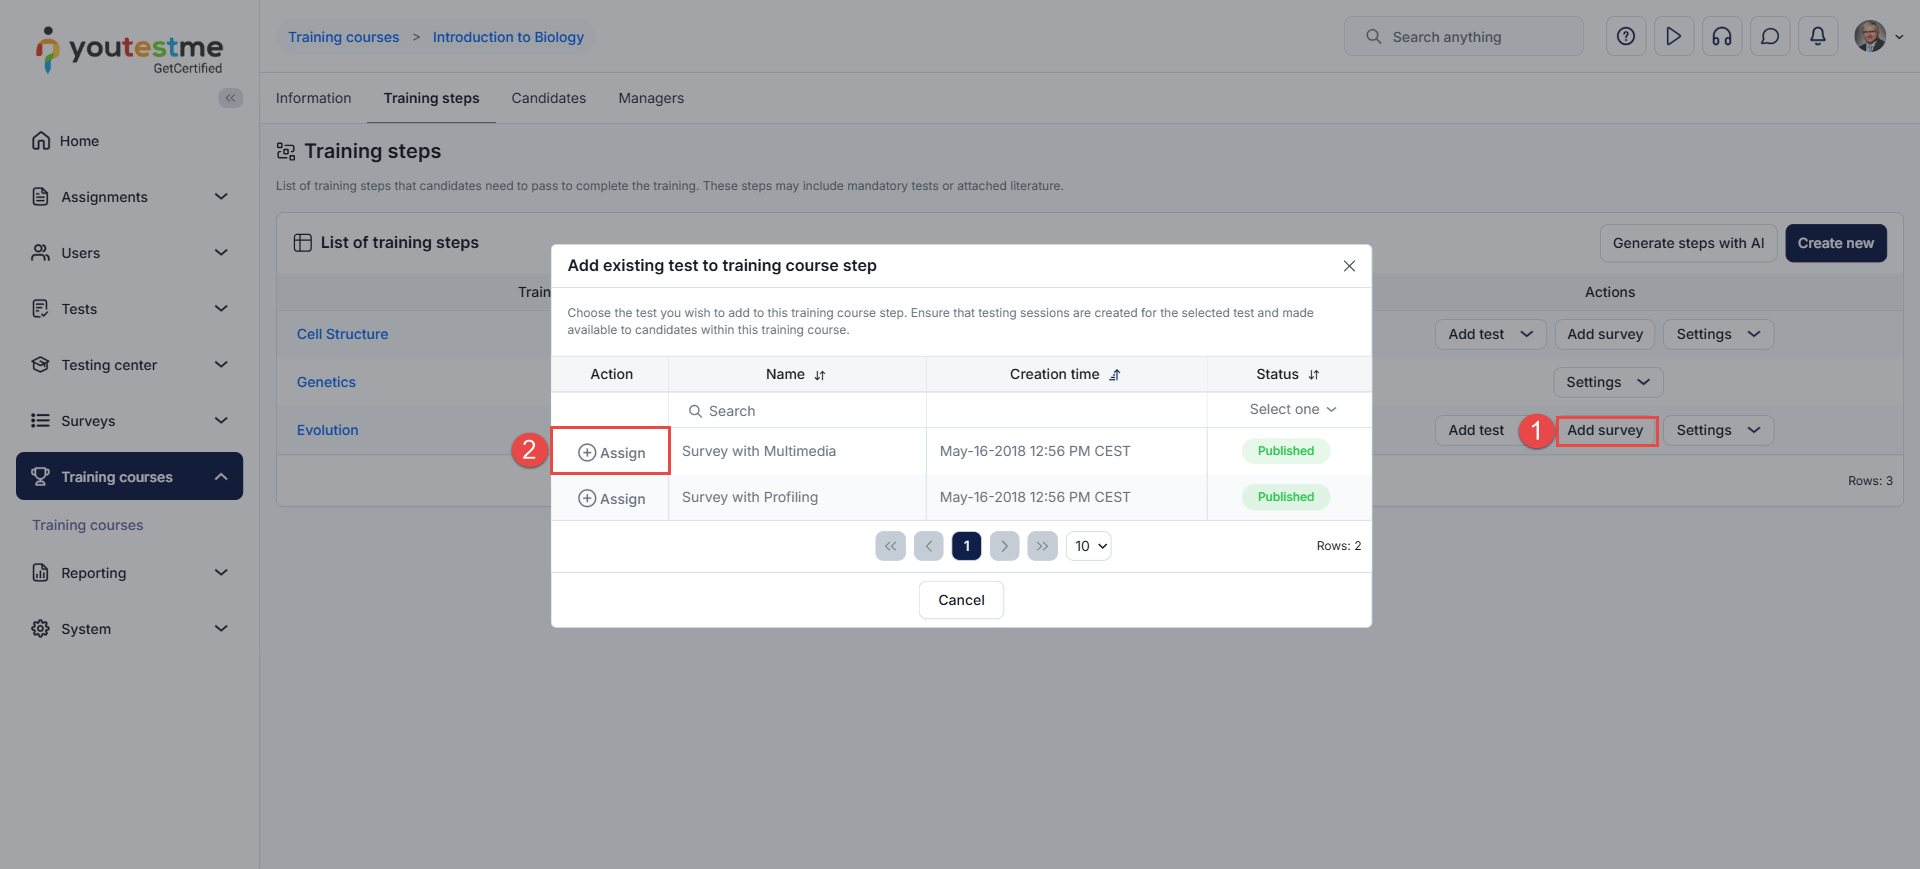
Adding a survey to a Training Course Step
You can add an existing survey to a training course step. Surveys are typically helpful in the final step of the training course, allowing you to gather information from candidates, such as their examination experience.
To add a survey to a training course:
Click theAdd surveybutton.
Click theAssignbutton next to the desired survey.
Training Course Completion Certificate
Although YouTestMe does not support assigning a completion certificate directly to trainees upon finishing a training course, this can still be achieved by adding a test to the final training step and linking certificates to that test.
YouTestMe allows you to assign multiple certificates to test candidates based on predefined conditions. For example:
Participation Certificate: This certificate is awarded regardless of test results. Any trainee who enrolls in the training course and completes the final test can receive it, regardless of their score.
Completion Certificate: This certificate is awarded to trainees who enroll in the course and successfully pass the final test.
Beyond these examples, you can create certificates with conditions tailored to your specific scenario. The key point to remember is that a test is required in the final step of the training course to issue certificates, as certificates can only be assigned through tests. Please refer to this article to learn more about certificate conditions.
Additionally, you can manually assign certificates to users. For more details, please refer to this article.
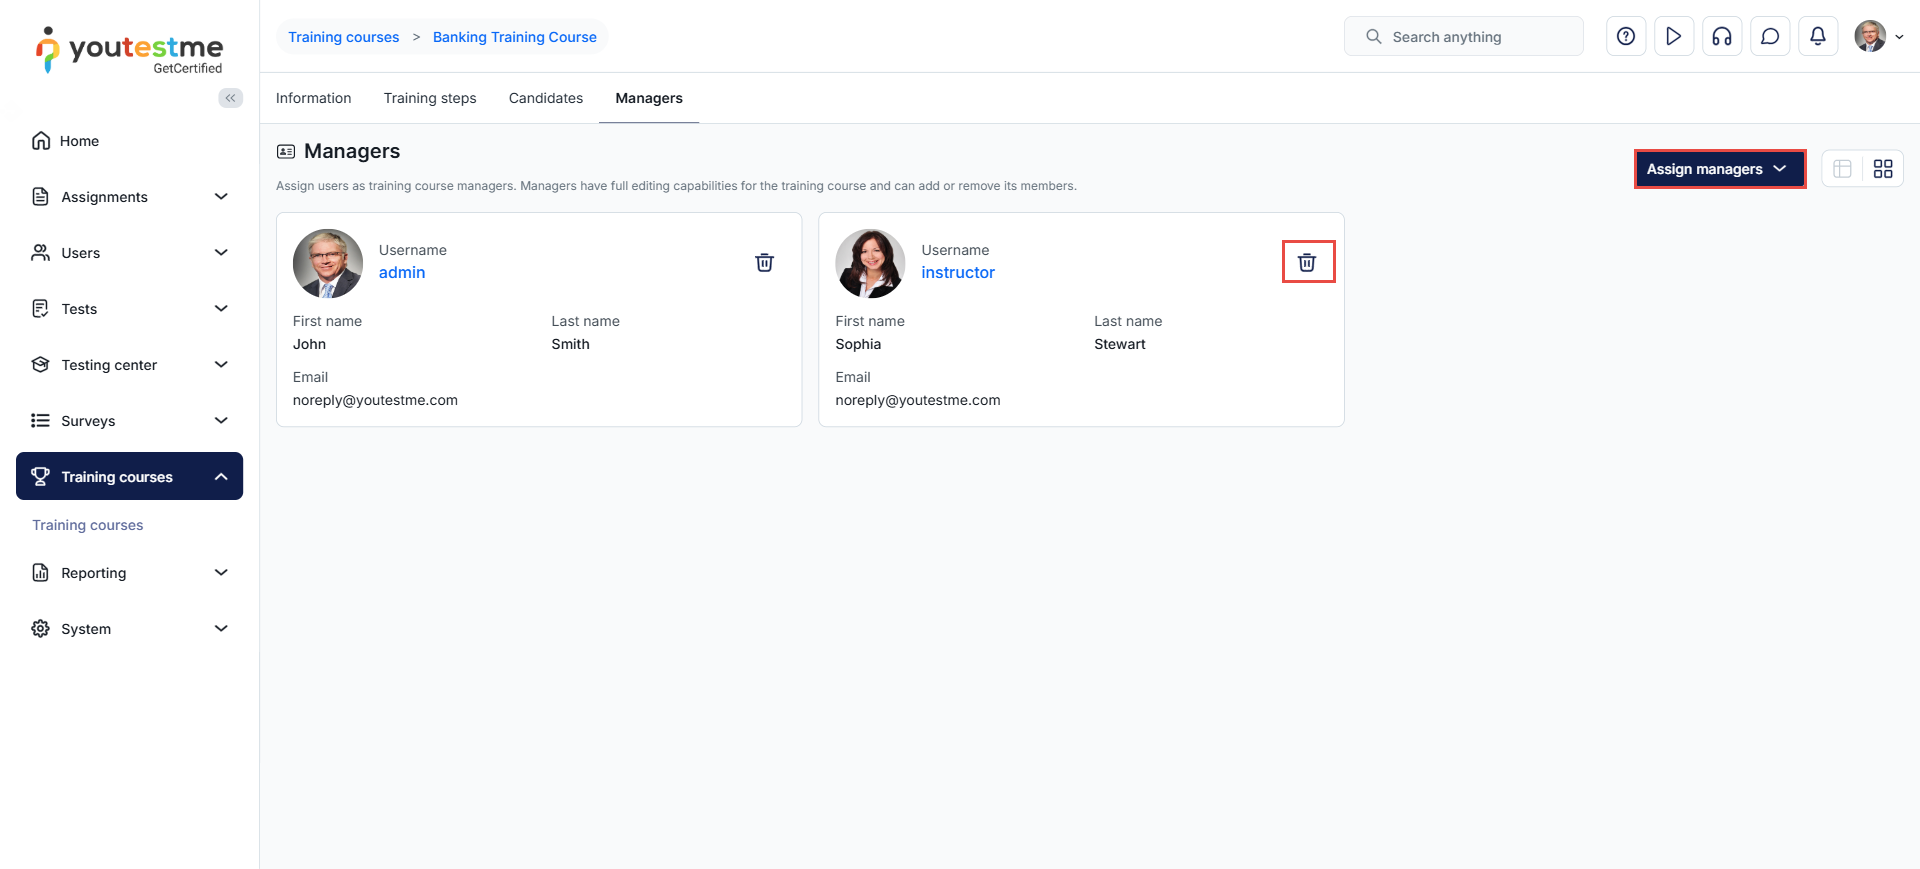
Assigning a Training Course Manager
A Training Course Manager has permission to manage the training course, its candidates, and the associated tests.
The Training Course Managers will be listed in the Managers tab, where you can add new managers or remove existing ones.
To assign a Training Course Manager:
Navigate to the Managers tab.
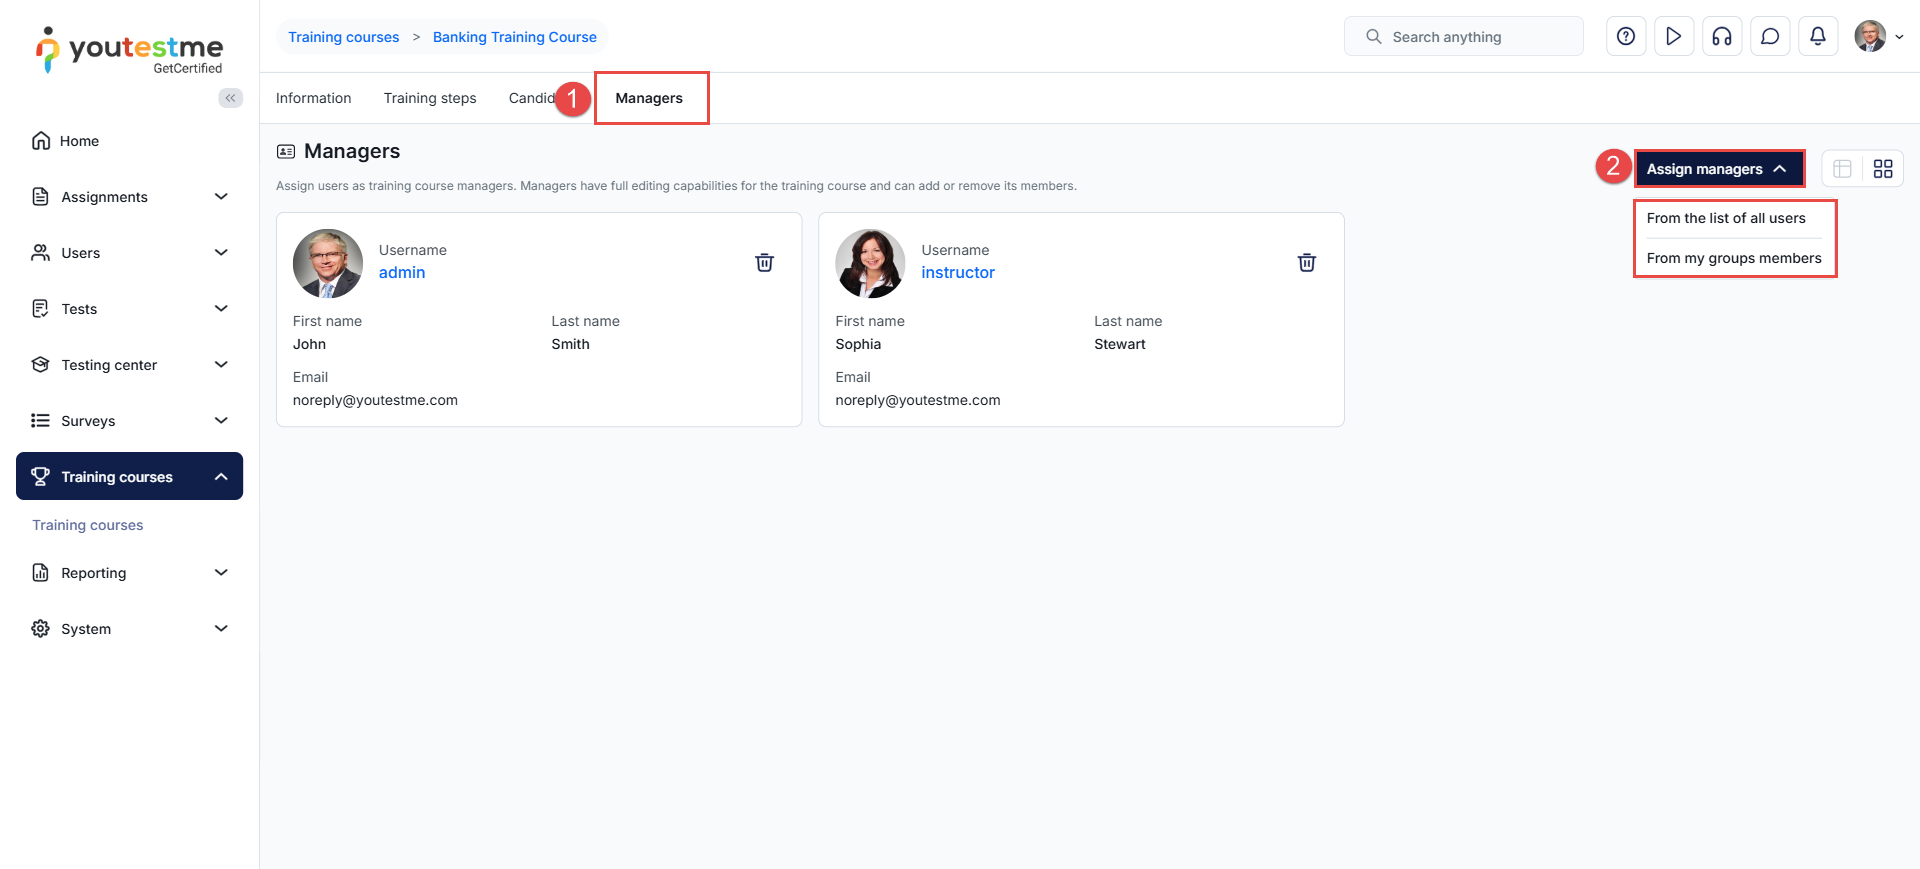
Click the Assign Managers button and choose one of the following options:
From the list of all users: Assign a user from the complete list of users in the system.
From My User Groups: Assign a user from a specific user group that you are a member of.
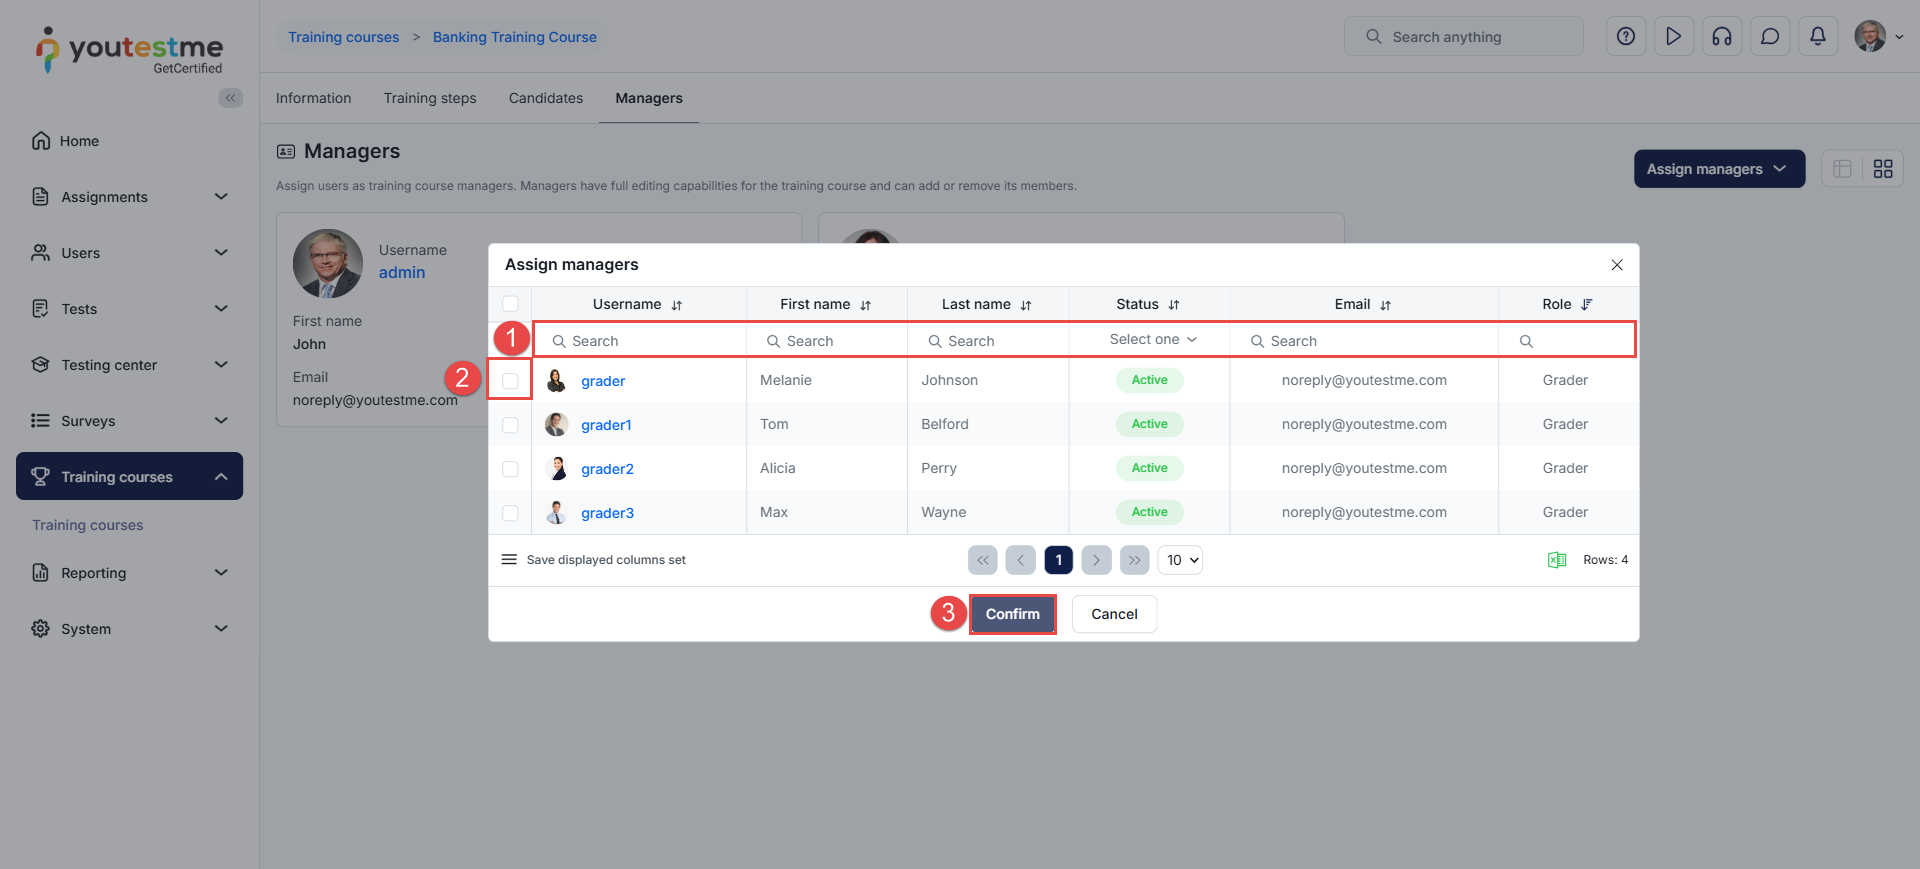
From the list of all users
When this option is selected, you will be presented with the list of all users in the system.
Use the filters available on column headers to find the desired user
Click the check box next to the username of the user you want to assign
Click the Confirm button
From My User Groups
When this option is selected, you will be invited to select a specific user group:
Select the desired user group
Use the search option to find the desired user
Check the box next to the username
Click the Confirm button
Assigning Candidates to a Training Course
To assign candidates to a training course, follow the steps below:
Navigate to the Candidates tab
Click the Assign Candidates button and select one of the following options
From the list of all users: When this option is selected, you will be presented with the list of all users from which you can assign the desired users to the training course.
From My Groups members: When this option is selected, you will be invited to select the desired user group to assign users to the training course.
Note: When candidates are manually assigned to a training course, they are not required to pay the course fee (if applicable). If the training course has a fee, users must self-enroll to make the payment.