Article verified for Release 15.1 on December 22, 2025.
This article explains the different methods available for adding and managing users within workspaces. It outlines how to assign users directly, automatically based on their role, or through registration links, and also describes how to remove users or update workspace membership settings.
Preparing the Roles
Organizing users properly ensures that each individual has access only to the content and tools relevant to their role and assigned workspace. This is essential for maintaining clear boundaries between different teams or departments within your platform.
For detailed instructions on how to create and manage workspaces, please refer to the article: How to Create and Organize Workspaces.
Creating Global Roles
Before assigning users, start by creating global (system) roles. These define the user’s access across the platform, not within a specific workspace.
Global roles should:
- Include permissions not related to specific workspaces (e.g., viewing system-level settings)
- Provide access to pages relevant to the user’s responsibilities
For detailed steps on creating global roles, please refer to Workspace Roles vs. System Roles.
Creating Workspace Roles
Workspace roles define what actions users can perform inside a specific workspace, such as:
- Managing tests and surveys
- Handling training content
- Assigning users or managing groups
Only users who are members of a workspace can be assigned a workspace role.
For detailed steps on creating workspace roles, please refer to Workspace Roles vs. System Roles.
Ways to Add Users to Workspaces
There are three main ways to assign users to workspaces:
- Directly assign user accounts
- Grant access based on their role
- Use registration links
Each method can be used depending on the organization’s needs. Below, we provide a step-by-step guide for each method, starting with the required setup.
Method 1: Directly Assign Users to Workspaces
To manually assign users one by one:
- Go to Workspaces > Manage Workspaces
- Click Edit (under the Actions column) for the desired workspace.

- Open the Members tab.
- Click Assign users to workspace.
- Select the appropriate workspace role.
- Choose users from the list and Confirm.


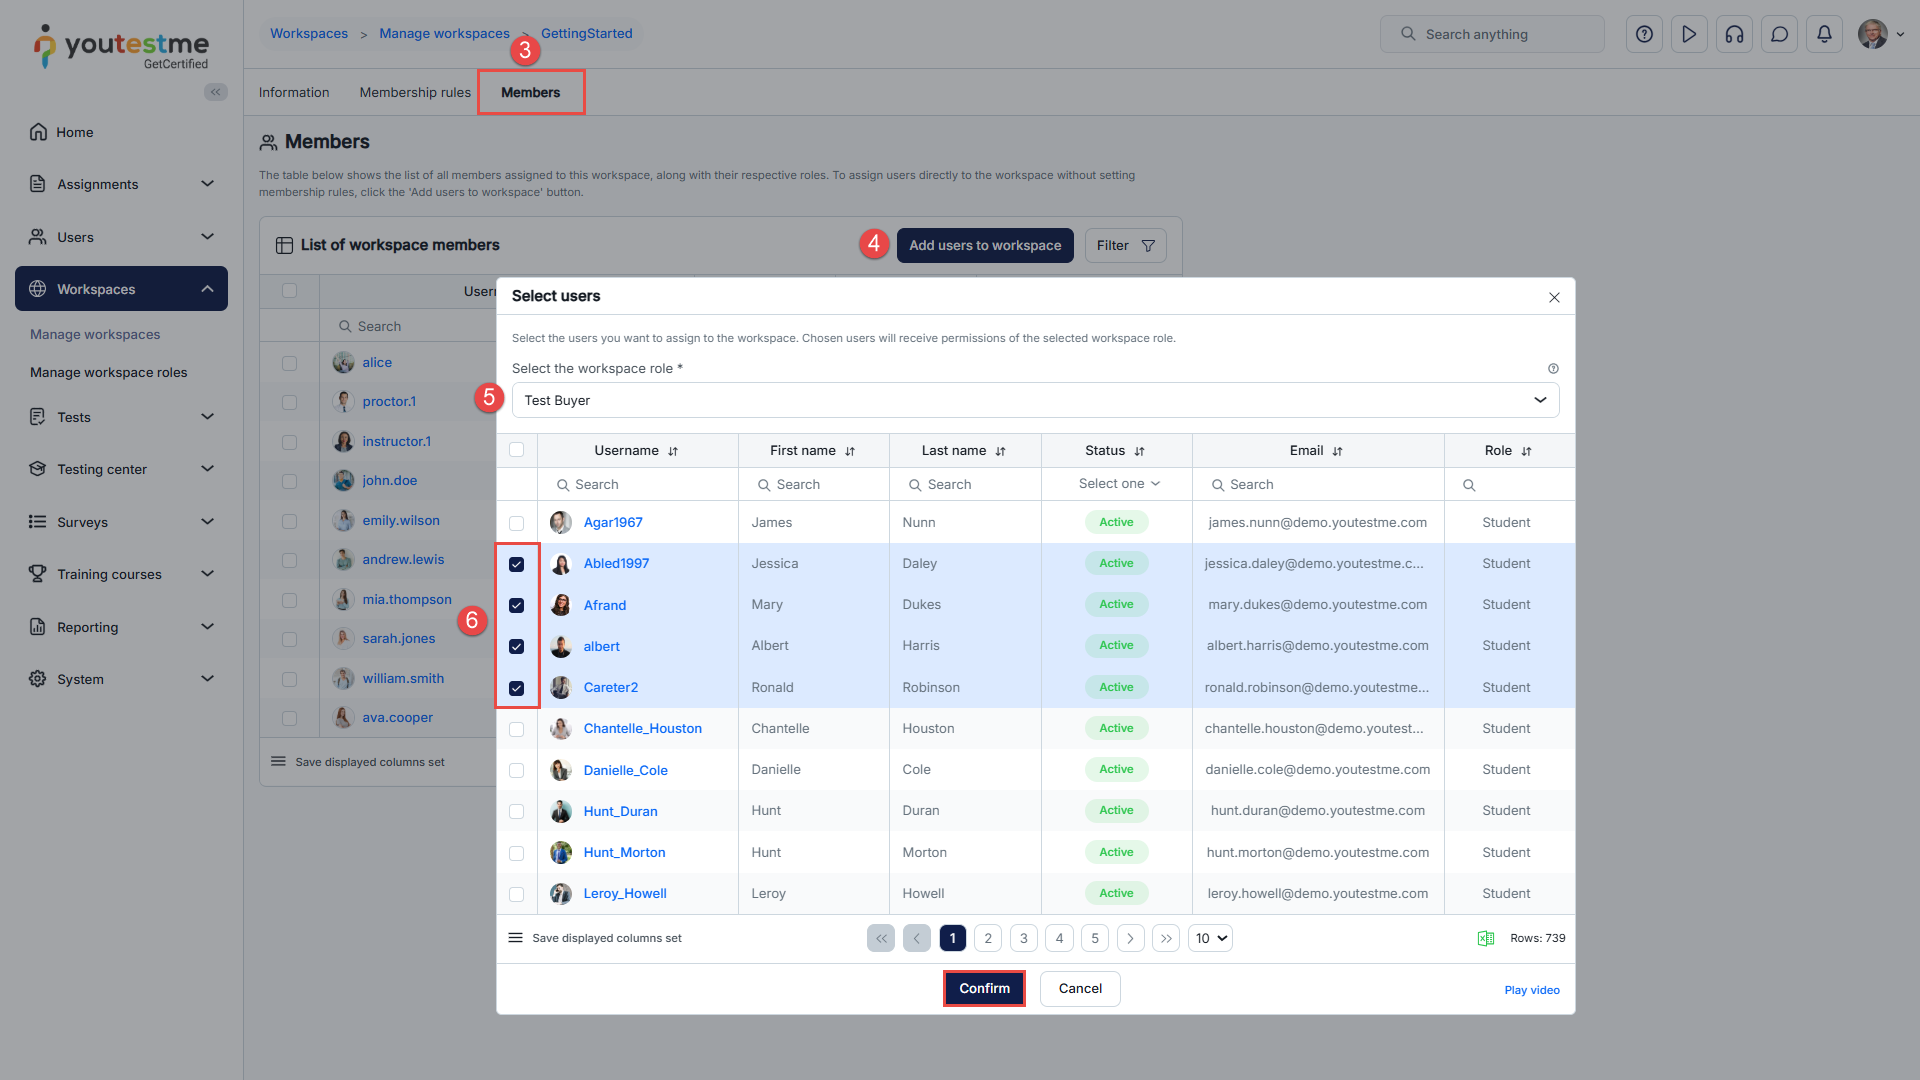
These users will now be workspace members with permissions defined by the role you selected.
Method 2: Grant Access Based on User Role (Membership Rules)
You can automatically assign users to a workspace based on their global role by mapping it to a workspace role:
Ensure that the global and workspace roles have already been created.
- Go to Workspaces > Manage Workspaces.
- Click Edit (under the Actions column) for the desired workspace.
- Click Create new membership rule
- Select:
-
A Global Role (e.g., Administrator)
-
A Workspace Role to map to (e.g., Workspace Admin)
-
- Click Save.
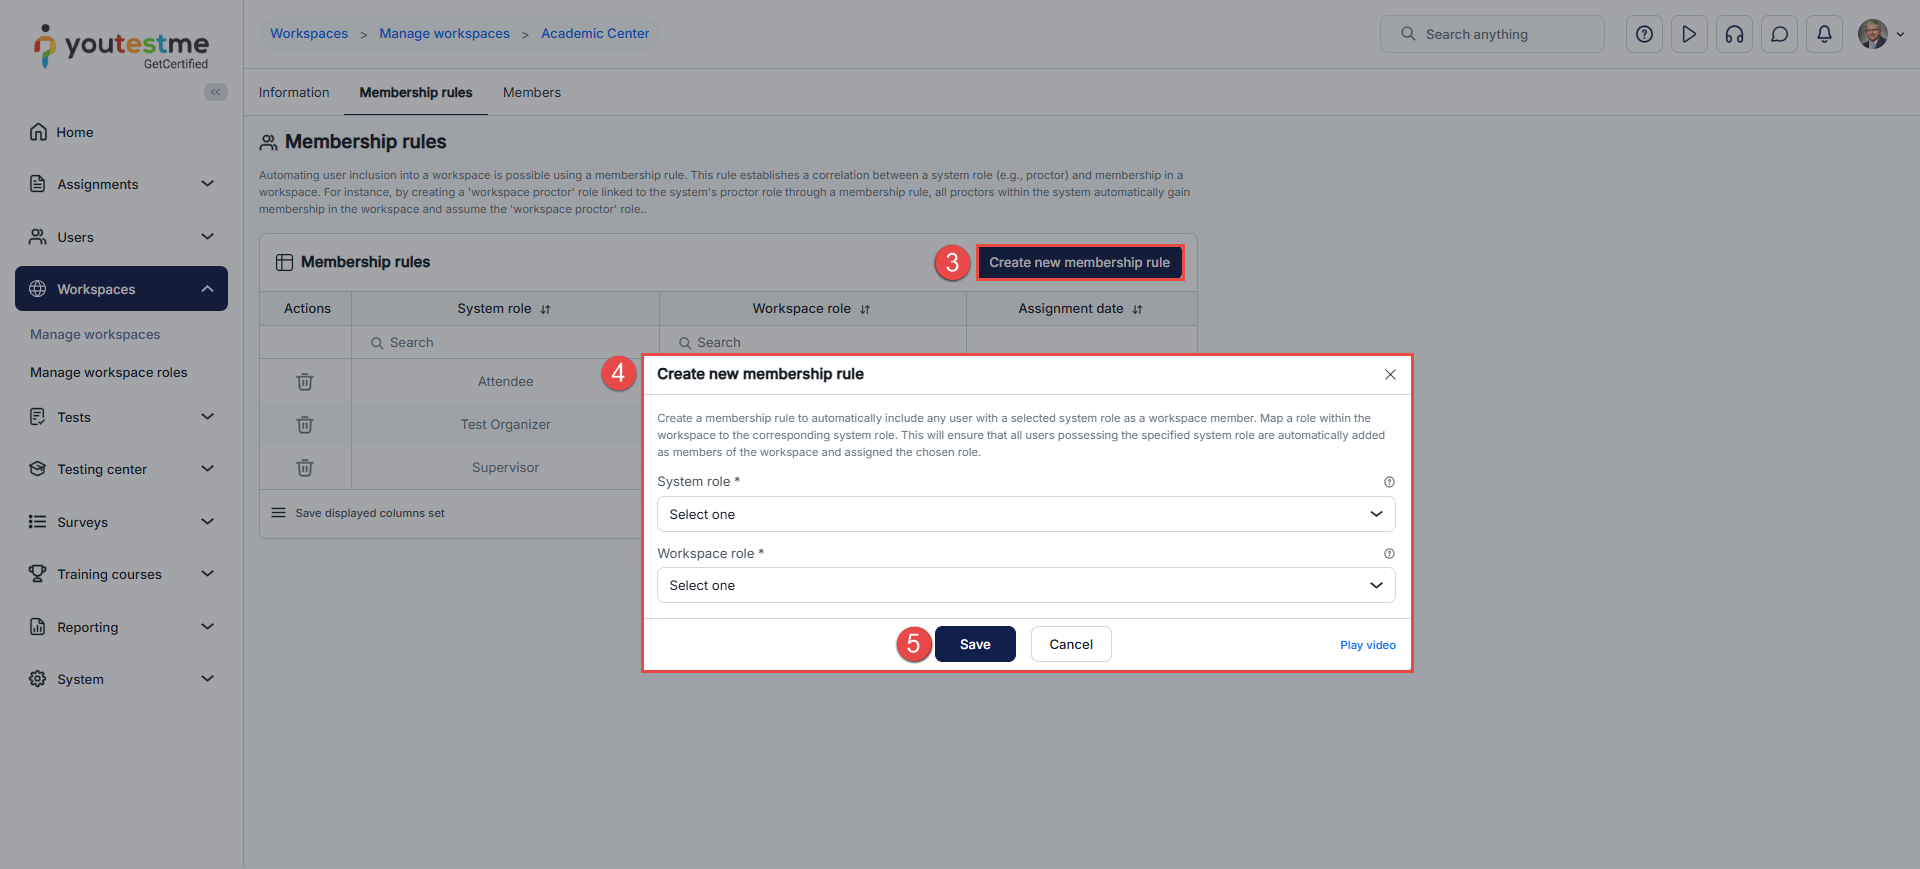
All users with the selected global role will be automatically added to the workspace with the assigned workspace role.
This is useful for bulk-assigning users based on their job function.
Method 3: Assign Candidates Using a Registration Link
Another way to assign users to a workspace is to share a registration link that automatically assigns them to a specific workspace, role, and group during account creation.
When using a registration link, you can predefine:
- The System Role the user will receive
- The Workspace they will be assigned to
- The Workspace Role
- The Groups they will join as members or managers
Note: If you are assigned to a group that belongs to a different workspace, you will not automatically become a member of that workspace. Workspace membership must be granted separately.
This method is especially useful for onboarding large numbers of candidates or external users without manual intervention.
For detailed instructions, refer to the article: How to Create and Use Registration Links
Creating or Importing Users to the System
When you create or import users into the system, they are added to All workspaces by default.
This is expected behavior, even when the action is performed within a specific workspace. Newly added users will not automatically become members of that workspace.
To avoid this default behavior, you can:
- Define a membership rule that assigns users with a specific global role to a desired workspace role
- Use registration links that associate users with a specific workspace upon registration
If you prefer to assign users to a specific workspace after creation, you can do so manually via the Members tab, as explained in Method 1 above.
For detailed instructions on how to create or import users into the system, please refer to the following article:
How to Create and Add Users in the System.
Switching Between Workspaces
All users, including candidates, can be members of multiple workspaces. This is particularly useful when users participate in different departments, training programs, or testing environments.
To switch between assigned workspaces, a user must have the “Change own current workspace” permission enabled.
Candidate Perspective
To switch between workspaces, follow these steps:
- Click on your avatar in the top-right corner.
- Select your current workspace from the dropdown. Note: If no specific workspace is selected, “All Workspaces” will be shown by default.
- Choose the desired workspace from the list.
- Click Save to apply the change.
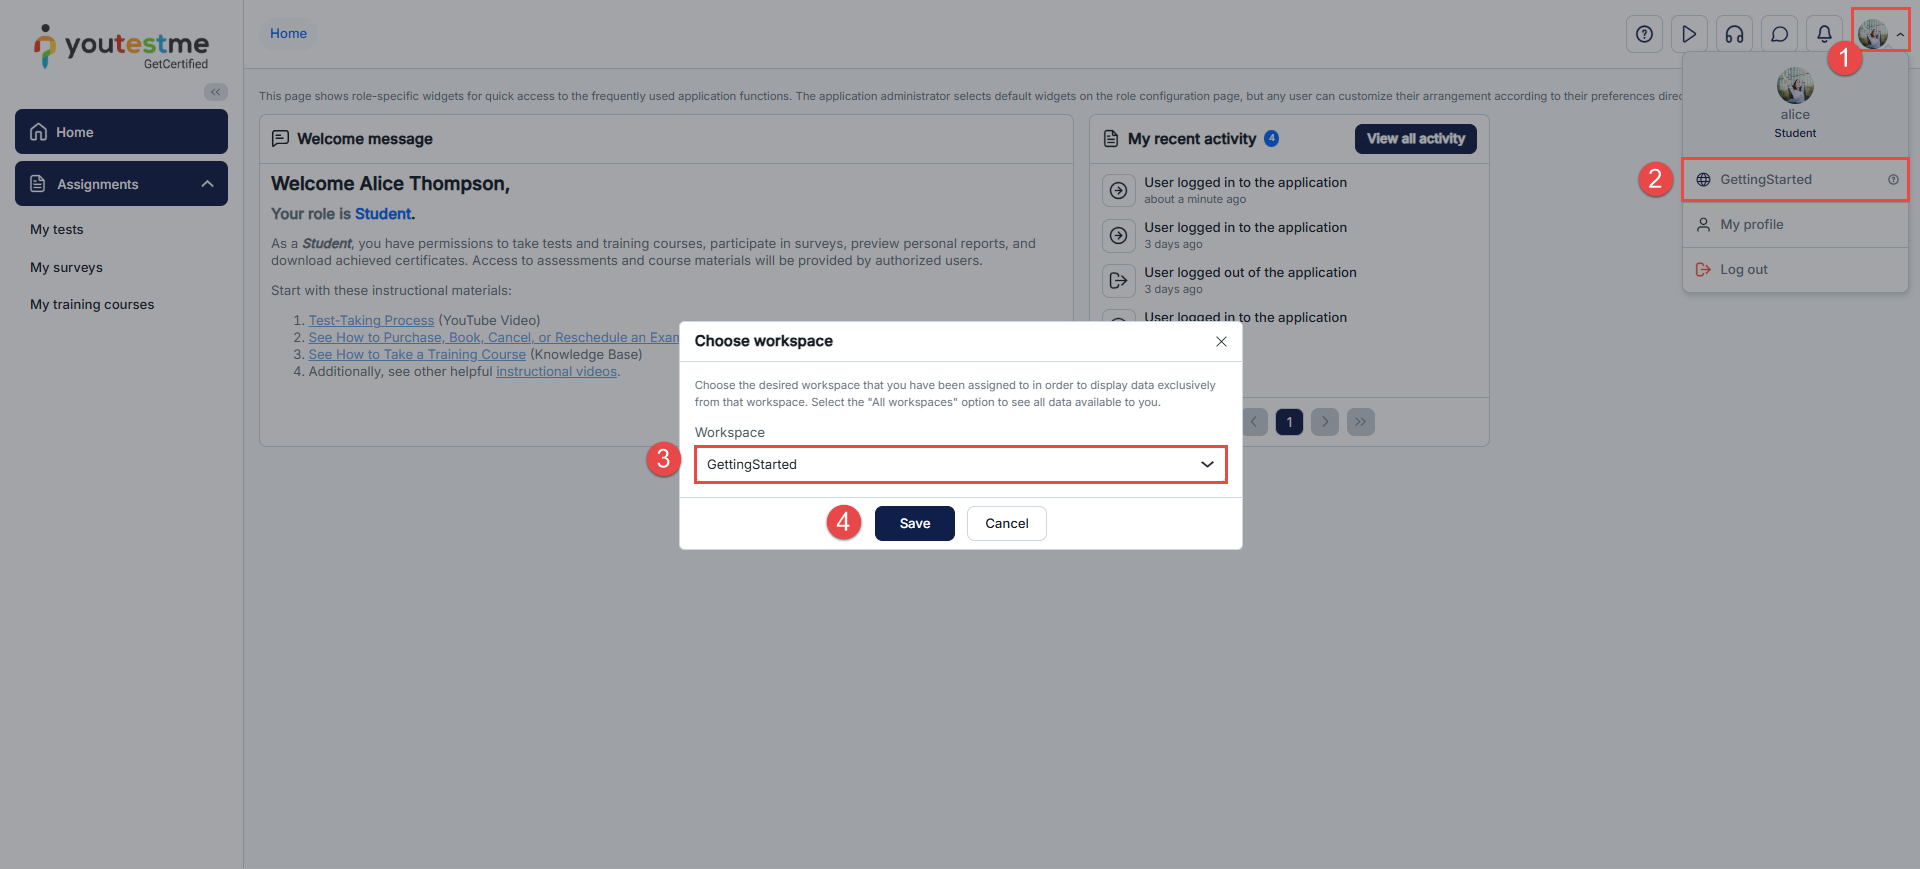
Note: After switching workspaces, you need to refresh the page to apply the changes.
Alternatively, users can change their workspace from the profile page by selecting the desired workspace from the dropdown menu and saving the changes.

Once updated, the system will display content and permissions relevant to the selected workspace.
Managing Workspace Memberships
Filtering Workspace Members
The workspace Members tab displays a list of all users assigned to the workspace, either directly or via a membership rule.
Use the filter options to:
- Show all members
-
Show only manually assigned members (default)
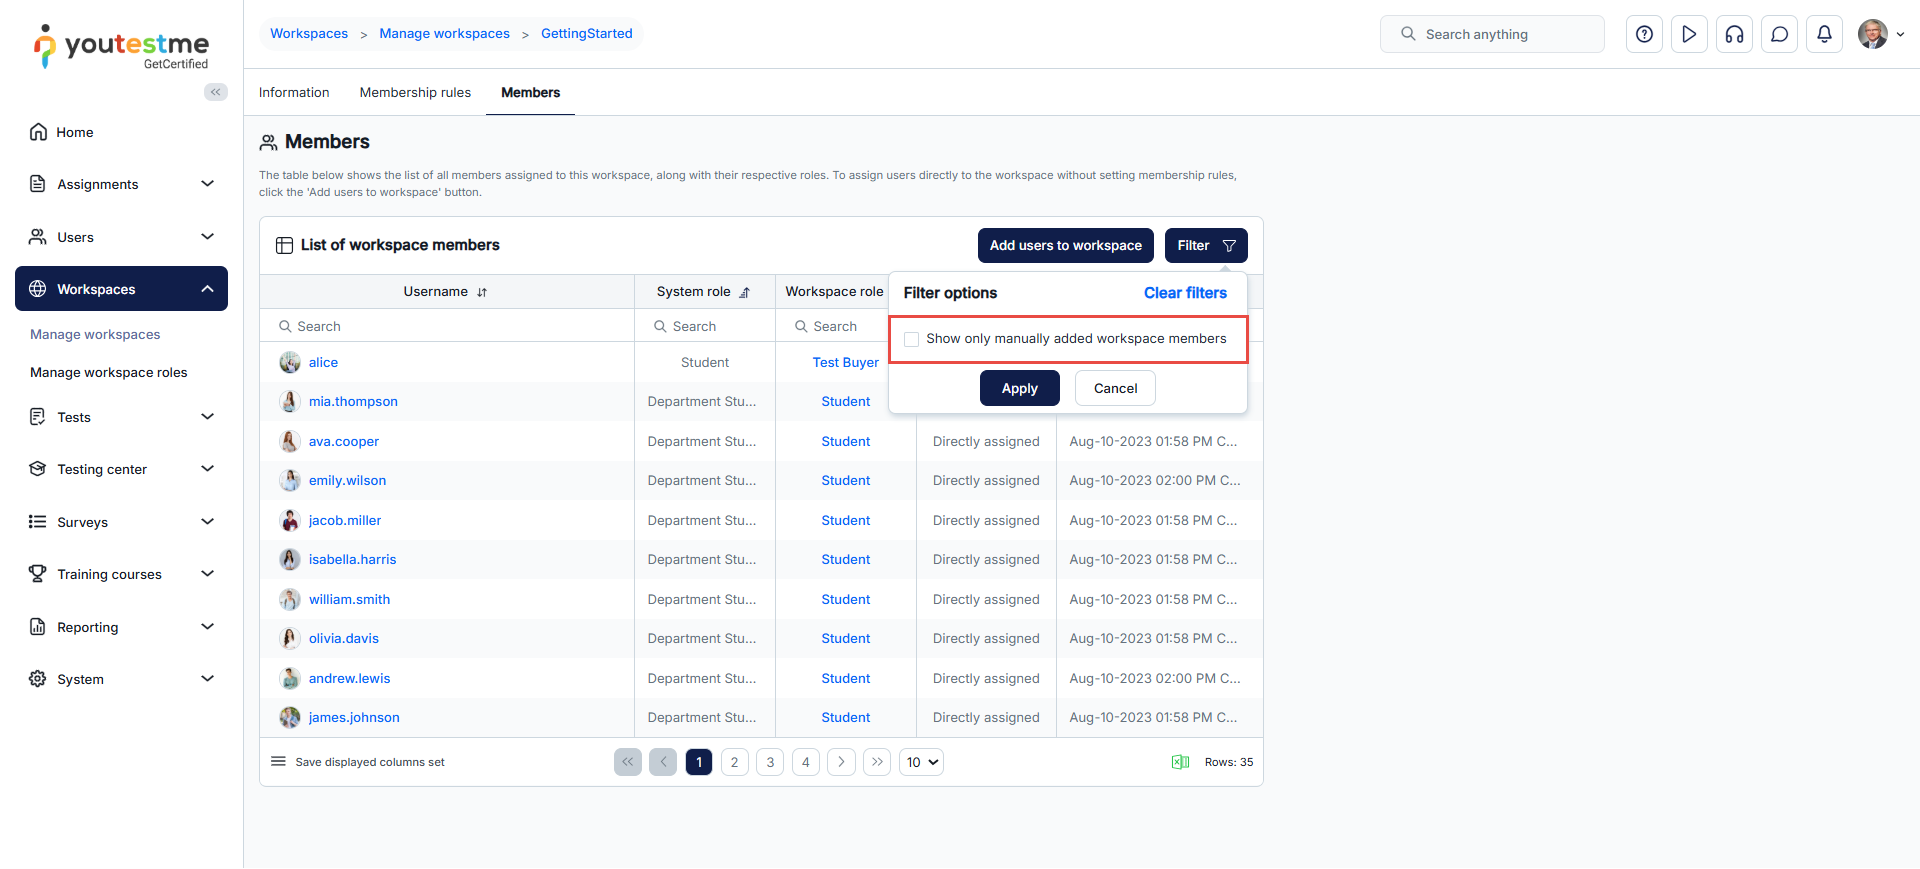
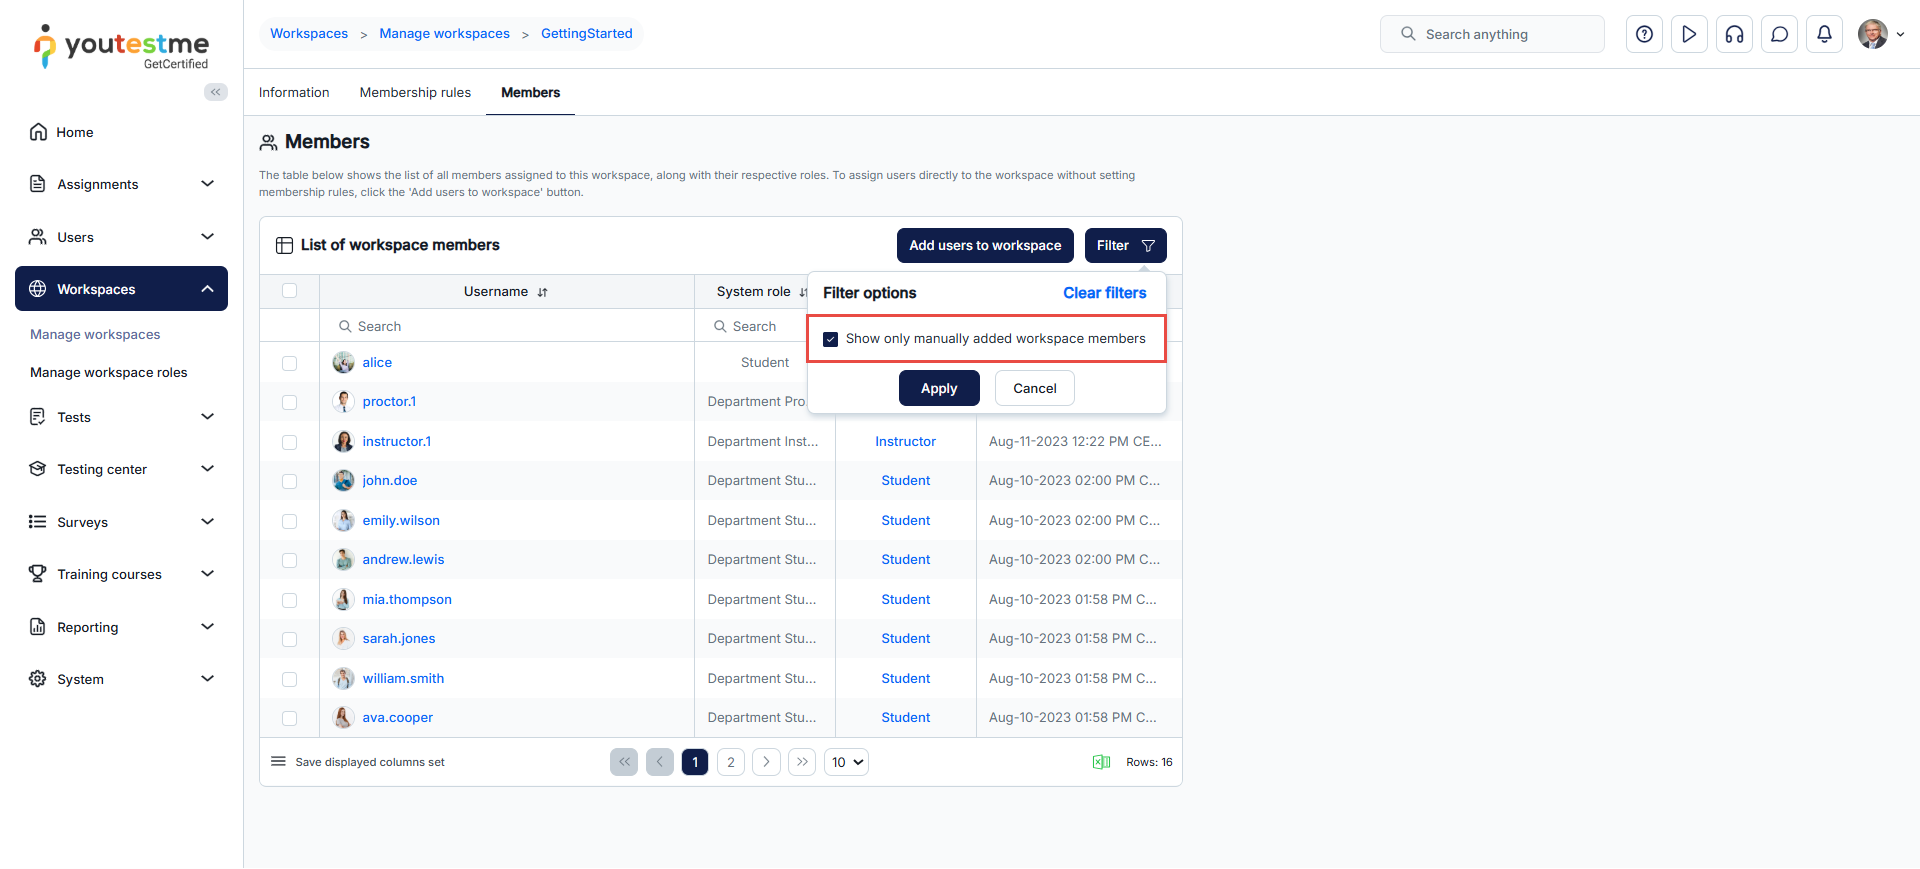
To assign users manually without using membership rules, click Add users to workspace.
Removing Users from Workspaces
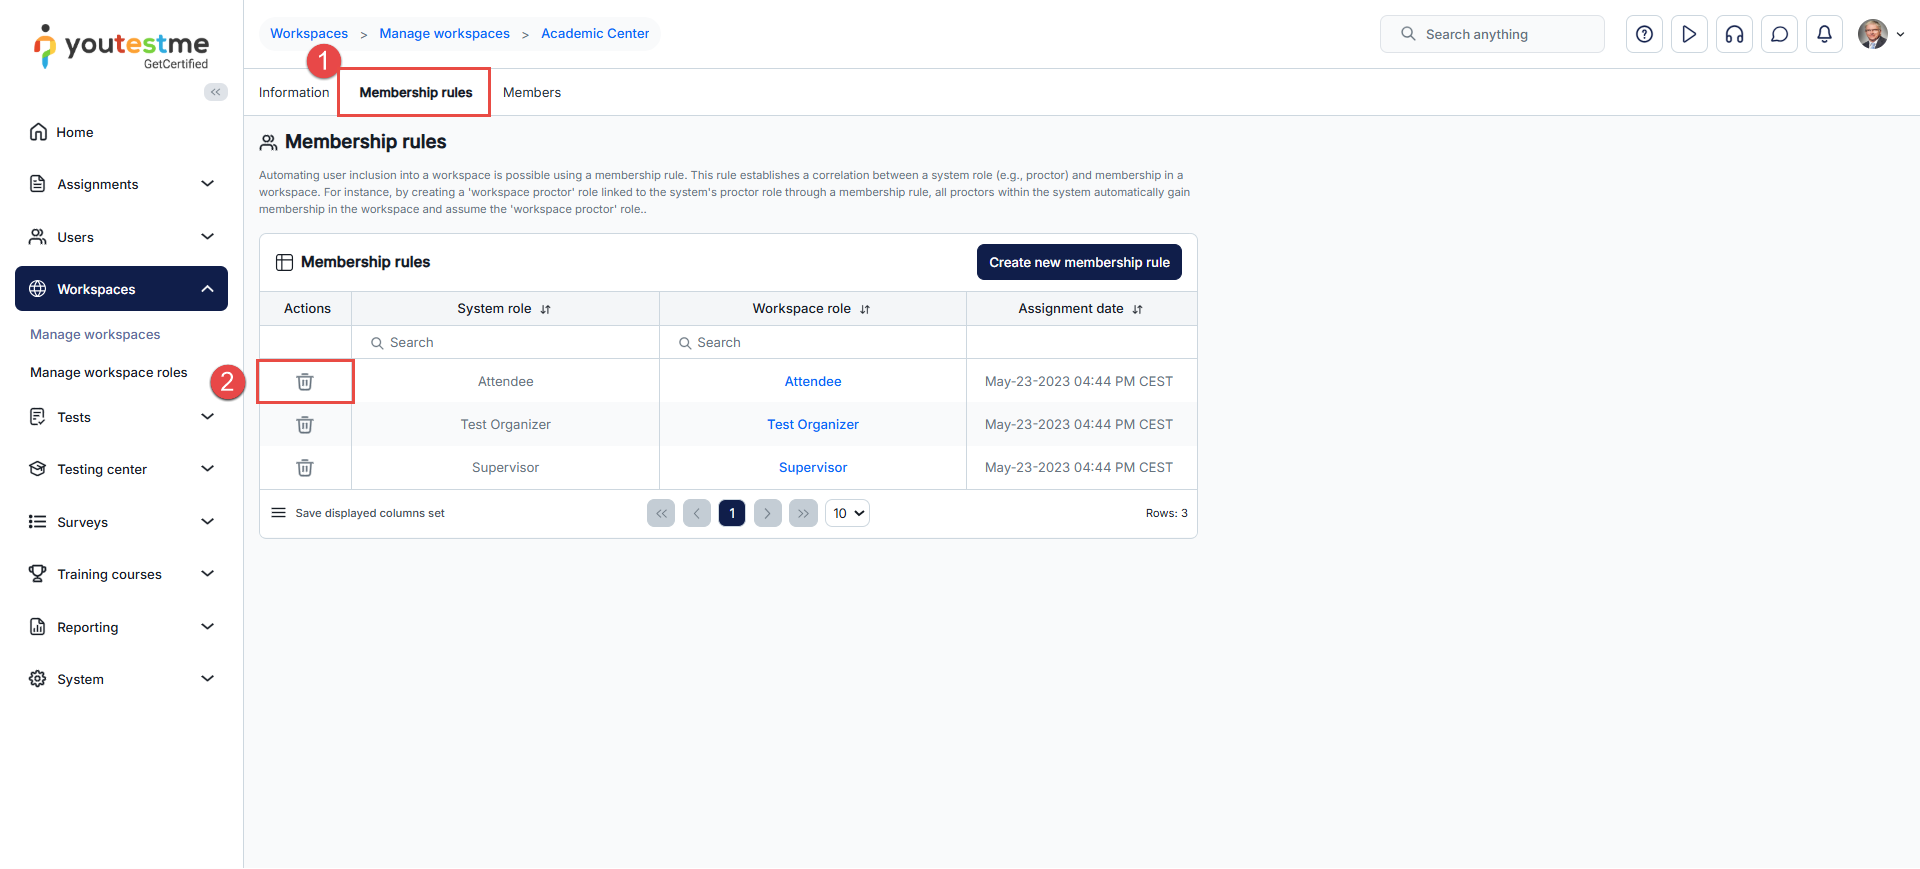
Remove Membership Rules
To remove all users added through a mapped global role:
-
- Open the Membership Rule tab.
- Click Delete on the rule you want to remove.
Note: All users assigned through that rule will be removed from the workspace.
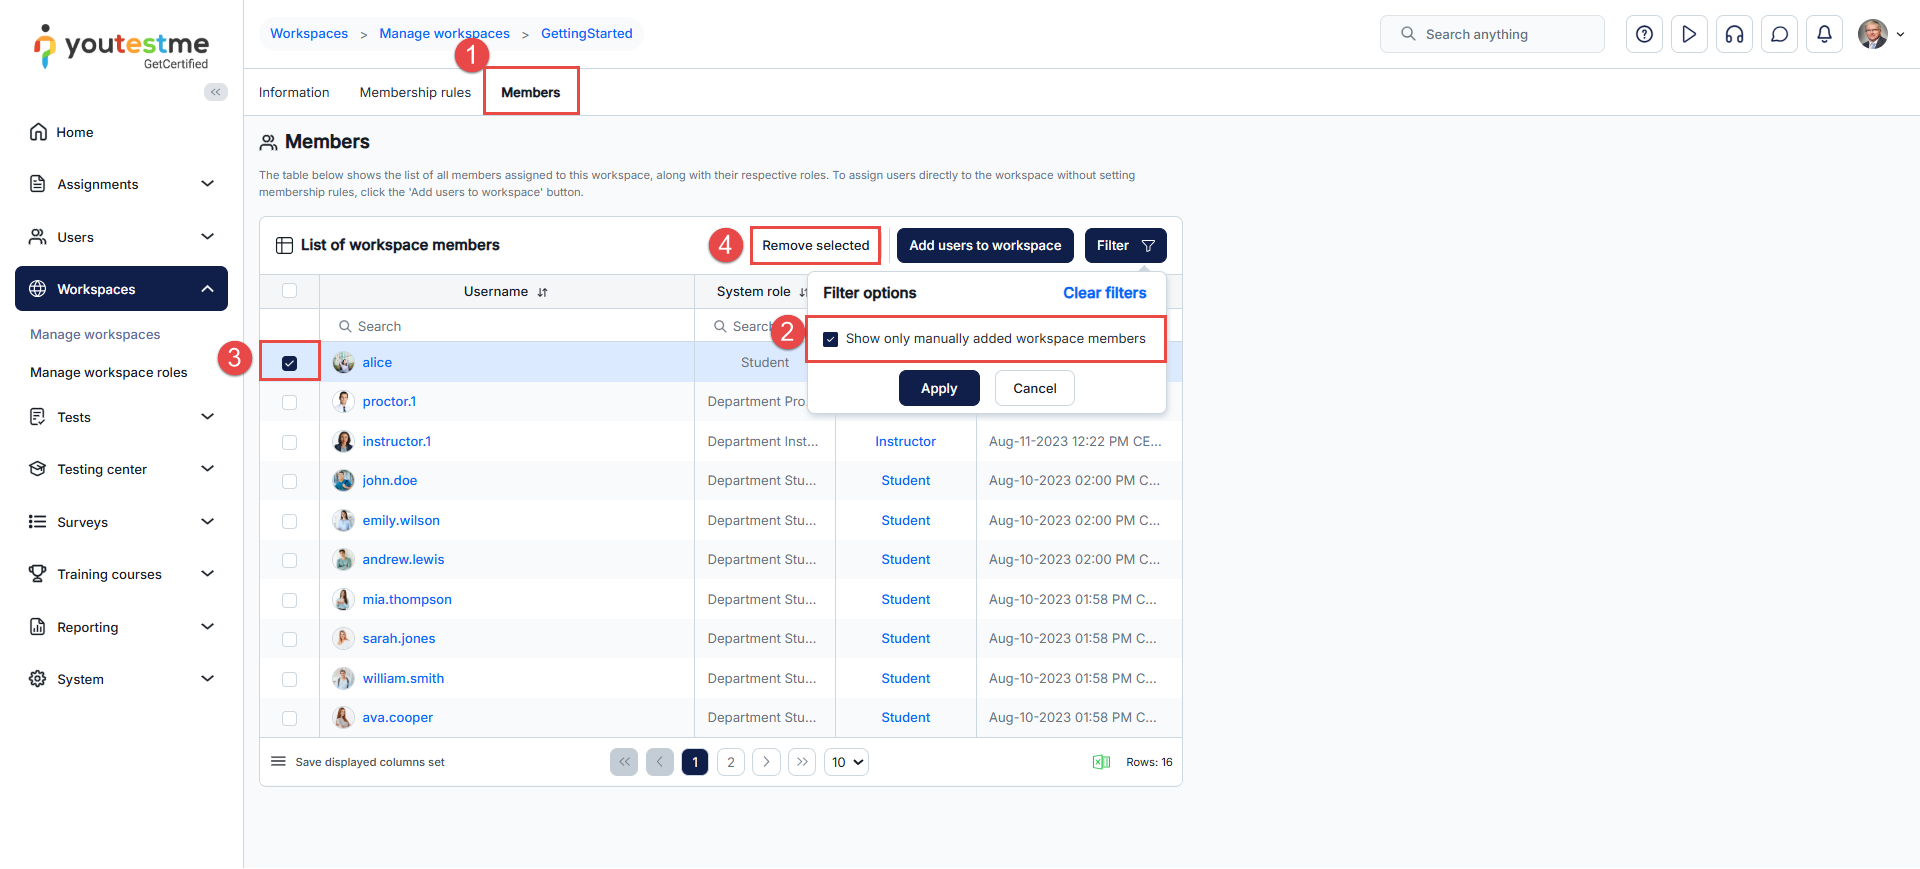
Remove Directly Assigned Members
To remove specific users assigned manually:
- Go to the Members tab.
- Filter by Manually added members if needed.
- Select users you wish to remove.
- Click Remove selected.
Conclusion
Managing workspace users is a key part of organizing your platform effectively. By combining global roles, workspace roles, and various assignment methods (manual, automatic, or through registration links), you can ensure users are placed in the right workspaces with the right permissions.
Whether you’re running a training center, managing a large team, or maintaining multiple departments, the workspace structure gives you the flexibility to scale while keeping everything organized.


