

Article verified for Release 15.0 on August 11, 2025.
In this article, we will explain how to create and manage user accounts in the application, customize user account settings, and configure the notifications sent to newly created users. You will learn how to enter user details, assign roles and workspaces, define login preferences, and modify the email template used to deliver account credentials. Step-by-step instructions and visual examples are provided to help you configure user accounts according to your organization’s requirements.
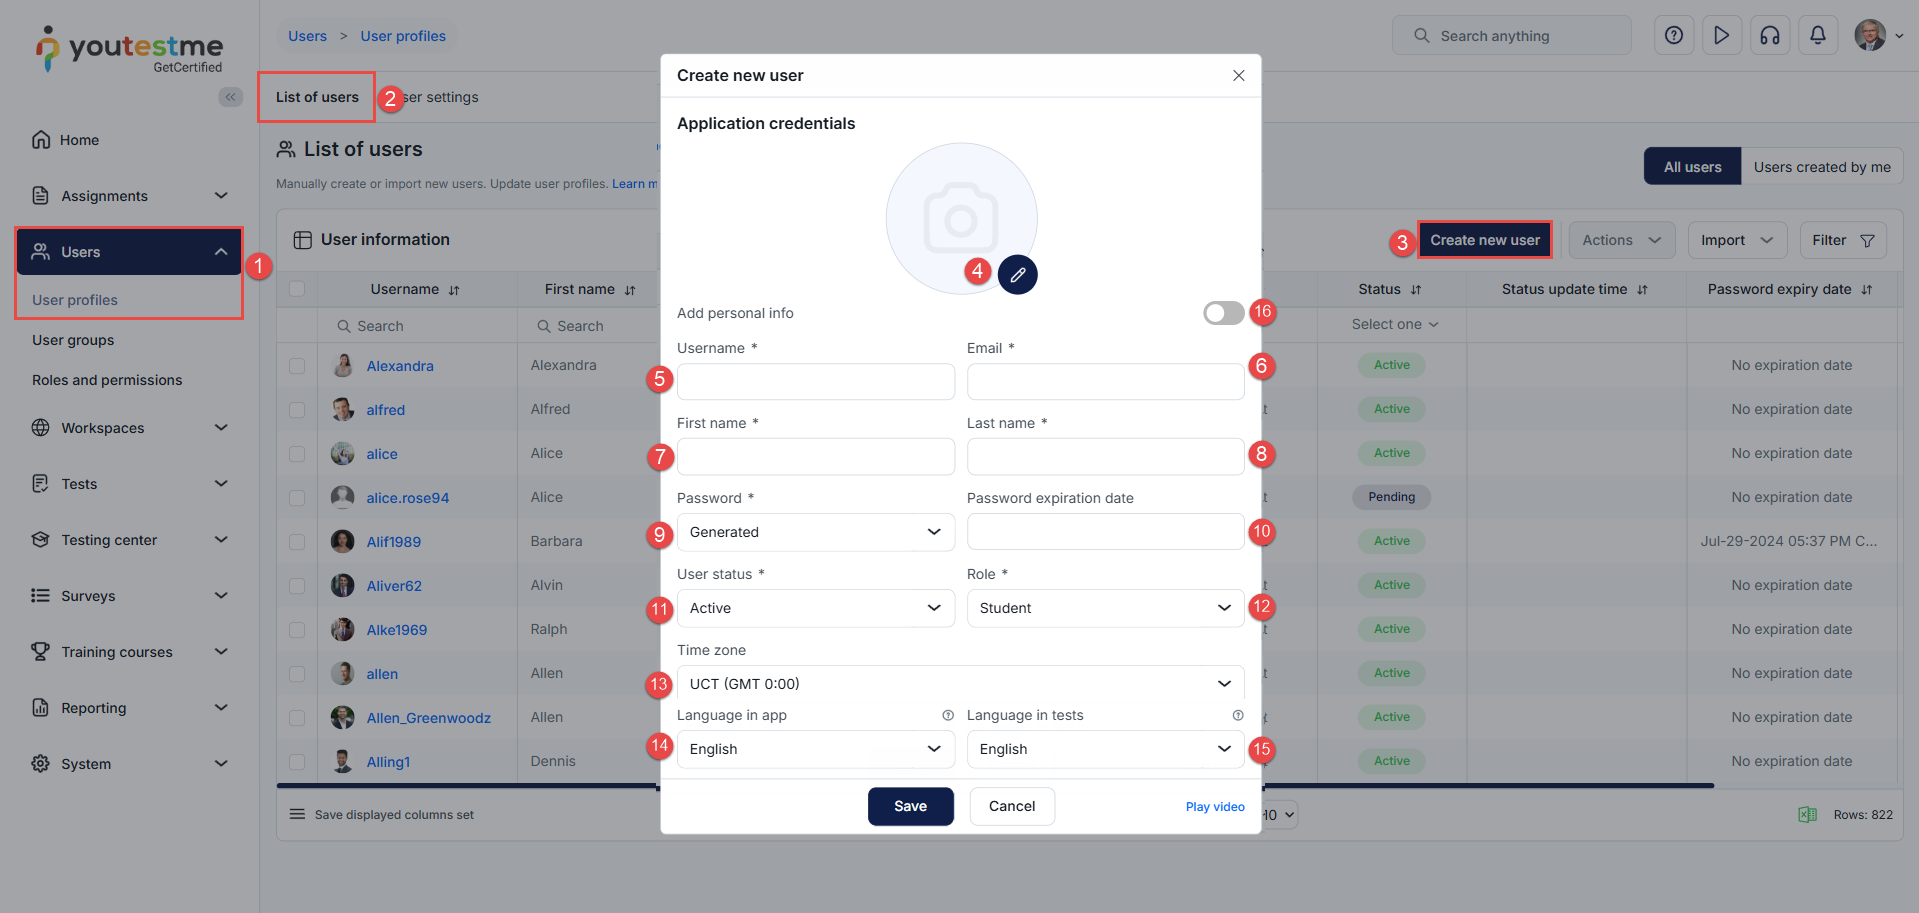
Creating a new user
To create a new user:
-
Select the Users/User Profiles tab.
-
Select the List of users tab.
-
Select the Create new user button.
-
Optionally, add a profile picture.
-
Enter a username – it must be unique for each user and cannot be changed later.
-
Enter the user’s email address.
-
Enter the first name.
-
Enter the last name.
-
Select Password:
-
Generated – The user receives a system-generated password via email.
-
Manually inserted – You create a password manually.
-
-
Password expiration date (optional) – After this date, the password must be updated.
-
User status – Select the status for the user:
-
Active – Allows the user to log into the system using their username and password. This status is also used for account reactivation. A new password is sent to the email linked to the account when the status changes to Active.
-
Inactive – Prevents the user from logging in until reactivated by a user manager. Inactive users are hidden from the user list unless the “Show inactive users” filter is enabled, and their test results are not visible in the application or included in statistics.
-
Suspended – Prevents the user from logging in until reactivated by a user manager. The results and data of suspended users remain visible in the application and included in statistics.
-
Locked – Requires the user to change their password at the next login. Once updated, the system automatically reactivates the account. Only a user manager can set this status.
-
Pending – Indicates a registration request awaiting approval. Once approved, the user receives the Active status; if rejected, the profile is not created in the system.
-
-
Select the Role the user will have in the system.
-
Set the Time zone in which all date- and time-related data will be displayed.
-
Set the Language in app – Determines the application interface language (excluding user-generated content such as question text or test descriptions). If a specific test has a language preference, it overrides the application interface language for that test.
-
Set the Language in tests – The default language for displaying questions and answers in tests, if defined during question creation.
-
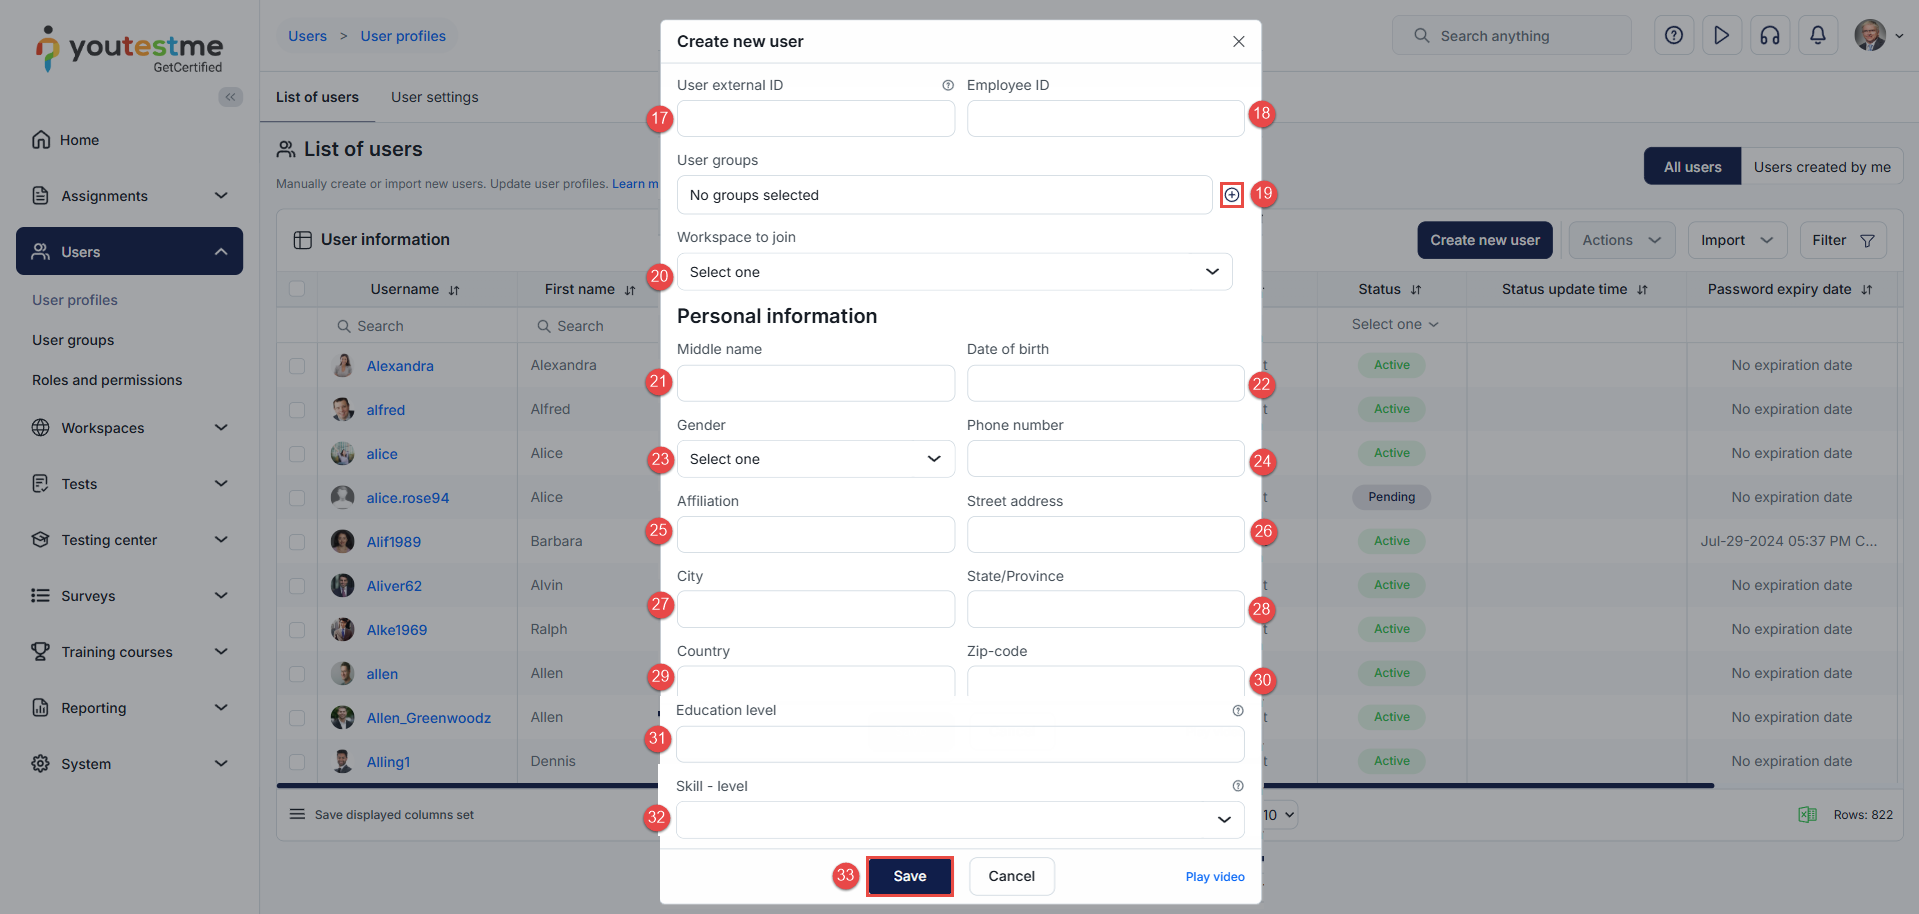
Select the Show additional information toggle.
-
Enter a unique External ID – a distinctive label for the user in the system. This identifier can be used when integrating with other external systems.
-
Employee ID – a unique identifier used to distinguish employees within an organization.
-
Assign the new user to user groups.
-
Add Workspace – The workspace to which the user will be automatically added and entered upon login. Once a workspace is assigned, the mandatory Workspace Role field will appear, indicating the role the user will have in the selected workspace. Only one workspace and one workspace role can be selected.
-
Enter the Middle name.
-
Enter the Date of birth.
-
Select the Gender.
-
Enter the Phone number.
-
Enter the Affiliation – The organization, institution, company, or group with which the user is associated or to which they belong. This is often used in systems where users are part of a larger entity.
-
Enter the Street address.
-
Enter the City.
-
Enter the State or province.
-
Enter the Country.
-
Enter the Zip code.
-
and 32. are custom properties. For more information, check this article.
-
Click Save to create the new user.
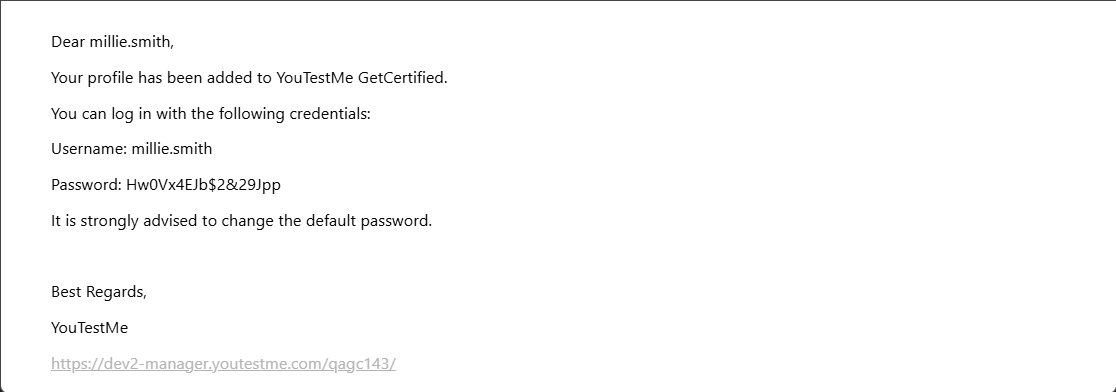
An automated email notification will be sent to the email address you provide to inform the user of their newly created account and provide them with the necessary credentials for access.
This email notification is fully customizable, allowing you to include login instructions and a direct link to the user’s profile.
Please check this article to learn more about email and notification configuration.
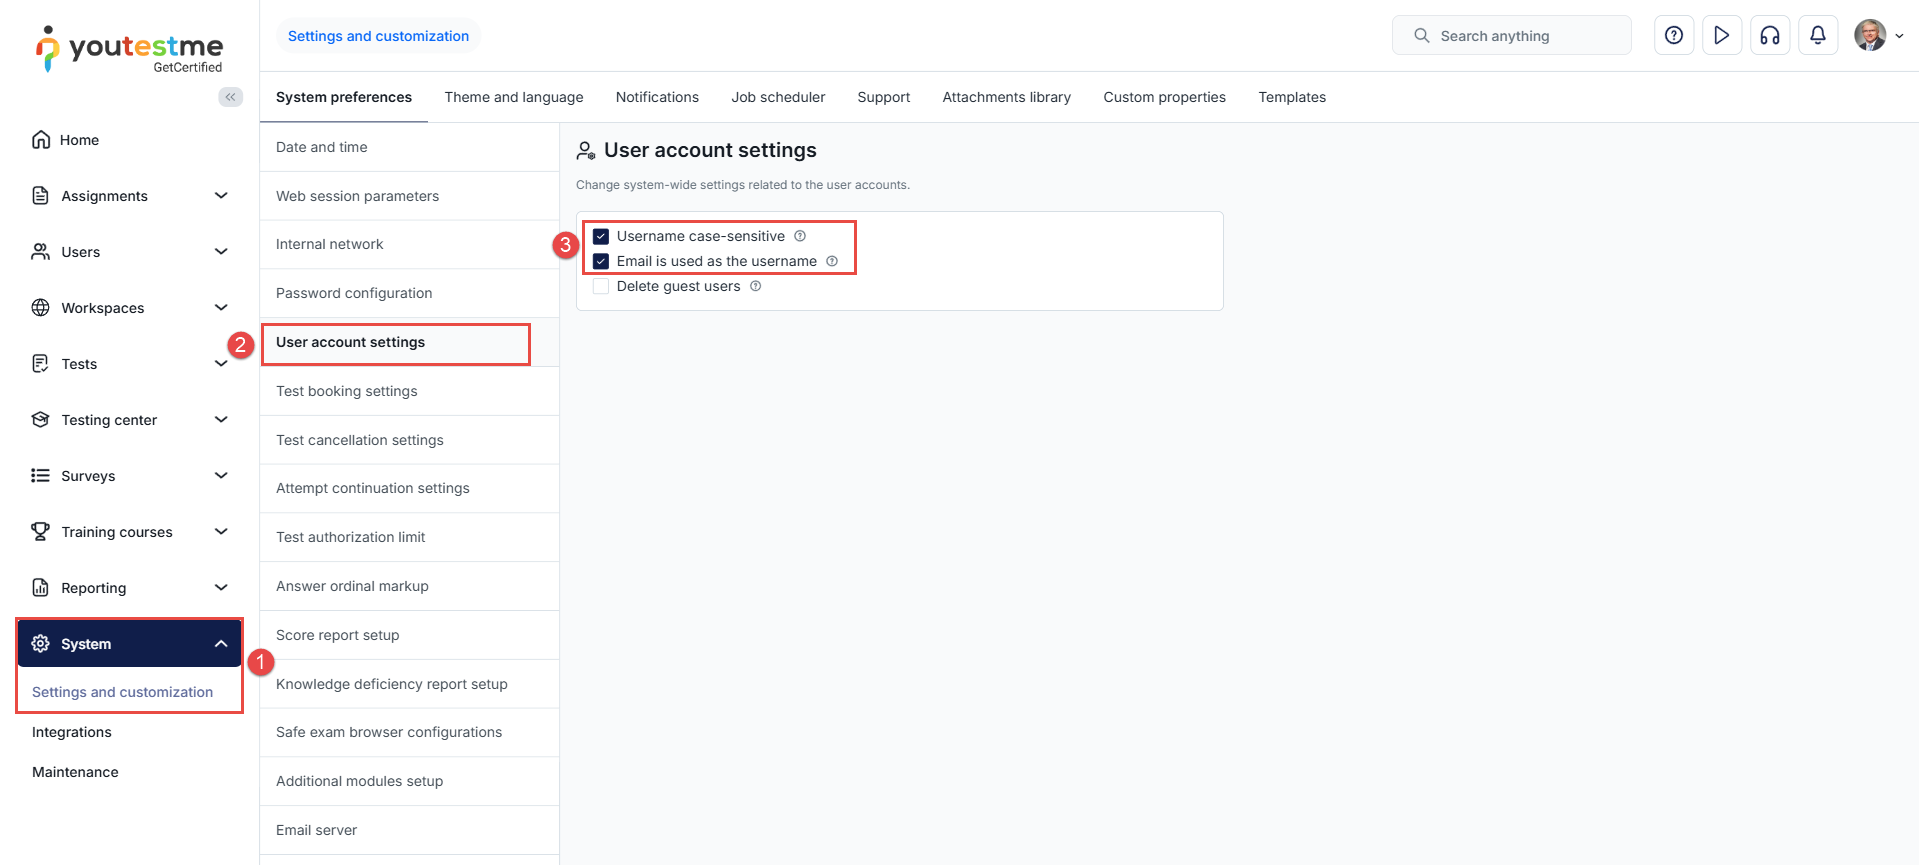
How to Customize User Account Settings
You have the ability to tailor the user account settings to match your preferences.
To customize the user account settings, follow these steps:
- Select the System/Settings and Customization tab.
- Select the User account settings tab.
- Select one or both options:
- Username case-sensitive –If the username is case-sensitive, the system will allow the creation of new accounts with usernames that only differ in capitalization. For example, an account with the username “Andy.Connor123” can be created, even if an account with the username “andy.connor123” exists.
- Email is used as the username – If the option is enabled, the email address is used as the username for all new user accounts. In other words, the username will be the same as the email for all new accounts.
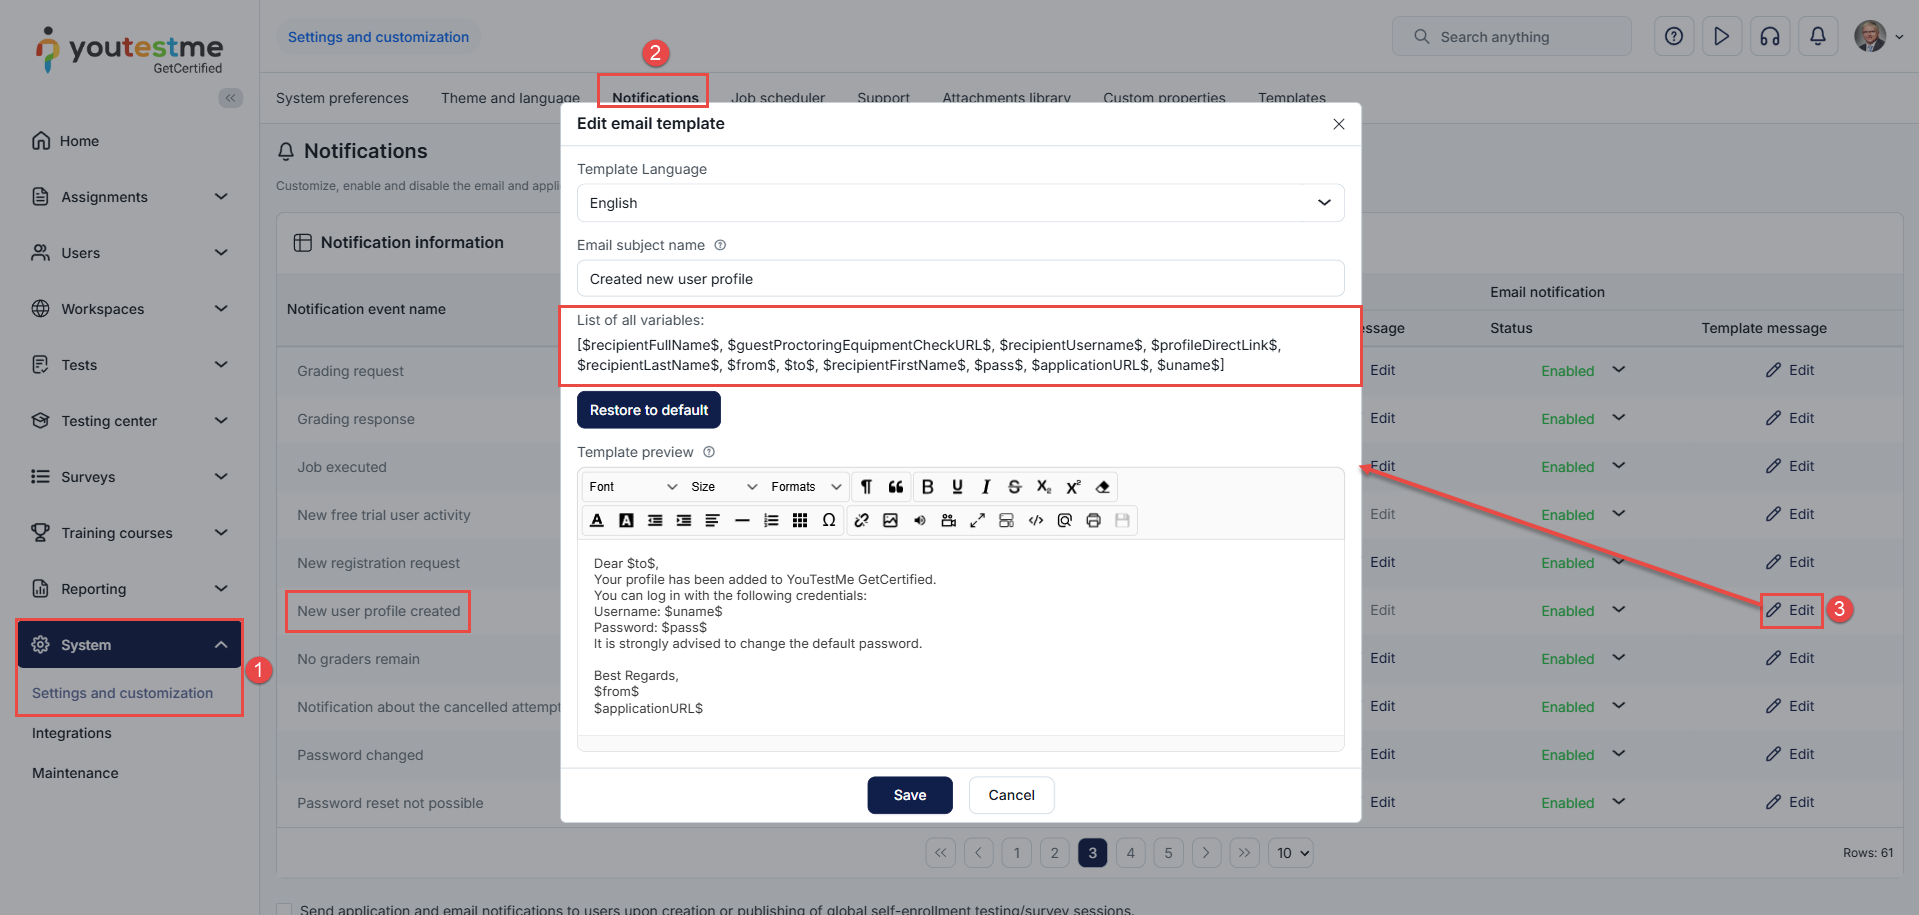
How to Customize Account Creation Notification
To tailor the account creation notification sent to users, please follow these steps:
- From the main menu, navigate to System/Settings and Customization.
- Access the Notifications tab.
- Locate the New user profile created notification and click the Edit button in the email notification column to modify the template.
You can select the email language, specify the subject line, and personalize the email text by utilizing the variables provided in the List of all variables. These variables will be automatically replaced with the relevant account information.
The following images illustrate the user’s email notification:
You can also watch the following video for step-by-step instructions.
