Article verified for Release 15.0 on October 10, 2025.
This article explains how to configure hold and release conditions for the test results verification process.
Depending on the personal report settings configured for each test, results may be set to become visible to test-takers only after verification by a test manager or another user with the appropriate permissions.
While result verification is mandatory in cases where reports should be hidden until approved, it can also be performed in other scenarios regardless of visibility settings. Verifying a candidate’s results marks the personal report as final, meaning no further changes can be made.
Verification methods
There are three methods to verify test attempts:
-
Immediate verification by hold criteria after test completion
-
On-demand verification by hold criteria
-
One by one – manual verification
Accessing the verification setup
To define the Immediate verification by hold criteria after test completion and On-demand verification by hold criteria methods, follow the steps below:
-
Navigate to System > Settings and Customization.
-
Under System Preferences, select Verification Process Setup.
-
Choose the desired delivery preference for which you want to configure the verification criteria.
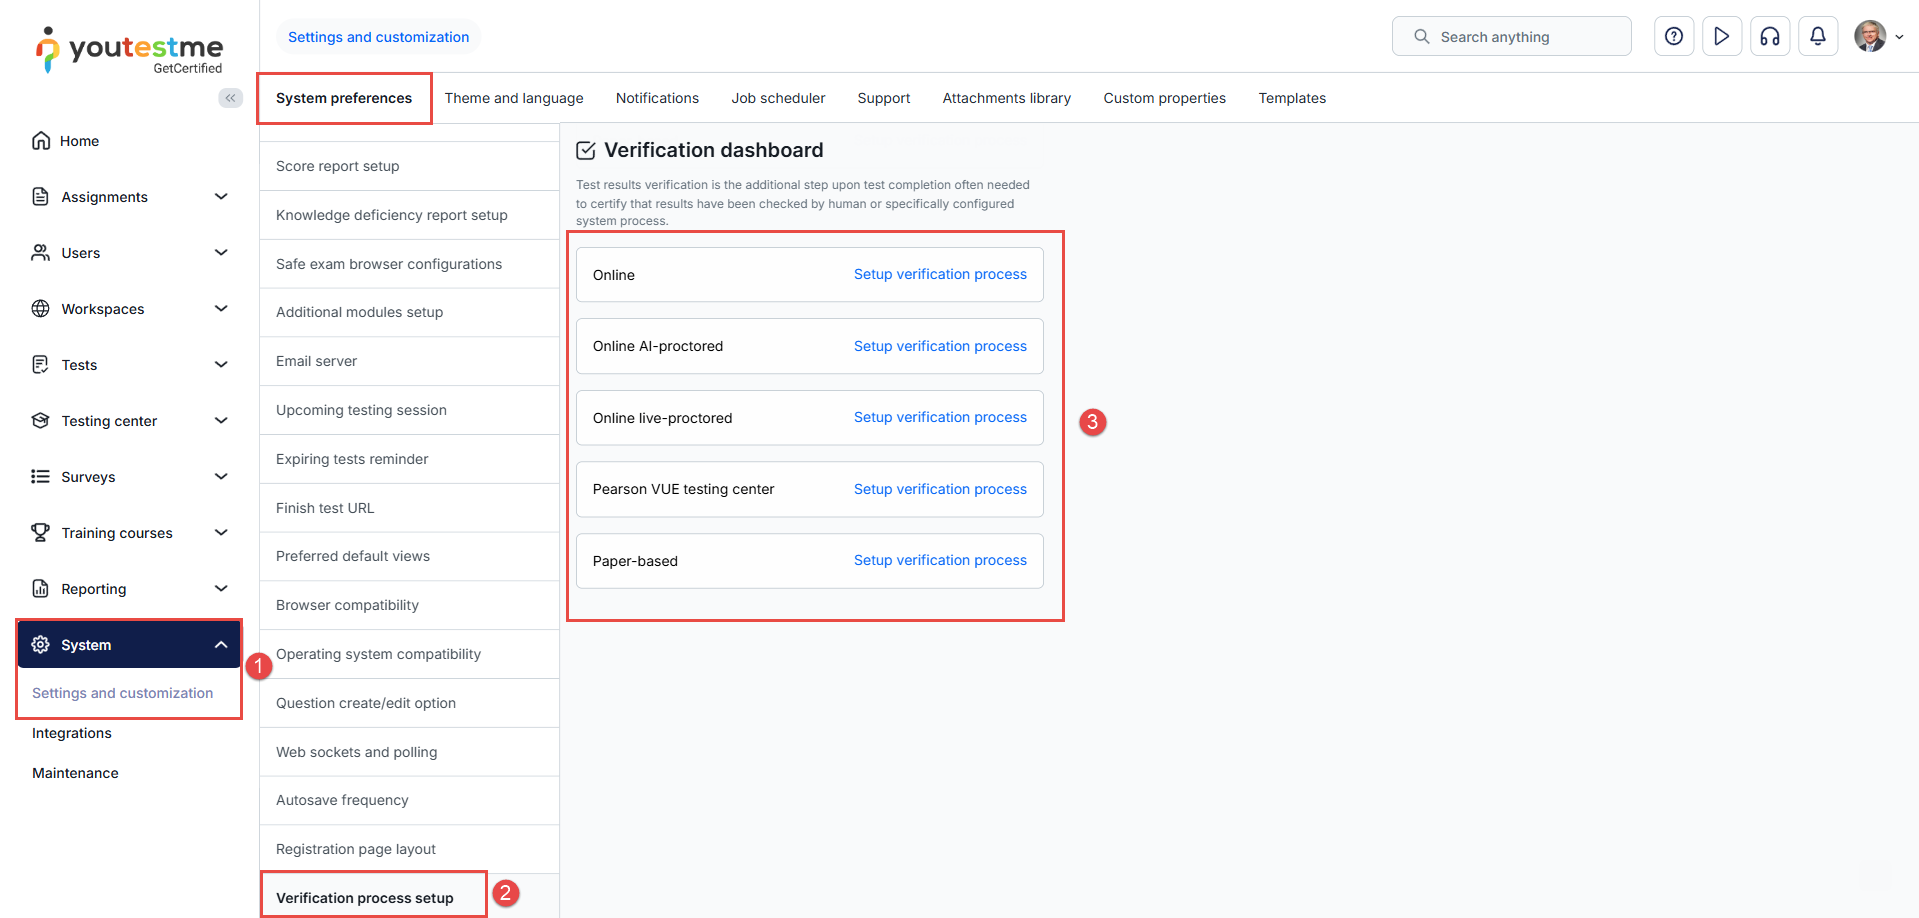
The two automated verification methods are explained in detail below.
Immediate verification by hold criteria after the test completion
To set up automatic verification, you must enable the Immediate verification by hold criteria after the test completion option.
Then you need to set all the conditions under which you want the results to be held and not verified.
- Percent scored below – Test attempts won’t be verified if the candidate scores below the specified percentage.
- Report needs grading – The test attempt will not be verified if there are questions left that require manual grading.
- Not finished – Verification won’t occur if the candidate doesn’t finish the test.
- Time used below – Verification won’t proceed if the candidate finishes the test in less time than specified.
- Refused NDA – Verification won’t occur if the candidate refused the Non-Disclosure Agreement (the test attempt status is Refused NDA).
- Did not show up – Verification won’t proceed if the candidate did not take the test within the allotted time (the test attempt status is Did not show up).
After setting all the conditions, click on the Save button.
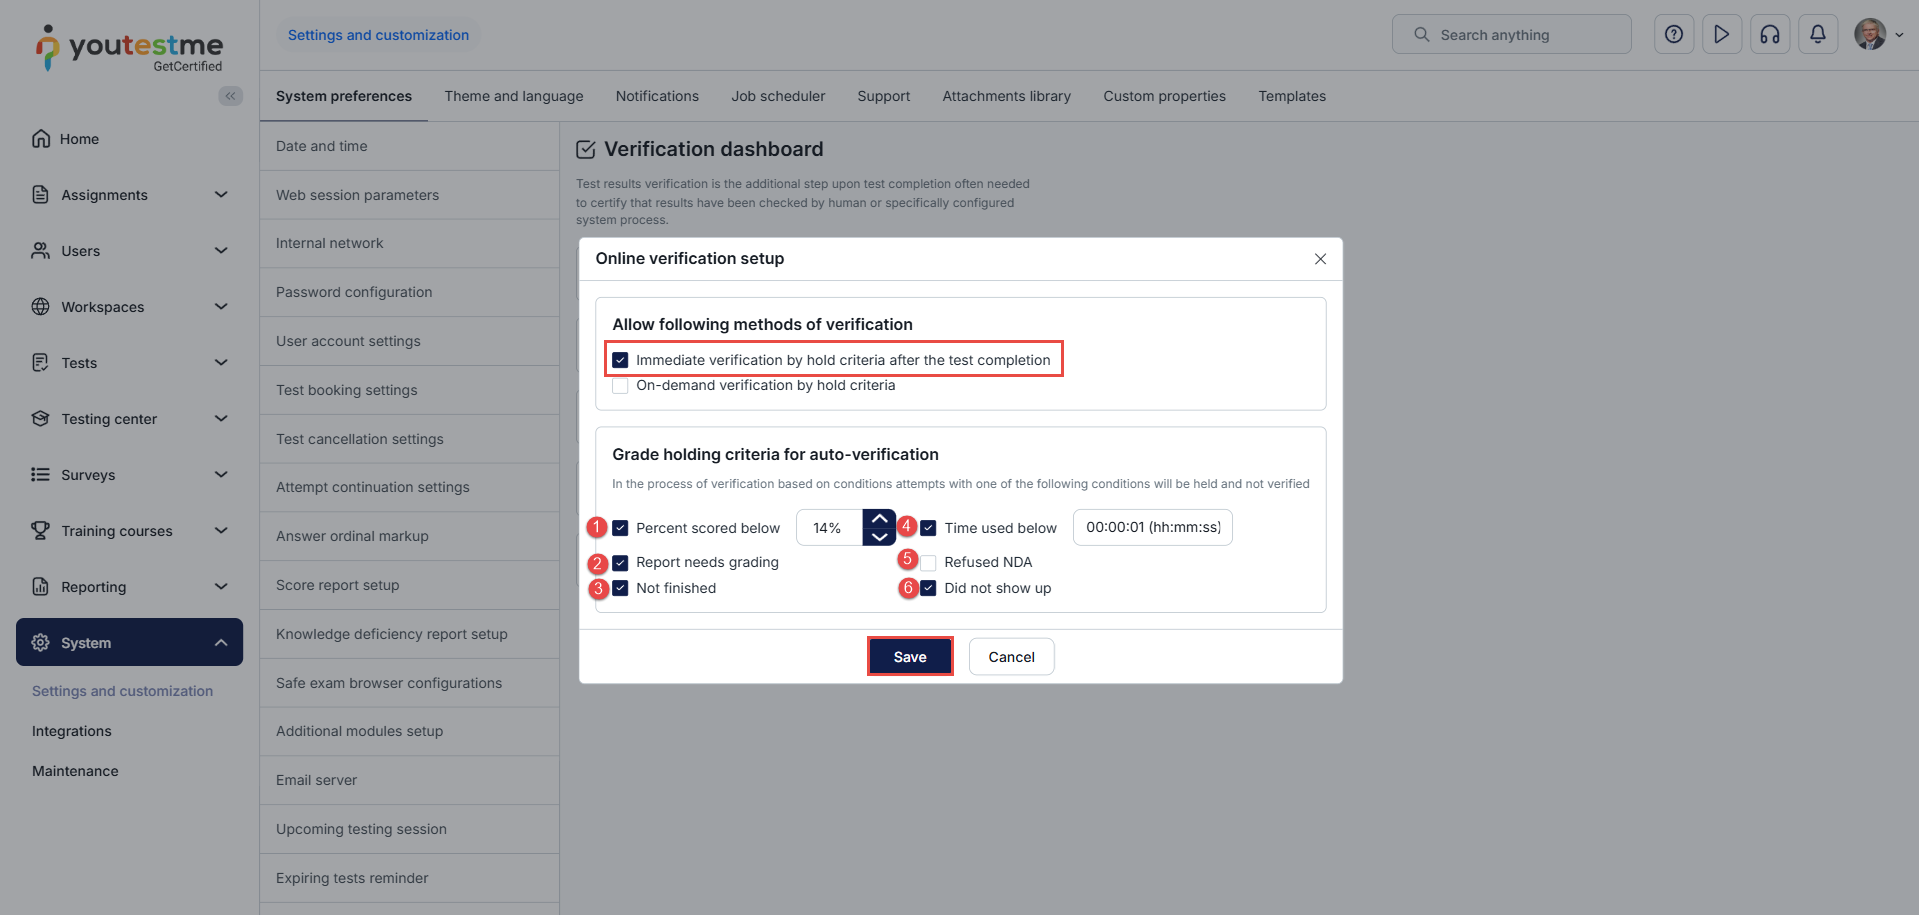
Note: The setup configurations will affect the next processing of the imported test results, and the setup configurations will affect the next processing of test results.
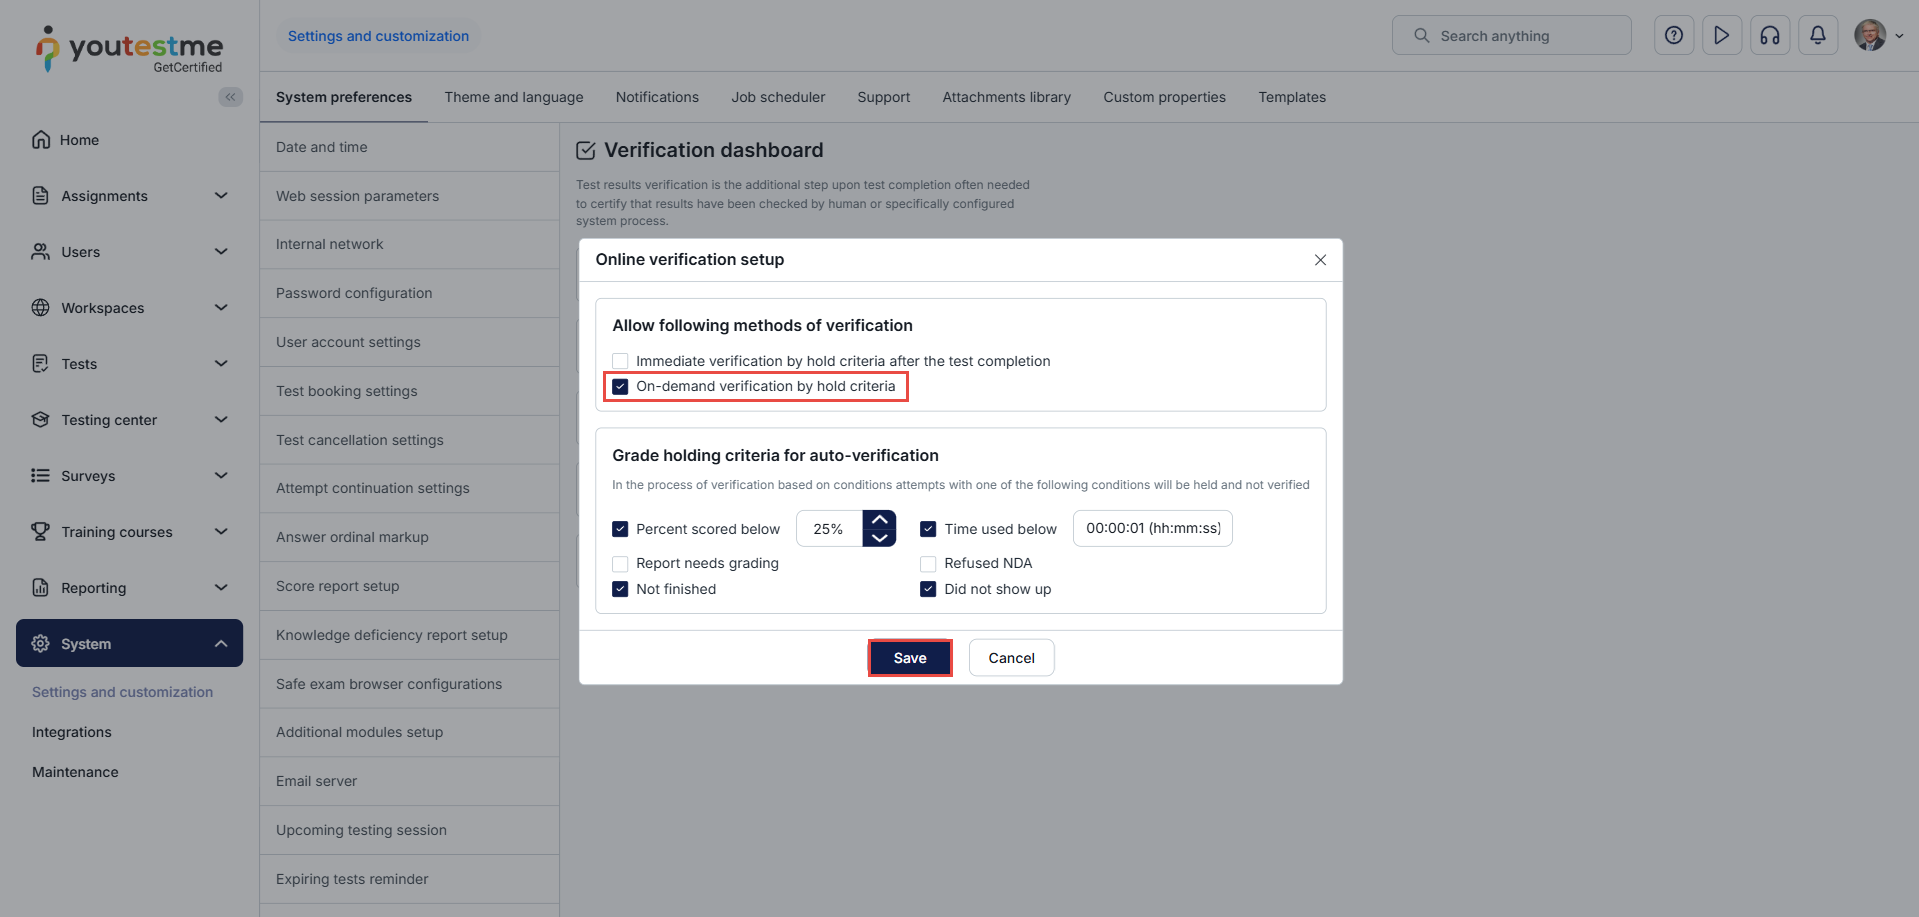
On-demand verification by hold criteria
You must enable the On-demand verification by hold criteria option to configure on-demand verification.
After setting all the conditions, click on the Save button.
Before running on-demand verification, you need to:
-
Select the desired test.
-
Select the desired delivery preference, then click Apply.
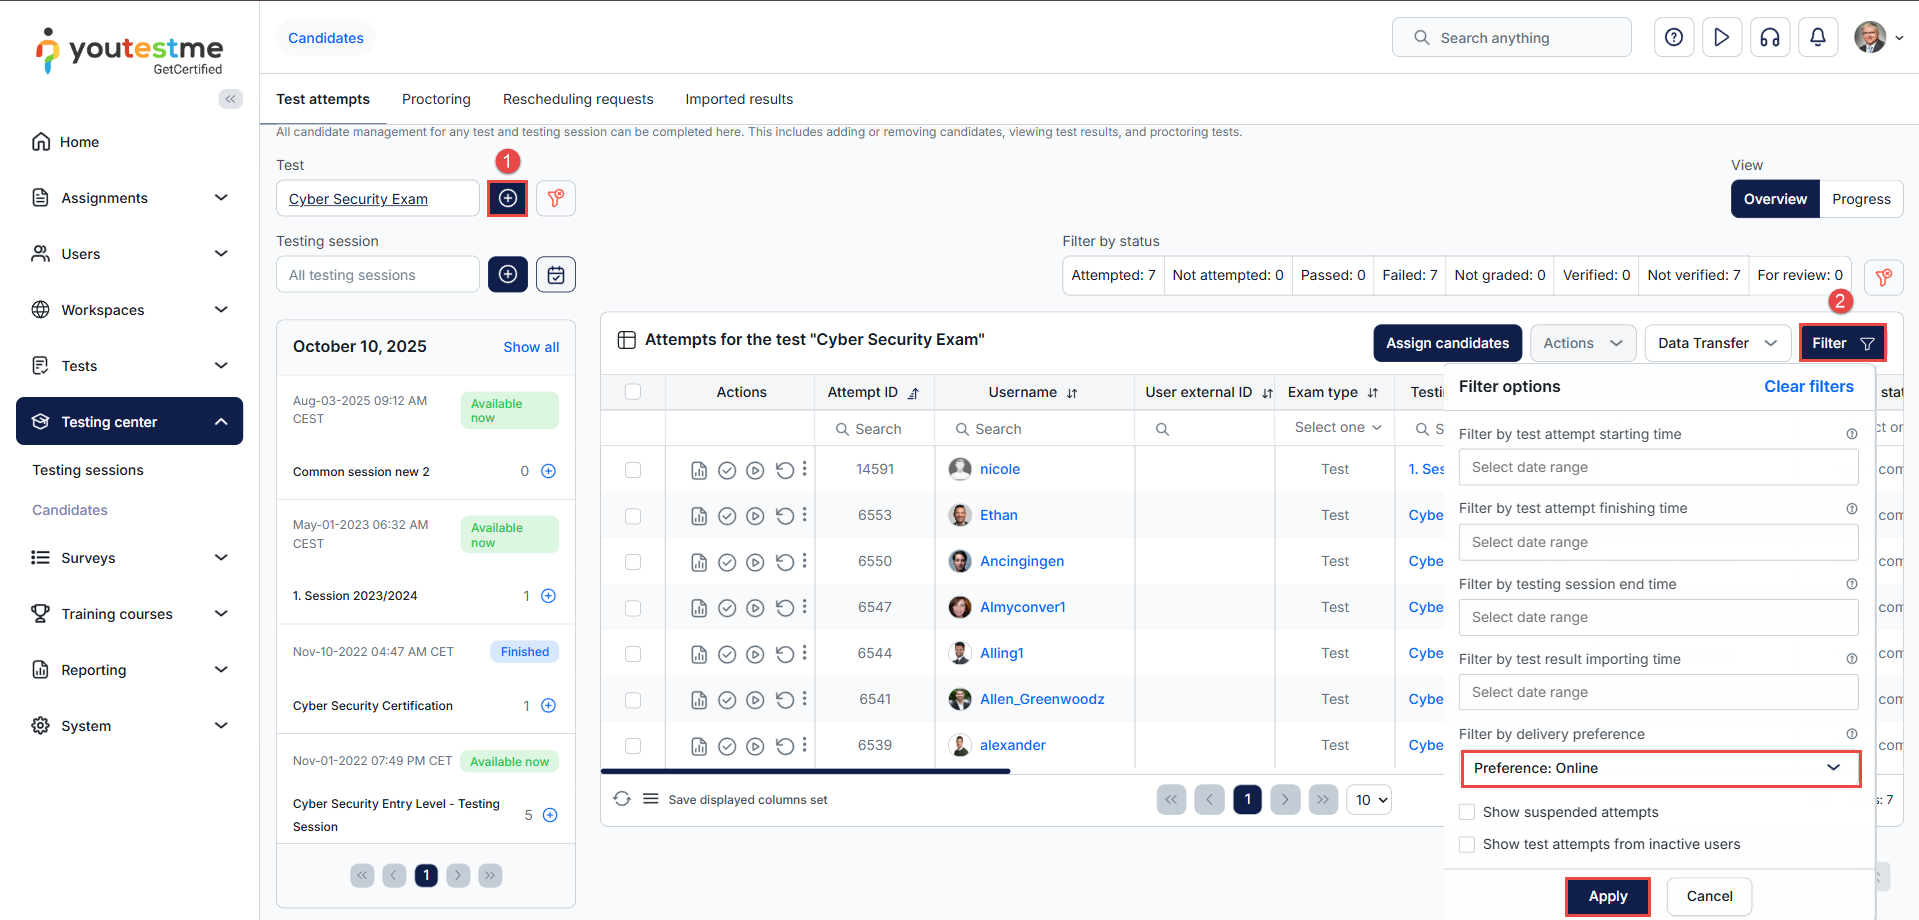
Note: If the delivery preference does not appear in the filter, make sure it is enabled under Additional Modules Setup.

Once all steps are completed, select the test attempts you wish to verify, then choose Run on-demand verification from the Actions menu.
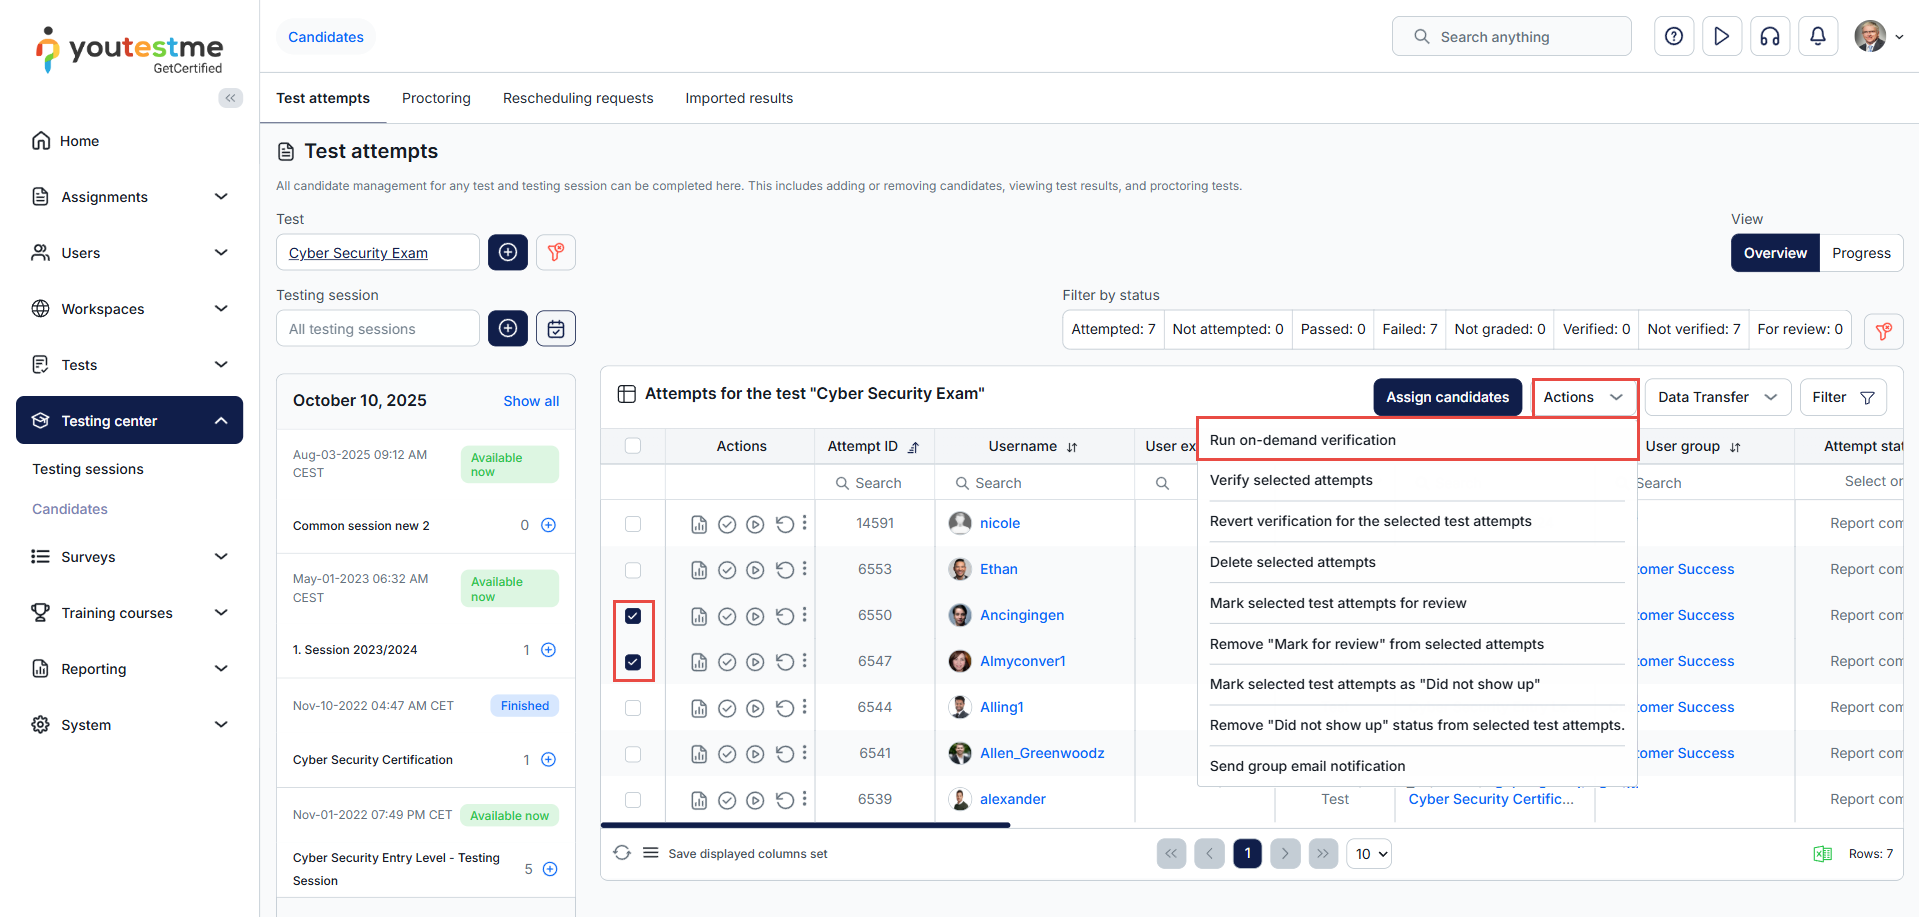
When executed, the system will attempt to verify all unverified attempts for the selected test. If any of the specified hold conditions are met, the attempt will remain unverified and will be forwarded to the manager for further processing.
Manual verification
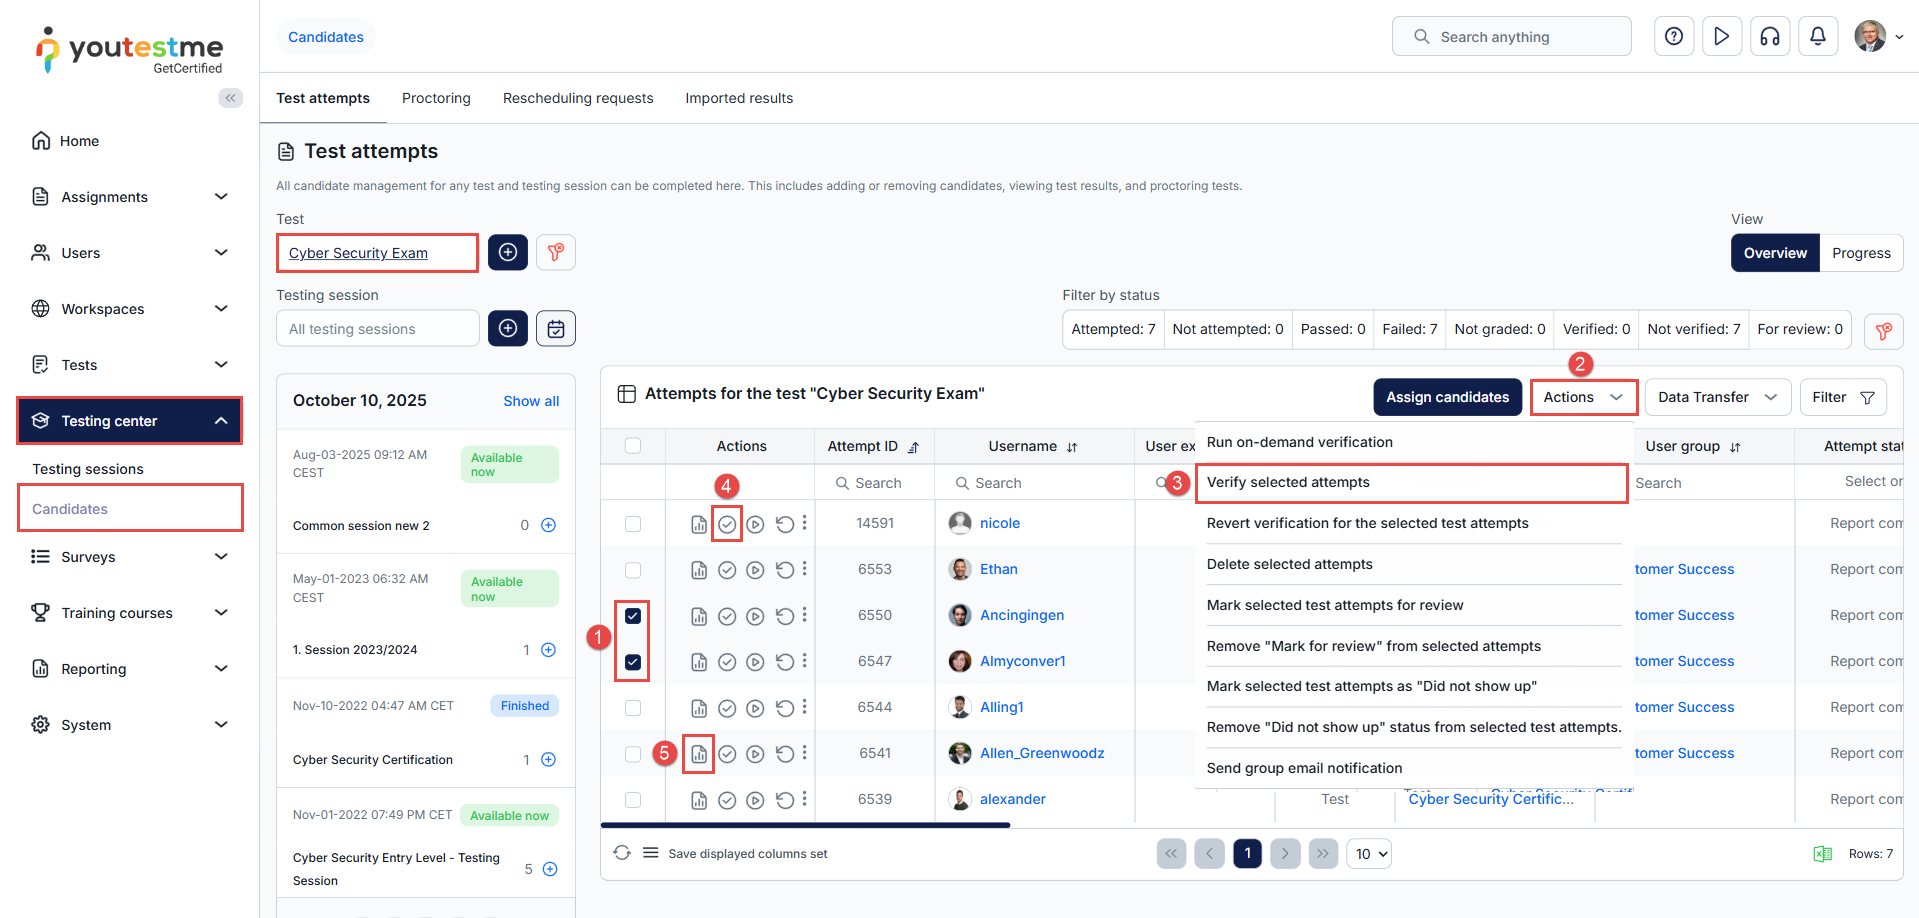
To verify test attempts, first navigate to Testing center > Candidates and select the desired test. In the Test Attempts table, you can verify attempts using three different methods.
Note: All verification methods can be done from the Tests > Manage tests > Candidates tab of the desired test.
Method 1 – Using the Actions menu
- Select the attempt(s) you want to verify.
- Click Actions.
- Choose Verify selected attempts.
Method 2 – Using the Verify icon
- Click directly on the Verify icon in the Actions column.
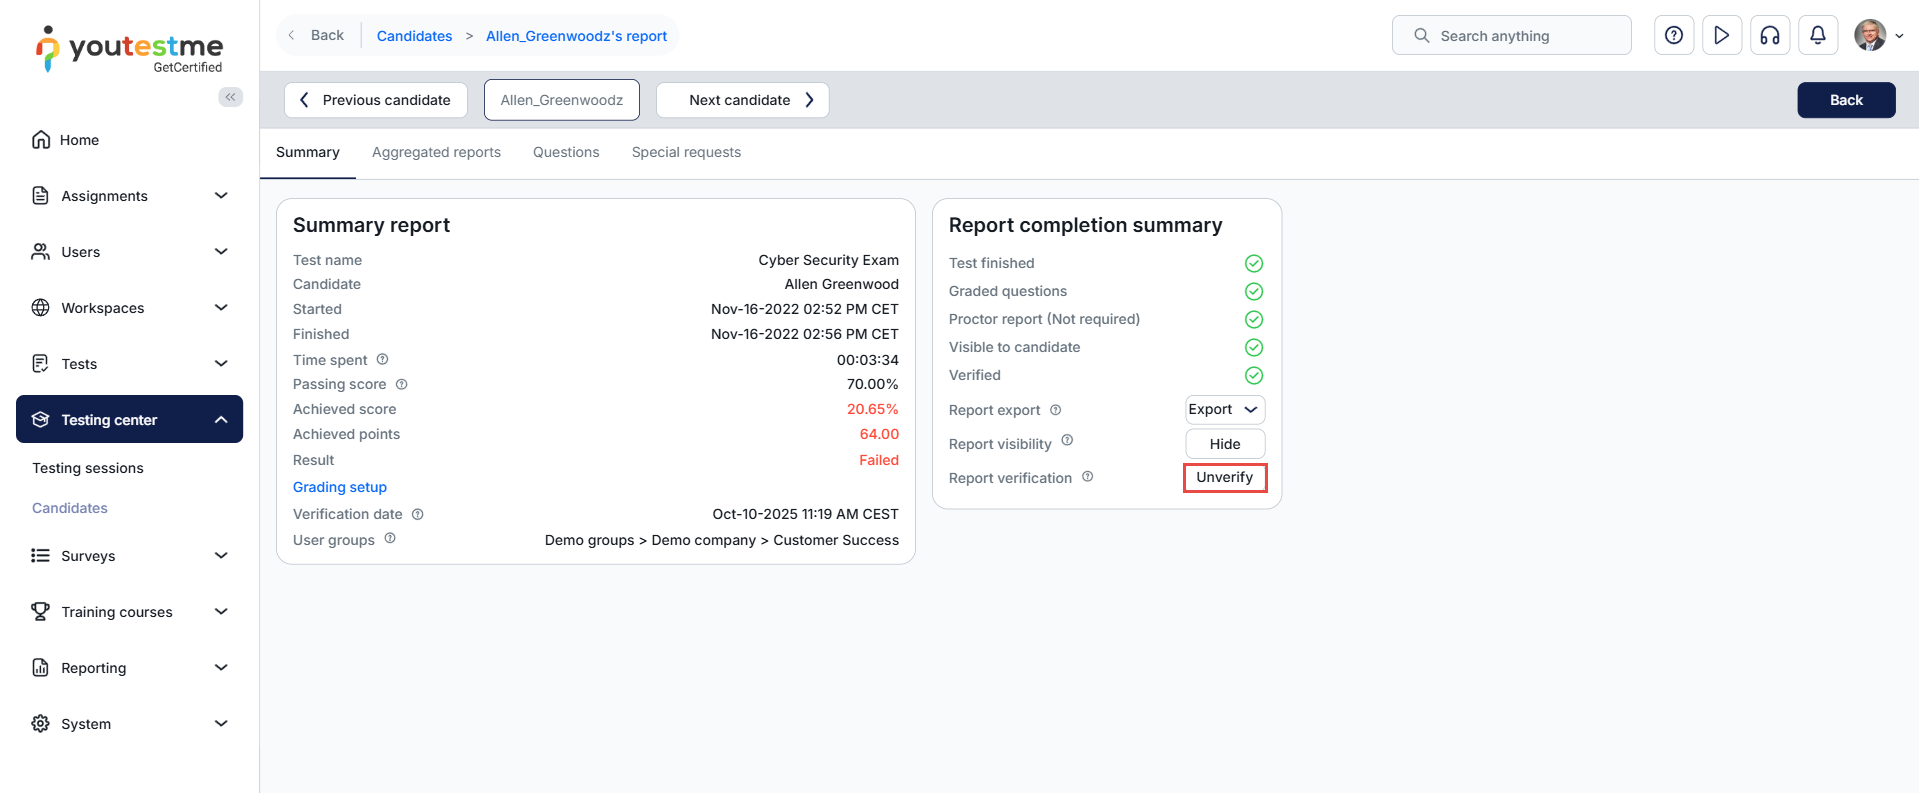
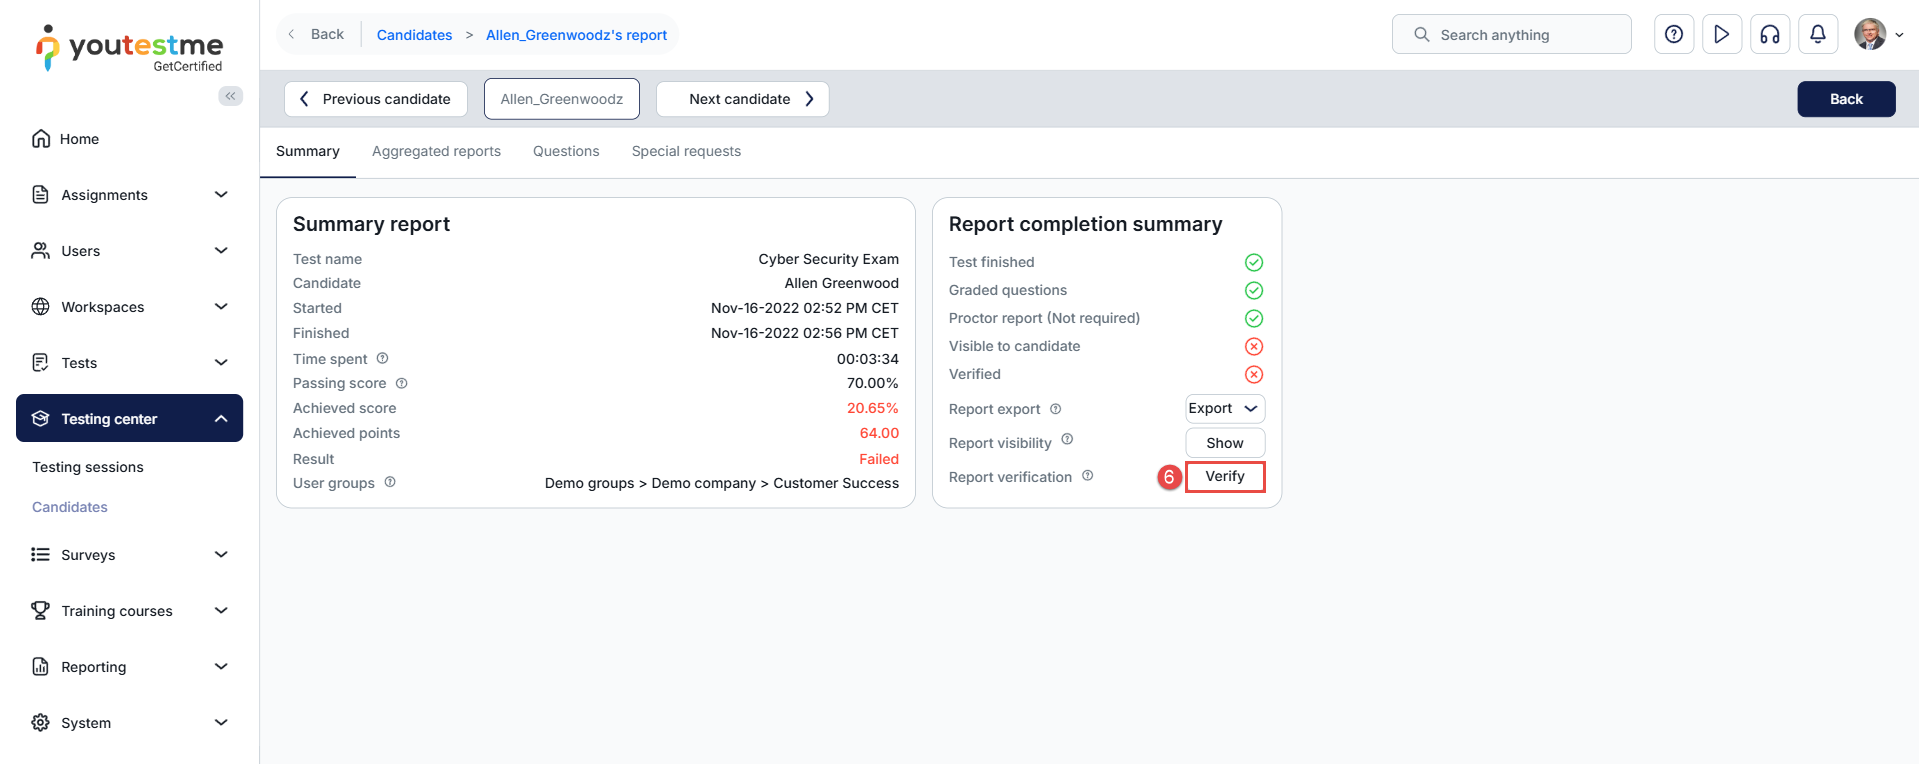
Method 3 – From the Reports tab (per candidate)
- Click the Report icon.
- In the Summary tab, click the Verify button to confirm the result for that candidate.
Reverting the verification
Once a personal report is verified, it cannot be edited. However, there may be situations where updating a verified report becomes necessary. In such cases, the verification must first be reverted to allow changes.
Reverting test result verification is only possible if the “Allow reverting test results verification” option is enabled in the system preferences.
Enabling the Option to Revert Verification
To enable the option to revert test result verification:
- Navigate to System and select Settings and Customization.
- Go to the System Preferences tab.
- Select Additional Modules Setup.
- Scroll down and enable the “Allow reverting test result verification” option.

Reverting Verification for Verified Attempts
Once the setting is enabled, follow the steps below:
To bulk revert multiple verified attempts:
- Select the desired test.
- Select the checkboxes next to the verified attempts you want to revert.
- Click the Actions button and choose “Revert verification for the selected test attempts” from the dropdown menu.
To revert verification for a single attempt:
4. Click the Personal Report icon in the actions column.
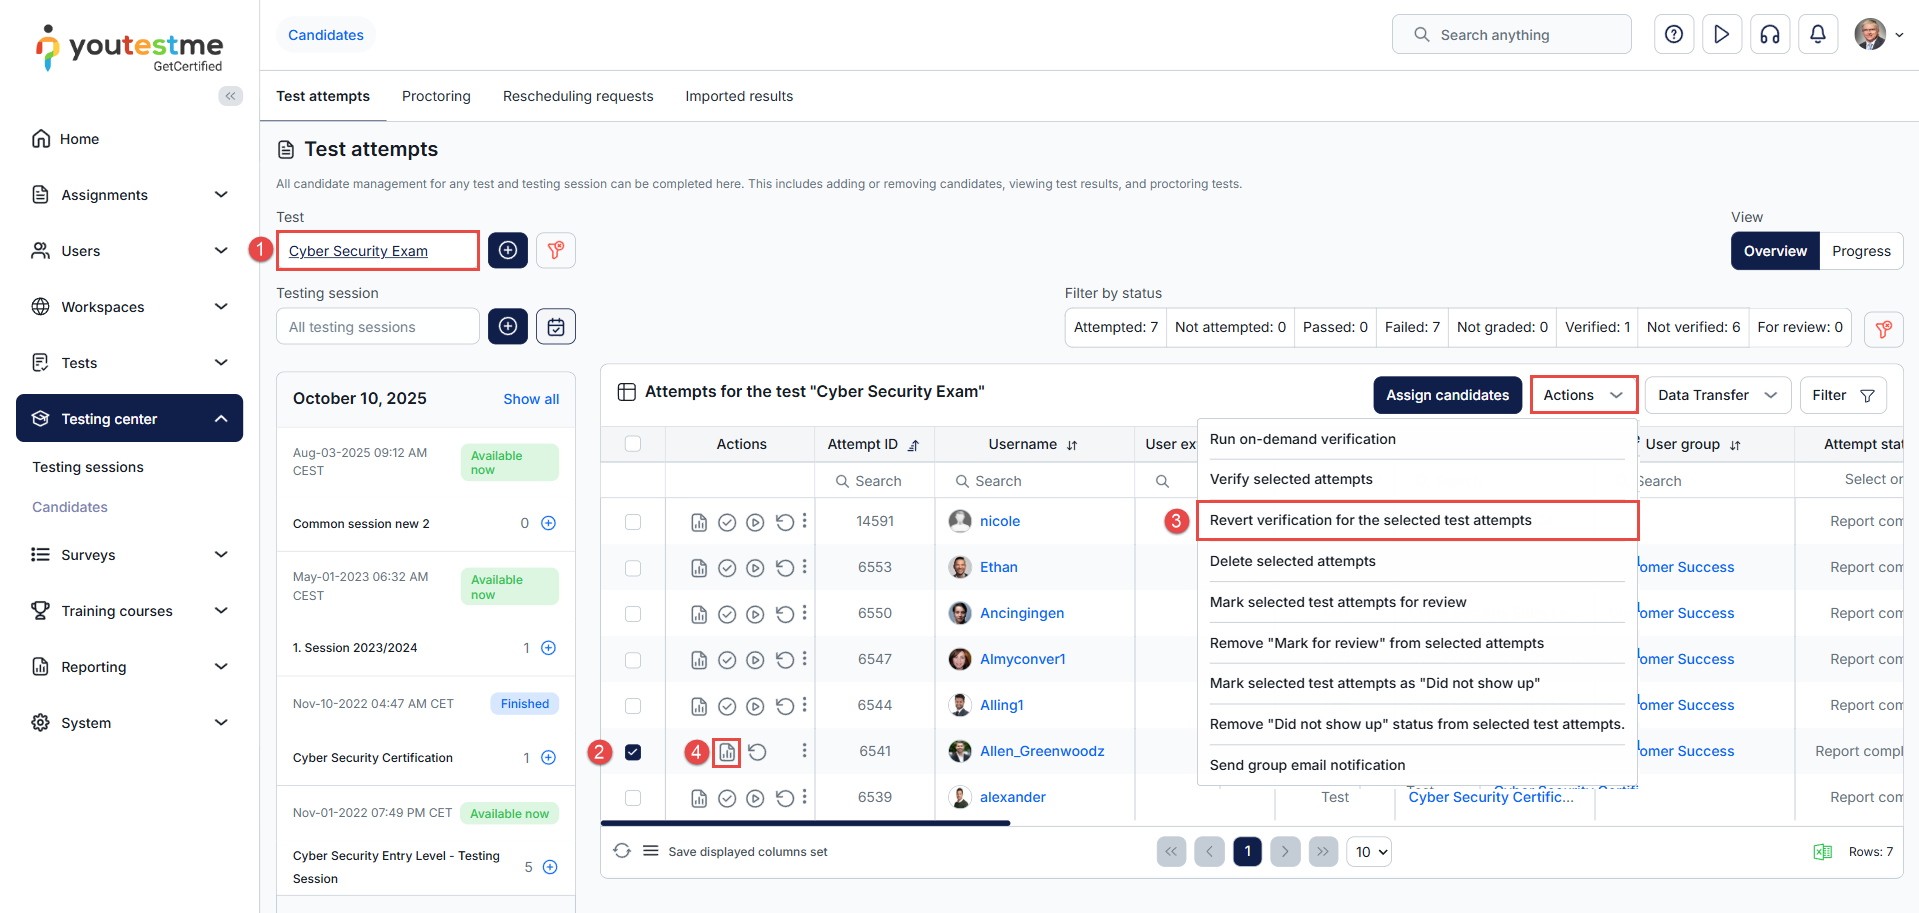
In the Summary tab of the report, click the “Unverify” button.
This will change the report status back to “Not Verified,” which will allow you to perform any necessary edits or updates before re-verifying.