
This article shows how you can leverage the full potential of YouTestMe as a robust job portal, enabling you to efficiently sort candidates and compare their success. YouTestMe, with its array of features and user-friendly interface, offers a seamless experience for both recruiters and job seekers alike.
Scenario Description: From Click to Career with YouTestMe
The candidate initiates the application process by clicking on the designated link or button. This seamlessly redirects them to the application portal within the YouTestMe platform.


After the successful completion of the registration process, the candidate is automatically enrolled in a dedicated group tailored to their desired position within the company. This grouping feature facilitates streamlined management of candidates, ensuring that each individual is appropriately categorized for the position they are pursuing. The candidate gains access to the qualification test designed specifically for the targeted position.

Upon finishing the qualification test, the candidate’s results are promptly processed. Depending on the company’s policies and the candidate’s performance, they will be contacted for the next stage of the recruitment process. The communication may include further interviews, assessments, or any other steps deemed necessary for the thorough evaluation of the candidate.
Beneath the Surface: Tailoring Insights in YouTestMe
Create User Groups
Creating user groups is an essential step in optimizing your candidate screening process with YouTestMe. Organizing users (candidates) into groups simplifies the analysis of their behavior, preferences, and activities. Here’s a step-by-step guide to creating user groups within the YouTestMe application:
- Navigate to the Users within the application and select the User Groups option.
- Click on the New top-level group button.

When the pop-up window appears:
- Type the name of the user group.
- If necessary, provide a brief description.
- If the self-enrollment option is enabled, users will be able to join the group without the manager’s approval.
- If needed, add an external ID that can be used for the external system.
- Click on the Save button to create a new group.

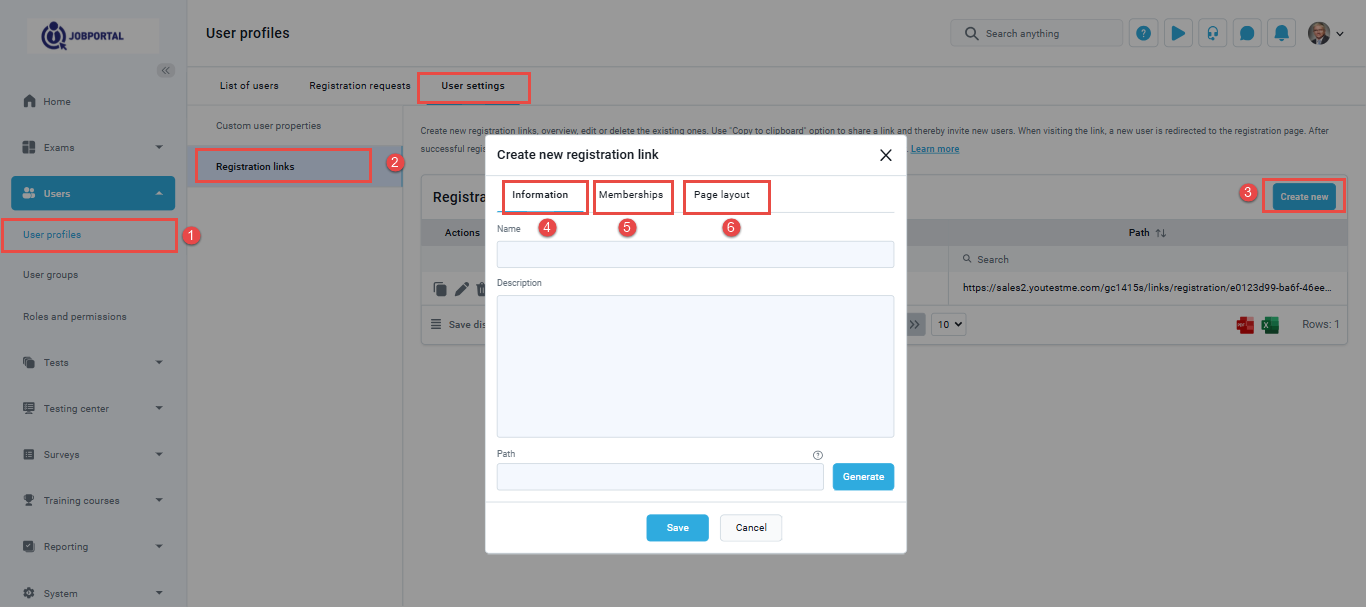
Create Registration Links
To ensure candidates applying for specific positions are automatically placed into the correct user groups during registration, connect registration links to their designated user groups. Follow these steps:
- Navigate to Users in the application and select User Profiles.
- Go to the User Settings/Registration Links tab.
- Click the Create New button.
- Complete the Information tab with the required details.
- Fill out the Memberships tab.
- Configure the Page Layout tab.
for more detailed instructions, on how to create registration links please visit this article How to Create and Add Users in the System
Uploading/Creating Interview Assessment Questions
When preparing your interview assessment, start by carefully selecting the question format that best suits your needs. Decide whether you want a single-choice assessment, where participants can choose only one response, a multiple-choice assessment allowing for multiple selections, or a ranked-choice system, where participants prioritize candidates or options in order of preference. The chosen format should align with the nature of the interview process and your specific assessment criteria.
In YouTestMe GetCertified, you have access to 10 types of questions for designing assessments, surveys, and training courses. These questions can be created directly within the application, prepared offline, and uploaded later. One efficient method is to create a question pool that contains questions that can be used across various assessments. You can find detailed instructions on creating a question pool in the following article: How to Create and Use Question Pools. Also, you can generate questions in question pools with the assistance of ChatGPT; for more information on how to do that, check this article: How to Generate Questions Using ChatGPT
Test Creation
You can start creating a test as shown in the following article, with the note that, when adding questions, you should select Pick questions from pools.
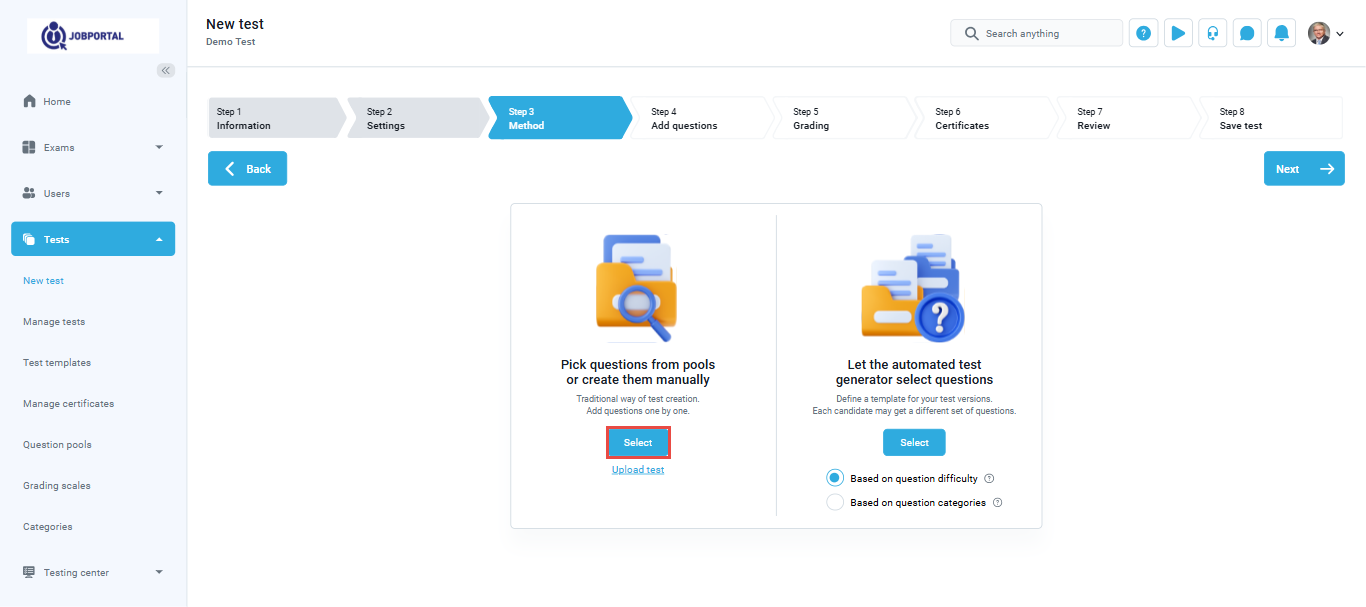
On the next step, click the Import from Pools button to select your desired question pool.

Creating Testing Sessions and Linking Them to User Groups
After configuring the main test options, it’s necessary to create testing sessions for each user group. Upon registration, this ensures that every candidate can access the test through the designated testing session tailored specifically for their position. For more information, please visit this article: How to Schedule a Testing Session
If you wish to organize a training course and link several tests to evaluate various knowledge levels, you can find additional information on creating training courses by following this link. It’s crucial to emphasize that in this case, when creating a session as demonstrated above, you should select the desired training course to connect it with the test.
Talent Evaluation: Ranking and Analyzing Candidate Potential
Personal Report Analysis
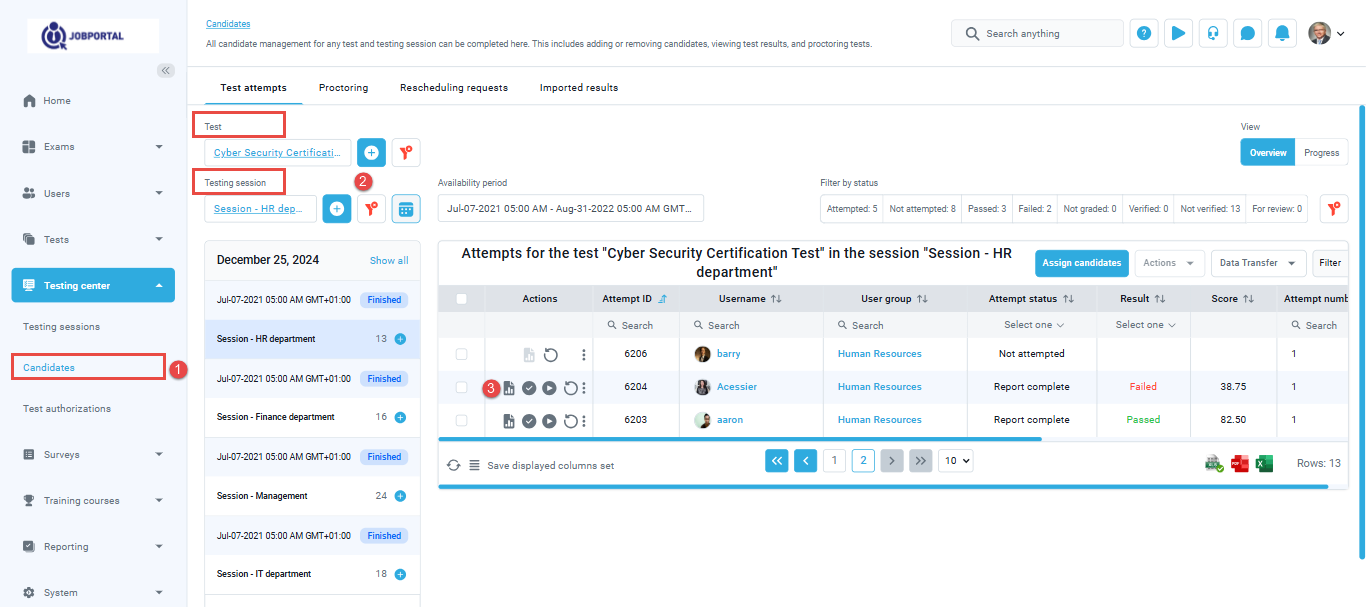
Access the personal report for each candidate directly from:
- Testing center/Candidates tab.
- Select the Desired test and testing session.
- By analyzing personal reports, you can individually assess each candidate’s performance.
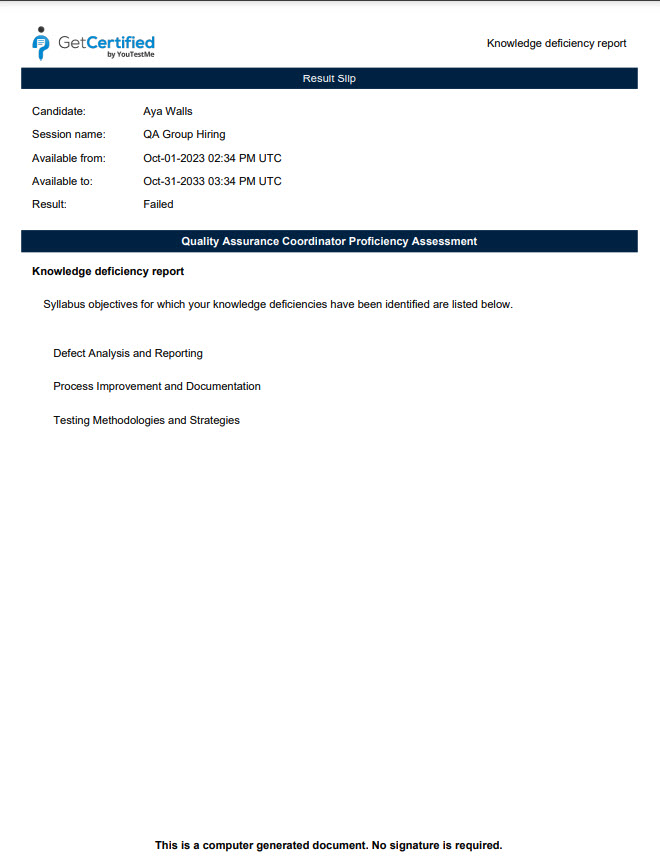
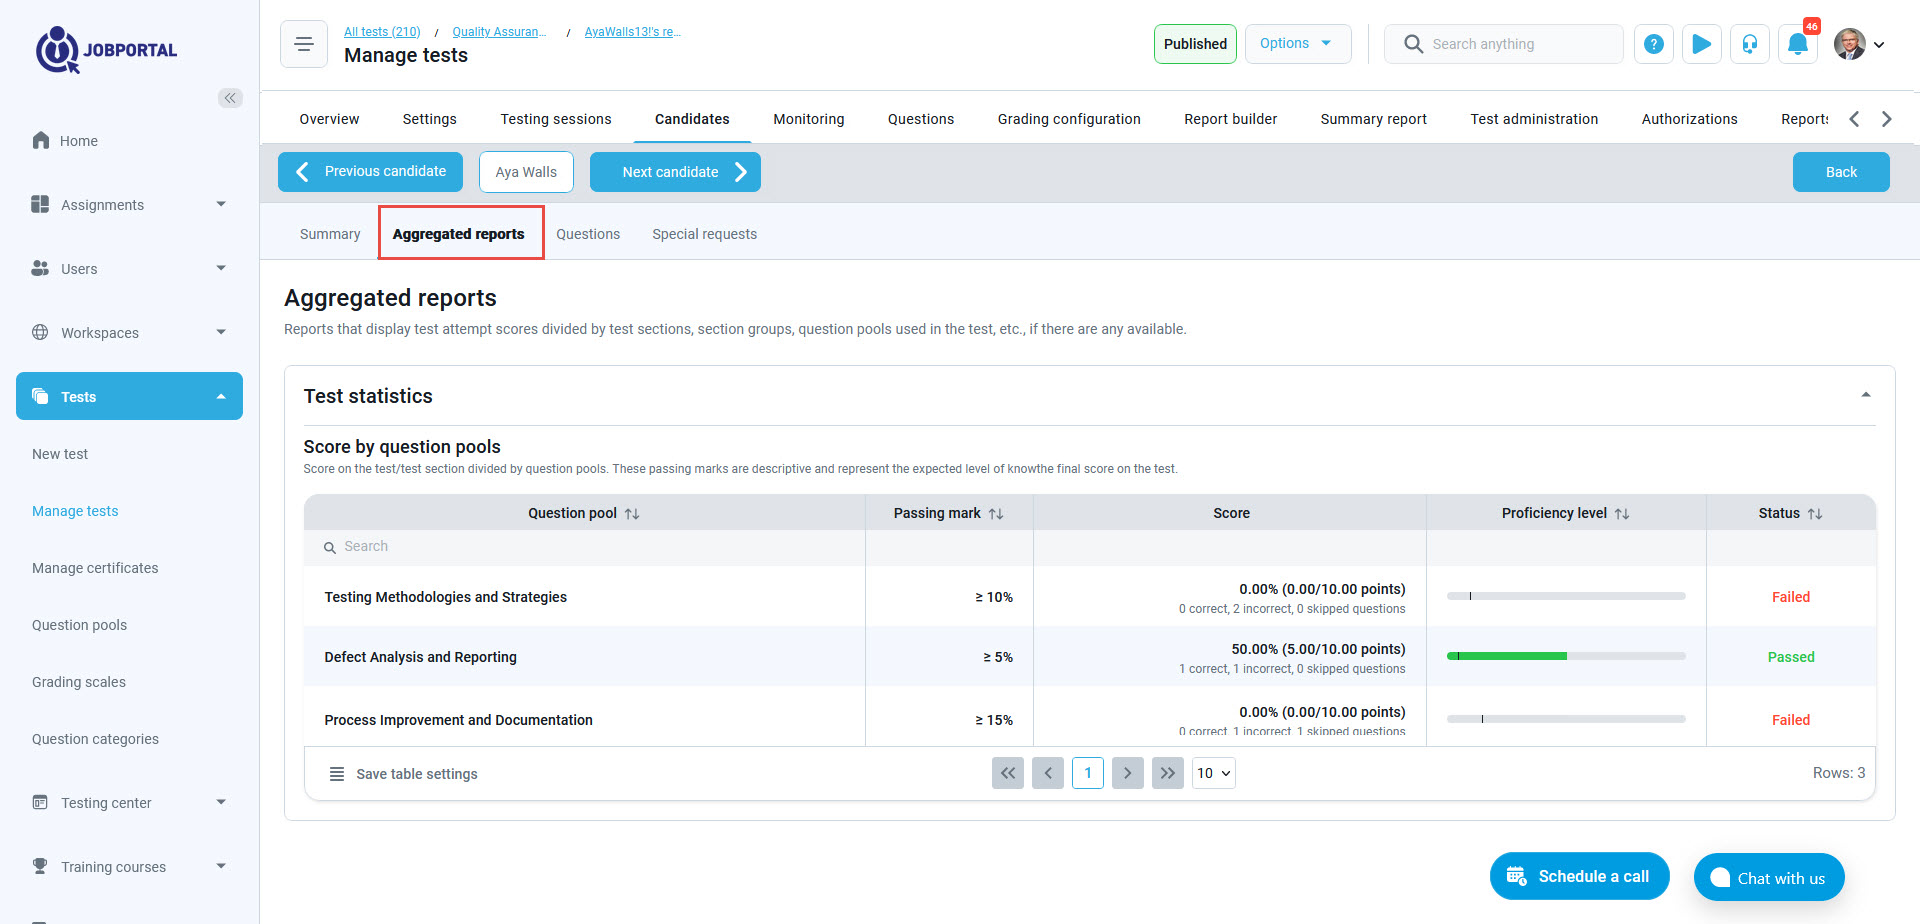
For example, the Knowledge Deficiency Report is a valuable resource for pinpointing areas where candidates may be lacking in knowledge. If your test contains questions from multiple question pools, enabling this report allows you to identify which question pools are potential weak points. It’s important to note that this report does not provide the exact number of incorrect answers; rather, it lists the question pools from which one or more questions were answered incorrectly.
In the Aggregated Reports tab, there is a graphical representation of their results, featuring colored bars that indicate their performance in each question pool. This report aims to provide a clearer understanding of their strengths and areas for improvement, empowering them to make more informed decisions regarding their proficiency levels. It’s important to note that this option is available only with the Score and Details option, and when the Display Pool results option is enabled.
Sorting and Ranking Candidates
Statistics on the Test Level
Navigate to the Reports tab in your test and click on Pool statistics.
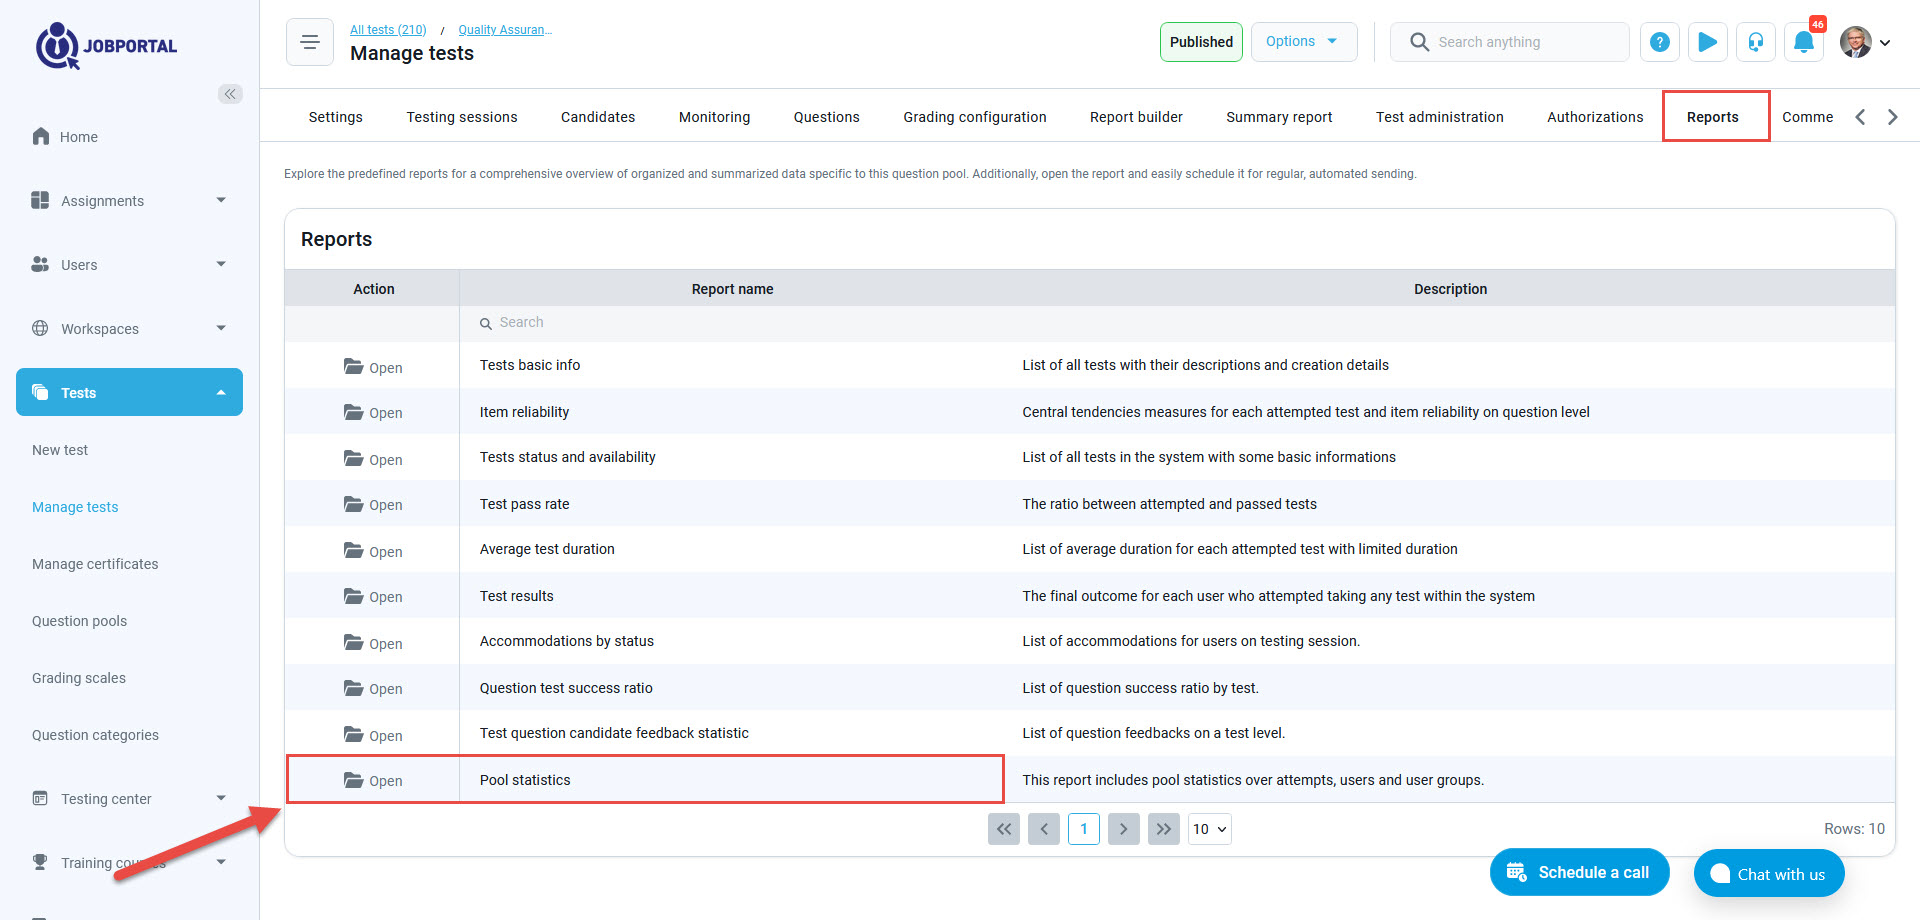
When you open the report:
- You will immediately view a graph comparing question pools and average scores based on all completed test attempts. Our example will illustrate success across skills.
- You have the option to select the chart view, choosing between a line, bar, or radar chart.
- You can also access a table displaying information about question pools, average scores, and the number of counted completed attempts. The table provides a comprehensive overview, allowing you to understand not only the content of the assessment (question pools) but also the overall performance trends (average scores) based on a specific count of attempts.

Pool Statistics by Users
To add your desired users to the statistics, follow these steps:
- Click on the Add button.
- Select Add Users.
- When the pop-up window appears, choose your desired users.
- Click the Confirm button to save the changes.

In our example:
- On the chart, the compared performance of all candidates we’ve added is now displayed for each question pool.
- We can change the chart view; in our case, we’ve selected the bar display.
- We can individually review the Proficiency Level for any of the candidates.
- We also have the option to remove a candidate from the analysis.

Pool Statistics by User Groups
To add user groups to the statistics, follow these steps:
- Click on the Add button.
- Select Add user groups.
- When the pop-up window appears, choose desired user groups.
- Click the Confirm button to save the changes.

In our example, we have added all the user groups:
- On the chart, the average score of all the user groups we’ve added is now displayed for each question pool.
- We can change the chart view; in our case, we’ve selected the bar display.
- We can individually review the Proficiency Level and average score based on the desired user group.
- We also have the option to remove the desired user group from the analysis.

Test Reports
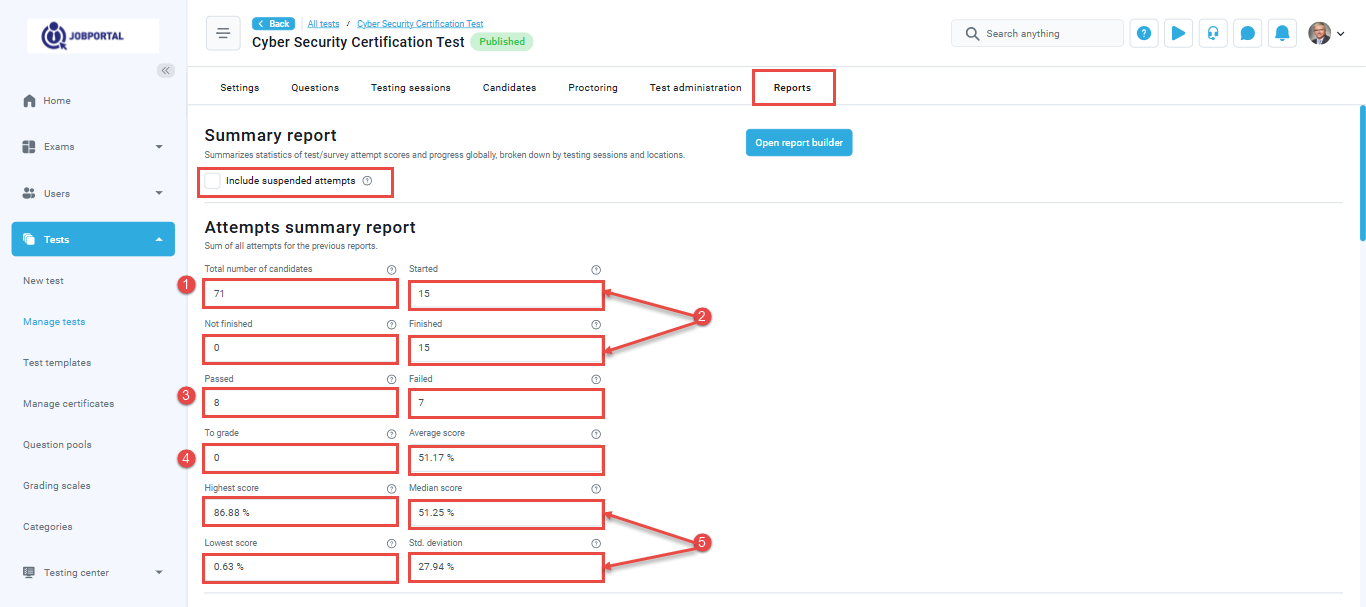
Access a detailed overview of test attempt scores and progress, globally and segmented by testing sessions and locations, through the Summary Report. Simply navigate to the Reports for this information. You have the option to include or exclude suspended attempts by selecting or deselecting the checkbox labeled Include Suspended Attempts.
In the Attempts Summary Report, you gain access to comprehensive global statistics related to test attempts, including:
- The total number of candidates who either booked or were assigned to the test.
- The count of candidates who initiated the test, completed it, and those who didn’t finish.
- The number of candidates who successfully passed the test and those who failed.
- The number of attempts that require grading.
- Key statistics such as the average, lowest, highest, and median scores, along with the standard deviation.
The Reports also features charts that display:
- The ratio of passed and failed candidates
- The distribution of scores in percentages for attempts that were successfully completed.

For more detailed information, you can see Question level statistic report.
This comprehensive and automated approach not only expedites the application process but also ensures that candidates are seamlessly integrated into the recruitment pipeline. YouTestMe’s efficient platform allows recruiters to focus on assessing candidates who have demonstrated their suitability through the qualification test, enhancing the overall effectiveness of the hiring process.
For more related instructional materials, please see:
