
Article verified for Release 15.1 on September 1, 2025.
This article explains the procedure for creating custom certificate templates. A certificate template is a .jasper file (Jasper report) produced by compiling a .jrxml file. Creation and compilation of .jrxml files are performed using Jasper reports software. We will refer to both .jrxml and .jasper documents as templates.
Software installation
We will use Jaspersoft Studio to create .jasper files. It is a standalone software that offers the same environment as the Eclipse plugin, Jaspersoft Studio. For compatibility, please ensure you are using at least Jaspersoft Studio version 6.21.3. It can be downloaded using the following link, as shown in the figure below. Choose the version for your operating system (Windows, Linux, or macOS).

Installation / Extraction
Depending on the package you download:
- Installer (.exe / .dmg)
Run the installer and follow the setup wizard. - Archive (.zip)
Extract the contents to any preferred location. No installation is required.
3. Launch
Open the application by running:
Jaspersoft Studio.exeon Windows- The
Jaspersoft Studioapplication file on macOS or Linux
Default templates
When creating a desired template, you can start from a completely new Jasper report by selecting File > New > Jasper report. However, YouTestMe provides four default templates that you can import and edit. These templates offer a flexible starting point, allowing you to modify and customize your certificates.
The included templates are:
Select the template you want to use to streamline the certificate creation process, designing certificates that fit your requirements.
Here, we will assume that you have chosen the second option (Landscape Orientation).
Importing templates
Start by importing the default templates into your project in JasperSoft Studio. The steps are shown in the figures below:
- Click File in the top menu to access the main application options.
- Select Import to open the file import wizard.
- When the import window appears, expand the General folder to view available sources.
- Choose File System as the import type for files from your local computer.
- Click the Next button to proceed to file and destination selection.

After that:
- Click on the Browse button.
- Select the folder where you store the default templates.
- Confirm the selected folder.

Now, you can:
- Select the template you want to use.
- Choose MyReports as the destination folder.
- Click the Finish button to complete and save the import.

Double-click the desired template in the left menu. You can now modify the properties of existing elements (images, text fields), remove them, or add new elements. Additionally, you can adjust properties for the entire report, such as page size, orientation, margins, and more.

Default templates analysis
Here we will explain in more detail one of the default templates, and then we will walk through creating a custom template.
The figure below shows that the template elements are placed in a Detail band, and when exportCertificate on the top of the Outline window is clicked, we can see the properties of the entire report on the right. By clicking the Edit Page Format button, a dialog appears where you can modify page size, orientation, margins, etc. After this operation, make sure the Language property is set to “Java” (sometimes it changes by itself after changing the page size).

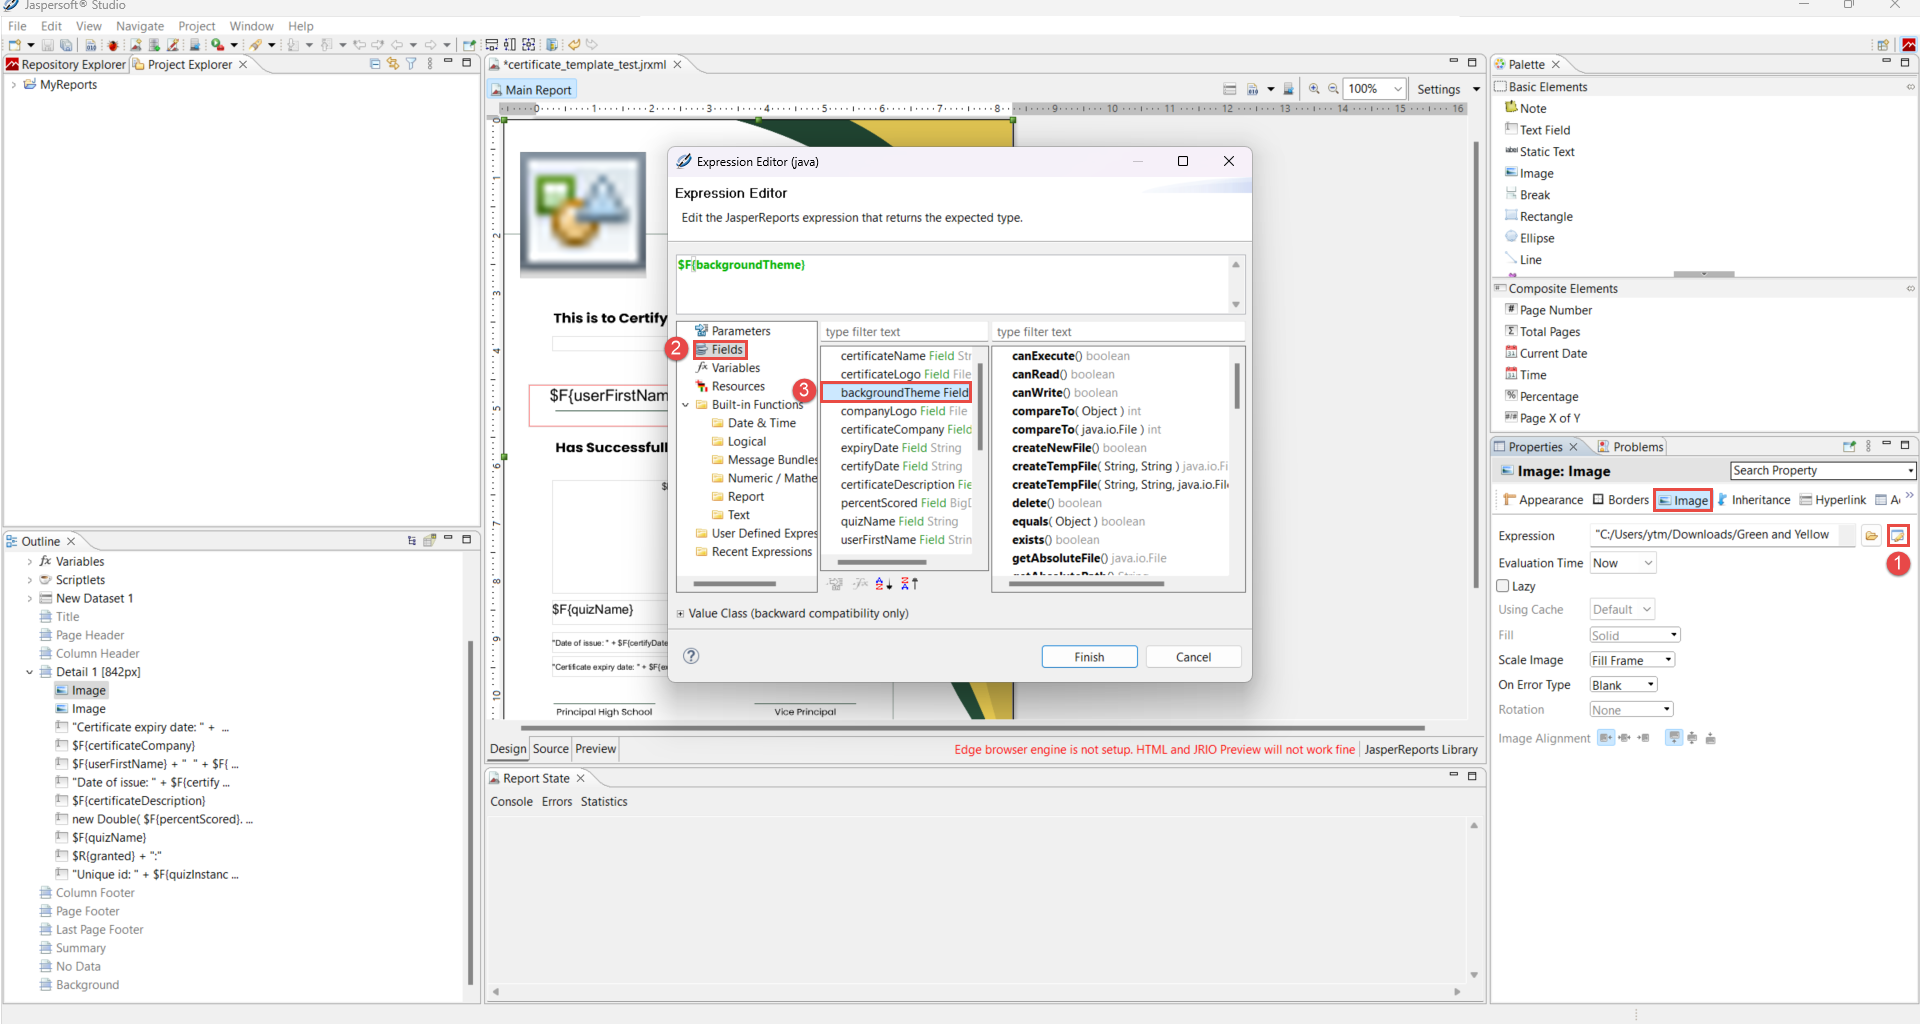
Now, we will look more closely at the image used as the template background. The analysis can be applied to other images as well. The background image should equal the page size, i.e., it occupies the whole Detail band.
Click the corresponding image element in the Detail band, and you will see the physical properties of the element, as shown below:

Under the Image tab, there are two very important properties. The first one is Expression, where you can choose whether to import the image for this image element from the file system or to enable importing it in the application. This will be explained later with an example. The second property is Scale Image, which specifies how the imported image will be scaled in the template. The three most important options are “Fill Frame”, where the image will occupy the whole image element size regardless of its aspect ratio (relation between image’s width and height), Retain shape, where the picture will stretch to fit one dimension and leave blank space in another dimension if its aspect ratio does not match the aspect ratio of the image element, and Real size, where the image retains its real size in pixels.

Supported Variables for Custom Certificates
When designing or modifying a template, you can insert variables that will be automatically replaced with user, test, and certificate information at runtime. These variables can be inserted as text fields within the template, allowing you to generate personalized certificates dynamically.
The following variables are currently supported:
- User Information
userId,userFirstName,userLastName,userFullName,userUsername,dateOfBirth,country,userGroupName(name of a user group assigned to a session) - Certificate Information
certificateId,certificateName,certificateDescription,certificateCompany,expiryDate(certificate expiration),certifyDate(certificate creation date) - Logos and Design
certificateLogo,companyLogo,backgroundTheme,defaultLogo,defaultCompanyLogo,defaultBackground - Test Information
quizDefinitionId(test ID),quizName,quizDescription,testLabel,percentScored,uniqueQuizId(test version ID),uniqueQuizName(test version name),quizFinishDate(when the test was finished),quizInstanceId,displayTestName,displayTitle,displayScore,displayDateOfIssue,displayExpiryDate,displayUniqueId,testExternalId,gradingSystemId,grade - Session Information
testingSessionId,testingSessionName,testingLocationName,sessionAvailableFromDate, userGroupName
These variables can be combined with static elements (such as background images or fixed text) to produce fully customized and dynamic certificates.
In addition to simple variables and fields, certificates can include more complex data such as test categories.
Print test categories
- Field name:
testCategories - Class:
java.util.List Data source expression:-
Fields in a record:
-
key– String -
value– String
-
To display categories in a Key: Value format: $F{key} + ": " + $F{value}
Adding a Field That Is Not Listed
If you need to add a field that is not available in the certificate template, follow the steps below. In this example, we will demonstrate adding a User Group field. Note: Fields can only be placed inside a TextField component.
Step 1: Create the Field
- Navigate to the Outline module.
- Select Fields.
- Click Create Field.

Enter a field name (e.g., userGroupName) and click anywhere on the window to create it. The new field will now appear in the list.

Step 2: Insert the Field into the Document
- Place the cursor in the TextField component where you want the field to appear and double-click.
- In the popup window, select Fields.
- Type the name of the field you just created.
- Select it from the list and double-click to insert it into the document.
- Click Finish to confirm and add the field.

Change the image background
To change the image background, follow these steps:
- Click on the Image tab in the bottom-right corner.
- Click the Browse icon.
- Select URL in the filesystem.
- Enter the URL link for the background.
- Click OK to apply the changes.

Fonts and Character Support
The DejaVu Sans font must be used to ensure that both Cyrillic and Latin scripts are displayed correctly. Please note that Japanese, Chinese, Thai, and Korean characters are not supported.
How to Save a Created Certificate Template
- Open Project Explorer.
- Navigate to My Reports.
- Select the .jrxml template you have been editing and press Ctrl + S to save your changes.
- Click the Compile Report button to generate the compiled template.

.jasper file will be created and ready to be uploaded to the application.How to Review the Template
Before uploading the .jasper file to the application, you can use Preview in Jaspersoft to detect any existing syntax errors.
If you used one of the YTM default templates listed above, the YTM resource bundle is set by default, and you must remove it before running the Jaspersoft Preview.
To do that:
- Click the template name.
- Navigate to the Dataset.
- Change the Resource Bundle and remove the following line: resourceBundle=”com/mallocinc/ytm/webview/jasper/local/jaspermsg”

Note: If you don’t see Outline or Properties tabs, go to Window/Show view/Other or Ctrl+3 shortcut.
Possible Issues and How to Detect Them
- During compilation in Jaspersoft
If there are syntax errors in the code, the report will not compile. Check the error messages shown in the Report State section and correct them. - During certificate template upload to the YTM application
If unsupported fields are used, the template cannot be uploaded. Make sure only supported fields are included before compiling. - During certificate preview in the YTM application
If an error appears when previewing the certificate in the application, it indicates that the data types are not configured correctly (for example, using a number where a string is expected).
Example – Modifying a default template
Now, we will go through an example. Let’s imagine we want the image below to be the background image in default_template_landscape.jrxml. The file name is OriginalBackgroundImage.png.

First, we import the image from the file system into the template to place other elements in the desired positions concerning the background. The steps are shown in the figure below. We are changing the properties of the image element representing the background image in the template.
Since the Scale Image property is set to Fill Frame, the imported image will scale to fit the image element size. If it is not essential for you to preserve the image aspect ratio, importing the background image is finished here. The next step is to place other elements at appropriate positions, change their properties, remove some elements, add new elements, etc.
However, if preserving the imported image aspect ratio is required, we change the Scale image property to Retain shape. Since the imported image has a lower aspect ratio (width/height = 1.29) than the default template page size (A4 format, width/height = 1.41), we see the blank space on the right in the figure below. The goal is to remove this blank space, i.e., to adjust the image element size to the imported image.
Note that only the aspect ratio of the imported image is preserved (Retain shape), not the original size.
If the original size is to be preserved, then the Real size option should be chosen. This option should be used when it is very important to preserve the quality of the image.

We adjust the corresponding image element size (842 x 595) to the imported image size (770 x 595), as shown below:

Now we reset the Expression of the image background element, making use of the corresponding field (backgroundTheme in this case), so it can be imported into the template at the time of creating a certificate in the application.

After saving and compiling the default_template_landscape.jrxml, you get the default_template_landscape.jasper file, which you can use when creating a new certificate, as shown below:

After compiling the .jasper file, to add the template to the GetCertified, do the following:
- Select the System > System and customization tab.
- Select the Templates tab.
- Click on the Create new button.
- Enter the name of the certificate.
- Optionally add a description.
- From the drop-down list, choose a template type.
- Upload the previously created .jasper file.
- Click on the Save button to add the template to the system.

After adding the template, create a certificate from the Tests/Manage certificates tab:
- Select the newly added template from the dropdown menu.
- Select the background image.
- Click the Preview button to see how the template is applied to the background image.
- Click on Save to save the certificate.
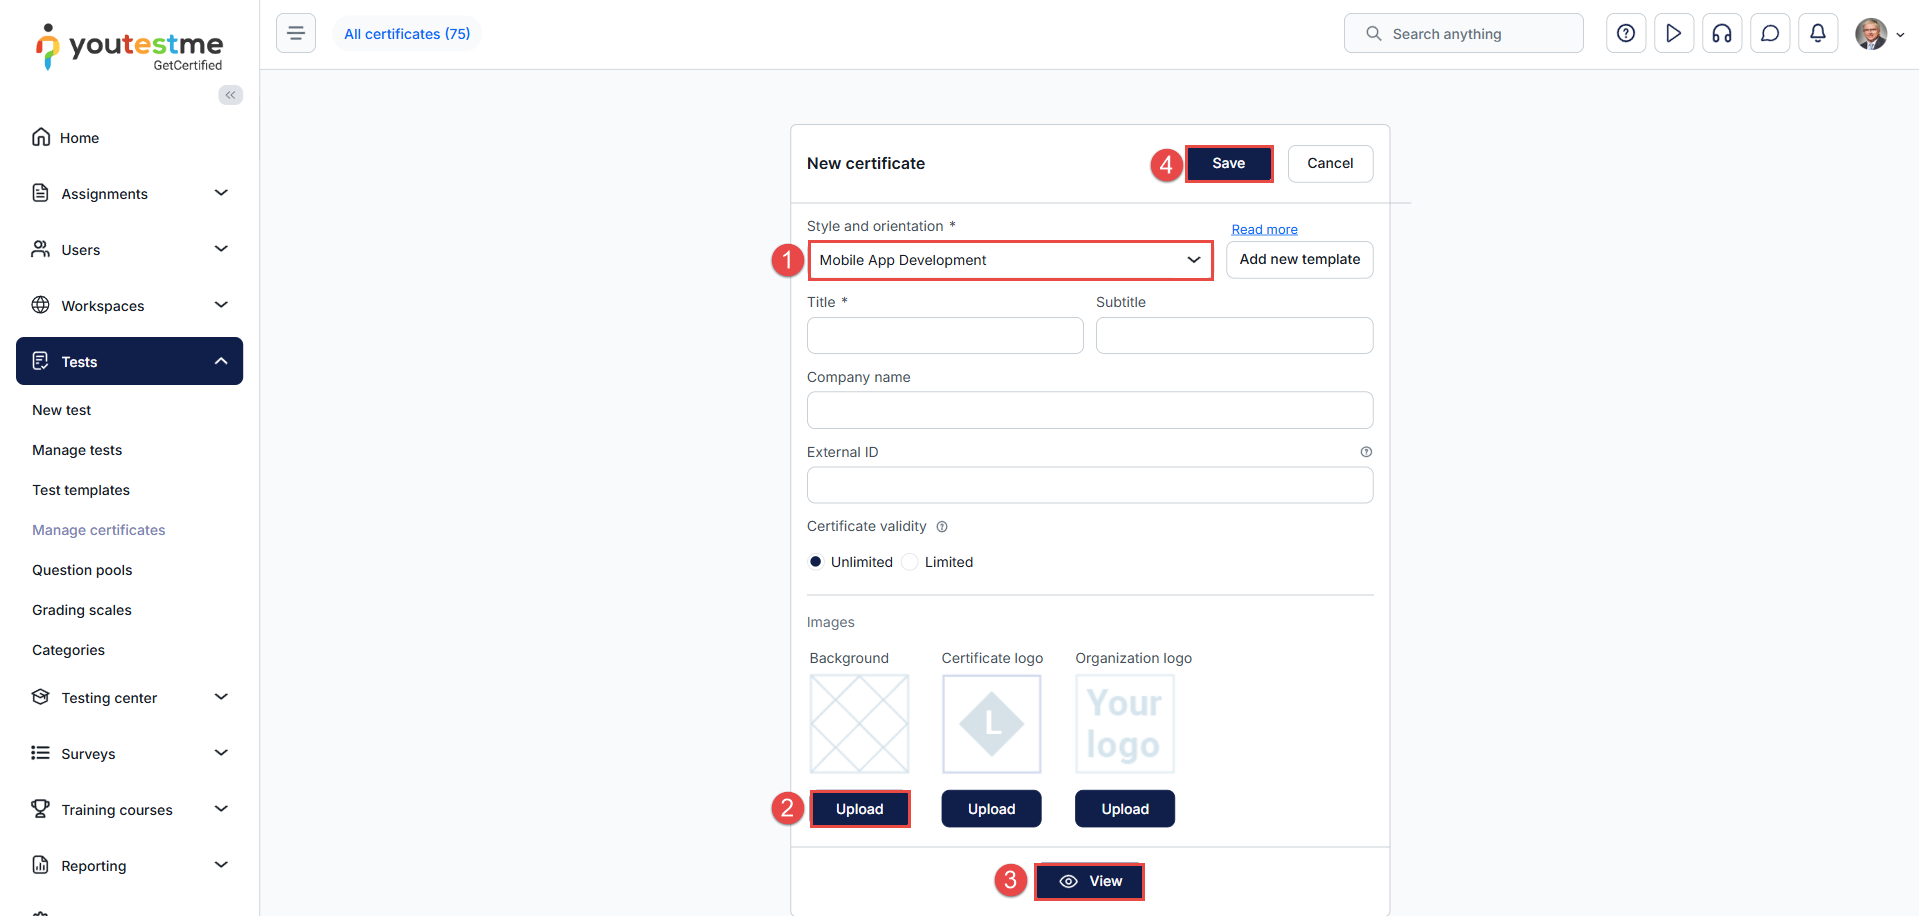
In step 1, you upload the default_template_landscape.jasper file to be used as the template for the certificate is created. In step 2, you upload the image you want to use as a background, in this case, OriginalBackgroundImage.png.
What if you want to create a certificate that has 2 pages? It is very simple. You only need to add a new Detail band to default_template_landscape.jrxml and set its elements and properties similar to the existing Detail band.

Custom certificate templates can also be added to the user’s achieved Certificates list on the user’s profile. To do this, select the assigned certificate. You can:
- Choose the previously created custom certificate from the drop-down list using a template.
- Select the validity period for the certificate.
- Save the changes.

For more information, please watch this video:
