The article was verified for Release 14.2 on August 09, 2025.
This article explains how to create test authorizations in the YouTestMe system, ensuring that only candidates holding a valid authorization can find and start the test.
The Test Authorization feature allows administrators to restrict access to an exam by requiring candidates to hold a valid authorization before they can view or take the test. Authorizations can be created manually for specific users or automatically based on predefined rules. Each authorization can include a deadline, which prevents candidates from accessing the exam after a certain date, even if the test session itself remains open.
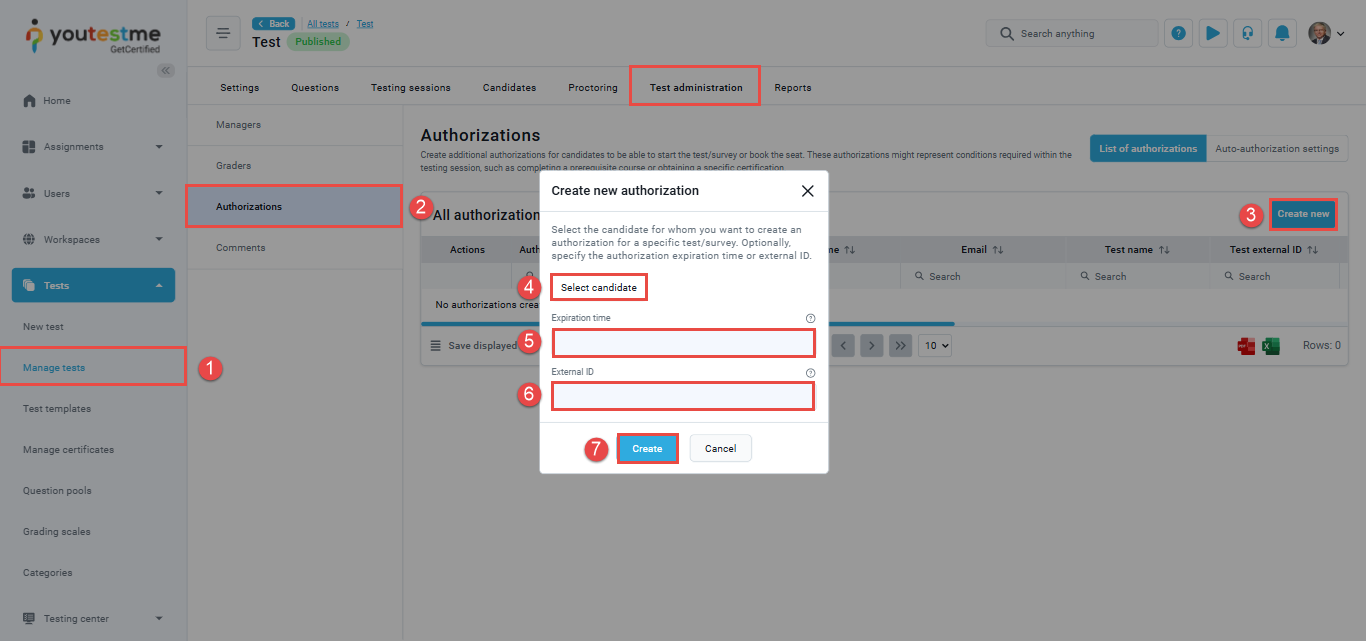
How to manually create an authorization from the Manage Tests module
You can manually create a test authorization directly from the page of a specific test. To do so, follow these steps:
- From the main menu, navigate to Tests, then select Manage Tests. Choose the desired test from the list.
- Go to the Test Administration tab and select the Authorizations option.
- Click the Create New button.
- In the Create New Authorization dialog, click Select Candidate and choose the desired user.
- Set the Authorization Limit to define the expiration date for the authorization.
- Enter an External ID if needed for system integrations.
- Click Create to finalize the authorization.
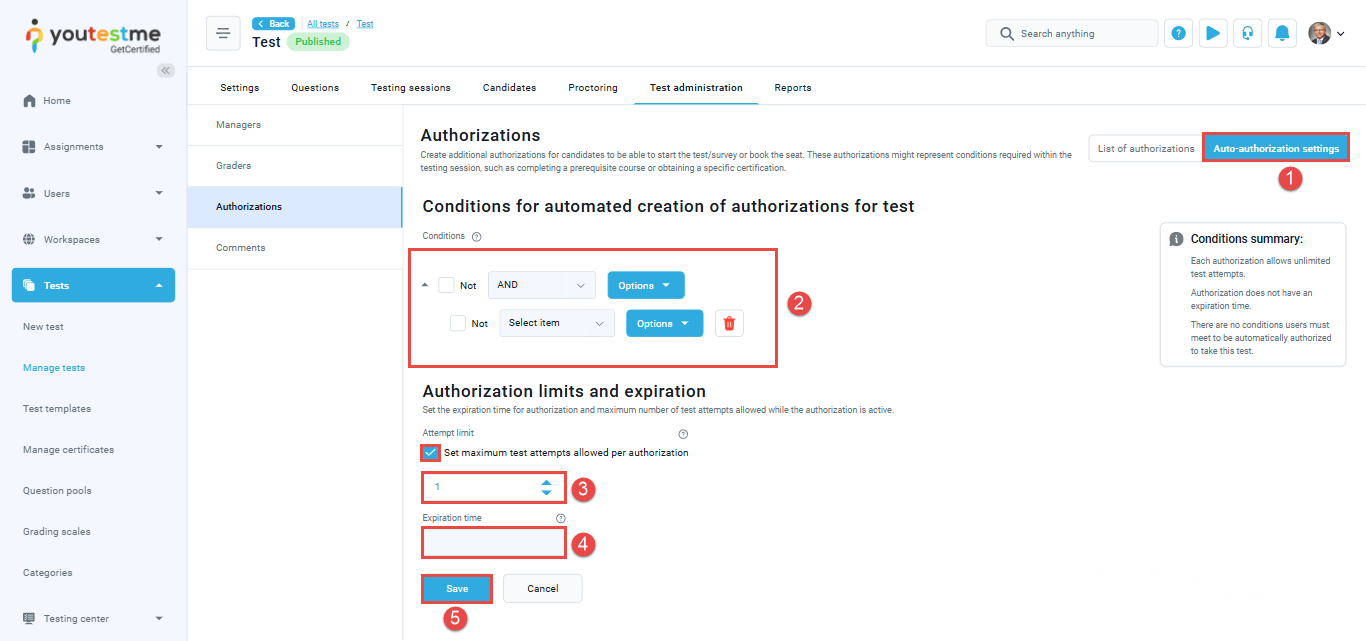
How to create automatic authorization
You can configure automatic test authorizations to ensure that only users who meet specific conditions gain access to a test. To set this up, follow these steps:
- From the Authorizations tab of the selected test, navigate to the Auto-authorization settings option.
- Define the conditions that users must meet to be automatically authorized for the test.
- Specify the number of times a candidate can use the same authorization to take the test. If left unset, candidates will have unlimited attempts with the same authorization.
- Set the expiration date for the authorization. After this date, the candidate will no longer be able to access the test using that authorization.
- Click Save to apply the settings.
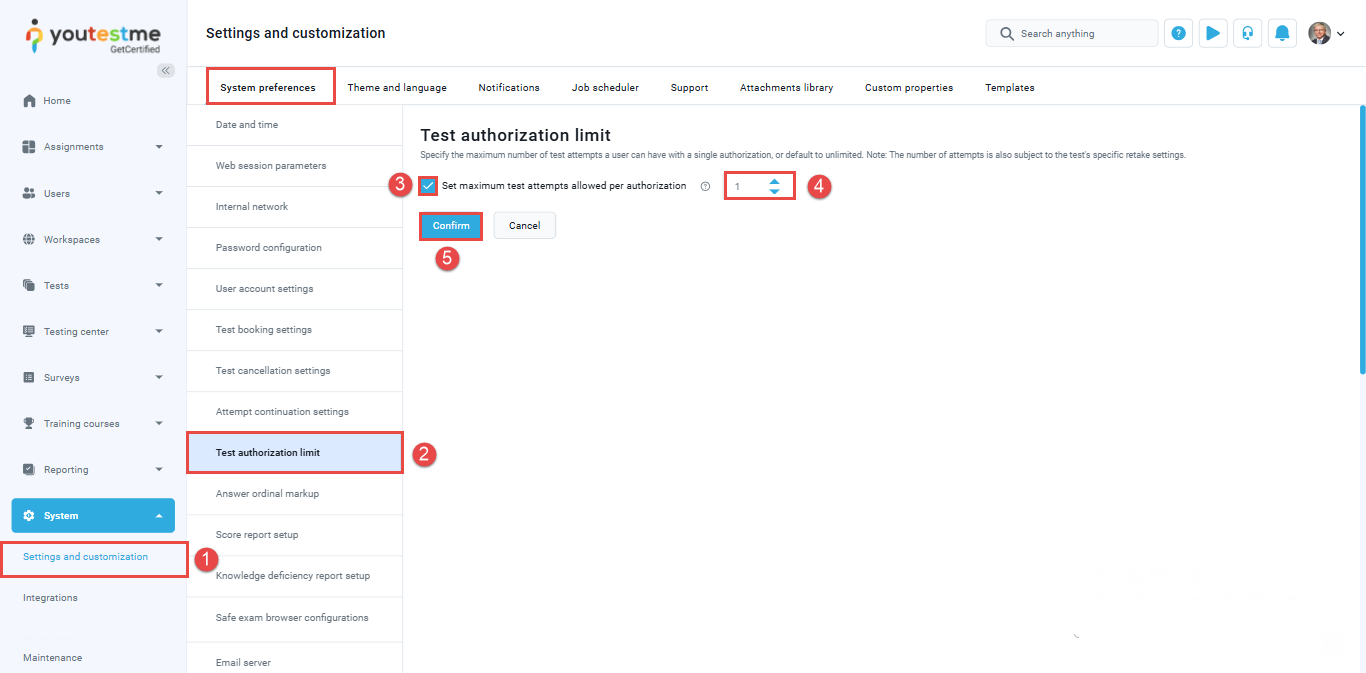
How to set the authorization limit settings
To specify the maximum number of test attempts a user can have with a single authorization, follow these steps:
- From the main menu, navigate to System, then select Settings and Customization.
- Under System Preferences, go to Test Authorization Limit.
- Check the box labeled Set maximum test attempts allowed per authorization.
- Enter the desired attempt limit in the provided field.
- Click Confirm to save your changes.
Note: If the box is unchecked, users will have unlimited attempts with the authorization.
How to create and manage authorizations from the testing center
In addition to managing authorizations from the Manage Tests module, administrators with access to the Testing Center can also create and manage test authorizations here. The Testing Center offers a dedicated interface for viewing all authorizations in a list format and performing actions such as rescheduling attempts, editing, or deactivating authorizations.
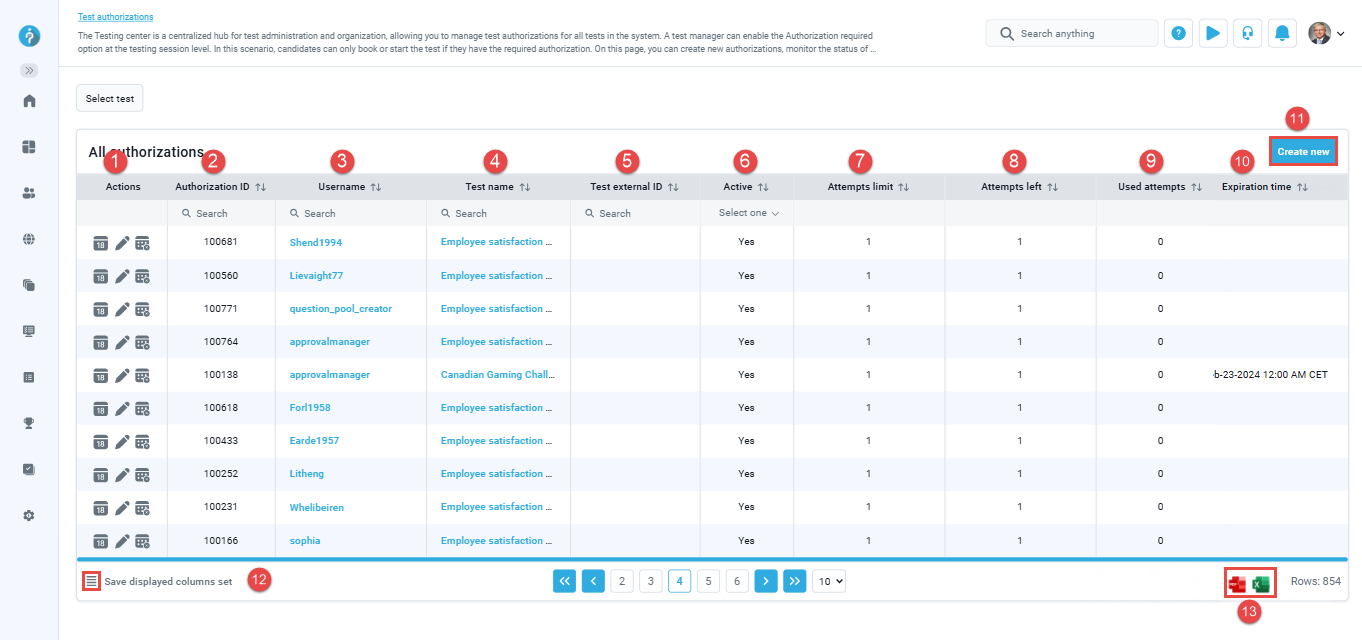
List of Authorizations – Table View
From the main menu, select Testing Center and navigate to the Test Authorizations sub-menu. Here, you will see a table listing all current authorizations, which includes the following columns:
- Actions – From the Actions column, you can perform the following:
- Reschedule Testing Attempt – Assign the user to a specific testing session. If there’s an existing attempt linked to this authorization, it will be suspended and replaced by a new one.
- Edit – Adjust the authorization’s expiration date.
- Deactivate – Set the authorization status to inactive, preventing the user from accessing the test, even if the expiration date hasn’t passed and attempts are still available.
- Authorization ID – Automatically generated when the authorization is created and cannot be edited.
- Username – Displays the username of the authorized candidate.
- Test Name – The name of the test the user is authorized to take.
- Test External ID – The external identifier used for integration with other systems.
- Active – Indicates whether the authorization is currently valid. It remains active if:
- The expiration date hasn’t passed,
- Attempts are still available,
- The authorization hasn’t been manually deactivated.
If any of these conditions are not met, a new authorization is required.
- Attempts Limit – The maximum number of test attempts allowed under the authorization.
- Attempts Left – The number of test attempts the user still has available.
- Used Attempts – The total number of attempts already made using this authorization.
- Expiration Time – The time limit for using the authorization. If no expiration is set, the authorization remains valid indefinitely.
- Create New – Click this button to create a new authorization.
- Table Settings – Allows you to choose which columns are displayed in the table.
- Download Options – Enables you to download the authorization list in PDF or Excel format.
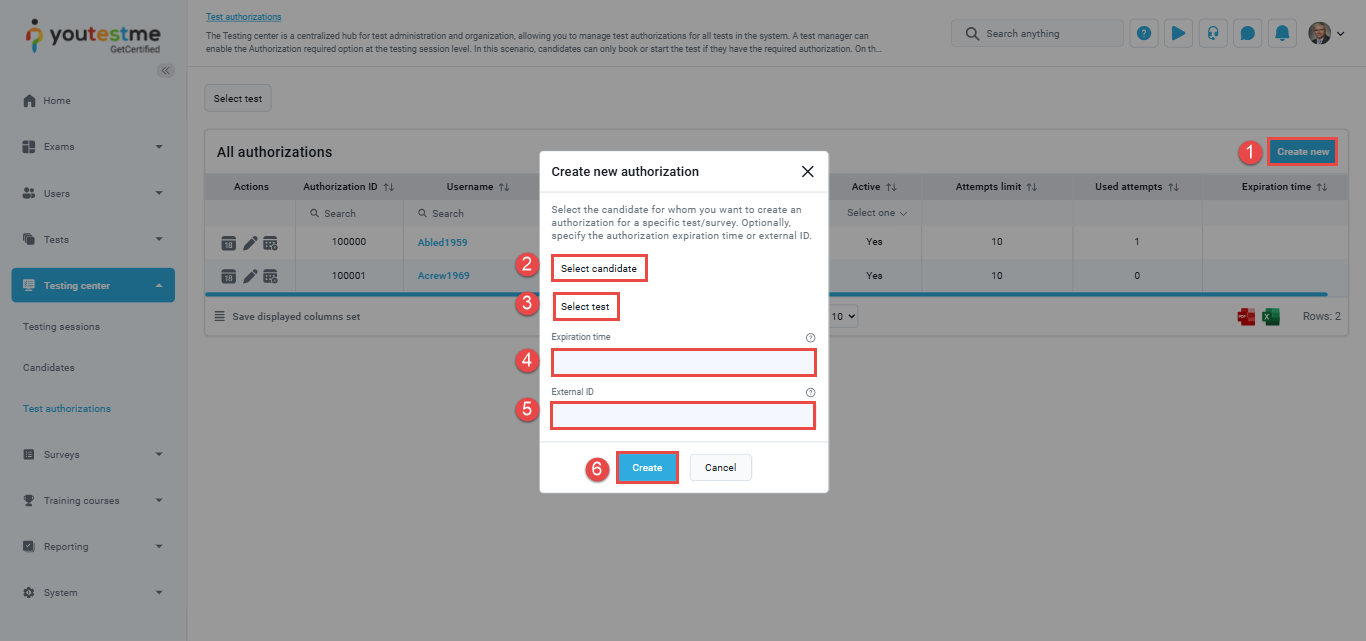
How to Create an Authorization from the Testing Center
In addition to viewing and editing existing entries, the list view provides quick access to create new authorizations for candidates.
- Click Create New.
- In the Create Authorization dialog, click Select Candidate and choose the desired candidate.
- Click Select Test to choose the test you want to authorize.
- Set the Expiration Date to define how long the candidate is authorized to take the test.
- Enter an External ID, which serves as a unique identifier for integration with external systems.
- Click Create to finalize the authorization.
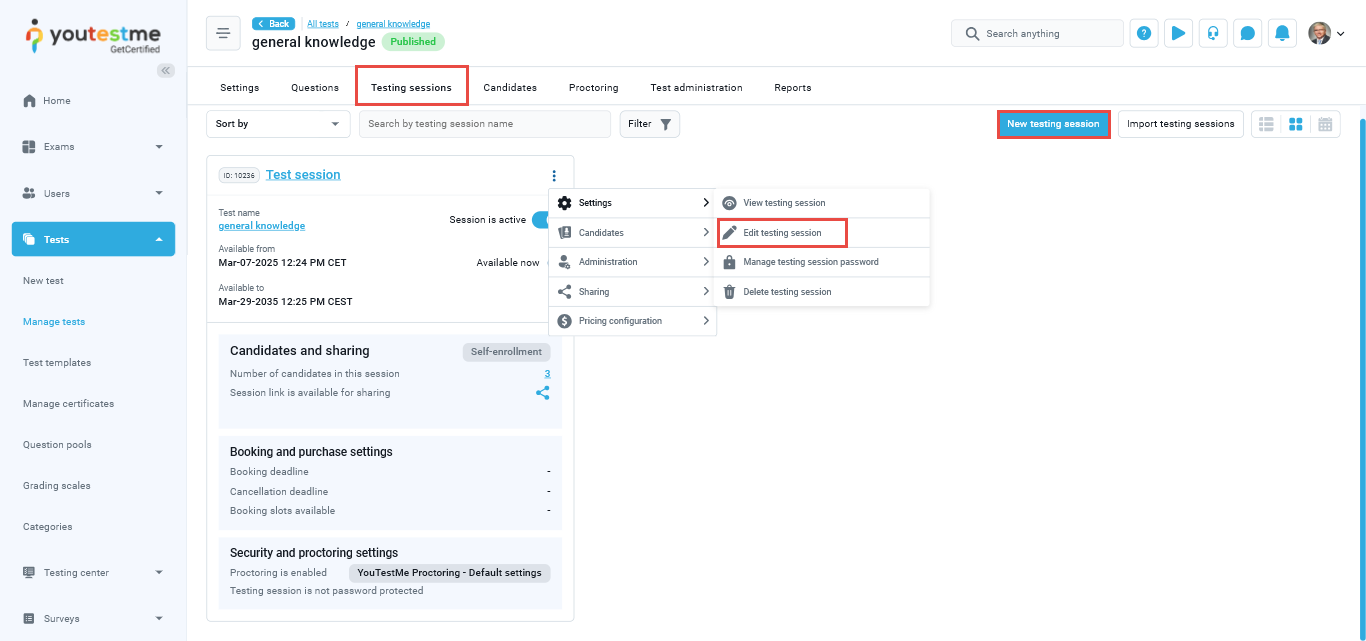
How to Create a Testing Session Requiring Authorization
After creating authorizations for your chosen candidates, locate the test associated with the authorizations and open the Testing Sessions tab.
- Click New Testing Session to create a new session, or Edit Testing Session if you want to modify an existing one.
- During the session setup, in the Candidate section, check the box labeled “Required authorization”, then click Save.
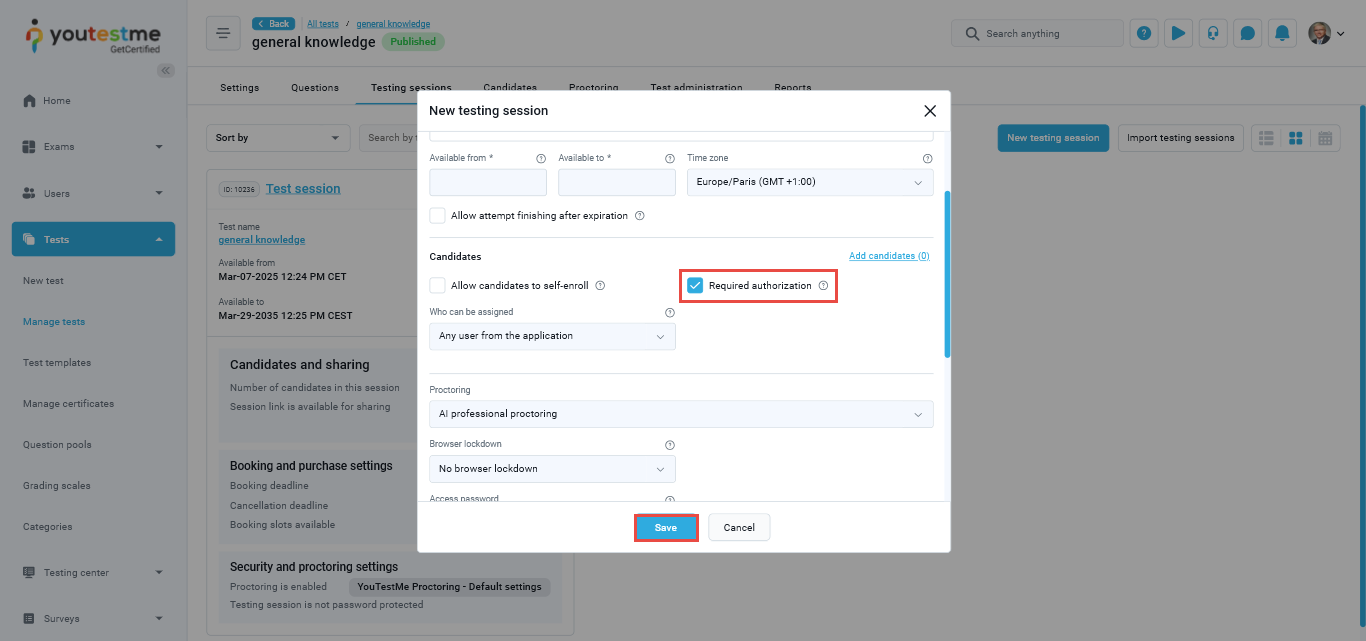
Once enabled, only authorized users will be able to find and start the test from the My Tests page. Users without authorization will not see the test listed.
Authorization status
There are two possible statuses for test authorizations:
Active – An authorization is considered active if it has been successfully created and the candidate has not yet used it. This means the candidate is currently authorized to take the test.
Note: Each candidate can only have one active authorization for a given test at a time.
Inactive – An authorization becomes inactive in any of the following cases:
- The manager manually deactivates it.
- The candidate has already used the authorization to take the test (if an attempt limit was set).
- The authorization has expired because the candidate did not take the test before the specified expiration date.
Conclusion
Enabling test authorizations within the YouTestMe system allows for secure and streamlined testing by ensuring that only authorized candidates can book testing sessions, thus preventing unauthorized access and maintaining the integrity of the testing process.
For more instructional materials on related topics, please read the following articles:


