
Article verified for Release 16.1 on March 16, 2026.
This article explains creating a test proctored with Proctorio, an automated proctoring tool integrated with YouTestMe GetCertified. This integration ensures the total learning integrity of every assessment using state-of-the-art technology. It eliminates human error, bias, and much of the expense associated with remote proctoring and identity verification. The system automatically monitors the test attempt using behavioral trackers and records the entire process, marking the moments of suspicious behaviors. Once the exam is finished, the system stores the footage for subsequent human review and validation.
Configuring Proctorio Server Settings
Before creating a test, you should customize the proctoring settings.
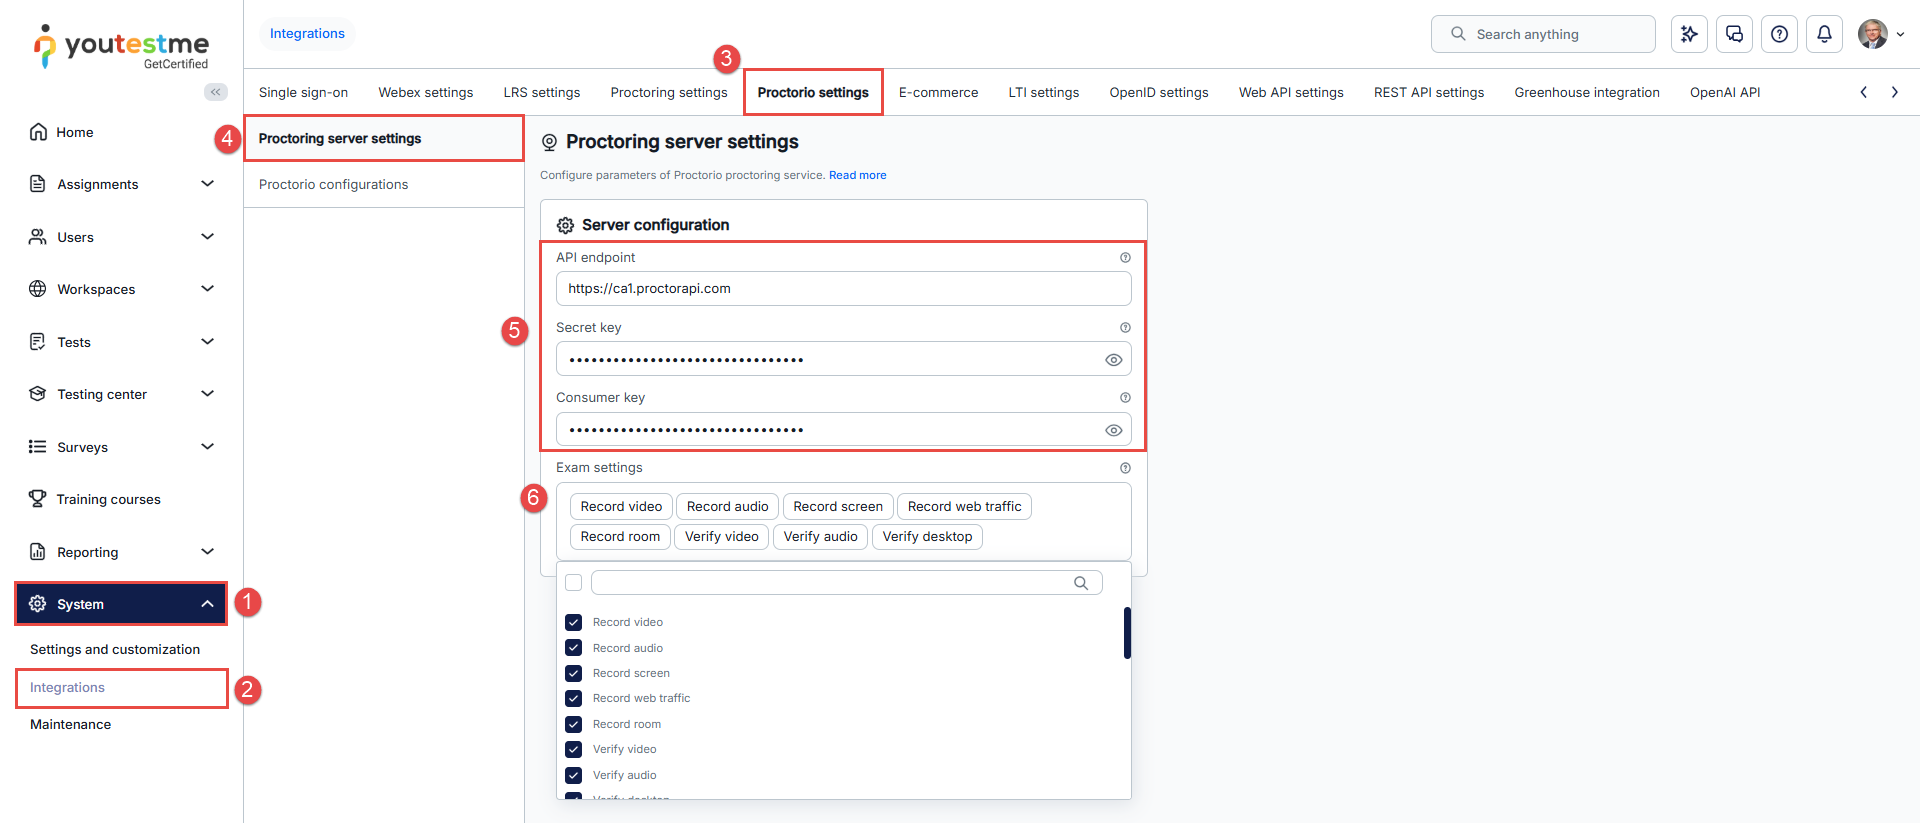
- From the main menu, choose System page.
- Select the Integrations tab.
- Navigate to the Proctorio settings tab.
- Select the Server settings option.
- API endpoint, Secret key & Consumer key are three integration parameters that should be filled in upon application delivery. If they are not, contact the YouTestMe support team.
- Click on the Exam settings field to select the desired settings for your proctored exam. Check the box for any desired configuration that you want to add. Options such as Record video, Record audio, and Record screen should always be turned on. We recommend turning on the Clipboard, Close tabs, One screen, Print, and Right-click for stronger cheating prevention. Enable Full screen, Verify ID, and Record room for even higher security. After adding the desired exam settings, confirm the changes.
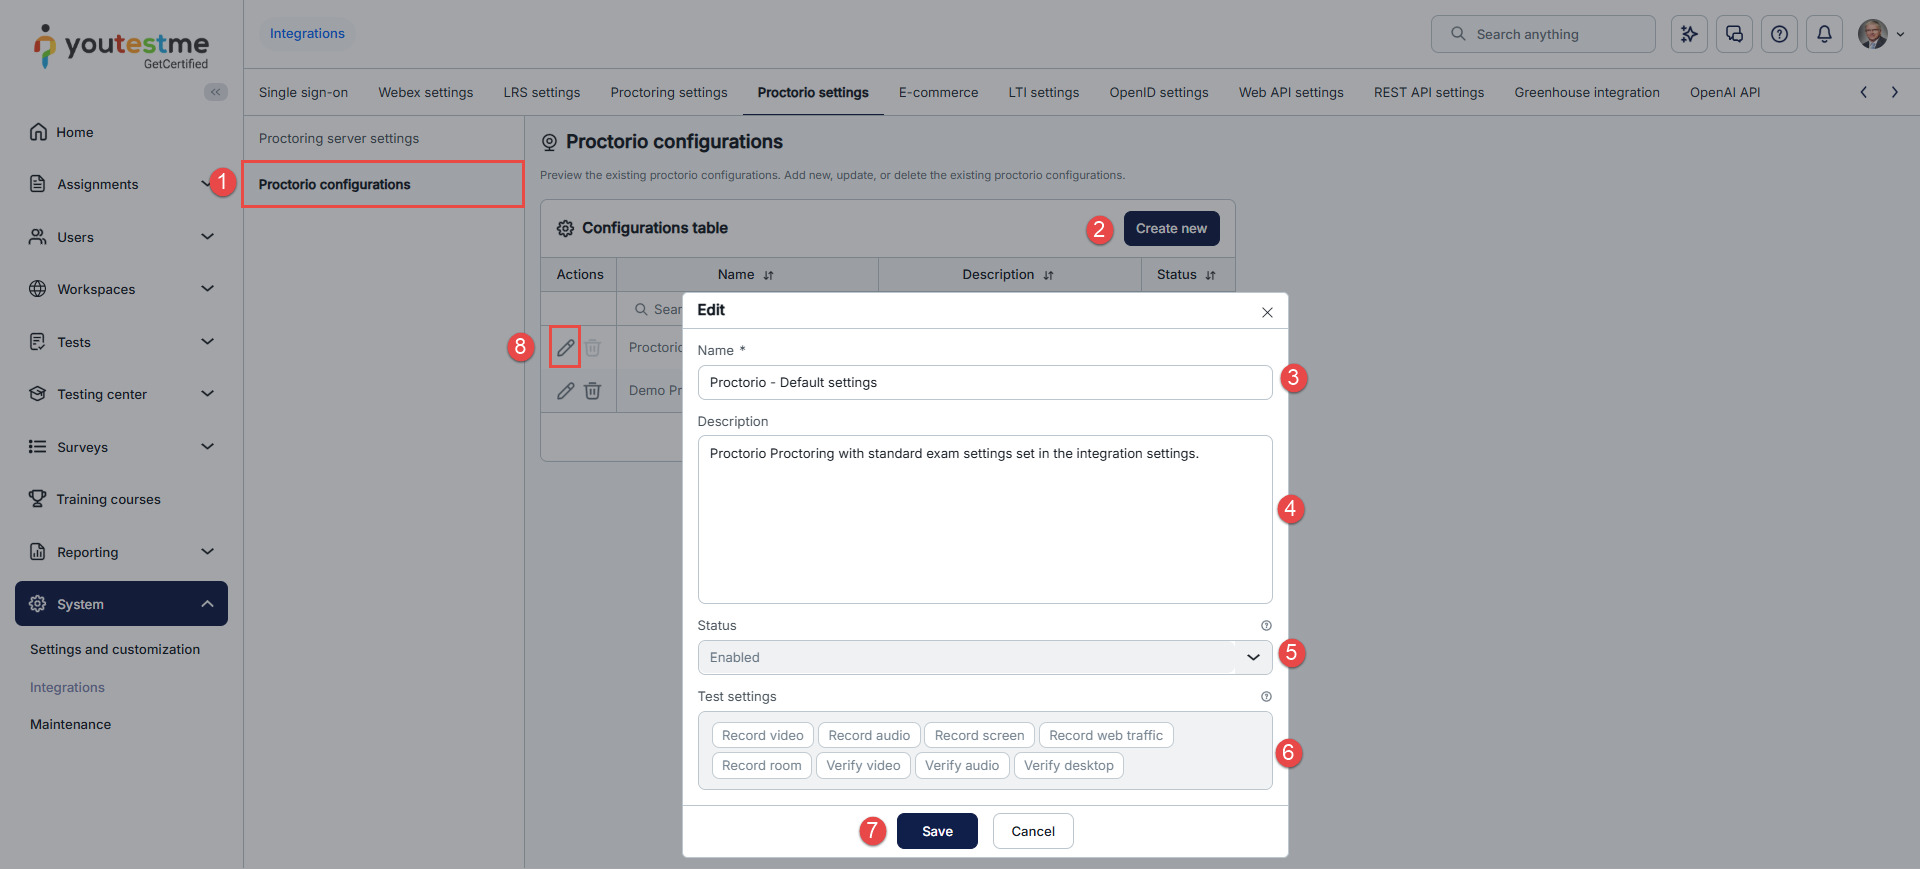
Proctorio Configurations
- Navigate to the Configurations tab. You will find a table on the Configurations tab displaying all Proctorio configurations. The table includes information such as configuration names, descriptions, and statuses.
- Click on the Create new button to create a new Proctorio configuration.
- Enter the name of the new configuration.
- Optionally add a description.
- Select the status of the configuration. The configuration can be used in the test if the status is Enabled.
- Click on the Exam settings field to choose the desired settings for your proctored exam.
- Click on the Save button to add the new Proctorio configuration to your configurations list.
- After creating a configuration, you can update it by selecting the Edit option.
Proctorio Add-ons Overview
Proctorio offers a variety of add-ons to enhance exam security and ensure academic integrity. Each add-on focuses on a specific aspect of monitoring or preventing unauthorized behavior during the test. Below is a brief introduction to each available add-on:
Verification Options:
- Verify ID auto – Automatically captures and analyzes the test-taker’s ID photo for identity verification before the exam starts.
- Verify ID live – Requires a live identity check using the webcam to match the test-taker’s face with their ID in real time.
- Verify signature – Prompts the user to provide a digital signature to confirm test ownership and authenticity.
Display & Full-Screen Options
- Full screen lenient – Allows mild tolerance for leaving full screen; minimal warning triggers.
- Full screen moderate – Balanced full-screen enforcement; occasional exits are flagged.
- Full screen severe – Strict mode; any exit from full screen is immediately flagged or blocked
- One screen – Restricts the session to a single monitor, blocking or flagging external or secondary displays.
Browser Control
- Clipboard – Disables copying or pasting during the exam to prevent sharing of content.
- No tabs – Prevents opening additional browser tabs while the test is active.
- Links only – Allows only preapproved or embedded links within the test interface.
- Close tabs – Automatically closes any open browser tabs unrelated to the exam session.
- Cache – Manages or clears browser cache to prevent local saving of test materials.
Recording & Monitoring
- Record video – Captures a continuous webcam video feed of the test-taker during the exam to monitor for suspicious activity.
- Record audio – Captures audio from the test-taker’s environment to detect background conversations or noise.
- Record screen – Records the test-taker’s on-screen activity throughout the session.
- Record web traffic – Monitors and logs web activity during the test to detect attempts to access unauthorized sites.
- Record room – Enables periodic or on-demand snapshots of the surrounding room environment to confirm the test-taker is alone.
- Verify video – Ensures the webcam is functioning correctly and that the test-taker’s face is visible before the session begins.
- Verify audio – Ensures the microphone is active and functioning properly before and during the session.
- Verify desktop – Checks the active desktop environment for unauthorized applications or displays.
Printing & Downloads
- Print – Restricts or disables printing of test material.
- Prevent downloads – Blocks downloading of files or content during the exam.
Session Control
- Right click – Disables right-click context menus to prevent copying or inspecting page elements.
- No reentry – Prevents the test-taker from rejoining the session after leaving.
- Agent reentry – Allows reentry by an authorized proctoring agent for troubleshooting or review.
Calculators & Tools
- Basic calculator – Enables a simple arithmetic calculator within the test interface.
- Scientific calculator – Provides a scientific calculator with advanced functions for technical exams.
Live Session
- Live proctoring – Allows a proctor to monitor the candidate in real time during the exam and intervene if necessary. A full recording and report are available in the Proctorio Review Center.
Note: The Record Video and Verify Video settings must be enabled.
Note: Some Proctorio add-ons are interdependent and must be enabled together to ensure proper functionality. When activating any recording option, make sure all related verification features — such as Record Audio and Verify Audio — are also enabled to guarantee complete monitoring.
Only one full-screen enforcement level (Lenient, Moderate, or Severe) should be active at a time to prevent conflicts. Additionally, enabling a full-screen option requires turning on all Full Protection add-ons — including Clipboard, No Tabs, Close Tabs, One Screen, Right Click, Prevent Downloads, Cache, and Print — to maintain full lockdown and exam integrity.
Note: System-level configuration in YouTestMe GetCertified overrides Proctorio configuration settings. For example, if reentry is disabled in Proctorio but allowed in the application settings, the candidate will still be able to reenter the test.
Utilizing Proctorio Configuration in the Test
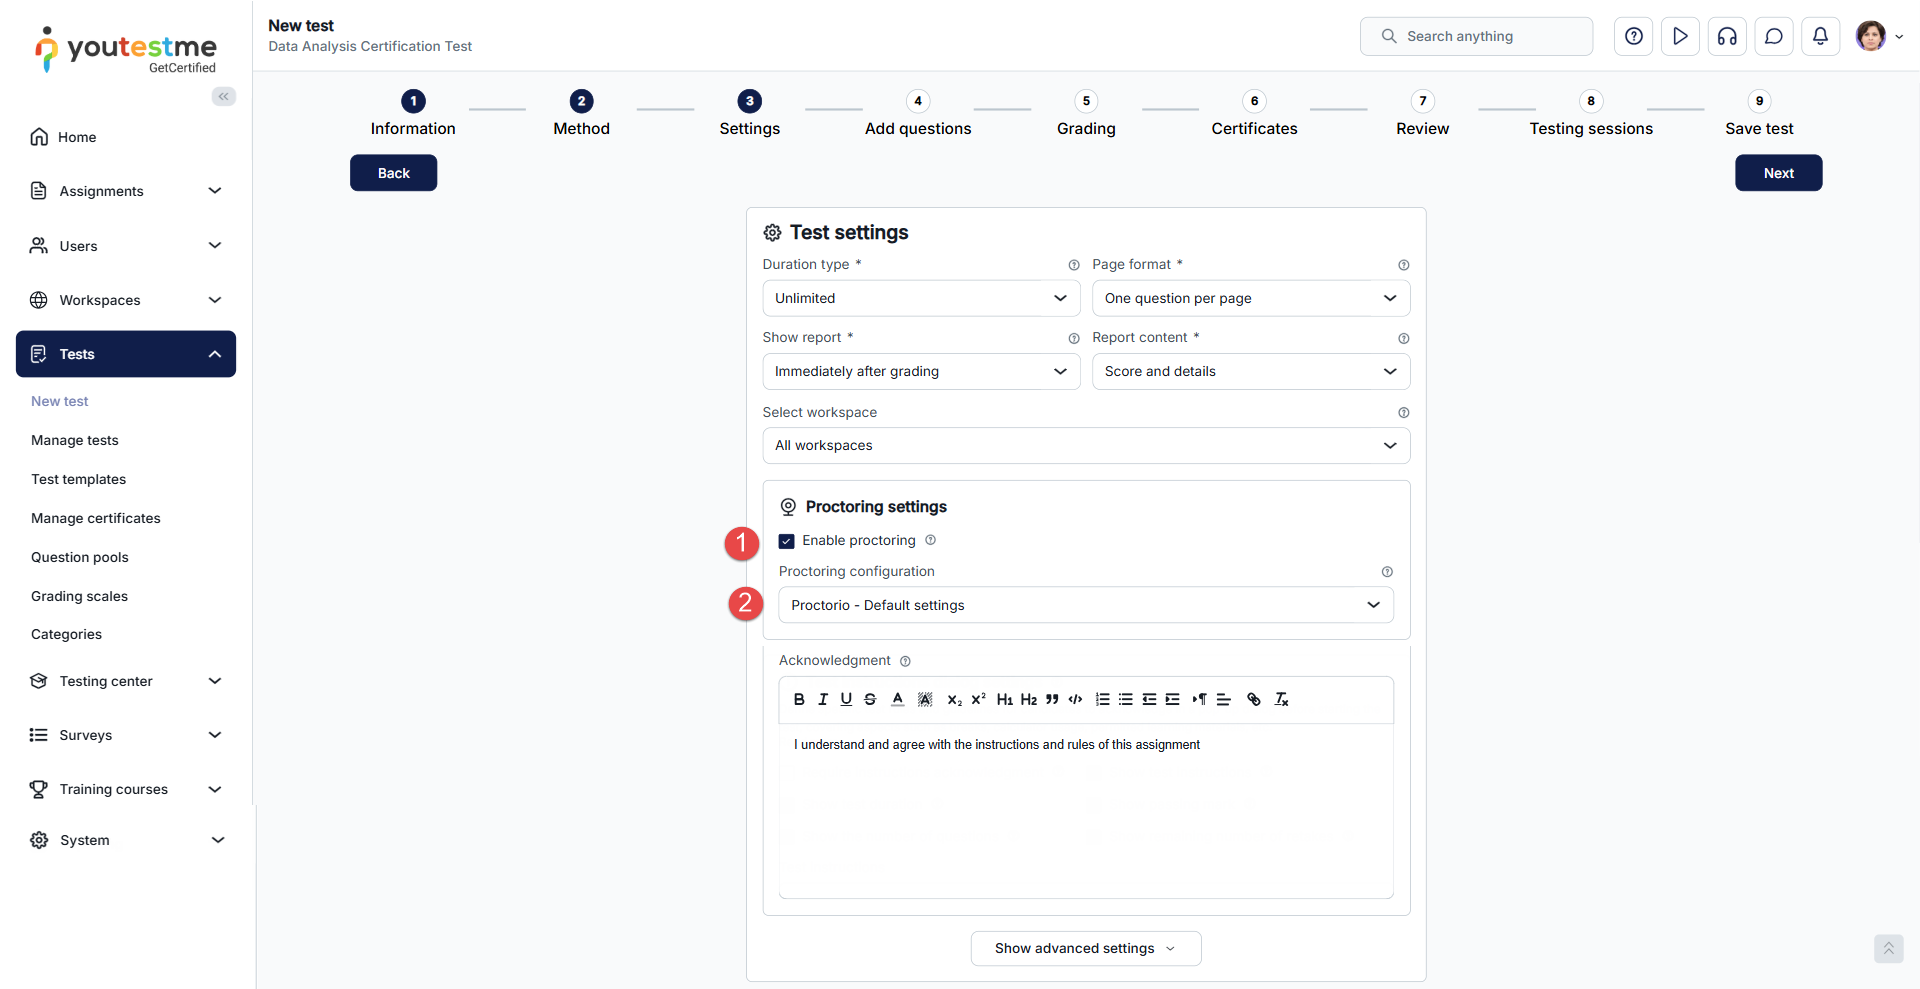
You can start creating a test as shown in the following article, and in the Settings tab, ensure to:
- Click on the Enable proctoring option.
- Select the desired Proctoring configuration.
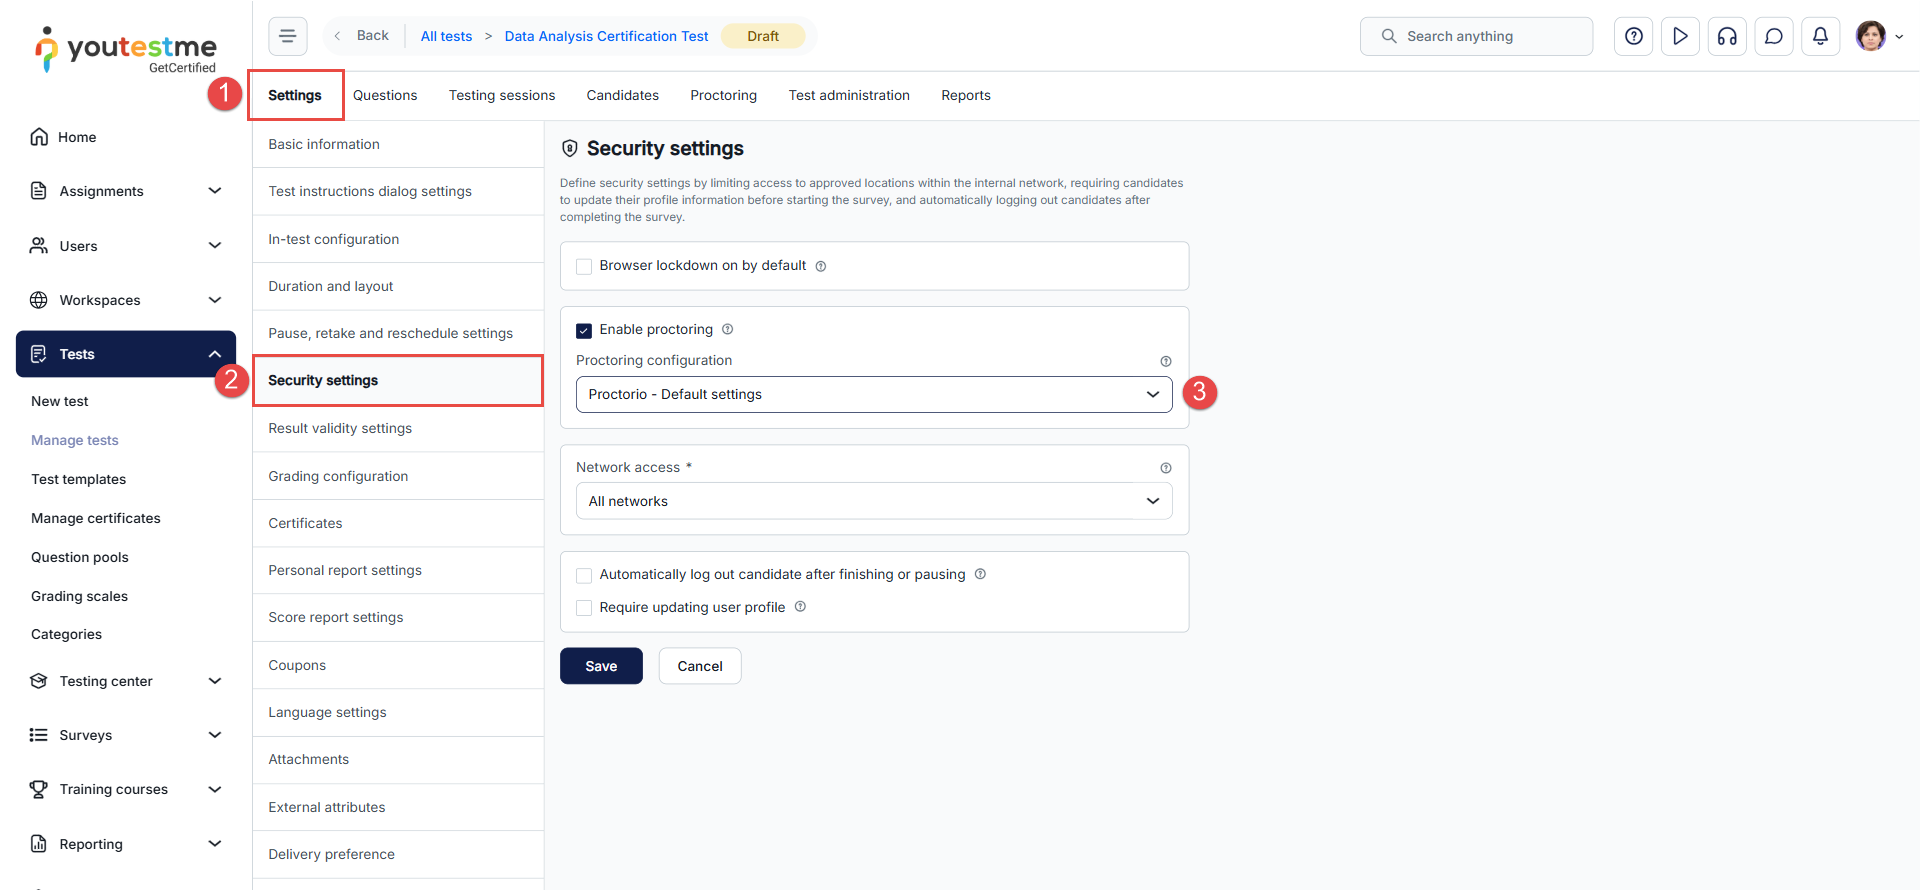
After finishing the test wizard creation and configuring the main test options, you also have the option to manage the Proctorio settings you previously established:
- Navigate to the Settings tab.
- Access Security Settings.
- Enable or disable proctoring. Select one of the existing configurations (if proctoring is enabled for the test).
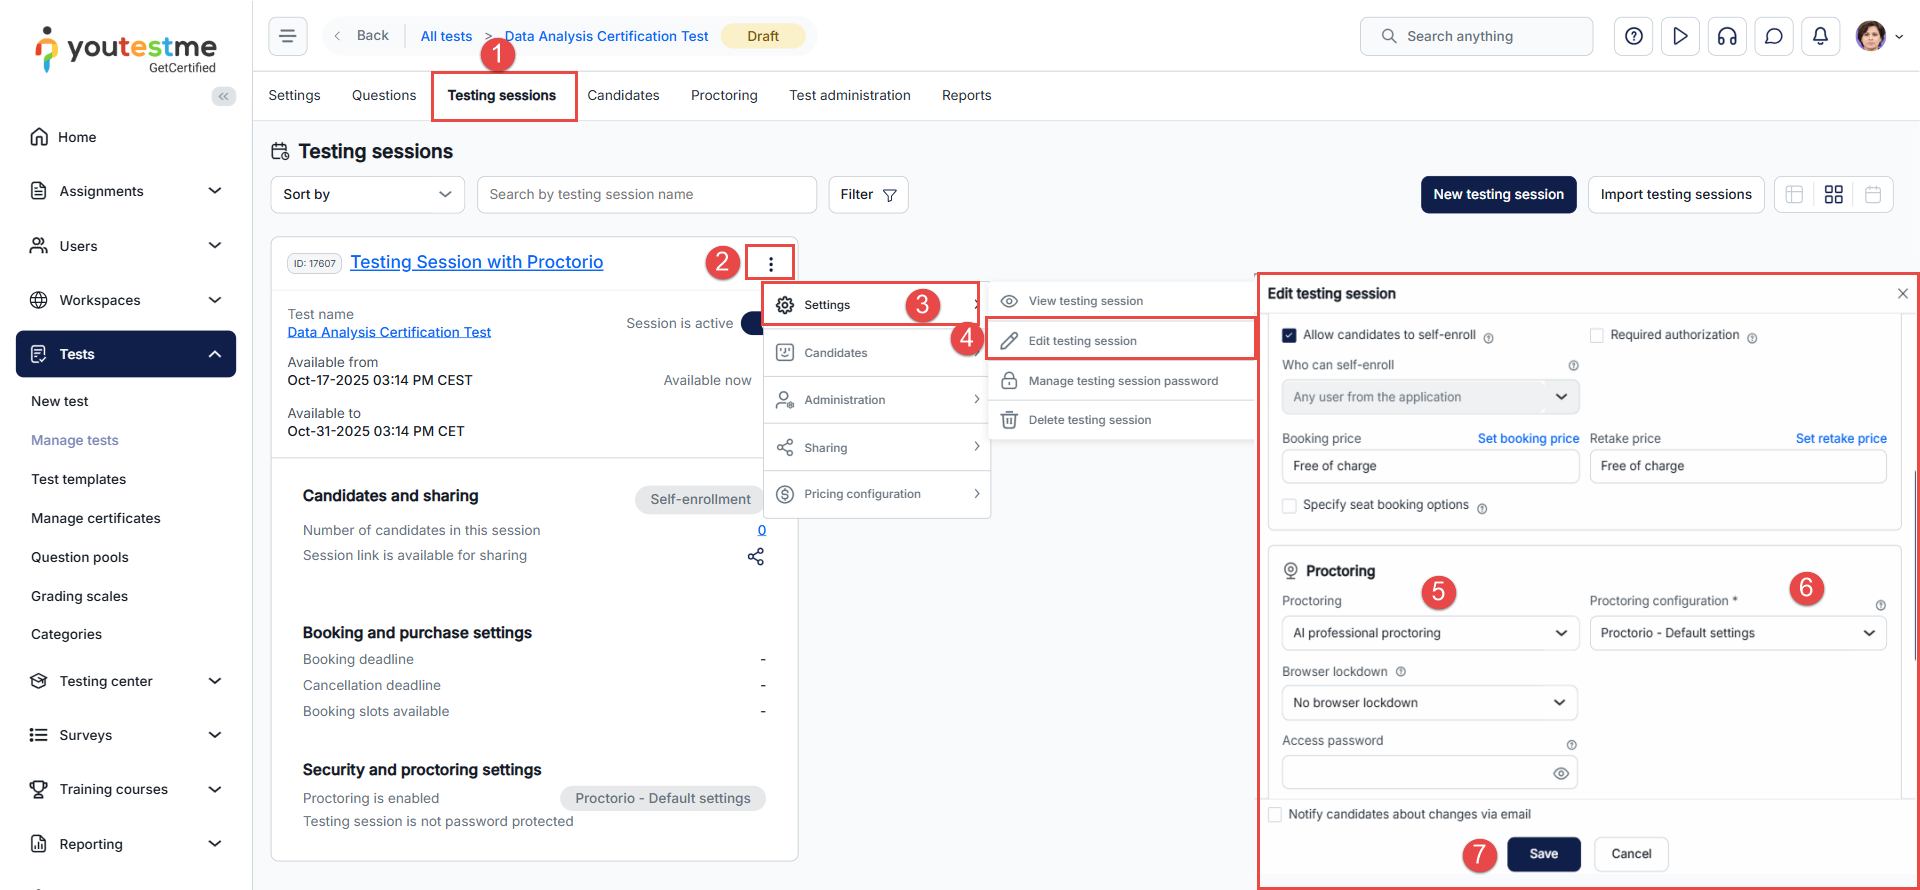
Configuring Proctoring at the Session Level
- Go to the Testing Sessions tab within the selected test to manage session settings.
- Click on the three-dot menu next to the specific testing session you want to configure.
- From the dropdown menu, choose Settings to adjust session details.
- Click on Edit testing session to open the session configuration panel.
- Select the AI Professional Proctoring from the Proctoring list.
- In the Proctoring configuration field, choose the appropriate proctoring configuration, such as Proctorio – Default settings.
- After making the necessary adjustments, click the Save button to apply the changes.
After the test is set up and sessions are created, publish the test.
Note: Proctorio and SEB are not compatible because both attempt to control the test environment in different, mutually exclusive ways. SEB blocks extensions such as the Proctorio Chrome/Edge extension, which is essential for Proctorio to function, as it enables access to the camera, microphone, screen, and activity monitoring during the test.
Candidate’s Perspective
The candidate can begin the assigned test by clicking on the Start button.

Upon starting, the candidate will first be directed to a page where they need to install the Proctorio extension if it is not already installed. 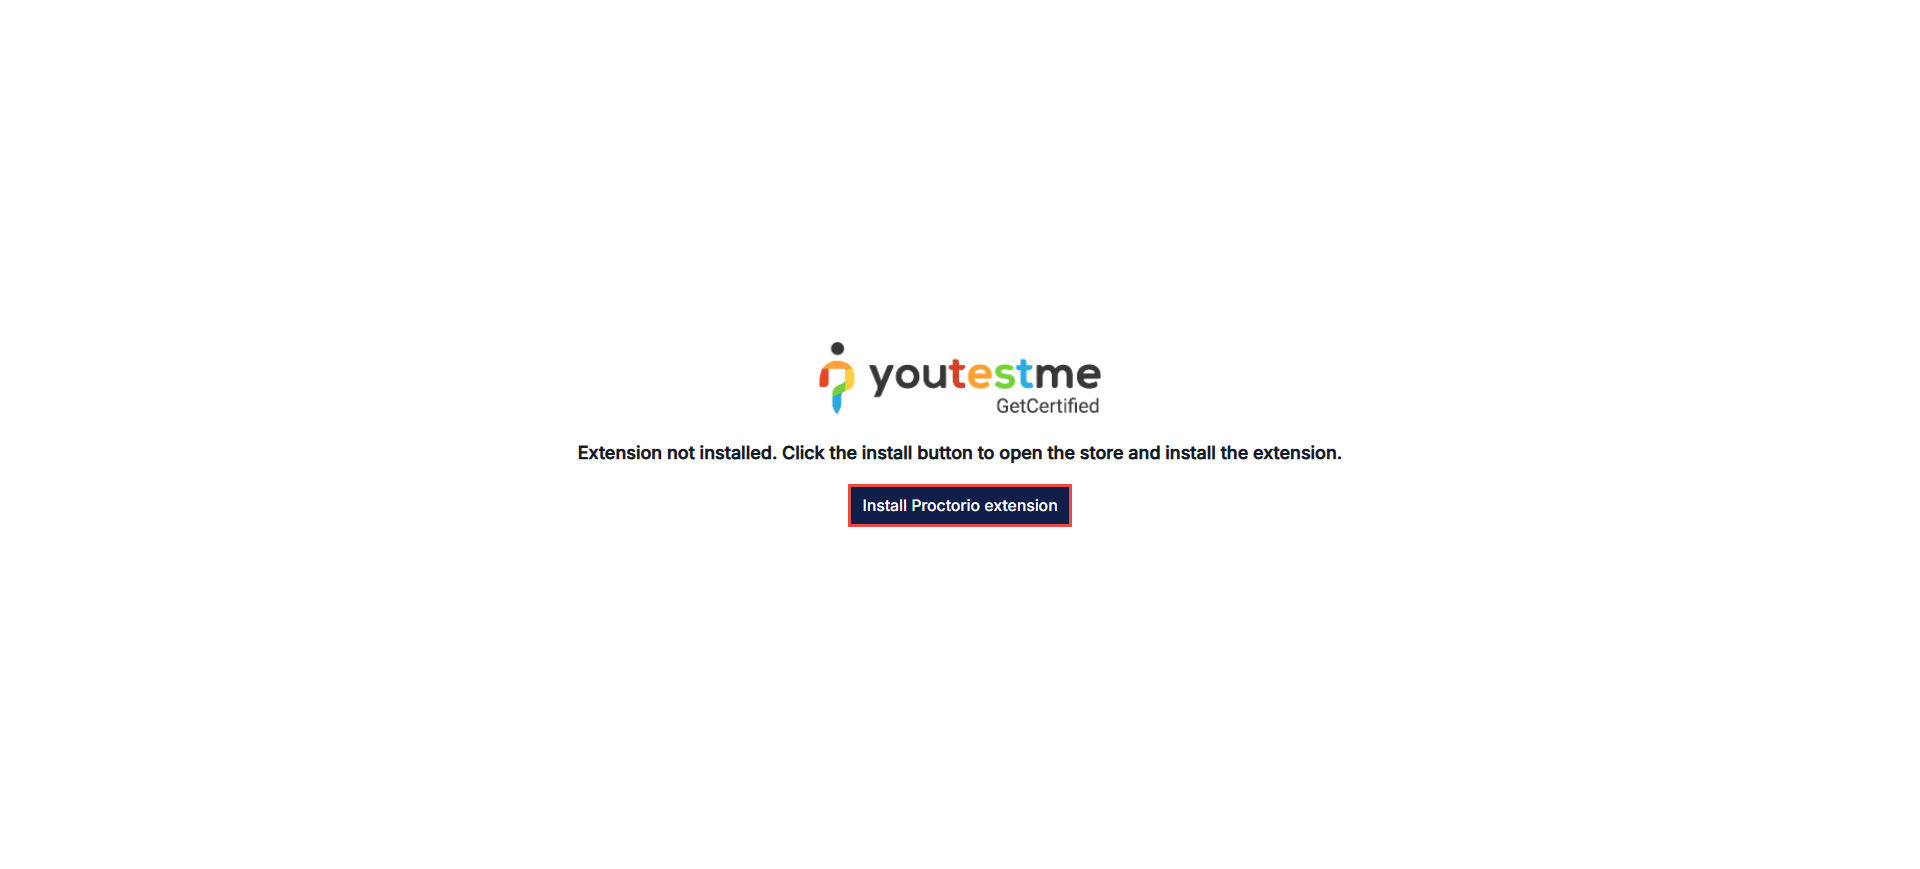
After completing the installation, they proceed to a page where they can:
- Learn what is recorded and restricted during the exam.
- Verify if any pre-exam actions are necessary. The candidate must follow these instructions to access the test.
- Click the Continue button after completing all the necessary preparations.

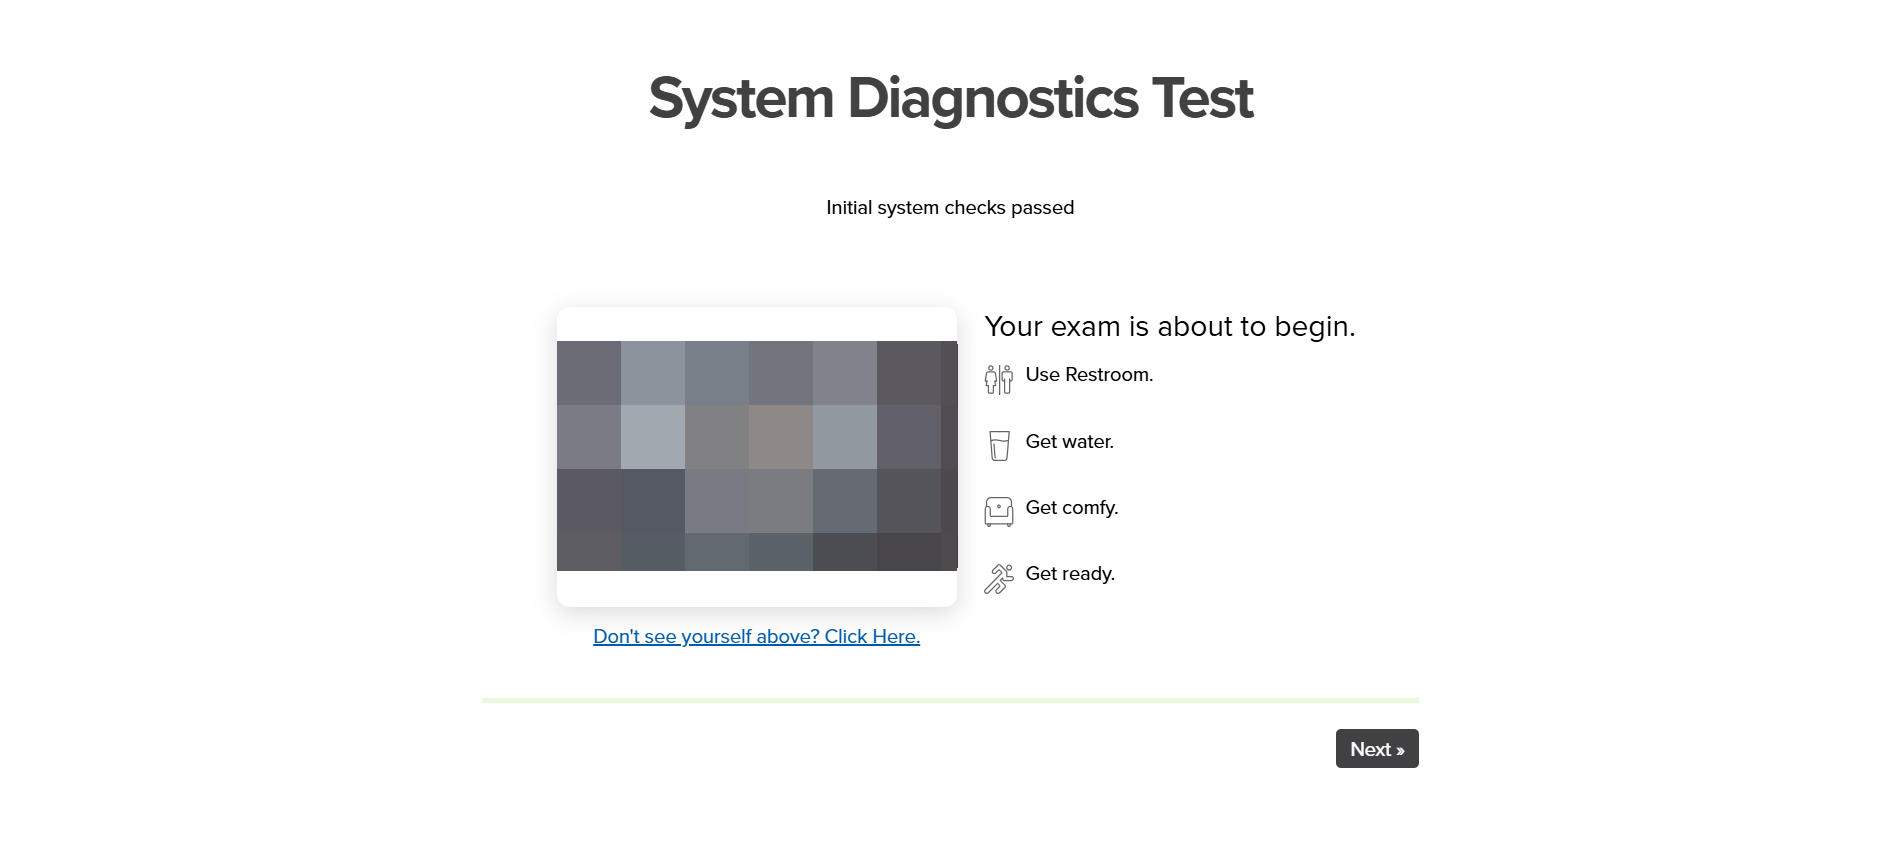
After that, the system check will commence, during which the candidate is required to share their entire screen.

If the initial system checks have passed, this window will appear.
The next step is a desk scan. The candidate will see a page explaining that their camera will be used to scan their desk environment, along with instructions on how to complete this step. After reviewing the instructions, the candidate must click the I Understand button to proceed.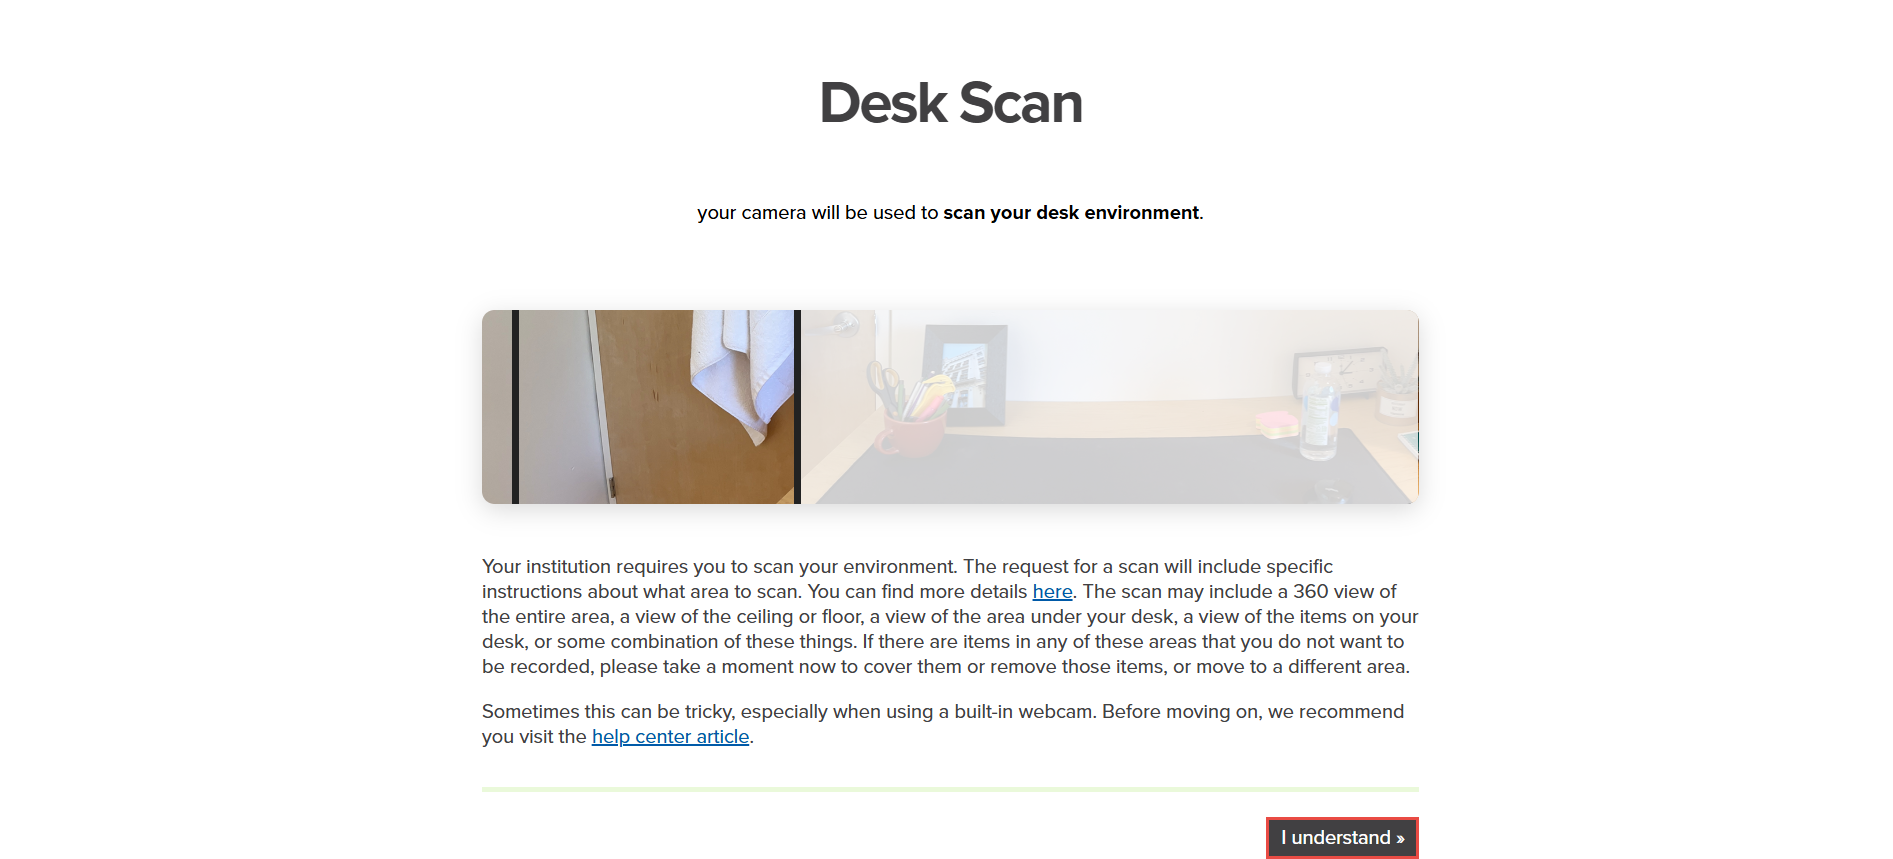
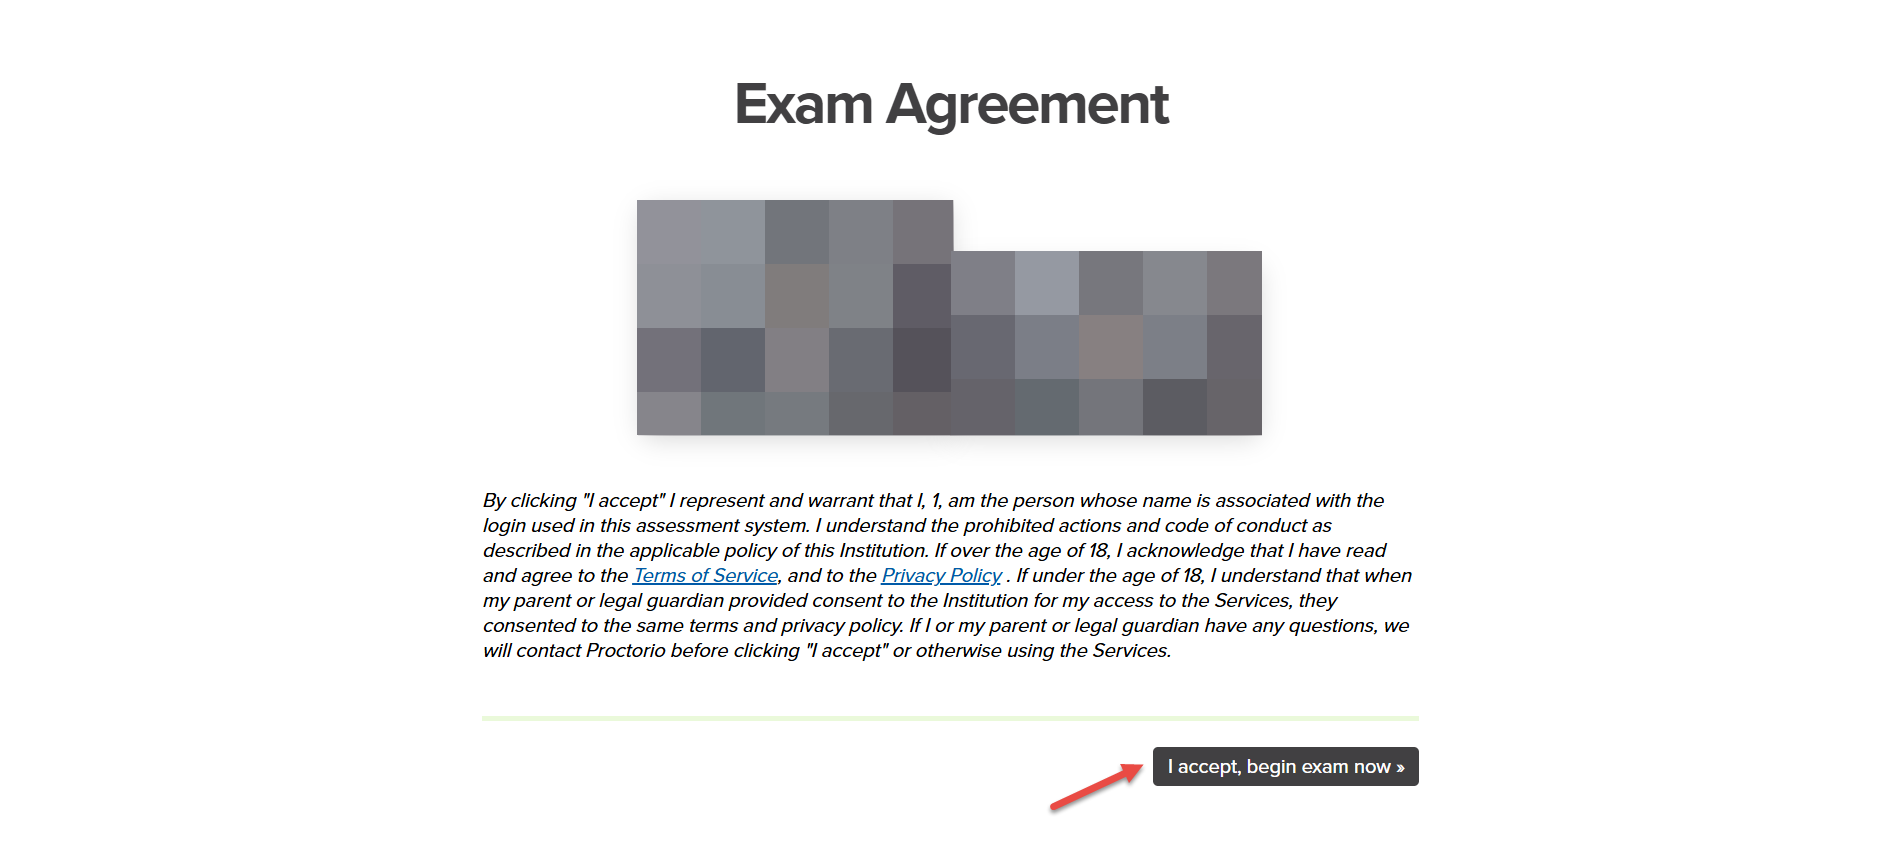
Following this, the candidate will be presented with the Exam Agreement.
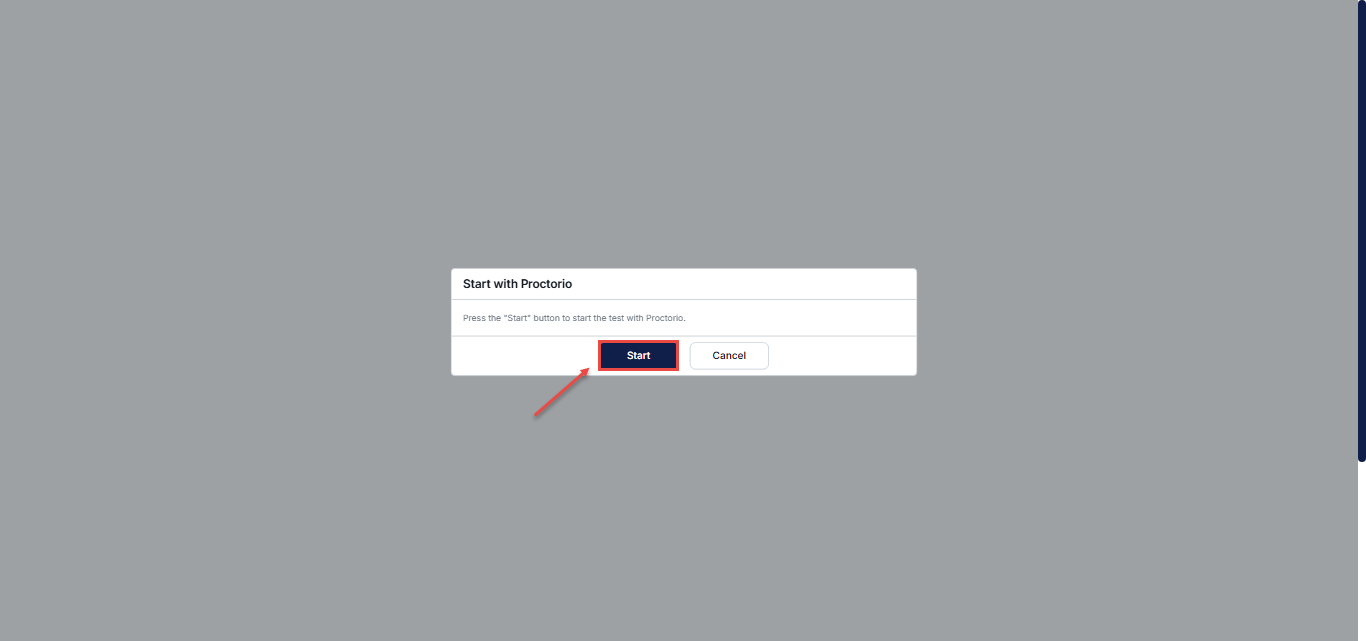
The candidate will be prompted to start the test.
Once inside the test, a window will appear prompting the candidate to begin the desk scan.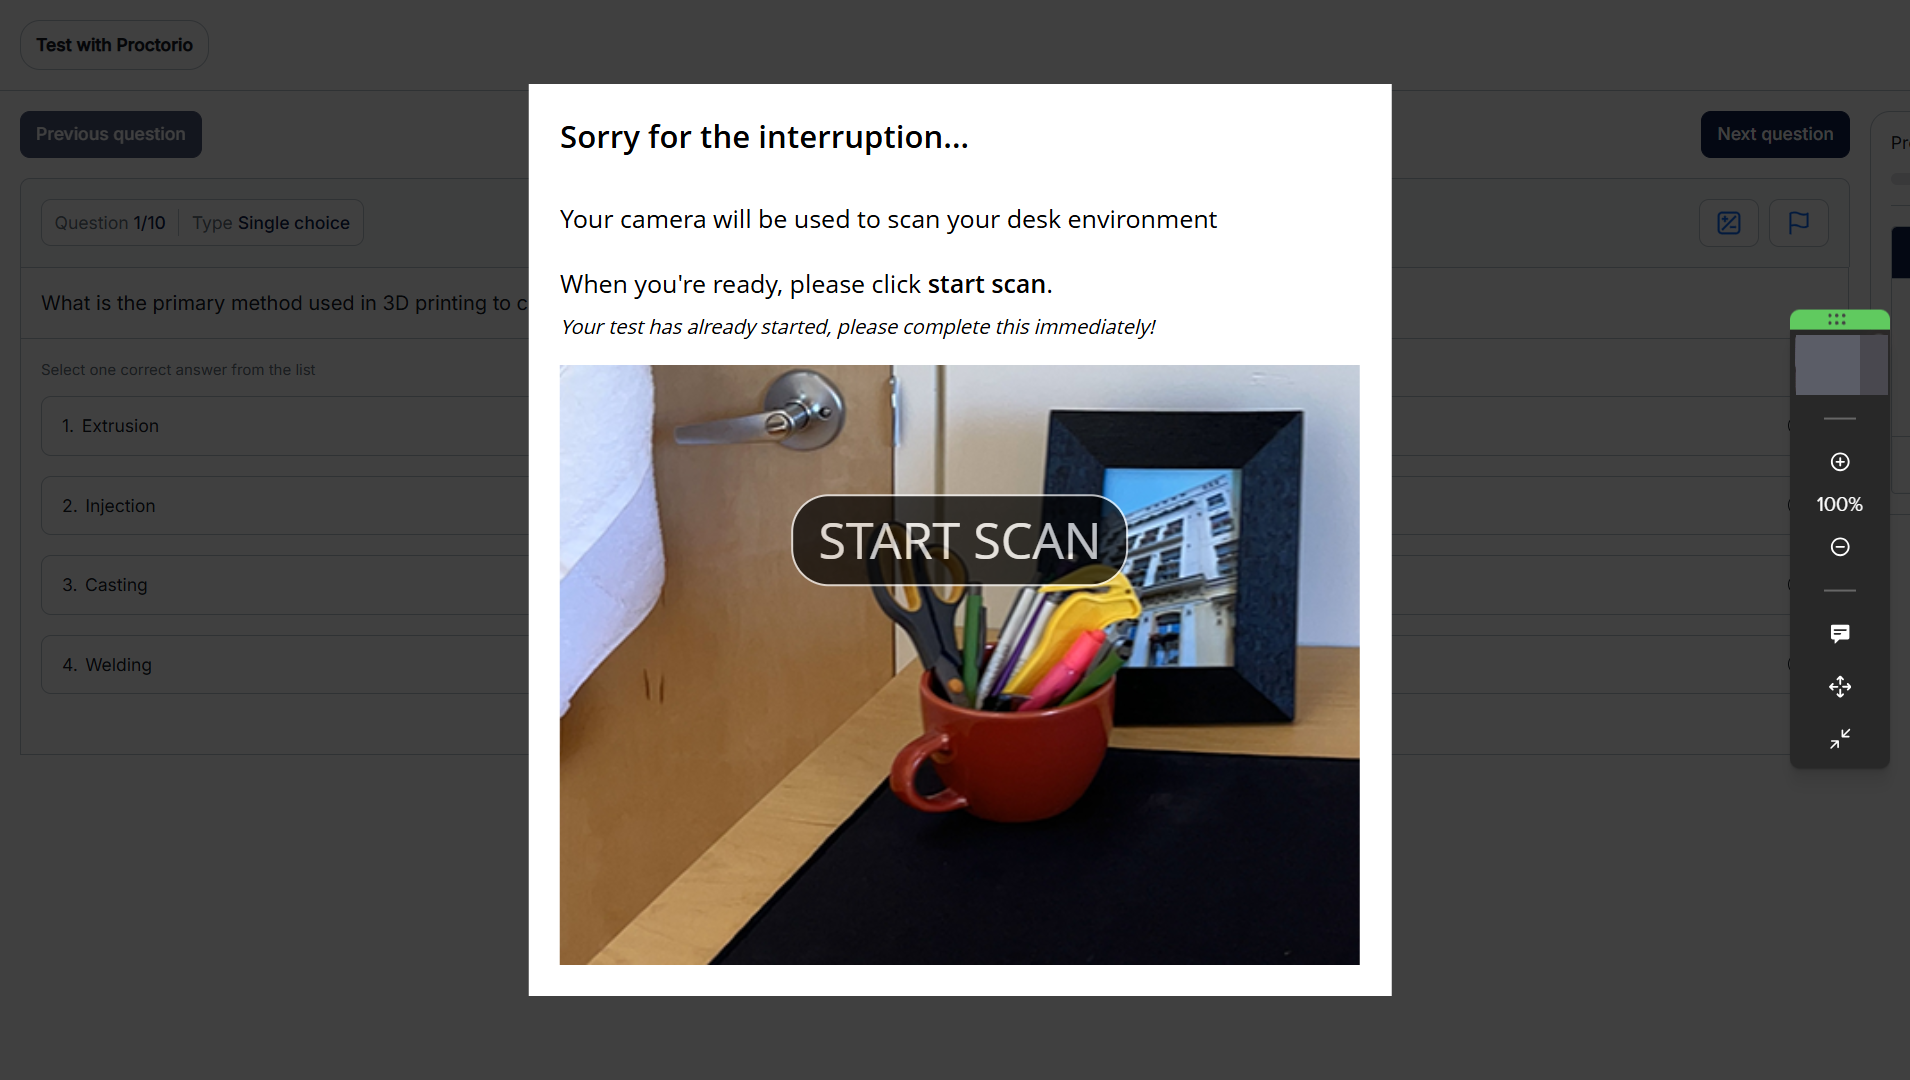
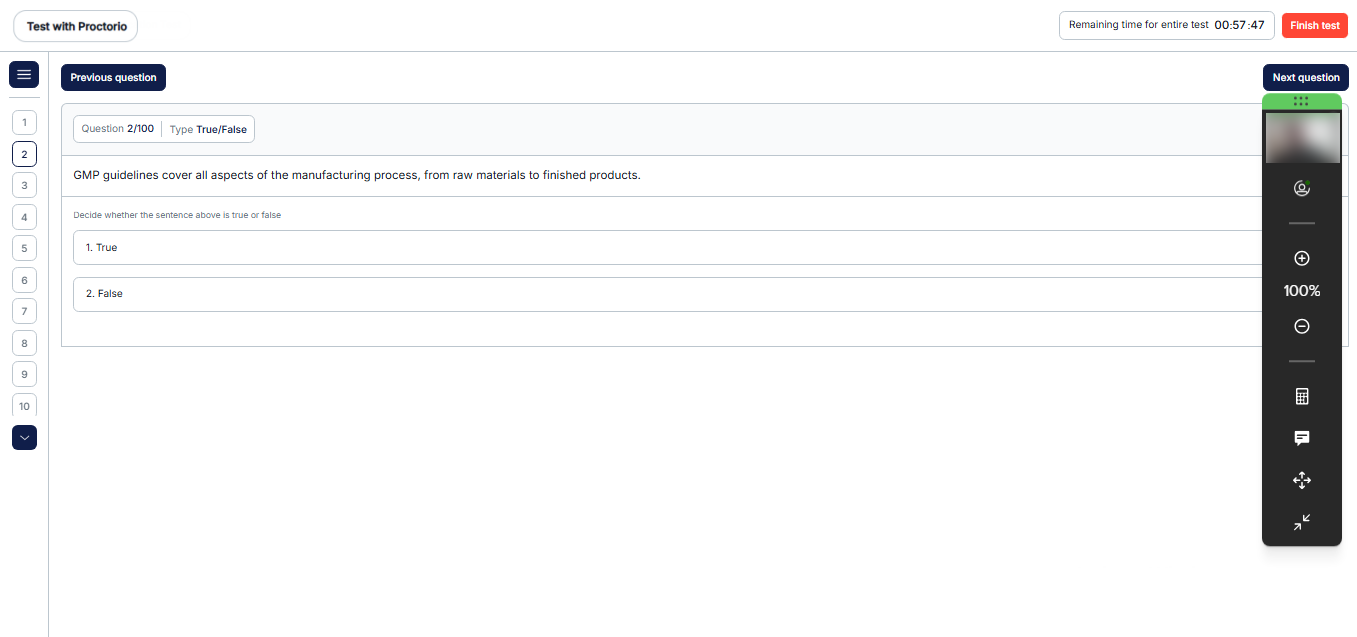
During the test, the candidate’s screen will be shared, and the candidate will be prevented from performing any restricted actions.
Minimum system requirements
Below are the minimum device requirements to ensure you have the best test-taking experience:

- Devices that are up to 10 years old
- Devices connected to public WiFi or your institution’s WiFi
- Devices connected to a mobile hotspot
- Devices connected to an Ethernet cable
- Devices connected to a WiFi extender
- External or internal webcams
- External or internal microphones
- Make sure you are using the latest version of the Proctorio extension and your internet browser.
- Try to update your operating system before starting the exam.
- Disable extra applications or extensions during your exam.
- Utilize an Ethernet cable for a secure internet connection.
For video instructions on how to create a test proctored by Proctorio, you may watch this video.
For more related instructional materials, please see:
