
Article verified for Release 15.0 on November 25, 2025.
This article explains how to review all testing sessions in the system, use filtering and display options, and export customized reports as Excel files. It also describes each visible column available in the Testing Sessions table.
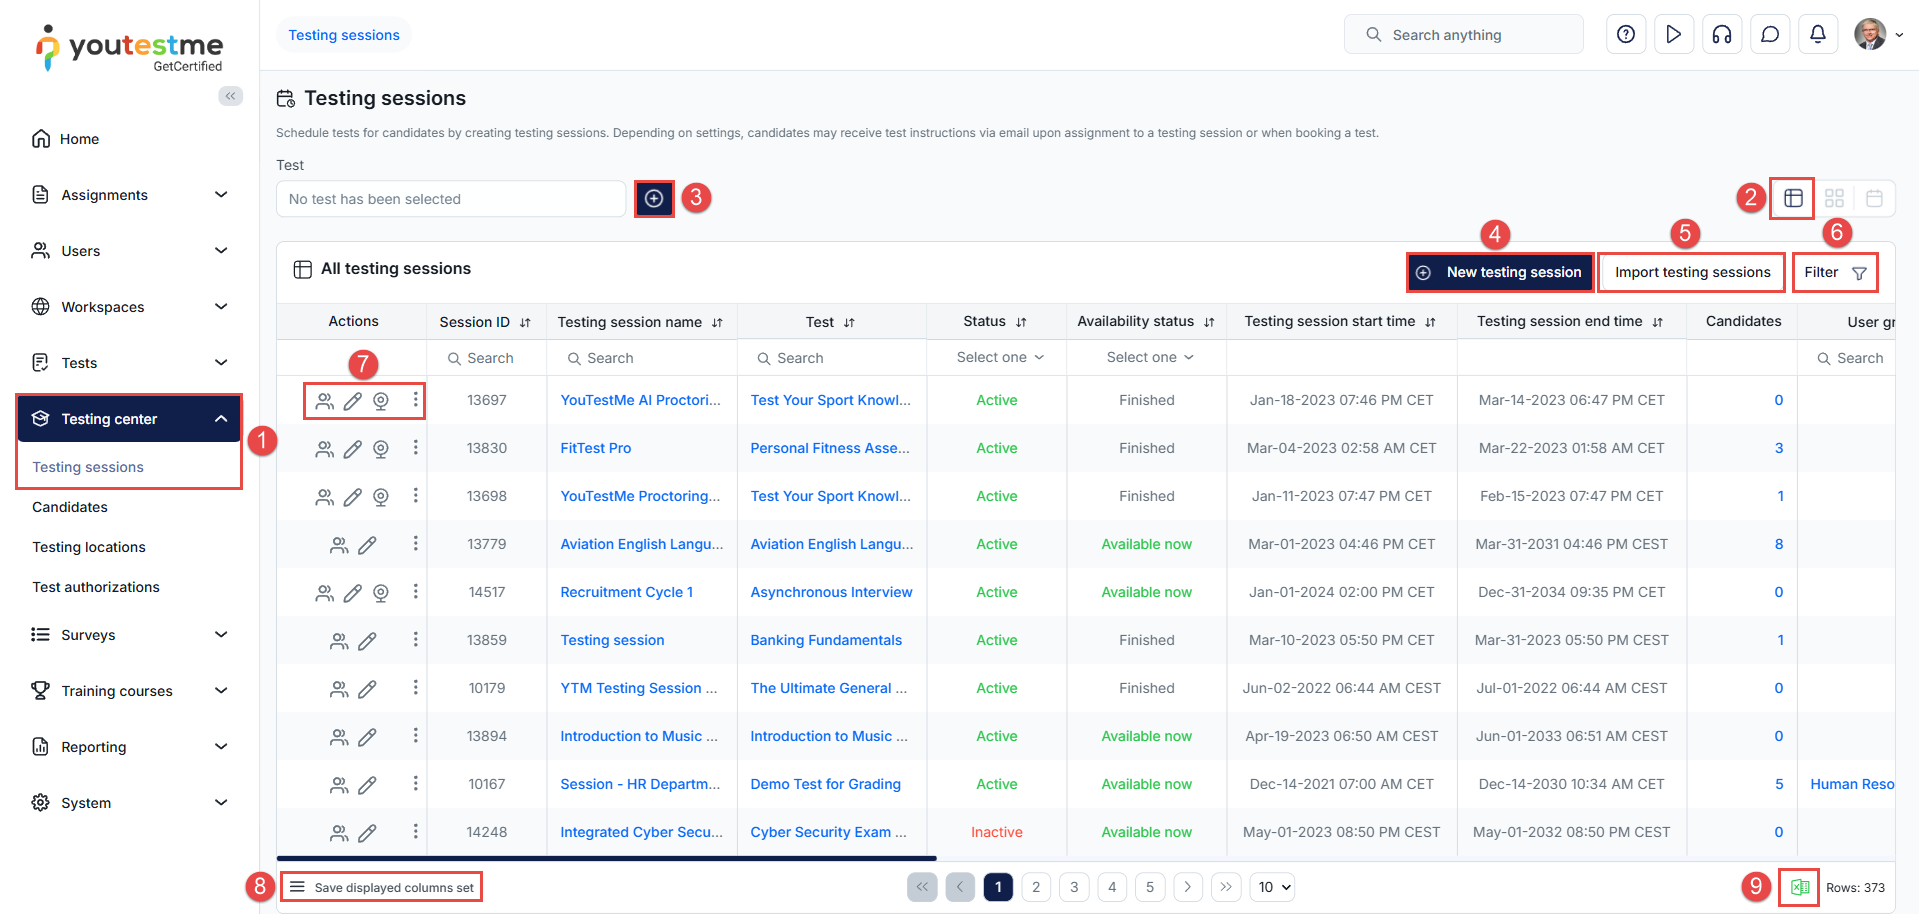
How to Access All Testing Sessions
To view and analyze all testing sessions created in the system, follow the steps below:
-
Navigate to the Testing Center > Testing Sessions.
This page displays a list of all sessions created in the application. -
Switch to the list view for a better overview of the sessions.
The list view allows easier sorting, filtering, and column customization. -
Optionally, filter by a specific test.
This narrows the list to only the sessions linked to the selected test. -
Create a new common session.
To add a new session, use the New testing session button. For more information, check the related article. -
Import testing sessions.
Import multiple sessions at once using an Excel file. For more information, check the related article. -
Filter by testing session start time.
Enter a date and time range to display only sessions scheduled within that period. -
Perform different functionalities on a session, such as assigning candidates, editing the session, and entering supervision mode. For more information, check the related article.
-
Change the displayed columns by selecting only the desired columns and saving the table layout.
-
Export the filtered and customized table as an Excel file for easier reporting, analysis, or distribution.
Visible Columns in the Testing Sessions Table
Below is a list of all commonly available columns, along with an explanation of what each represents.
-
Session ID – Automatically generated upon testing session creation and cannot be edited. This identifier is also used for LTI integrations to allow direct assignment of candidates to a specific testing session.
-
Testing Session Name
-
Test – Displays the test associated with the session. Only candidates assigned to this session will be able to access this specific test.
- Status – Shows whether the session is Active or Inactive.
Note: The test must also be published for an active session to become visible to candidates.-
Active – The session will be visible to candidates during its availability period.
-
Inactive – The session will remain hidden, even if the availability period is active.
-
-
Availability Status – Indicates the current availability phase of the testing session:
-
Finished – The testing session period has expired, and the assignment is no longer accessible.
-
Upcoming – The assignment will become available at a future date/time.
-
Available now – Candidates can currently access the assignment.
-
Suspended – The assignment is unavailable because the associated test has been suspended.
-
-
Testing Session Start Time – The exact date and time when the session becomes available for candidates.
-
Testing Session End Time – The exact date and time when the session stops being available for taking.
-
Candidates – Displays the number of candidates assigned to the testing session. Clicking the value opens the full candidate list.
-
User Group – Shows the user group assigned to the session, if any. Useful for identifying sessions linked to specific departments, classes, or teams.
-
Training Course – If the testing session is linked to a training course, the name of the course is displayed here.
-
Proctors – Usernames of proctors assigned to supervise this session. Proctors can monitor candidates in real time, depending on the proctoring configuration.
-
Self-Enrollment – Indicates whether candidates can enroll themselves in the testing session without manual assignment by administrators.
-
Location – The physical location associated with the testing session (e.g., “Room 204”, “Lab 1”). This is used primarily for onsite testing and scheduling.
-
Direct Access Link – An automatically generated link that redirects candidates directly to the session upon login. Useful for sharing via email notifications, websites, or LMS systems.
Notification templates can be customized under System / Settings and Customization / Notifications. -
Meeting Link – If proctoring via conference tools is enabled, this field displays the meeting URL candidates must join before beginning the test.
-
Locked – Indicates whether the testing session is protected with a password. When a session is locked, candidates must enter the password before accessing the test. This password must be shared with candidates in advance, typically through instructions, email notifications, or internal communication channels.
-
Session Room – Displays the virtual proctoring room or grouping identifier linked to the session, if configured.
-
Instructions for Candidates – Shows whether the session contains custom instructions visible to candidates before starting the test.
-
External ID – Identifier used for third-party integrations. Helpful when syncing sessions between YouTestMe and external systems.
-
External Name – An external reference name used for LMS or system integrations, allowing administrators to match sessions across multiple platforms.
