Article verified for Release 15.1 on February 18, 2026.
Proctored tests enable institutions to ensure candidates take tests under controlled, secure conditions. There are two types of proctoring services we offer:
- Live proctoring and
- Record & Review
In both cases, the test process involves a series of steps that candidates must follow to take the test. This article explains the process for both types of proctored tests, focusing on the steps candidates need to take before, during, and after the test.
Pre-Test Process
Notification and Test Access
When enabled, the system sends an email notification to candidates when they are assigned to a test. The notification content is fully customizable, allowing you to include any details necessary to help candidates prepare for their proctored test.

Trial Equipment Test
Taking a proctored test begins with a simple check-in process defined by the test administration. This Equipment Check verifies everything needed for a secure and successful test. The system automatically assesses browser compatibility, internet stability, webcam and microphone functionality, screen-sharing capabilities, and the candidate’s identity. Depending on the test settings, candidates may also be asked to record their environment or connect a secondary camera.
To ensure a smooth experience, candidates can run an equipment check before the actual test. This simulation follows the same check-in steps configured for the test, allowing candidates to confirm their setup and troubleshoot any issues in advance.
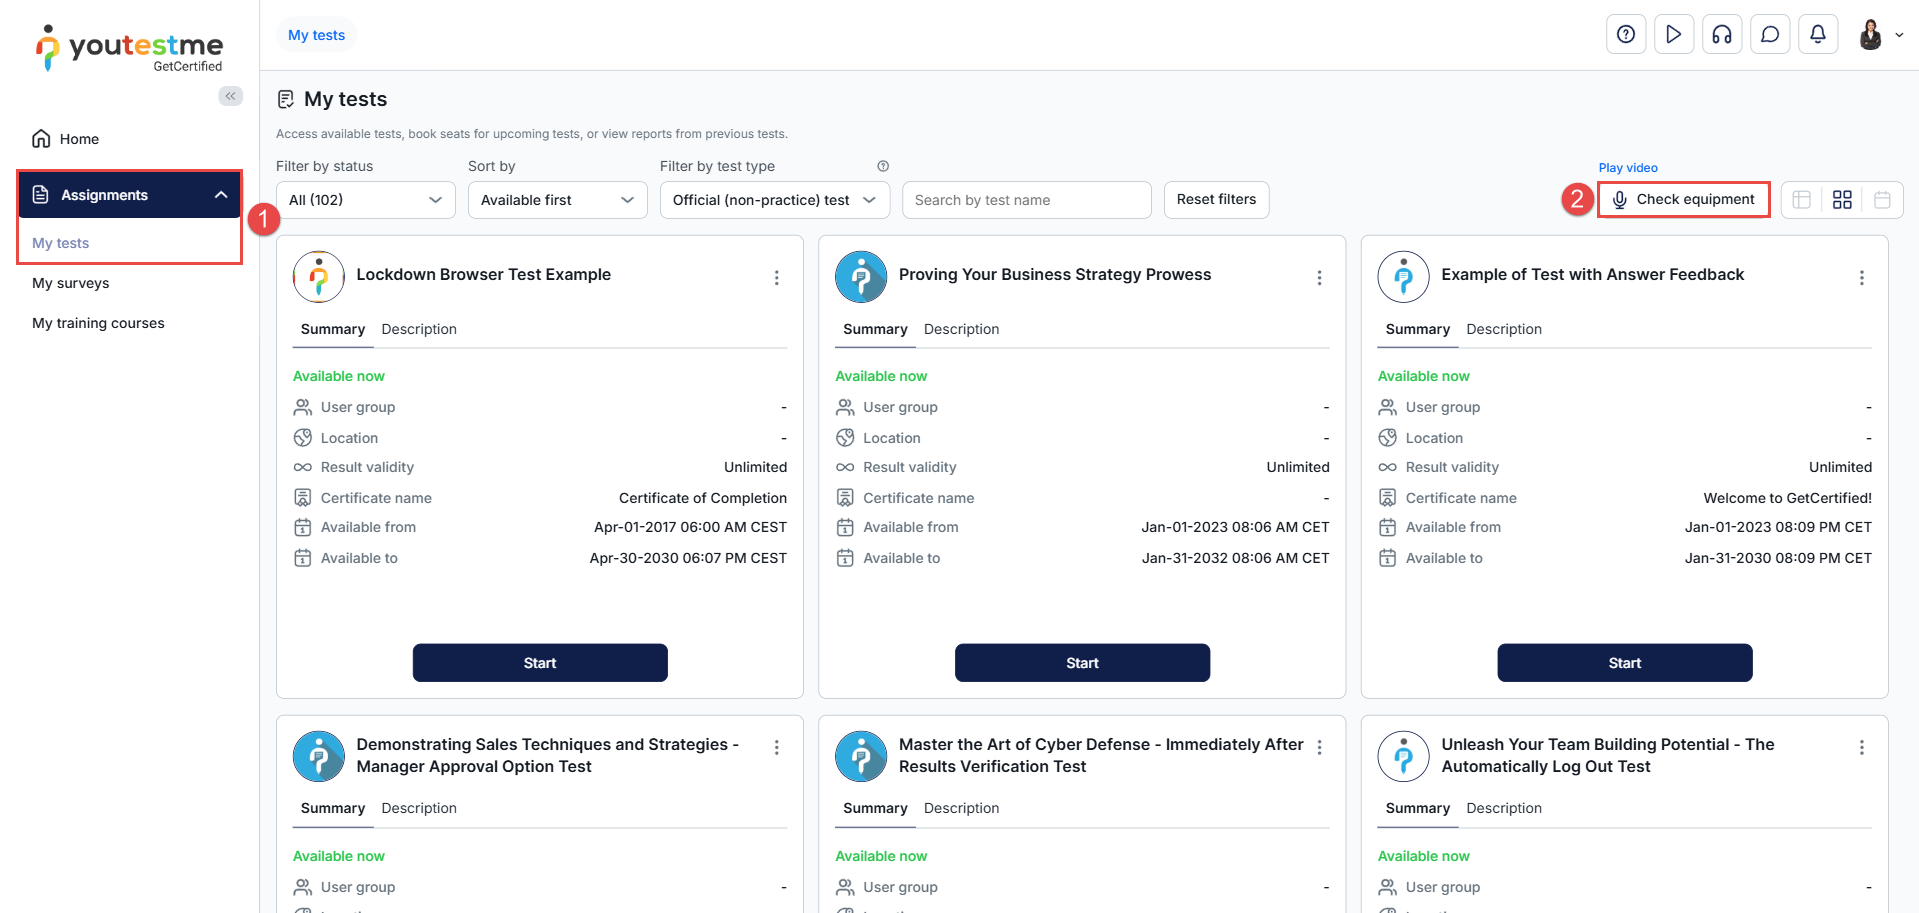
To perform an equipment check:
- Go to Assignments > My Tests.
- Click the Check Equipment button to start the test.
This will verify that your setup meets all technical requirements for a smooth test experience.
Equipment Check Overview
The Equipment Check consists of several steps, each designed to verify that your setup meets the requirements for your proctored test.
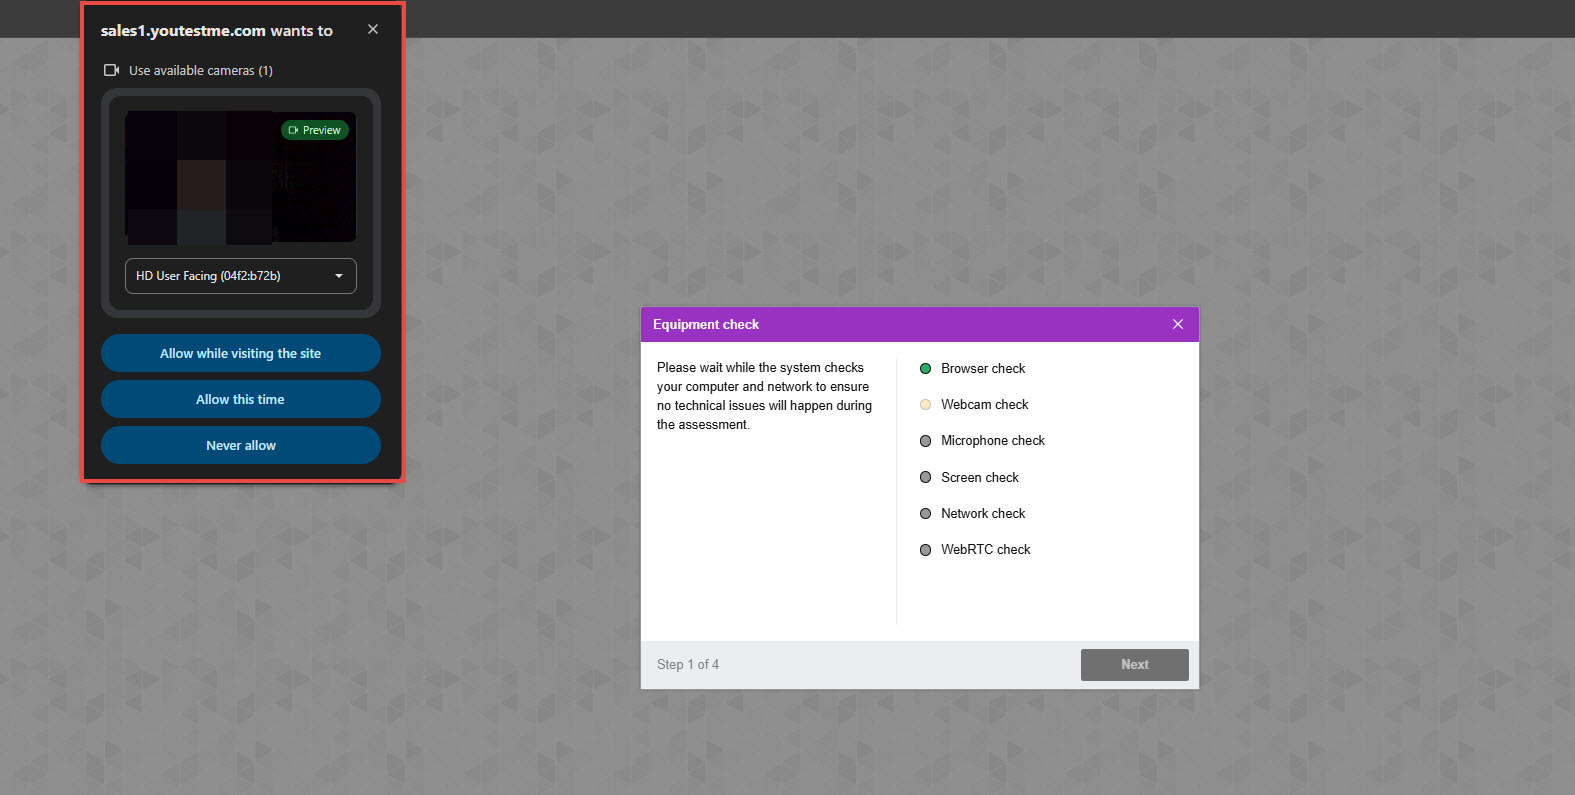
Step 1: Equipment Check
At the beginning of each session, a computer and internet connection check is performed automatically to identify any technical issues. User interaction is only required if problems are detected.
- During this step, your browser will request permission to access your camera, microphone, and screen. Please allow access and ensure you share your entire screen.
- Once the system completes the check, the Next button will turn green, allowing you to proceed to the next step.
- For troubleshooting assistance, please refer to the following articles: Camera, Microphone, Screen, and WebRTC.
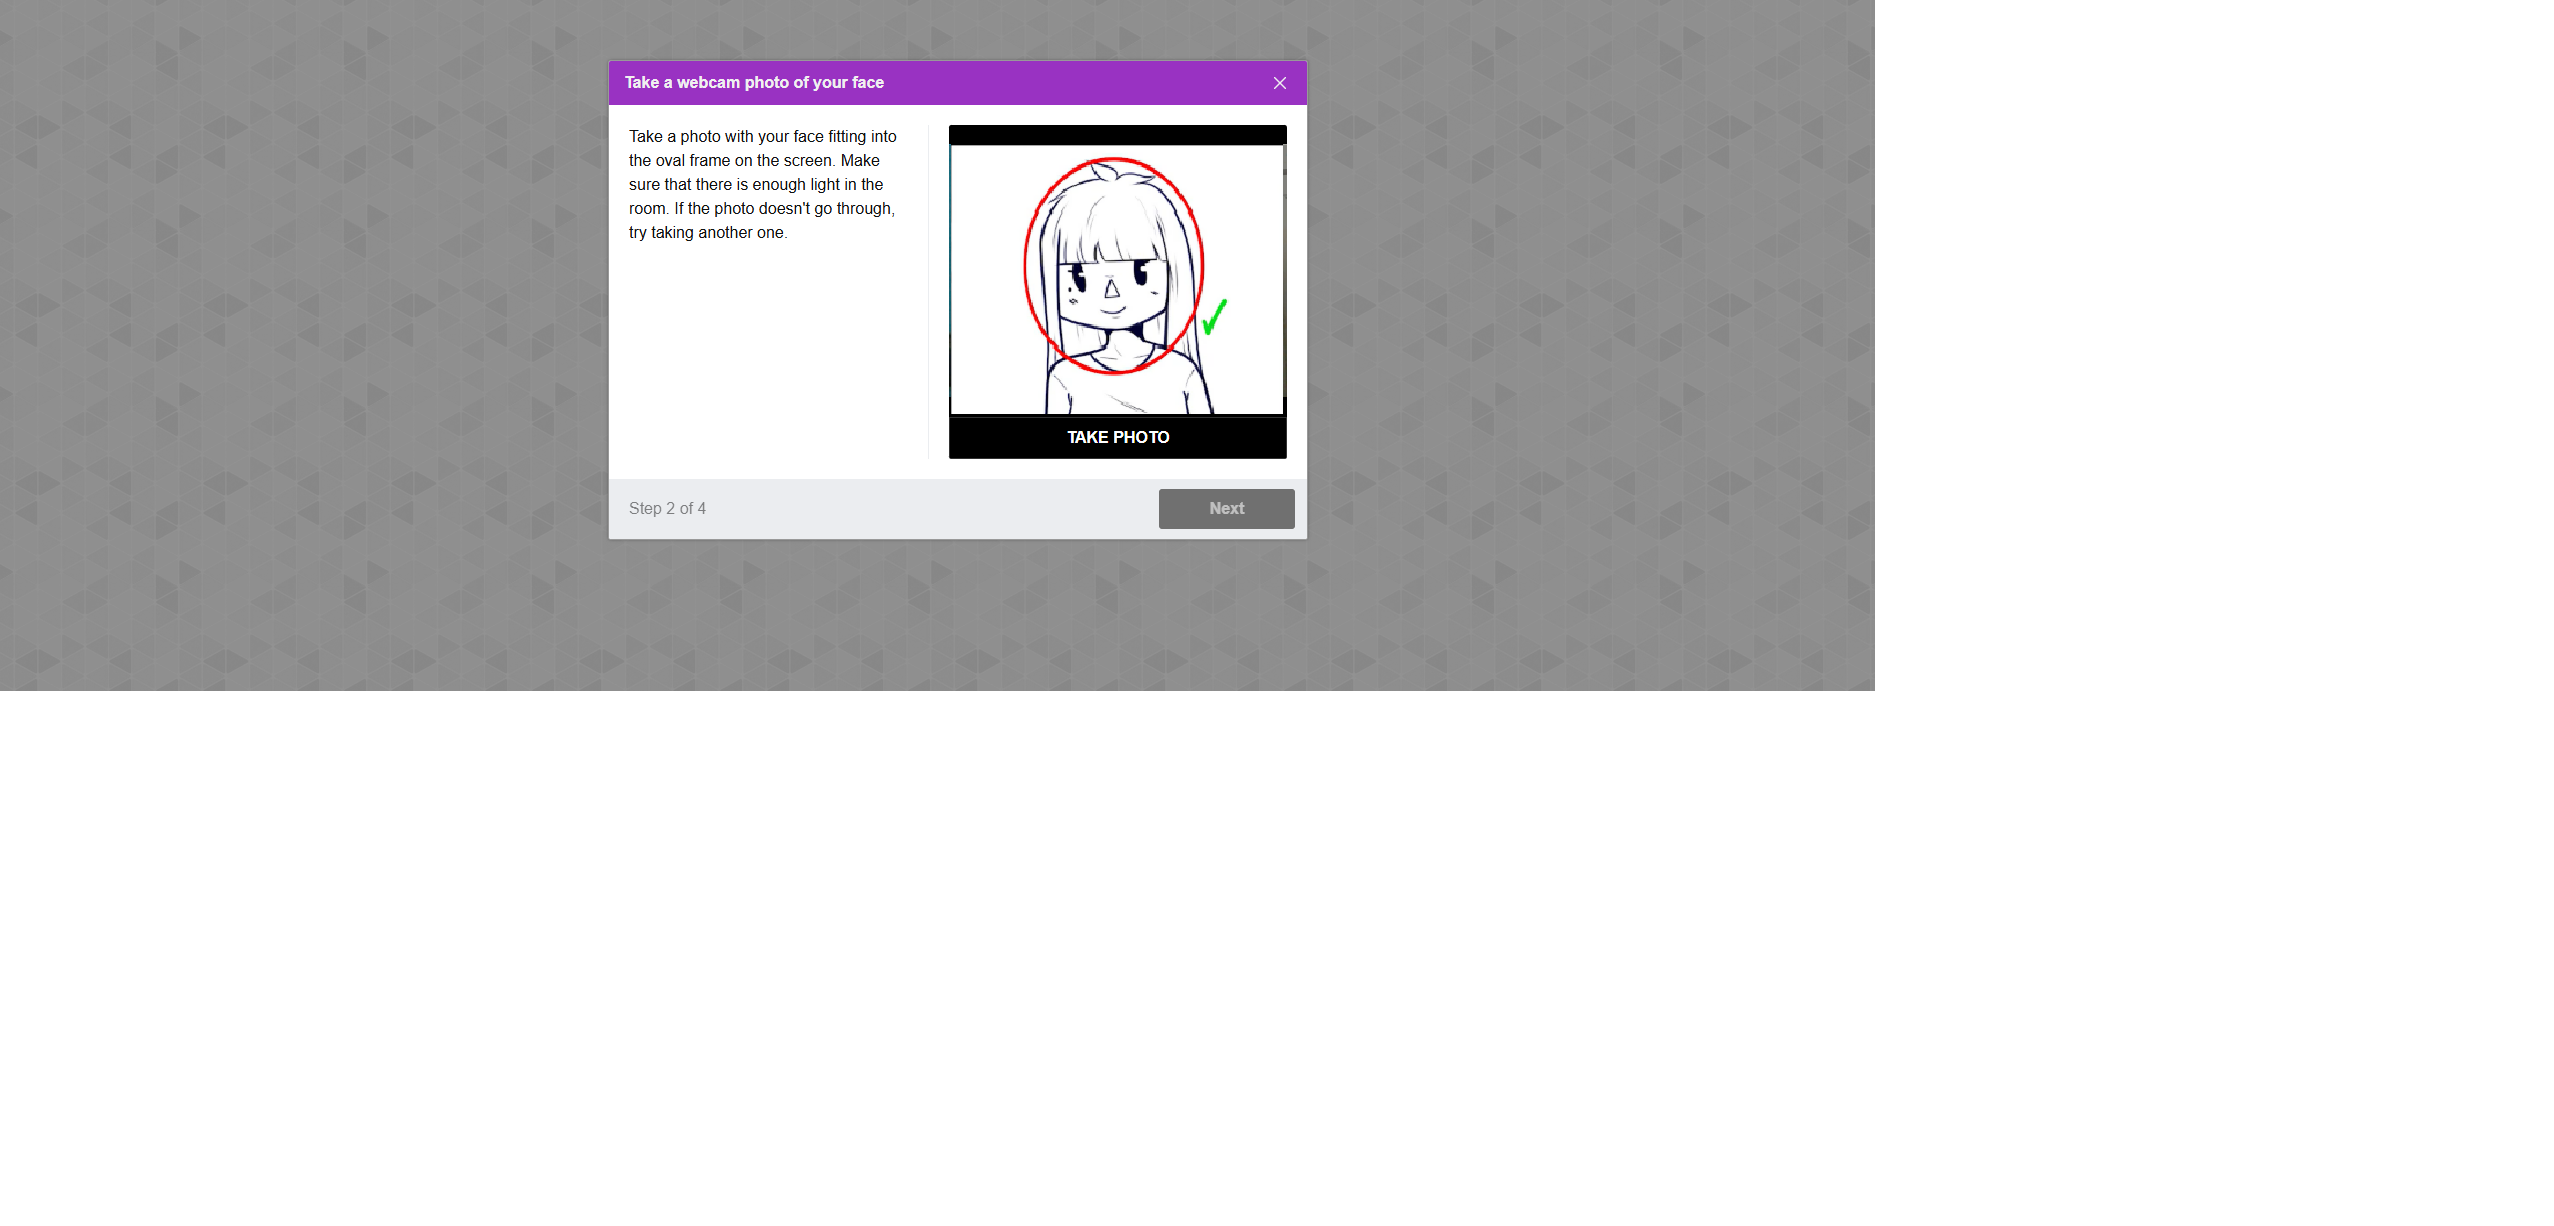
Step 2: Taking a Face Photo
- Your webcam will activate, allowing you to take a face photo.
- After taking the photo, the system will verify and approve it.
- Once approved, the Next button will turn green, enabling you to proceed.
- For troubleshooting assistance, please refer to the following article.
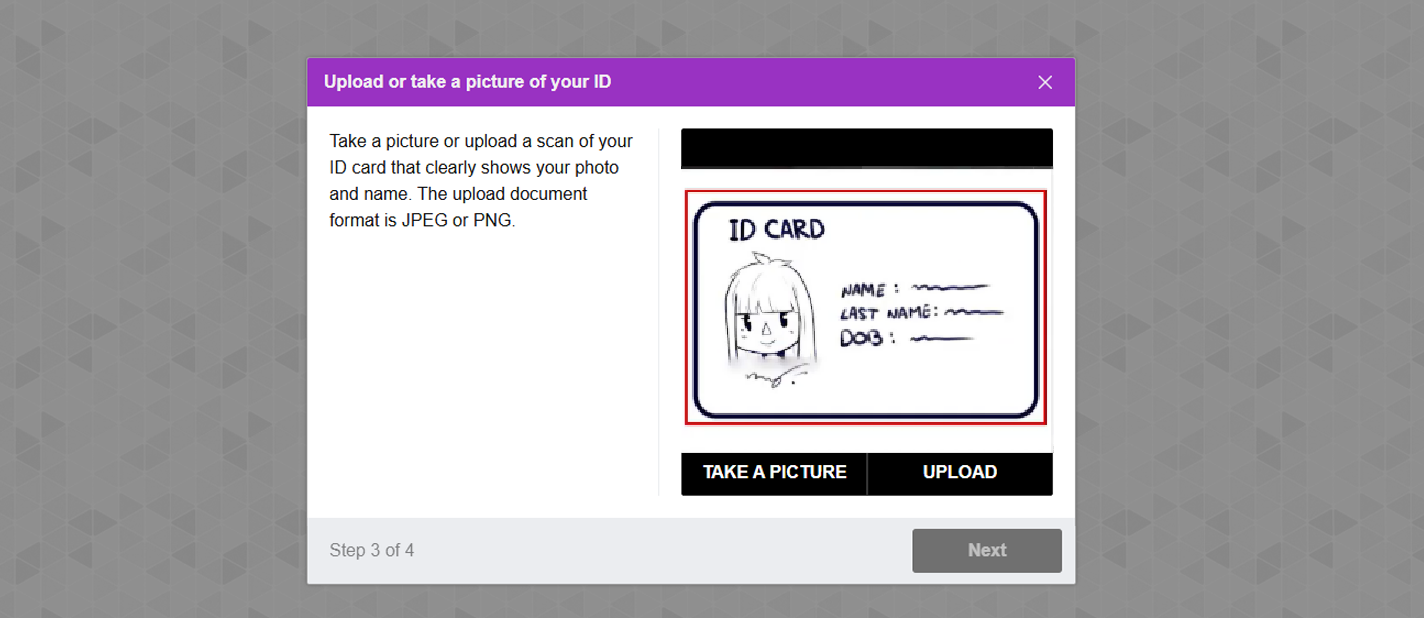
Step 3: Taking or Uploading an ID Photo
- The system will activate your webcam to allow you to take a picture of your ID.
- Alternatively, you can use the Upload button to upload an ID image from your device.
- After the ID is verified and approved, the Next button will turn green, allowing you to continue.
- For troubleshooting assistance, please refer to the following article.
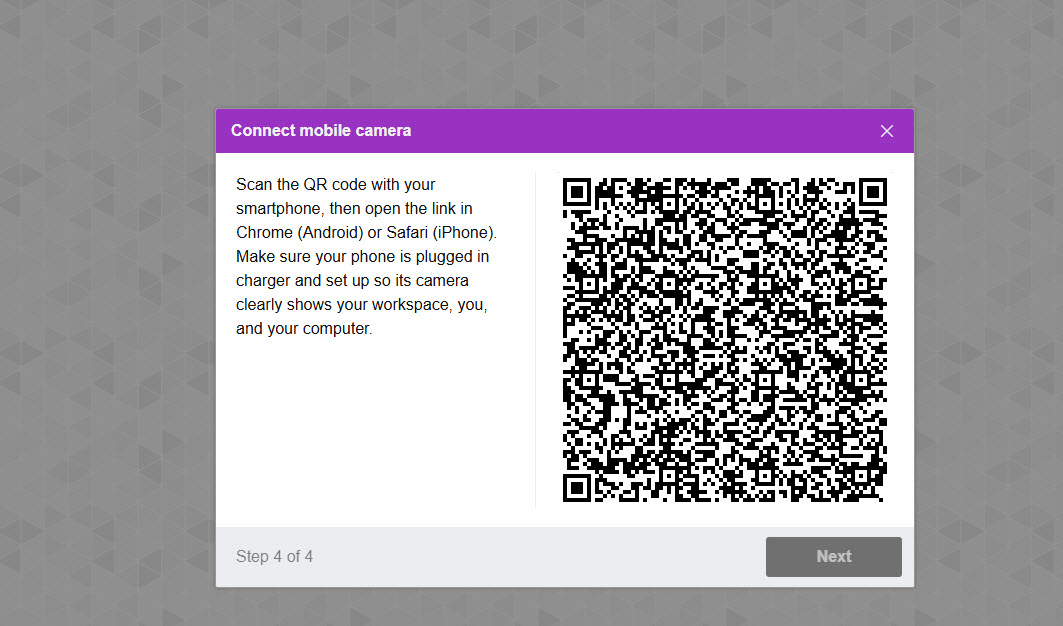
Step 4: Secondary Camera Setup
- A QR code will be displayed; scan it with your smartphone.
- Scanning the QR code connects your mobile camera as a secondary camera during the test.
- Once the mobile camera is connected, the Next button will turn green, signaling the completion of the Equipment Test.
- For troubleshooting assistance, please refer to the following article.
Once the equipment check is complete, you can return to the My Tests tab.

Note: The steps outlined above may vary depending on the test settings predefined by the test administrator. However, this guide covers all possible steps typically followed in proctored tests.
Live Proctored Test Process
Live proctored tests begin with a pause screen and a proctor’s welcoming message outlining rules and asking candidates for patience while the proctor verifies their ID and environment. The proctor can either unpause the test for one candidate as soon as their check is complete or for all candidates at once; only then does the test timer start.
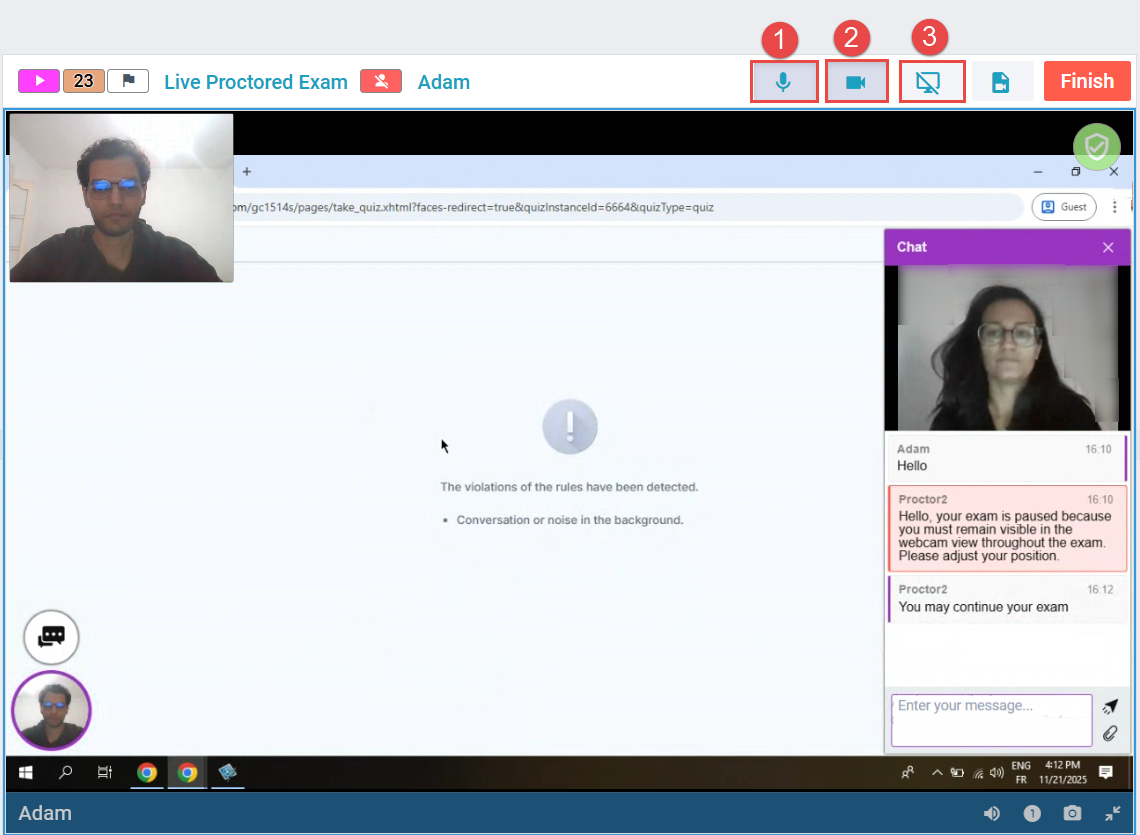
During the test, the system warns candidates if, for example, they open another tab. In addition to the system metrics, with live proctoring, the proctor records their observations about the candidate’s behavior.
At any time, candidates can communicate with the proctor, who can monitor them continuously. The proctor can interact with the candidate through the following channels:
- Microphone
- Camera
- Screen Sharing and Chat
Candidates who experience technical difficulties can contact the technical support team on a dedicated line to let us know which custom messages they would like on the answering machine in case the line is busy. In case the connection is lost, all candidates’ answers are saved, and you can decide if the proctors should allow them to continue.
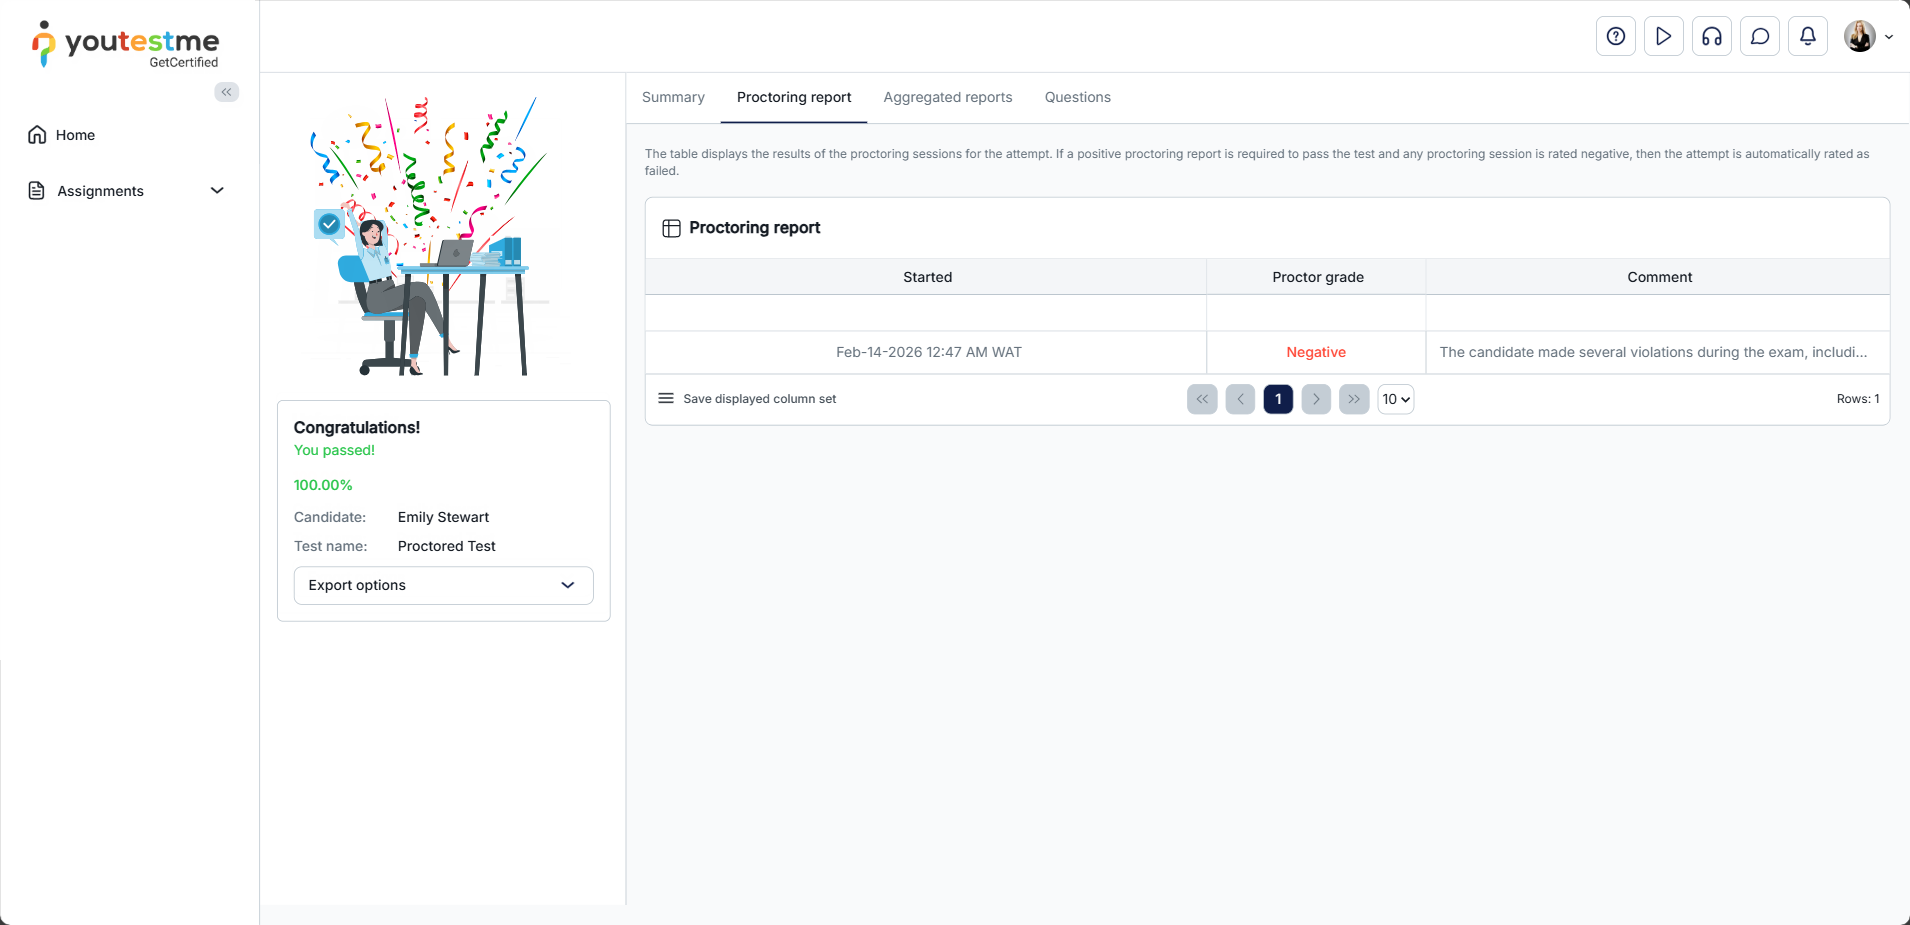
After the test, the proctor rates it and enters their observations in the comments section, which can be used to review and verify the results before they are released to the candidates.
Record & Review Process
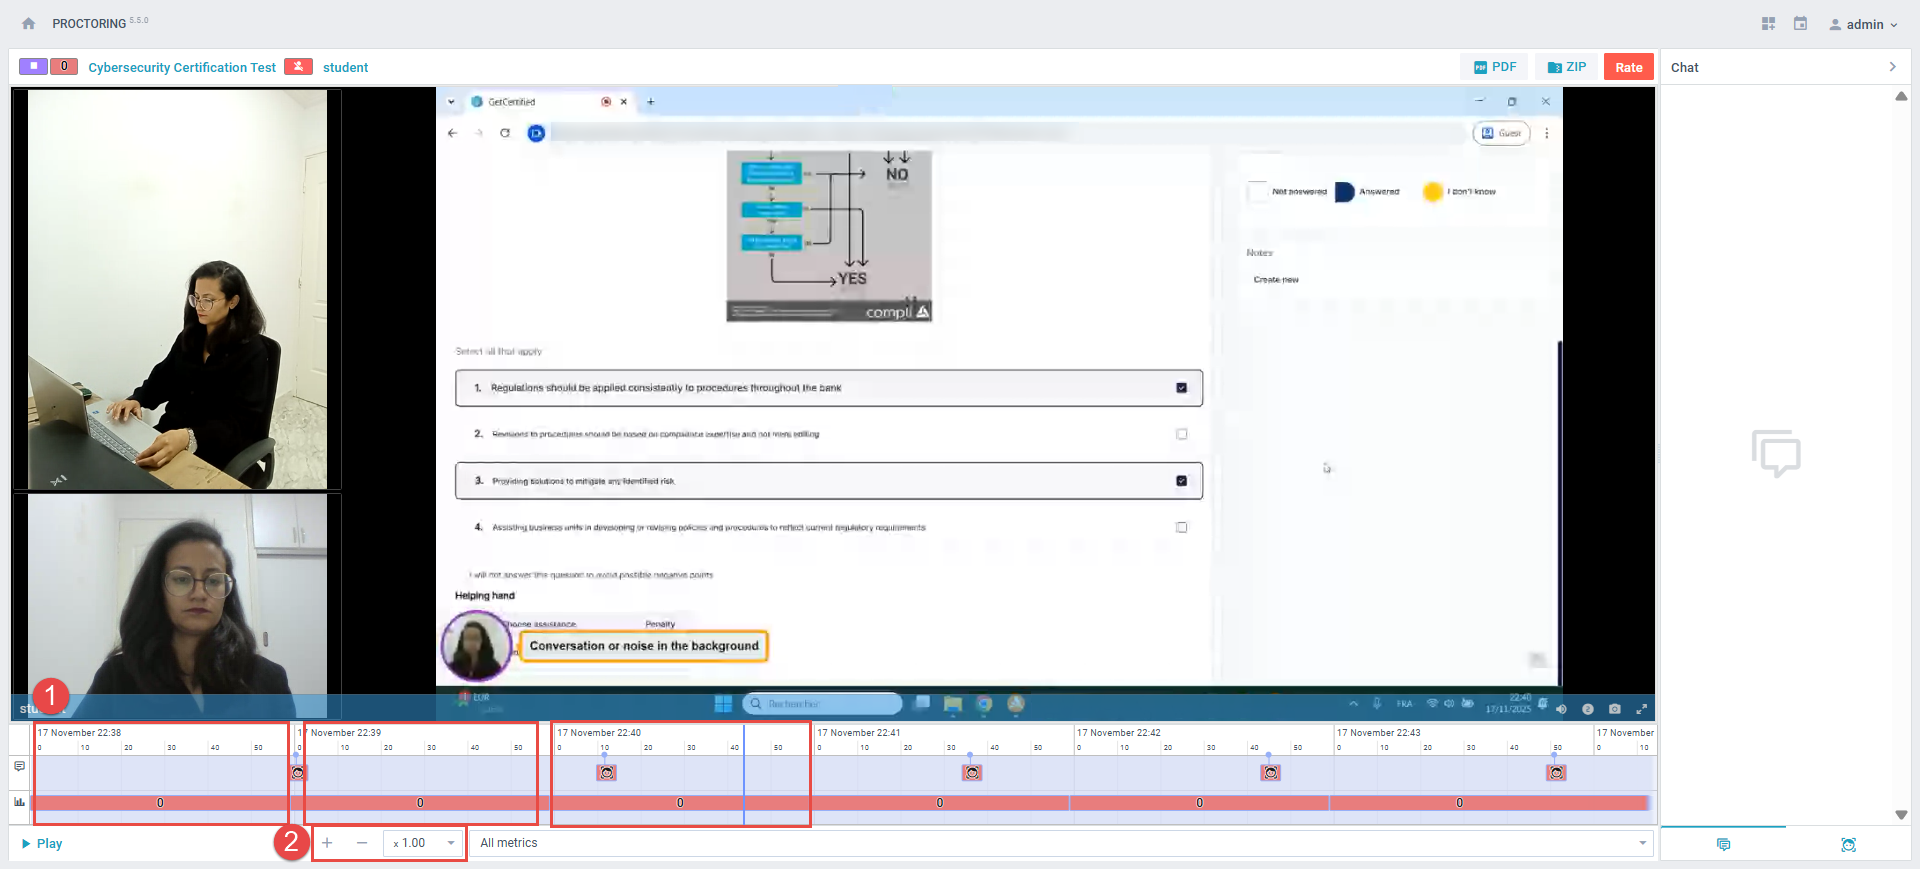
The process for live proctored sessions requires a specific test time to be scheduled in advance to ensure the proctor’s availability during the test. On the other hand, record-and-review tests do not require a live proctor, allowing candidates to take the test at their convenience. The entire test is recorded, and candidates receive warning messages if there is background noise, if they are not looking at the monitor, if they open another tab, etc. The candidate’s behavior is recorded, and any violations are noted. After the test is completed, the proctor reviews the recording, focusing on violations marked by the system and adding personal observations and comments, which are included in the rate report that the CSR or Test Manager can review.
- The proctor should check all spots marked red – those spots that the system detected as suspicious. These may include instances where the test-taker looked away from the screen, covered their face, or had someone else in the room.
- Speed up the video and review it thoroughly, just in case. This will help you identify any other suspicious behavior that may have been missed.
Post-Test Process
The post-test process involves candidates receiving a notification that their results will be available once they have been verified. Once the results have been verified, candidates can access them, as well as any comments made by the proctor, and any additional details that may be allowed by the test manager. This process ensures that the results are accurate and fair, and that candidates have the opportunity to review their performance and learn from the experience.
To see the whole process, check the video on How to see a proctoring report
Conclusion
In conclusion, proctored tests, whether live proctored or record and review, involve a rigorous process to ensure that the test is taken under controlled and secure conditions. It is recommended that candidates take advantage of the trial equipment test or practice test to ensure they are prepared for the actual test. After the test, the proctor’s observations and comments are used to review and verify the results before they are released to the candidates. This ensures the accuracy and fairness of the results.
Please watch the instructional video on How to take a proctored test


