

Article verified for Release 15.2 on January 13, 2026.
YouTestMe GetCertified
supports complete
white-labeling.
This article explains how to change the application theme (interface colors) and the appearance of the login page, set your logo and favicon, customize both in-app and email notifications, and configure your link.
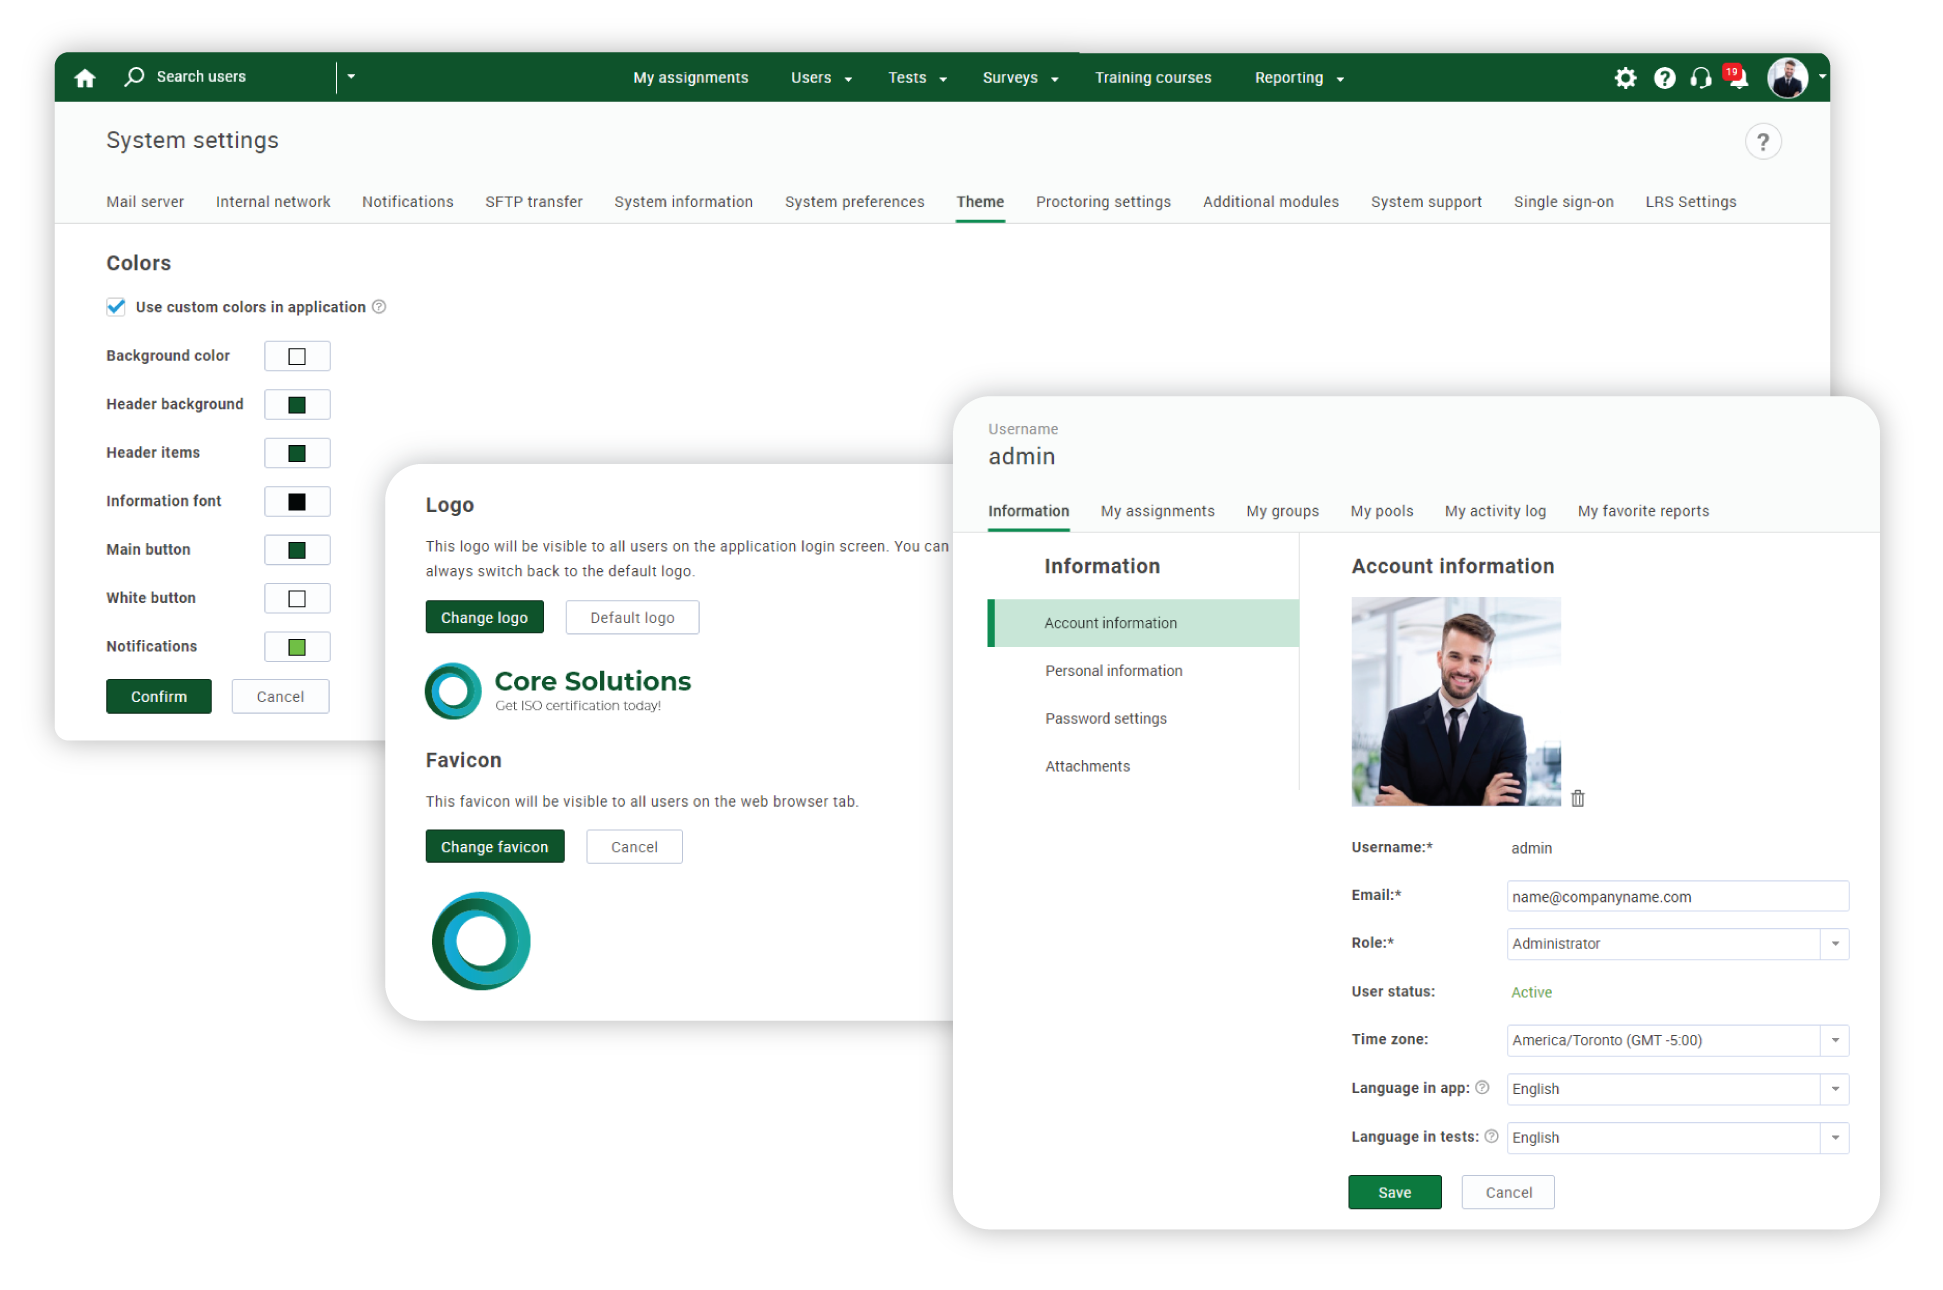
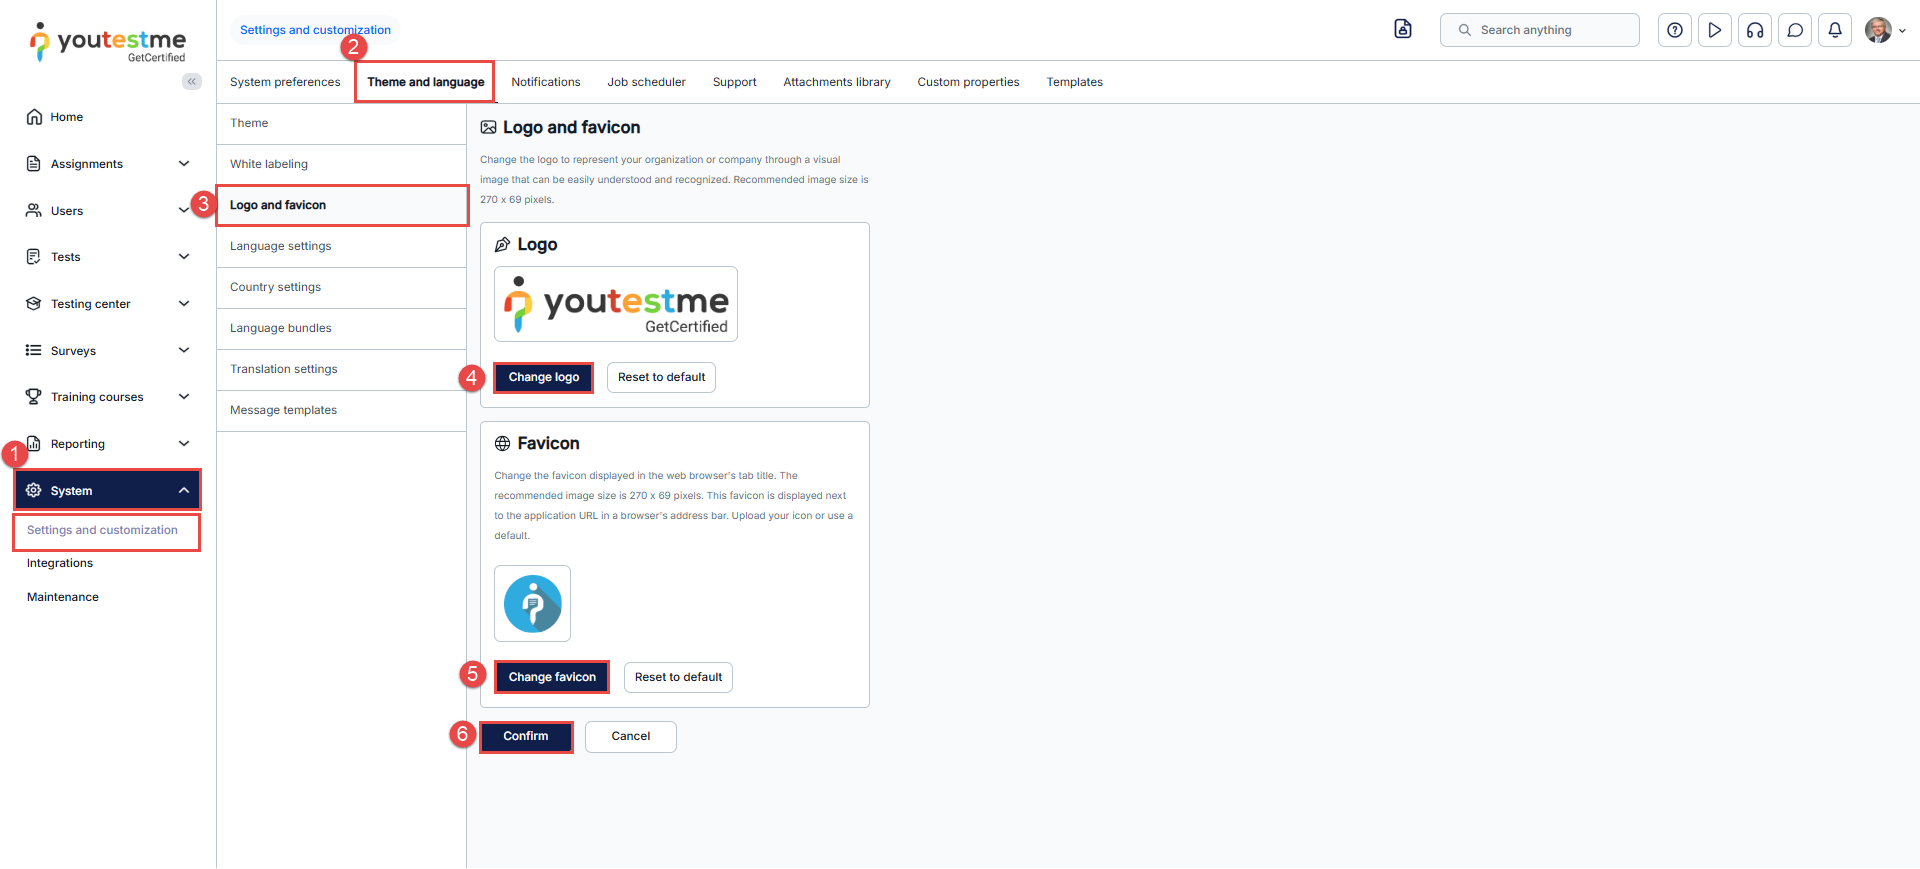
Logo and Favicon
To change the logo and favicon:
- Click the System option in the main menu, then select “Setting and Customization.”
- Navigate to the Theme and Language tab.
- Choose Logo and Favicon.
- Click on the Change logo button to change the logo and upload your preferred logo. You can always revert the default logo by clicking the Reset to Default button.
- To personalize the favicon, click on Change favicon (The icon displayed in the browser address bar). You can always revert the default favicon by clicking the Reset to Default button.
- To save changes, click the Confirm button.
Note: The changes will become visible the next time you log in. To check them out immediately, please log out of the application. The logo will be waiting for you on the login page.
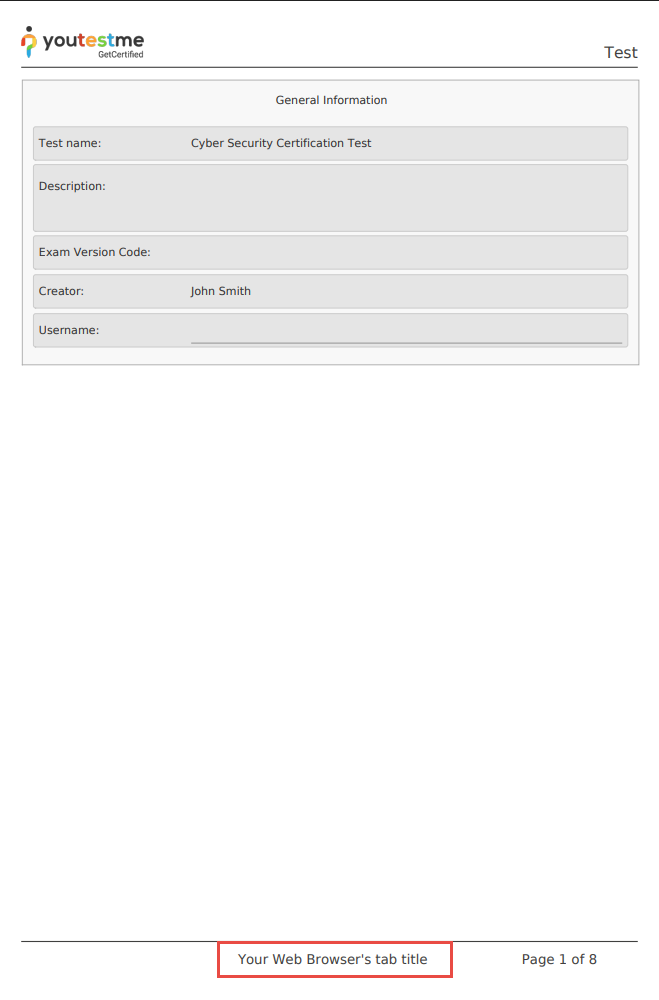
White Labeling – Web Browser’s tab Title
You can choose the title displayed in the web browser tab, which appears next to your favicon.
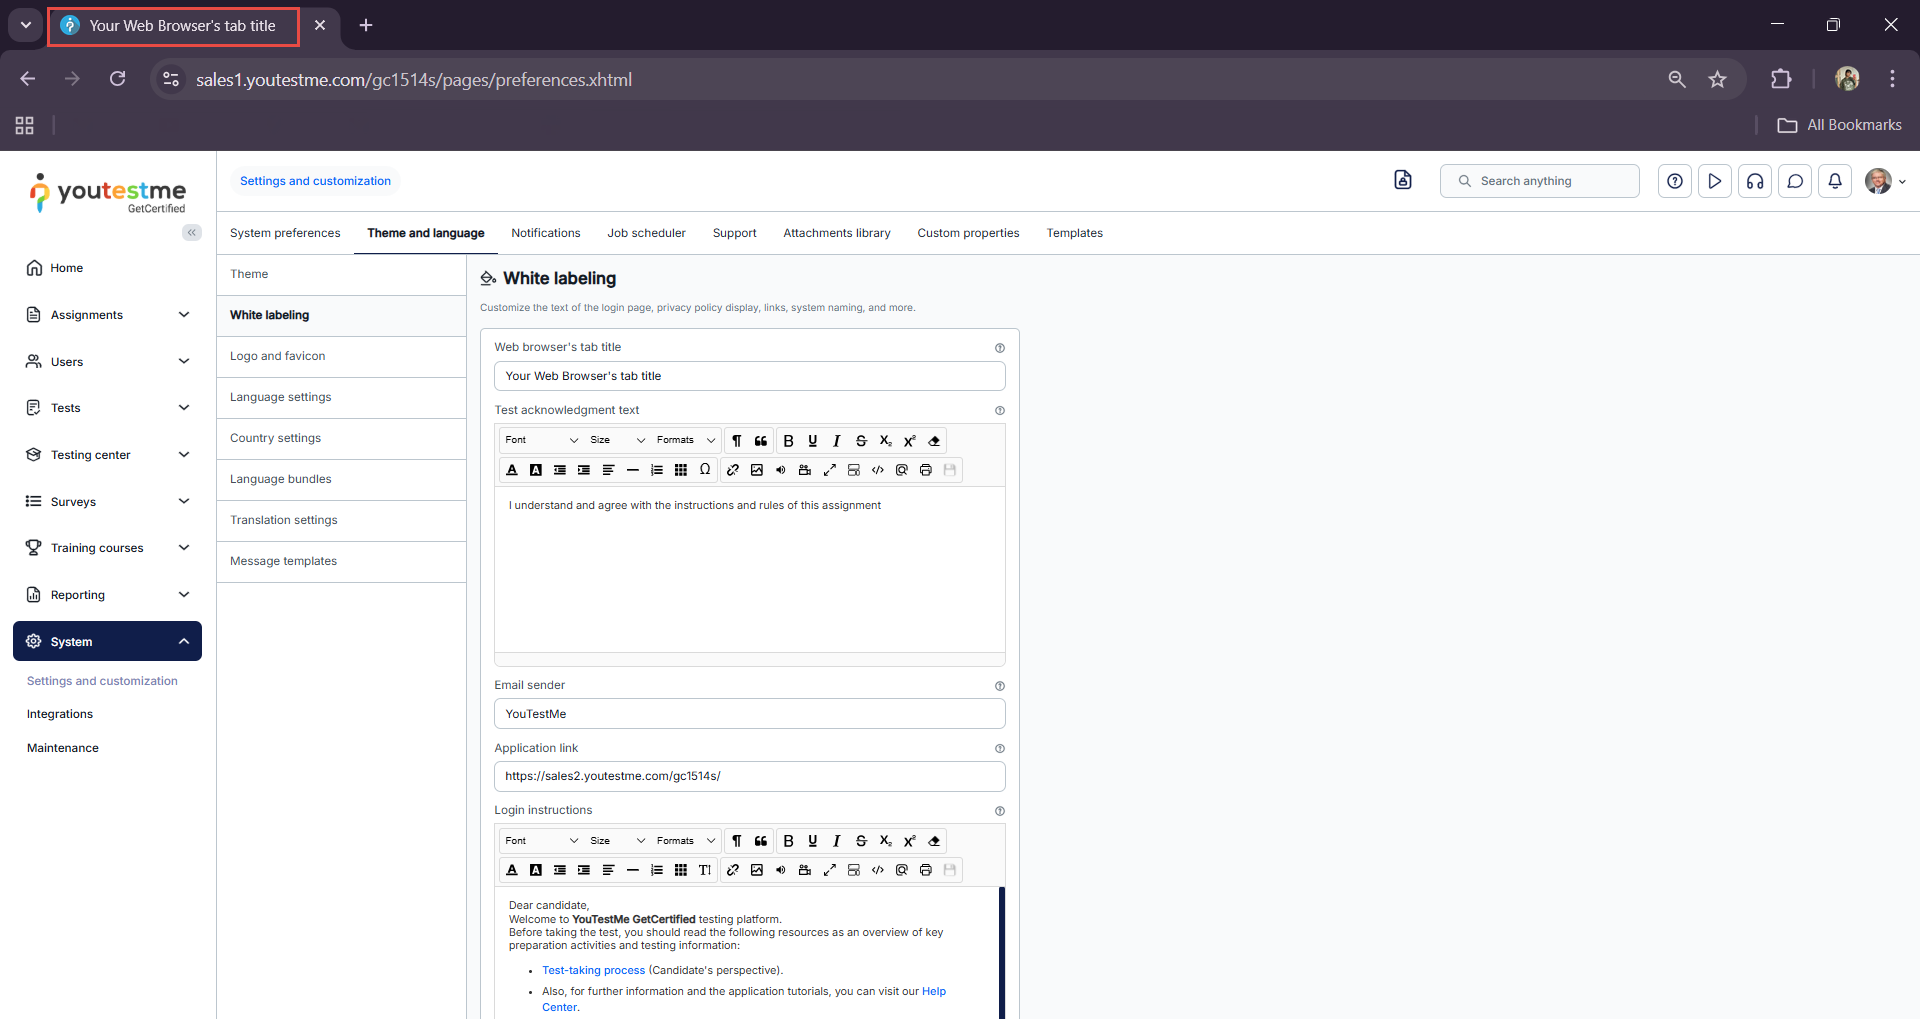
To personalize the web browser’s tab title, please follow these instructions:
- Click on the System option in the main menu, then select “Settings and Customization.”
- Navigate to the Theme and Language tab.
- Click on the White Labeling tab.
- Enter your desired title in the Web Browser Tab Title box.
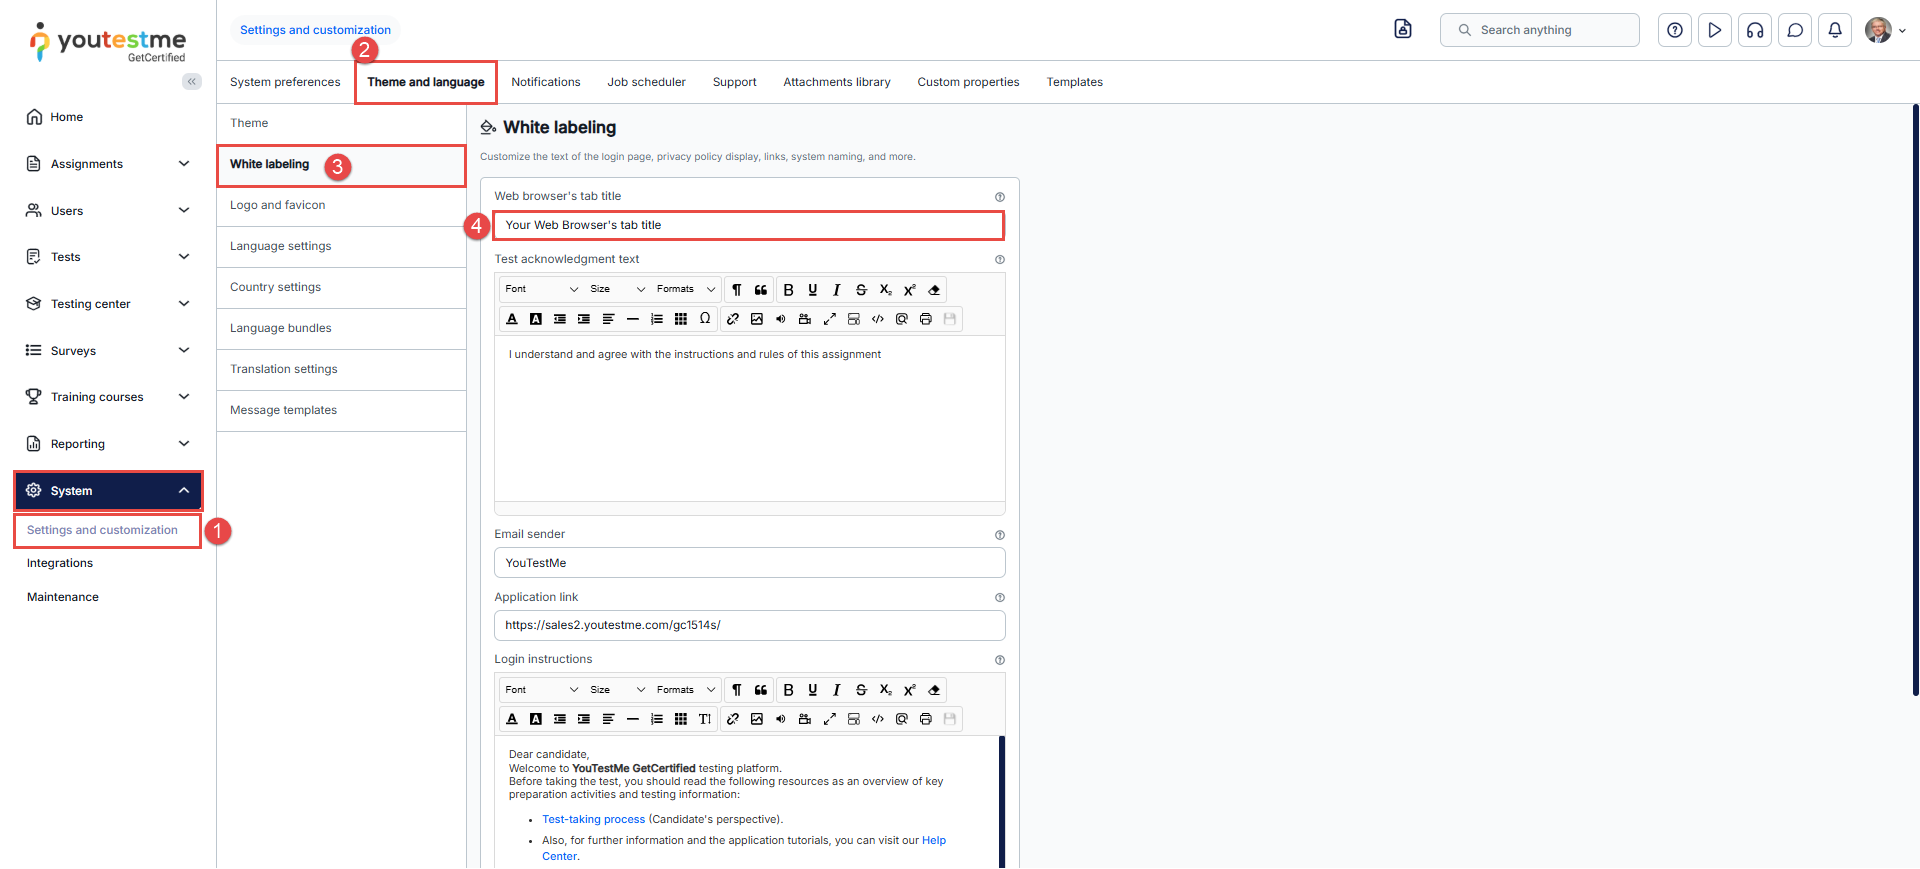
5. To save your changes, click the Confirm button.
Please note that if you export the exam in PDF format, the web browser’s tab title will be shown in the PDF footer.
White Labeling – Confirmation Label and Email Signature
In the white labeling module, you can also customize the signature to be displayed in the email notifications sent to users by the system, as well as the confirmation label that candidates will see when accepting the exam instructions.
- To edit the confirmation label, navigate to the Confirmation Label box and enter the desired text.
- To edit the signature in the email notifications, navigate to the Email Sent From box and enter the desired text.
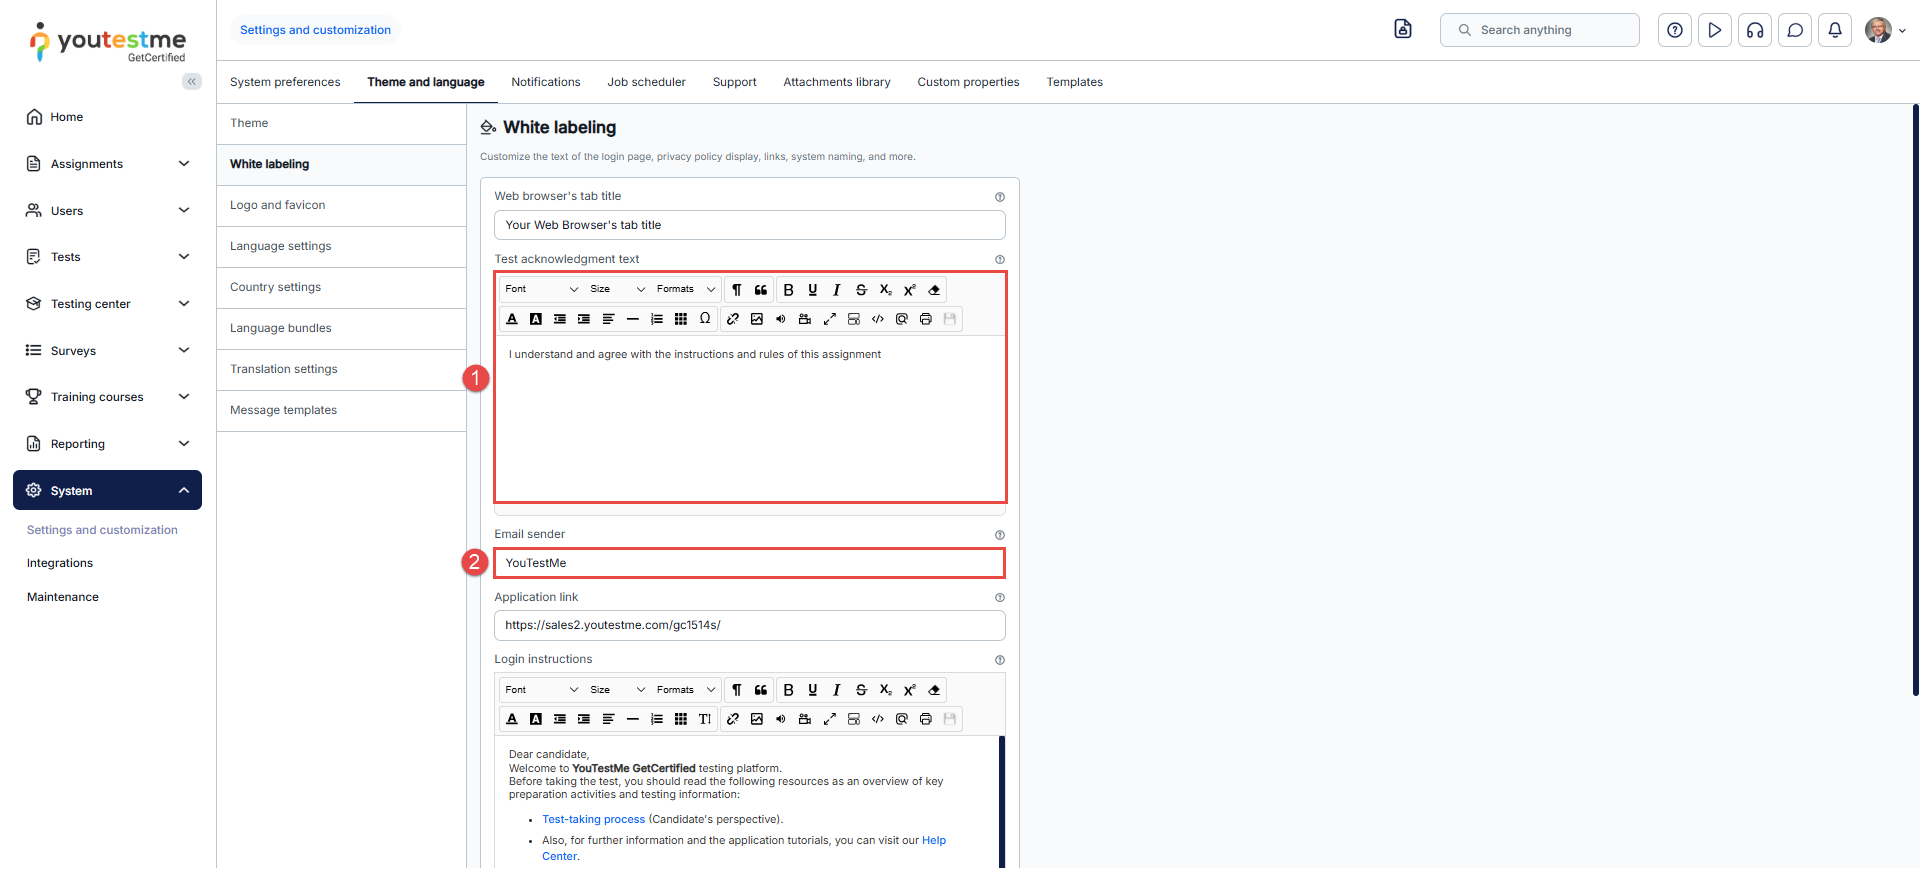
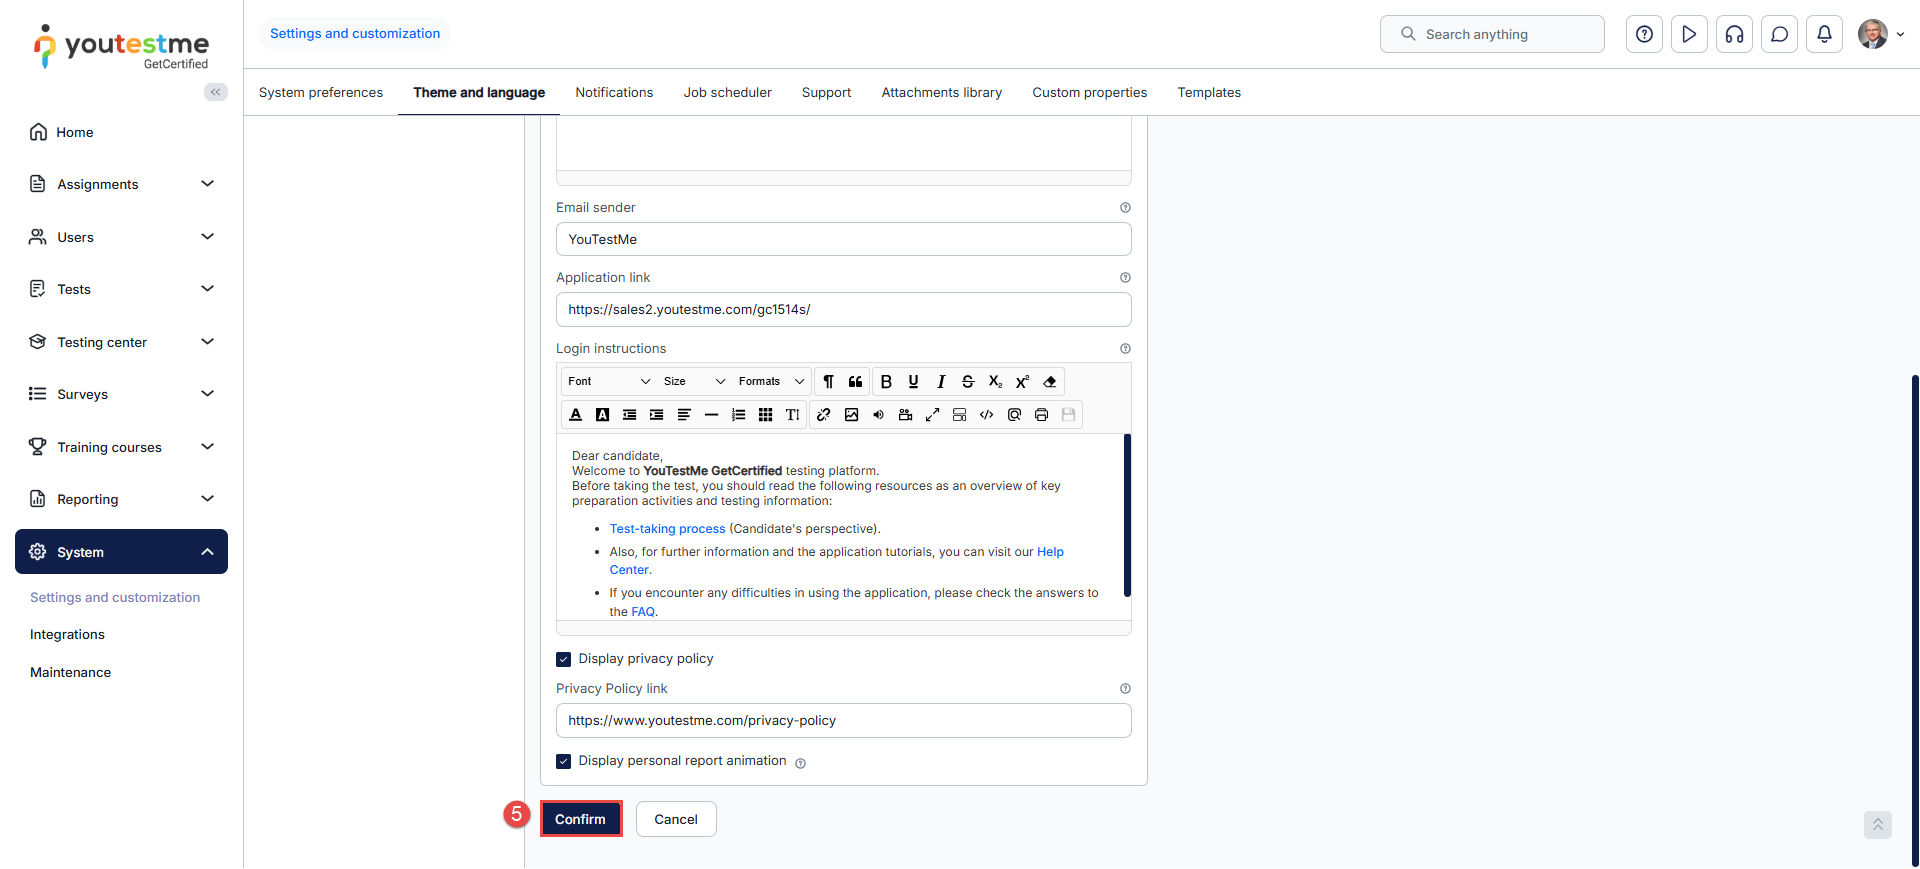
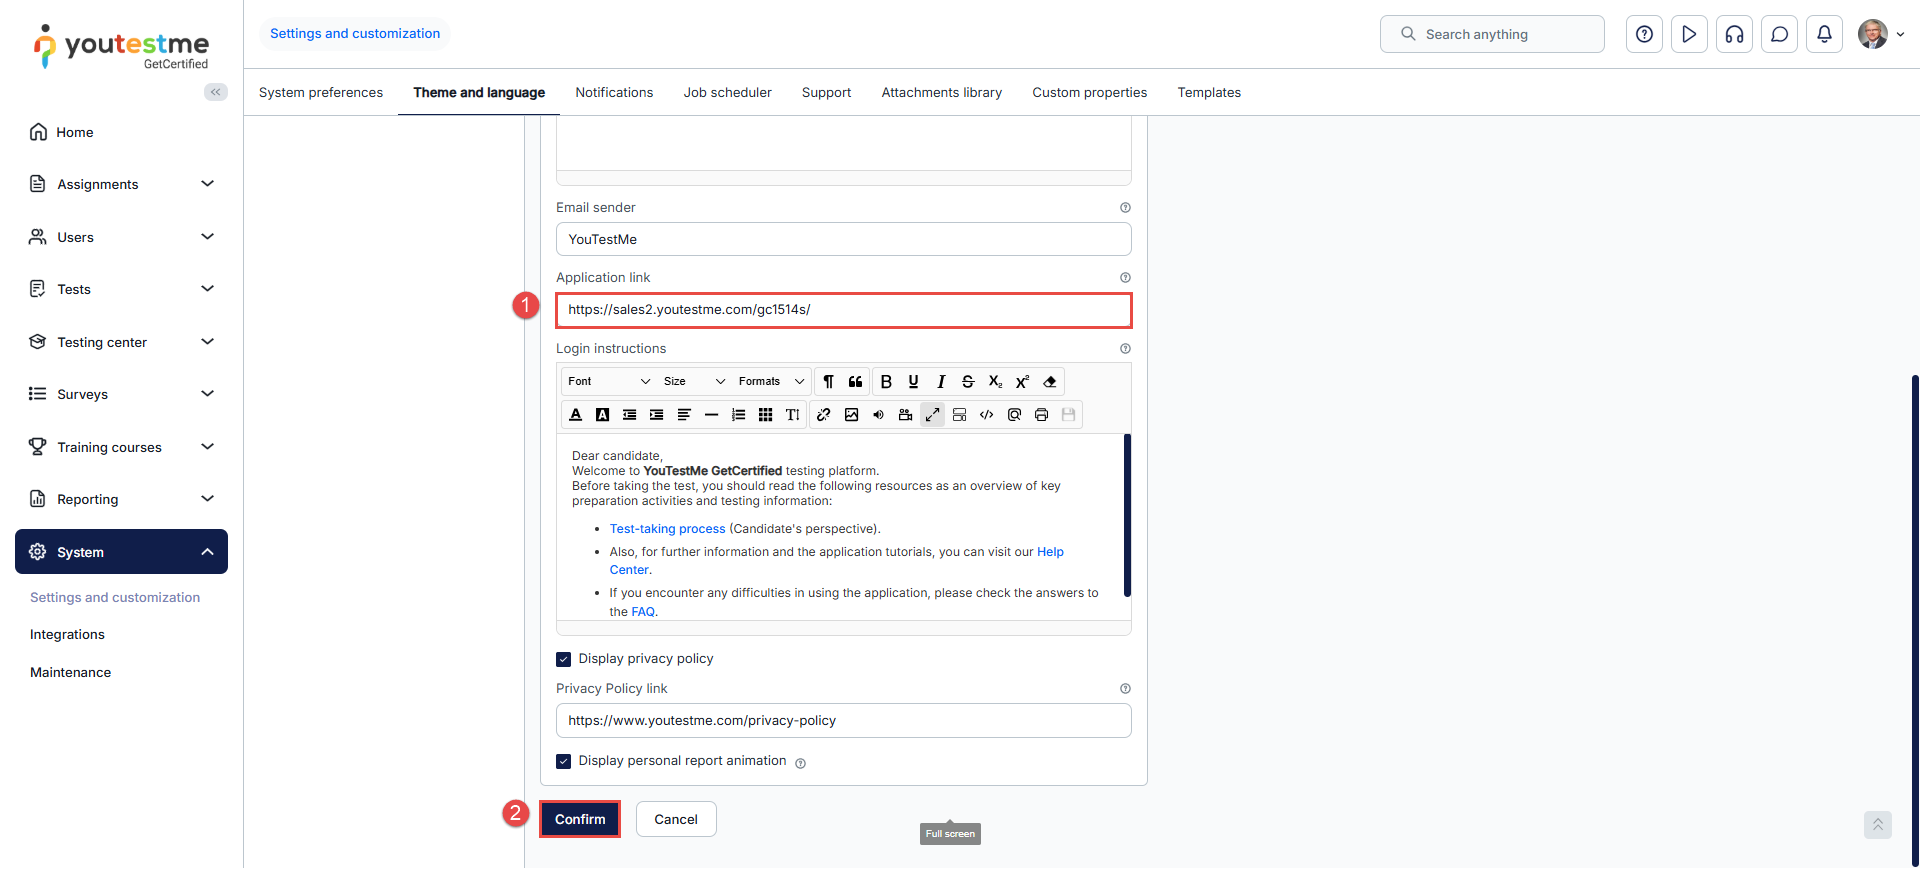
White Labeling – Application Link
In the white-labeling module, you can also customize the application link displayed to users in system email notifications. To do so, follow the instructions below:
- Navigate to the Application Link box and enter the desired link.
- To save changes, click the Confirm button.
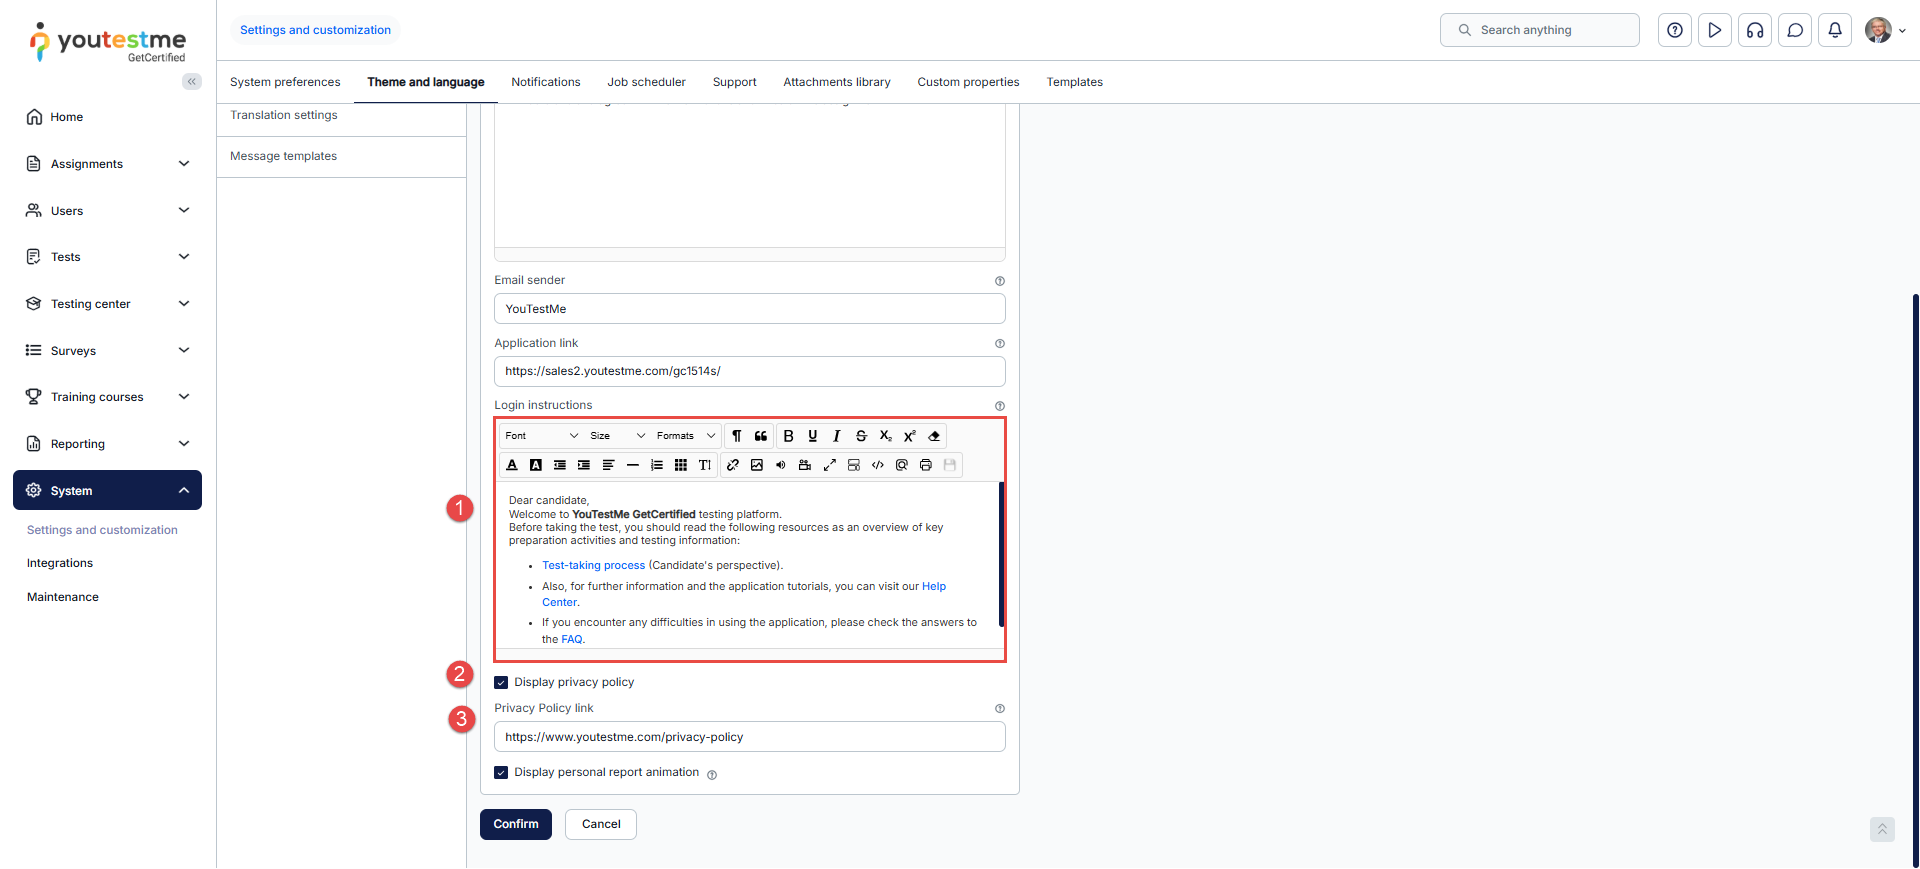
White Labeling – Login instructions and Privacy Policy link
In the white labeling module, you can personalize the login and registration pages by customizing instructions, managing the visibility of the privacy policy, and providing a direct link to it:
- Login Instructions – Customize the instructions displayed on the login and registration pages.
- Display Privacy Policy – Choose whether to show a link to your privacy policy on the registration pages.
- Privacy Policy Link – Add a URL that will redirect users to your privacy policy.
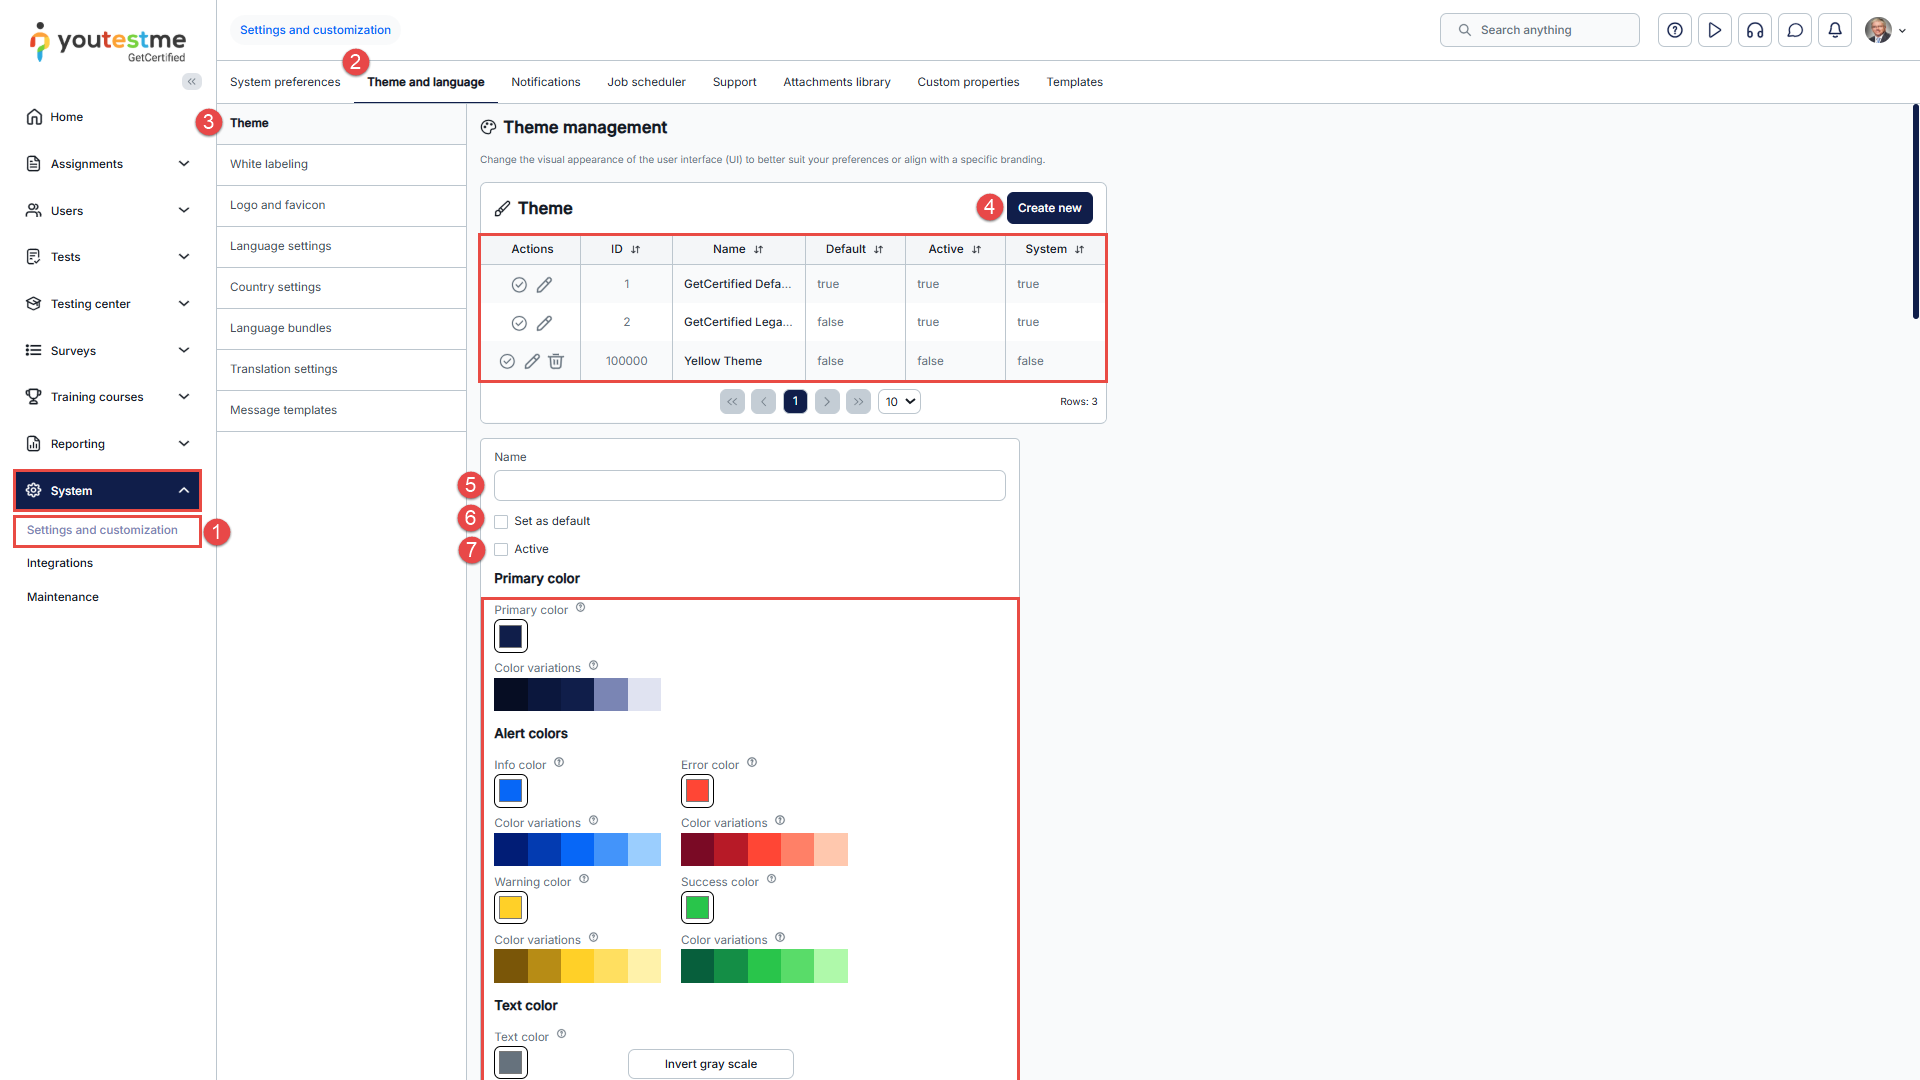
Theme
Theme refers to the color scheme of the application that can be changed by following these steps:
- Navigate to System > Settings and Customization.
- Click on the Theme and language tab.
- Choose the Theme tab.
- Click on the Create new button.
- Enter the name.
- Set as default.
- Activate the theme.
- Make the desired changes.
- Click on the Create button to save the changes.
- The created theme will be visible in the table above.
Legend with Examples
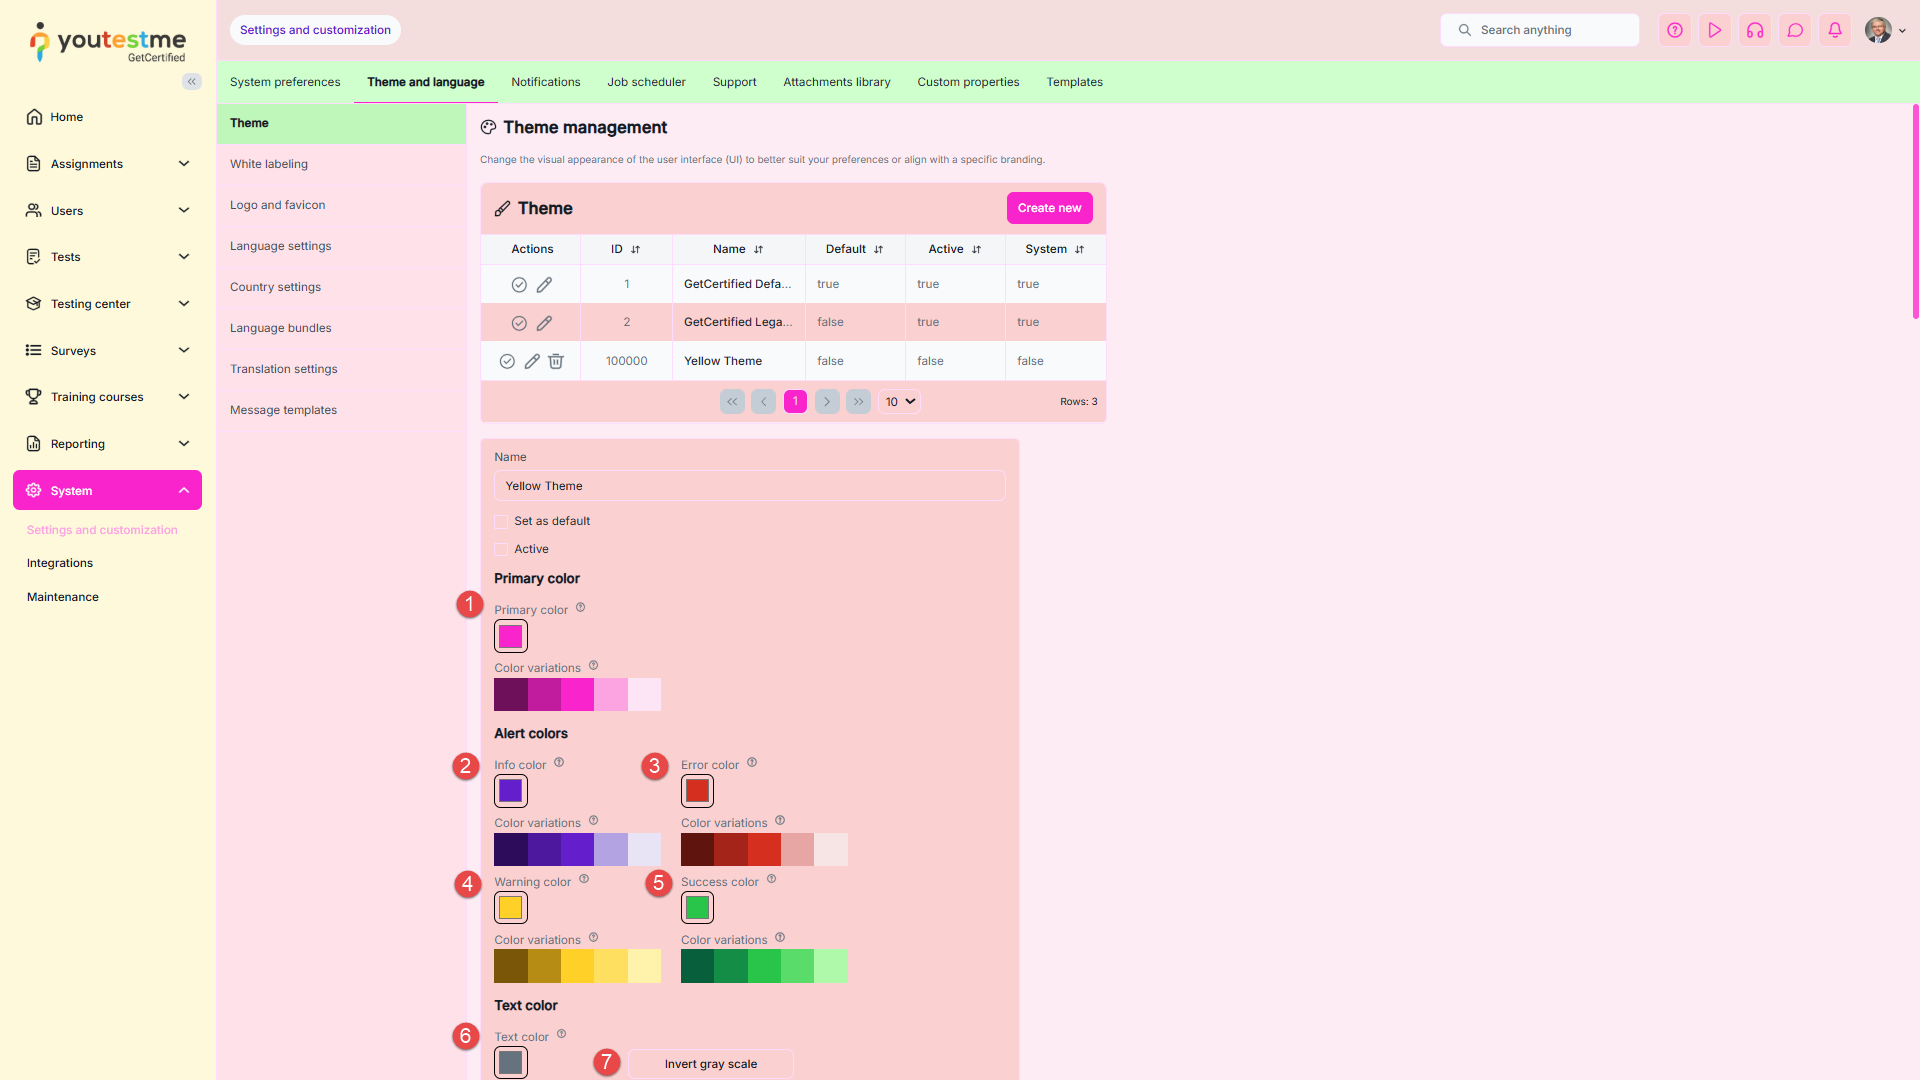
- Change primary color– The primary color is typically the dominant color used for buttons, links, marking menu items, and other key elements.
- Change info color – The color used for informative messages that appear in the top right corner when performing specific actions, such as confirming the saving of test settings changes.
- Change error color – The color for error messages that appear in the top right corner.
- Change warning color – The color for warning messages that appear in the top right corner, for example, a note indicating that you need to select a test to perform a certain action.
- Change success color – The color used to indicate important labels (e.g., the Passed label on tests or testing sessions that are currently available) or actions (such as the Start button on the My tests page, Test preview action, etc.).
- Change Text color – Customize the color of all text in the application, except white text.
- Click the Invert gray scale button to invert the grayscale values and change the colors. When you invert the grayscale, the darkest areas become the lightest, and vice versa.

- Change menu color – The background color of the main menu.
- Change background color – The background colors of pages, tabs, and header names.
- Change header color-color of the header color in the application.
- Change tabs color-color of the tabs in the header of the application.
- Change white color – The interior color of buttons, dropdown menus, tab headers, the background of odd table rows, etc.
- Change white text color – The color of white text, for example, text when the menu title is selected.
- Change white icon color – The color of white icons, such as menu title icons.
- Change border color– The color of borderlines.
- Change submenu color – The background color of submenu items in the navigation.
- Change submenu selected color – The accent color used when selecting rows in tables.
- Change hover accent color – The colors used when hovering over input or dropdown fields.
- Change disabled field color – The accent color used for fields that cannot be changed.
- Change login panel color – The background color of the login panel area.
- Change finish button color – The color of the “Finish” button in test-taking views.
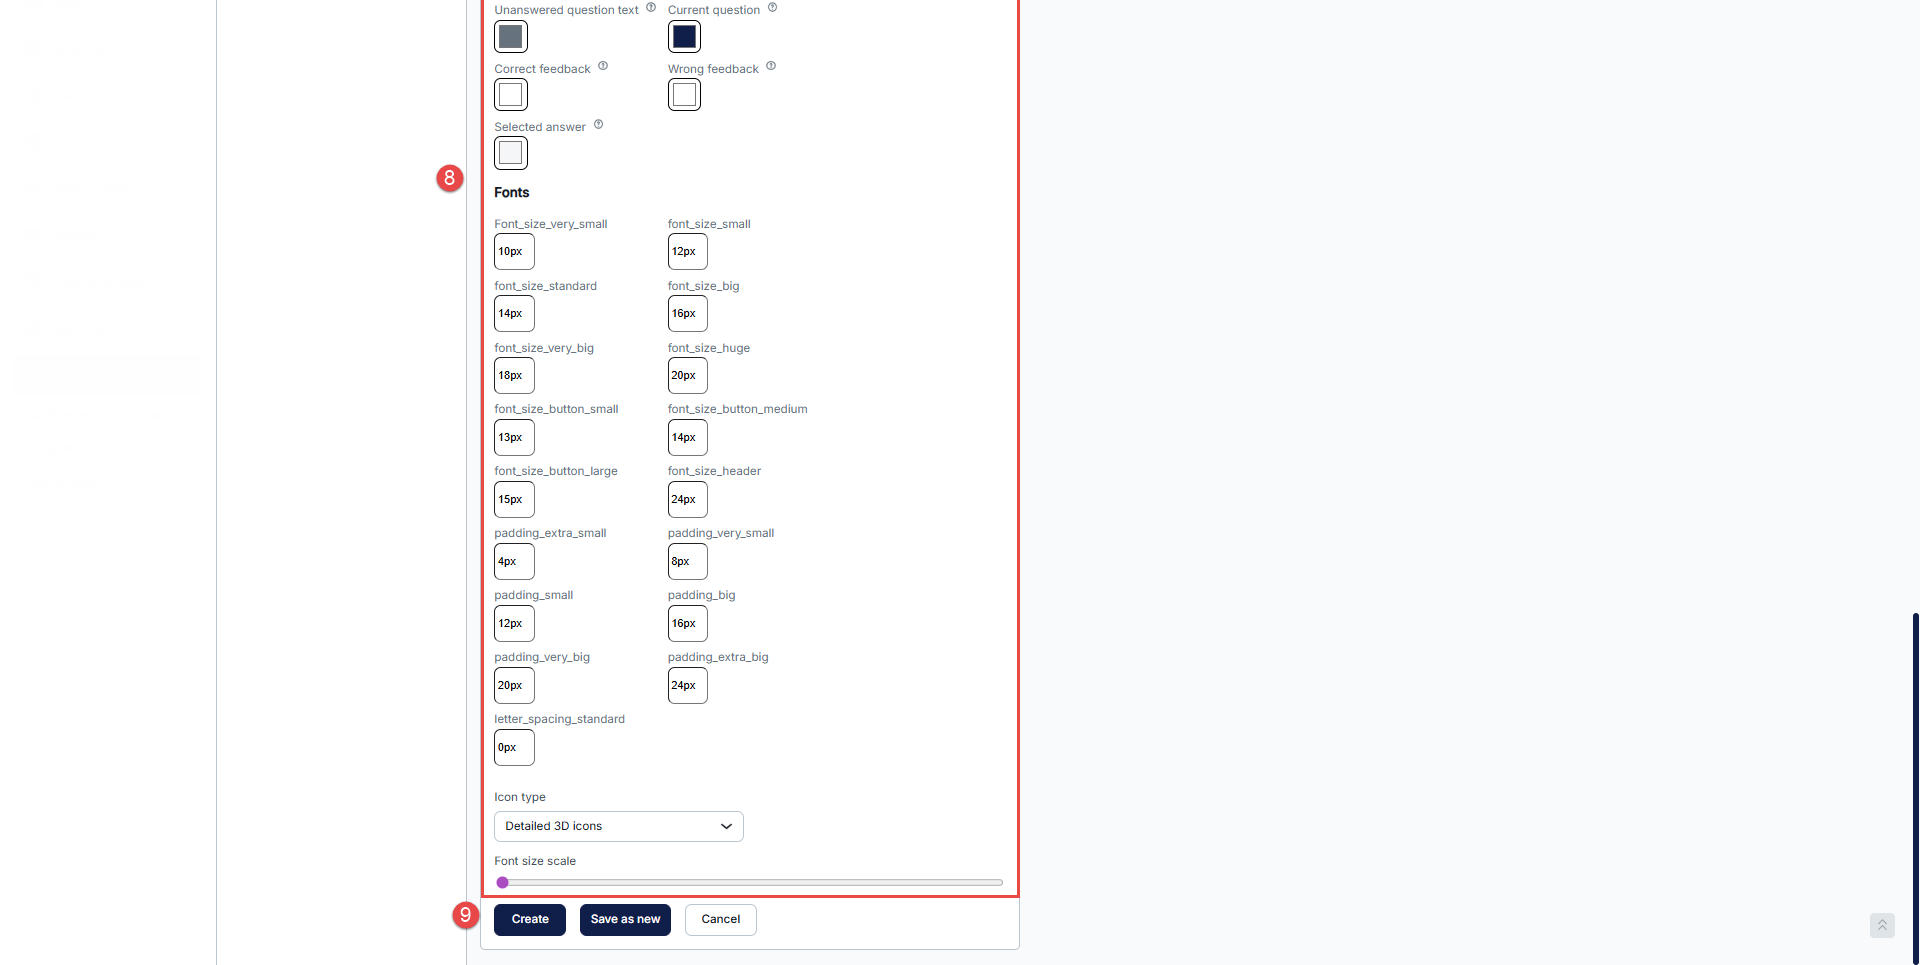
- Change answered question color – The color used to mark answered questions.
- Change unanswered question color – The color used to mark unanswered questions.
- Change correct answer color – The color that highlights correct answers.
- Change incorrect answer color – The color that highlights incorrect answers.
- Change finish button text color – The text color displayed on the “Finish” button.
- Change unanswered question text color – The text color for unanswered questions.
- Change current question color – The color used to indicate the current question being viewed.
- Change correct feedback color – Sets the color used for the feedback shown after a question is answered correctly.
- Change wrong feedback color – Sets the color used for the feedback shown after a question is answered incorrectly.
- Change the color of the selected answer within the test-taking process.
- Select between detailed 3D icons or simple flat icons.
- You can adjust the font size by dragging the circle to the right if needed.
- Save the changes.
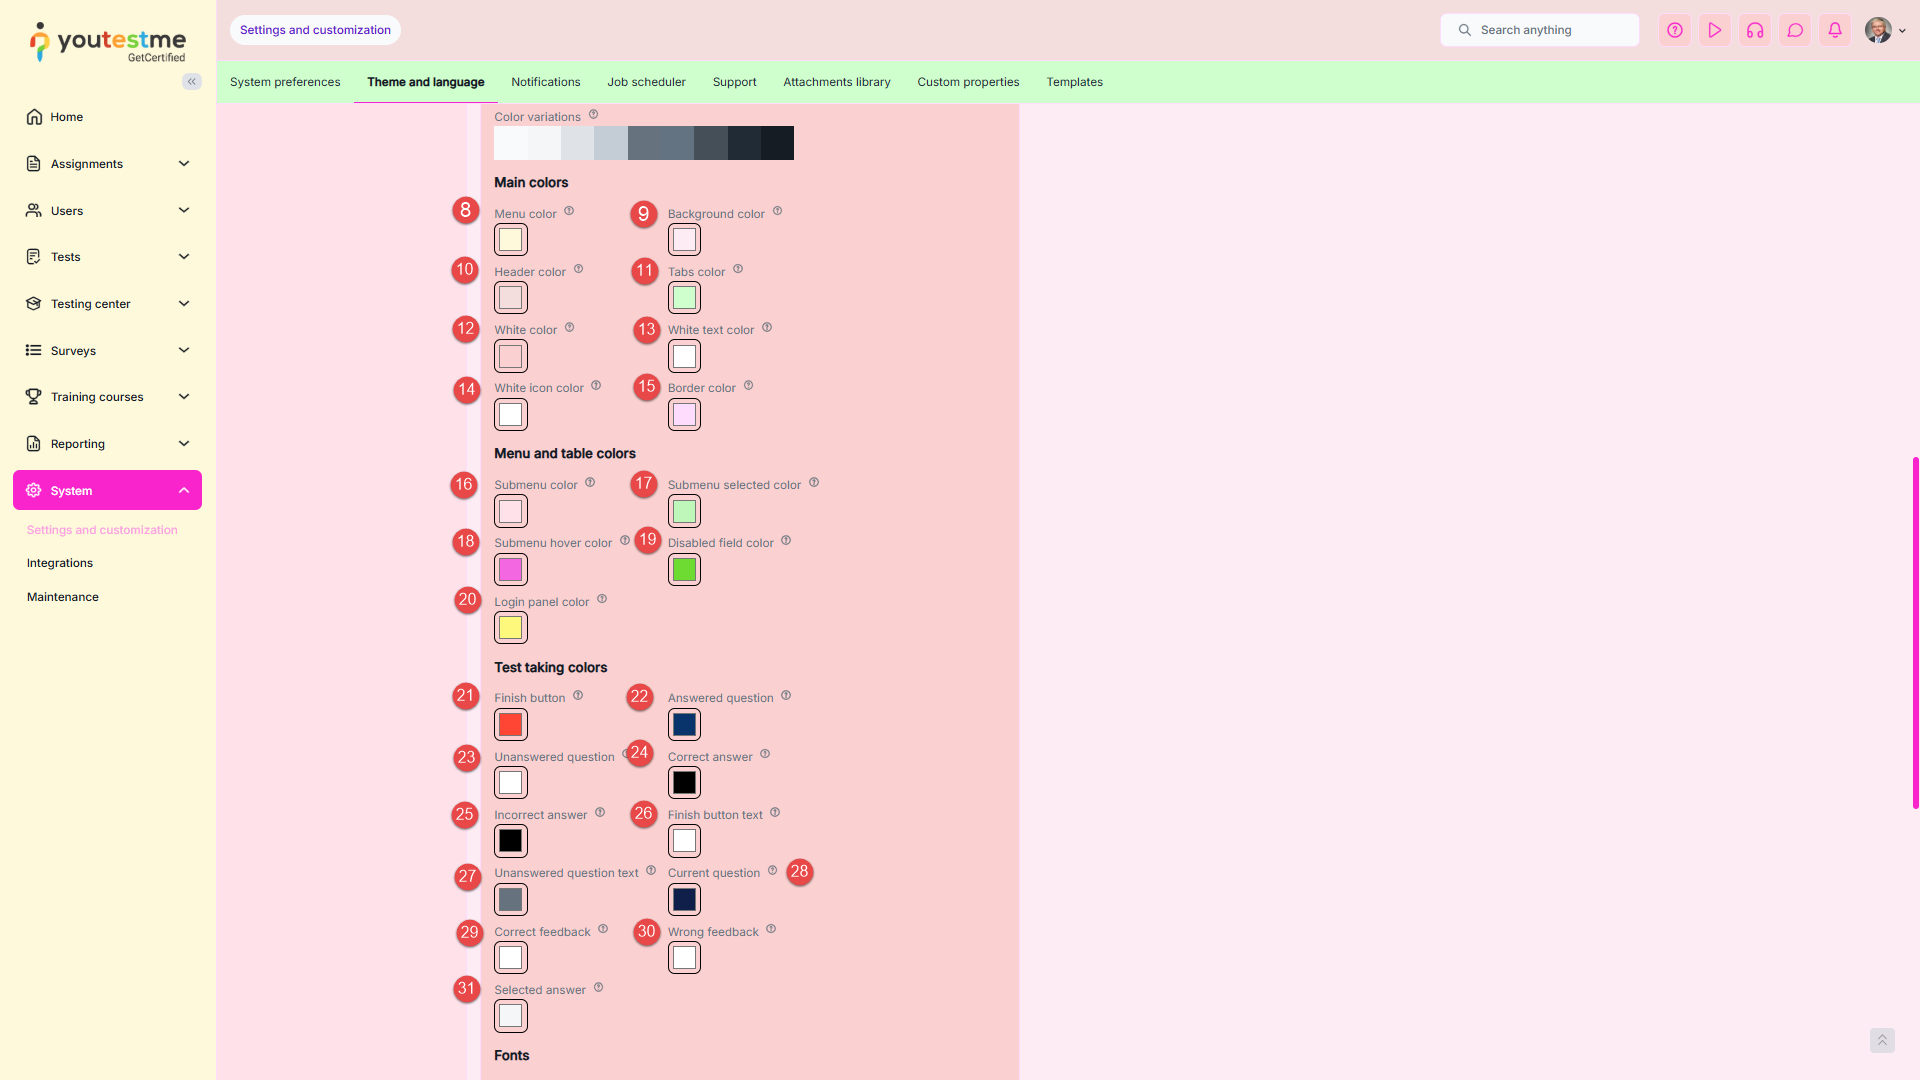
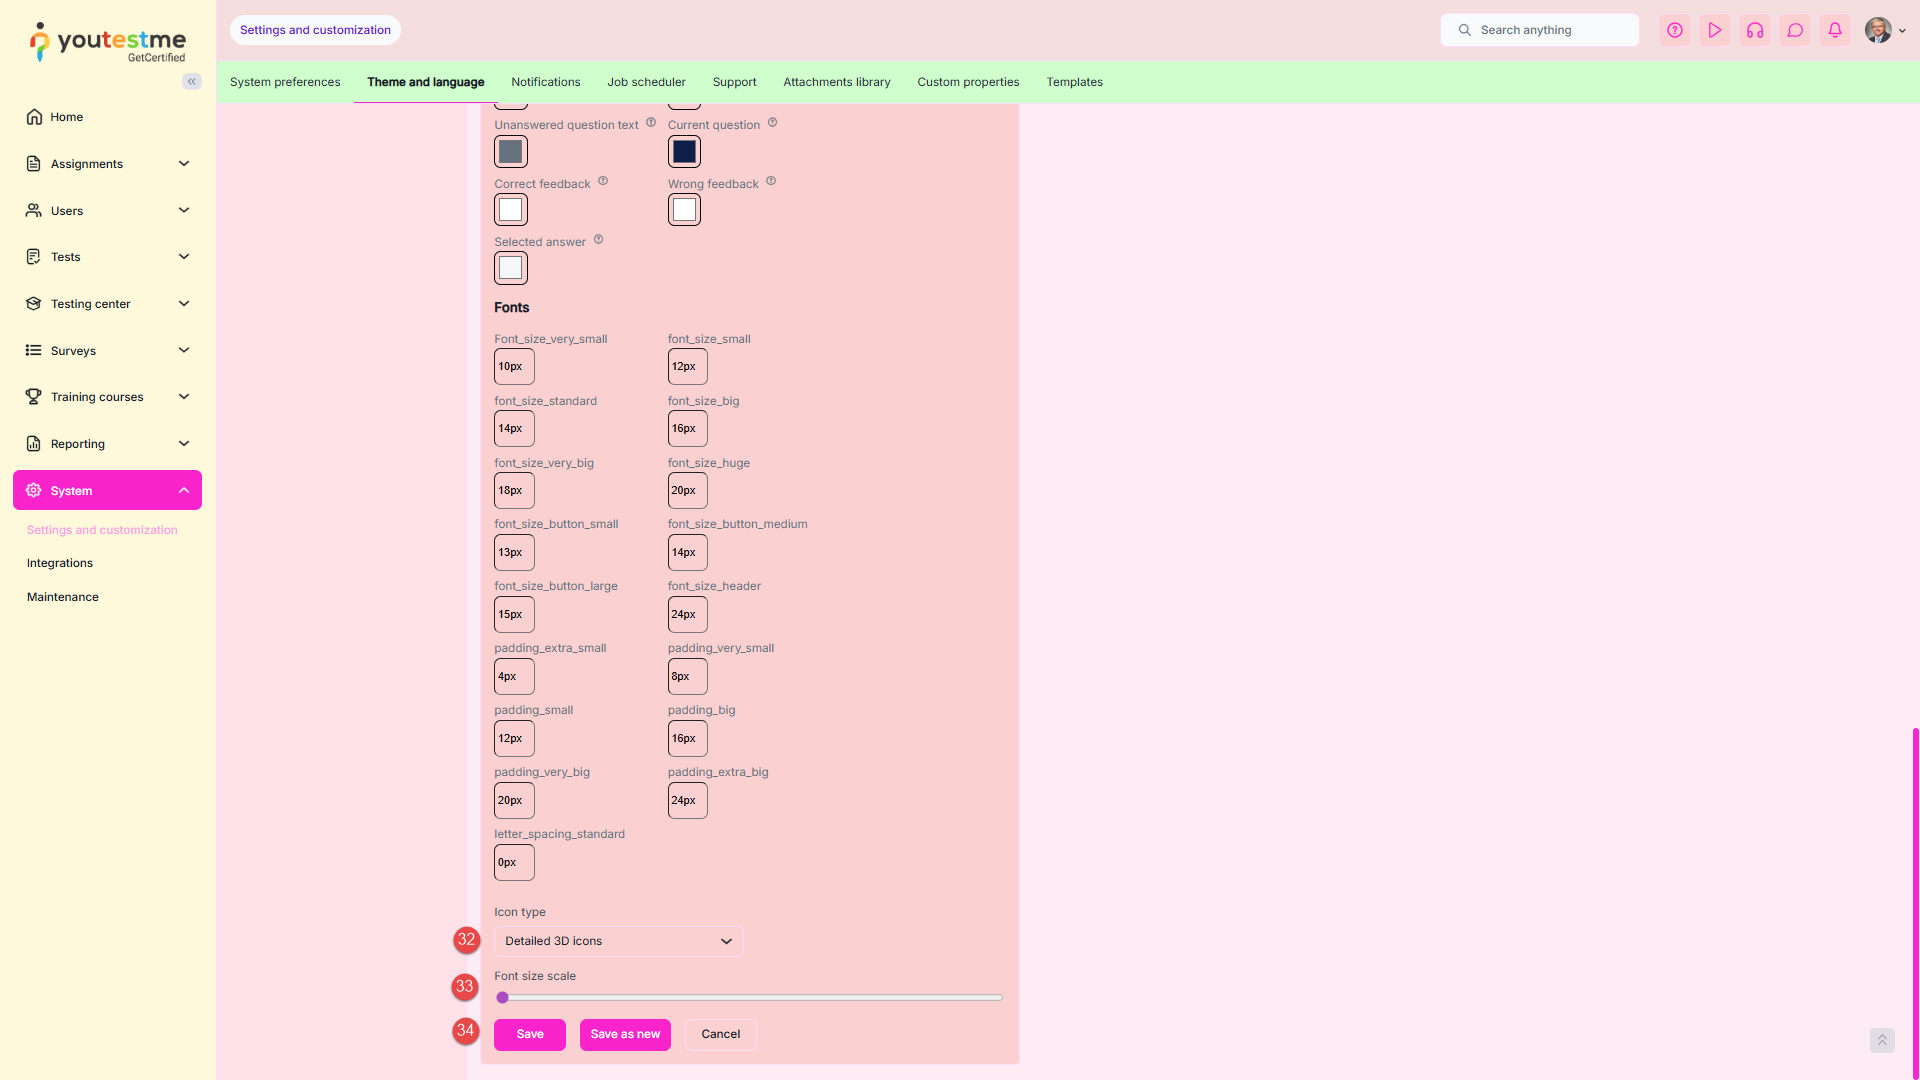
Note: For colors with multiple shades displayed on the right side, the varying shades will be applied to different parts of the application.
From our example above, an Error Message will look like this:
Warning Dialog:
Informative Message:
The application appearance can be configured only by the administrator role, while changes are visible to all system users.
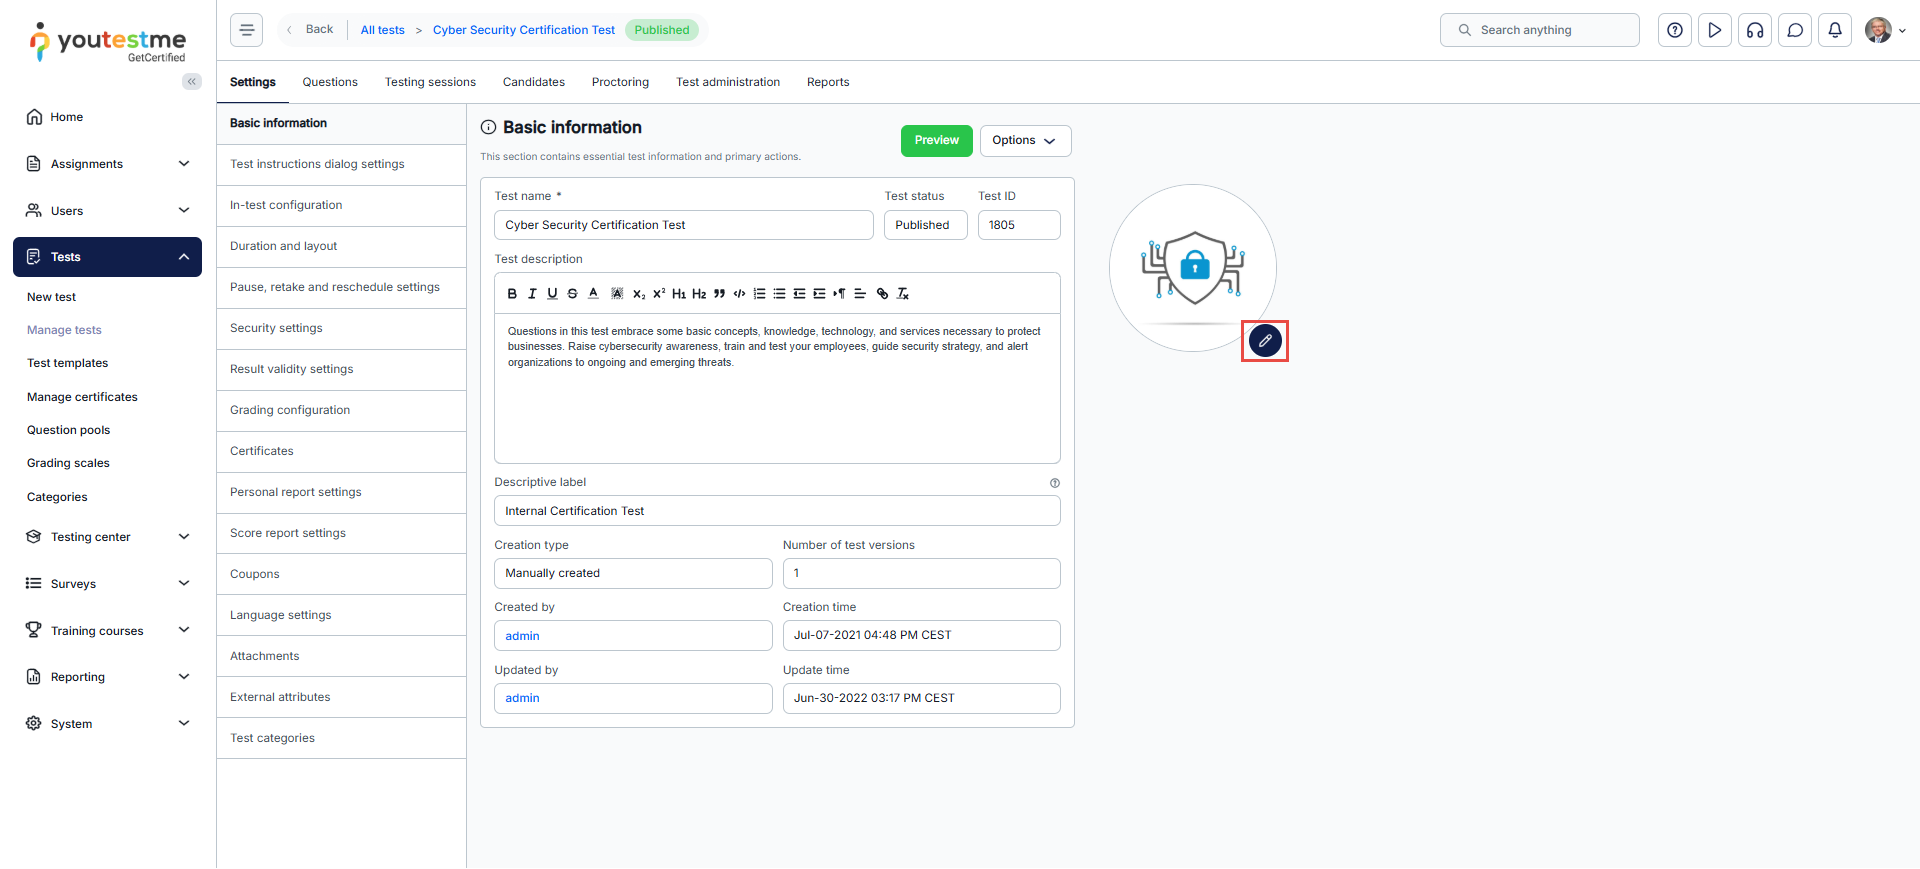
Test Logo
You can set a specific logo for each test you create, in addition to branding the entire application with your logo. Here is how:
Navigate to your test’s Settings tab. In the Basic Information section, you will find the test logo box. Click on the pencil icon to edit the logo.
A new pop-up window with the following options will appear:
- The test logo is displayed here.
- Upload a new logo from your device.
- Delete the existing logo.
- Information on recommended logo size and type.
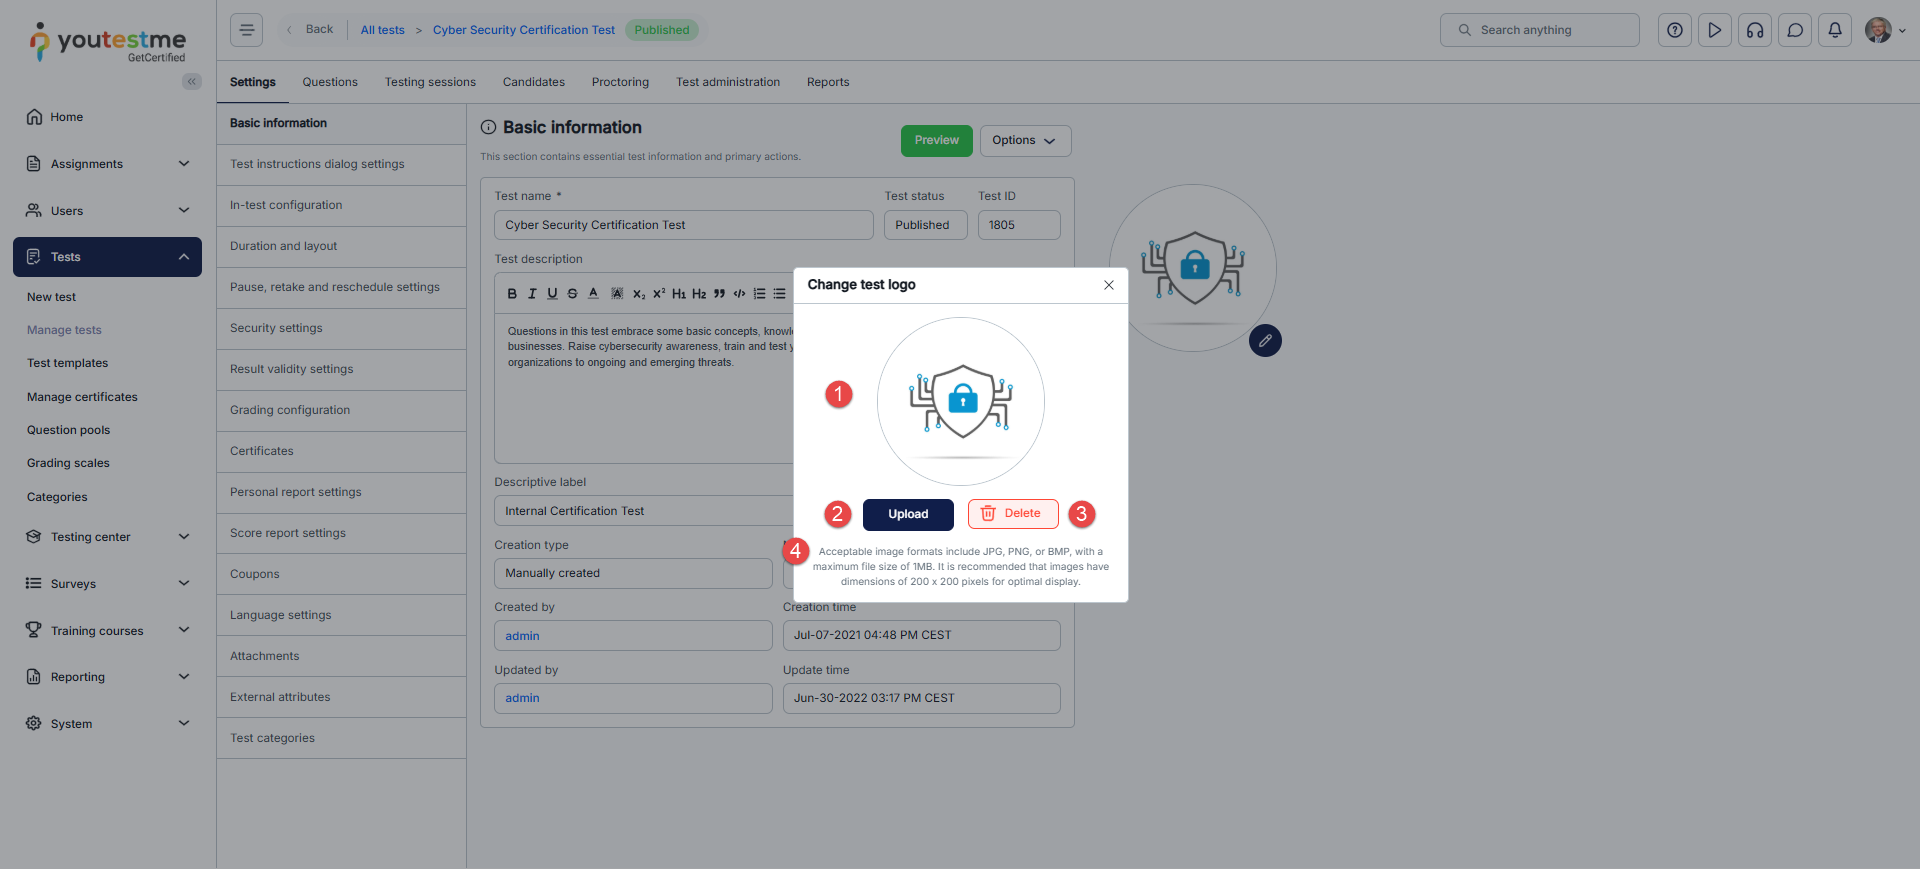
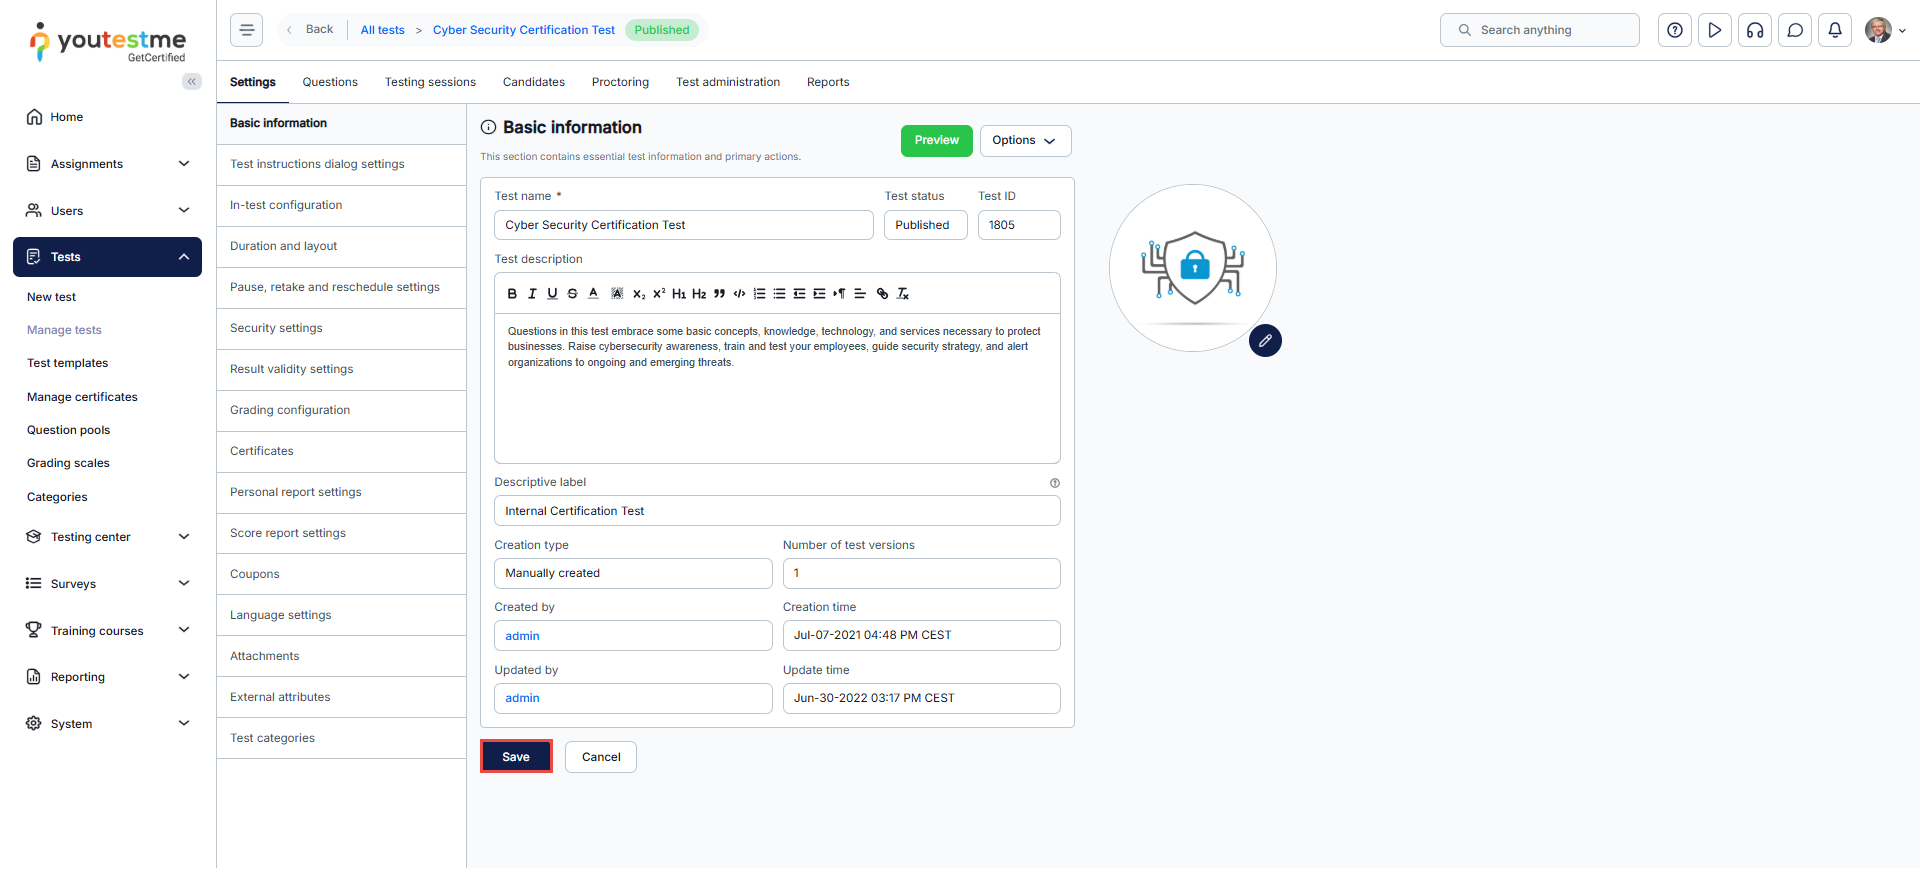
Save the changes you’ve made.
You can view the logo that has been set on the My tests page.
Set Up Your Support Contacts
The purpose of this article is to explain how to set up application support contacts.
For a video tutorial on setting up contacts, please use this link.
Customizing In-App and Email Notifications
The Notification tab contains email and in-application notification templates that are automatically sent when a specific action is performed in the application.
Notification templates are predefined but editable. To manage and edit notifications, follow the instructions below:
Select the System/Settings and customization/Notifications tab.
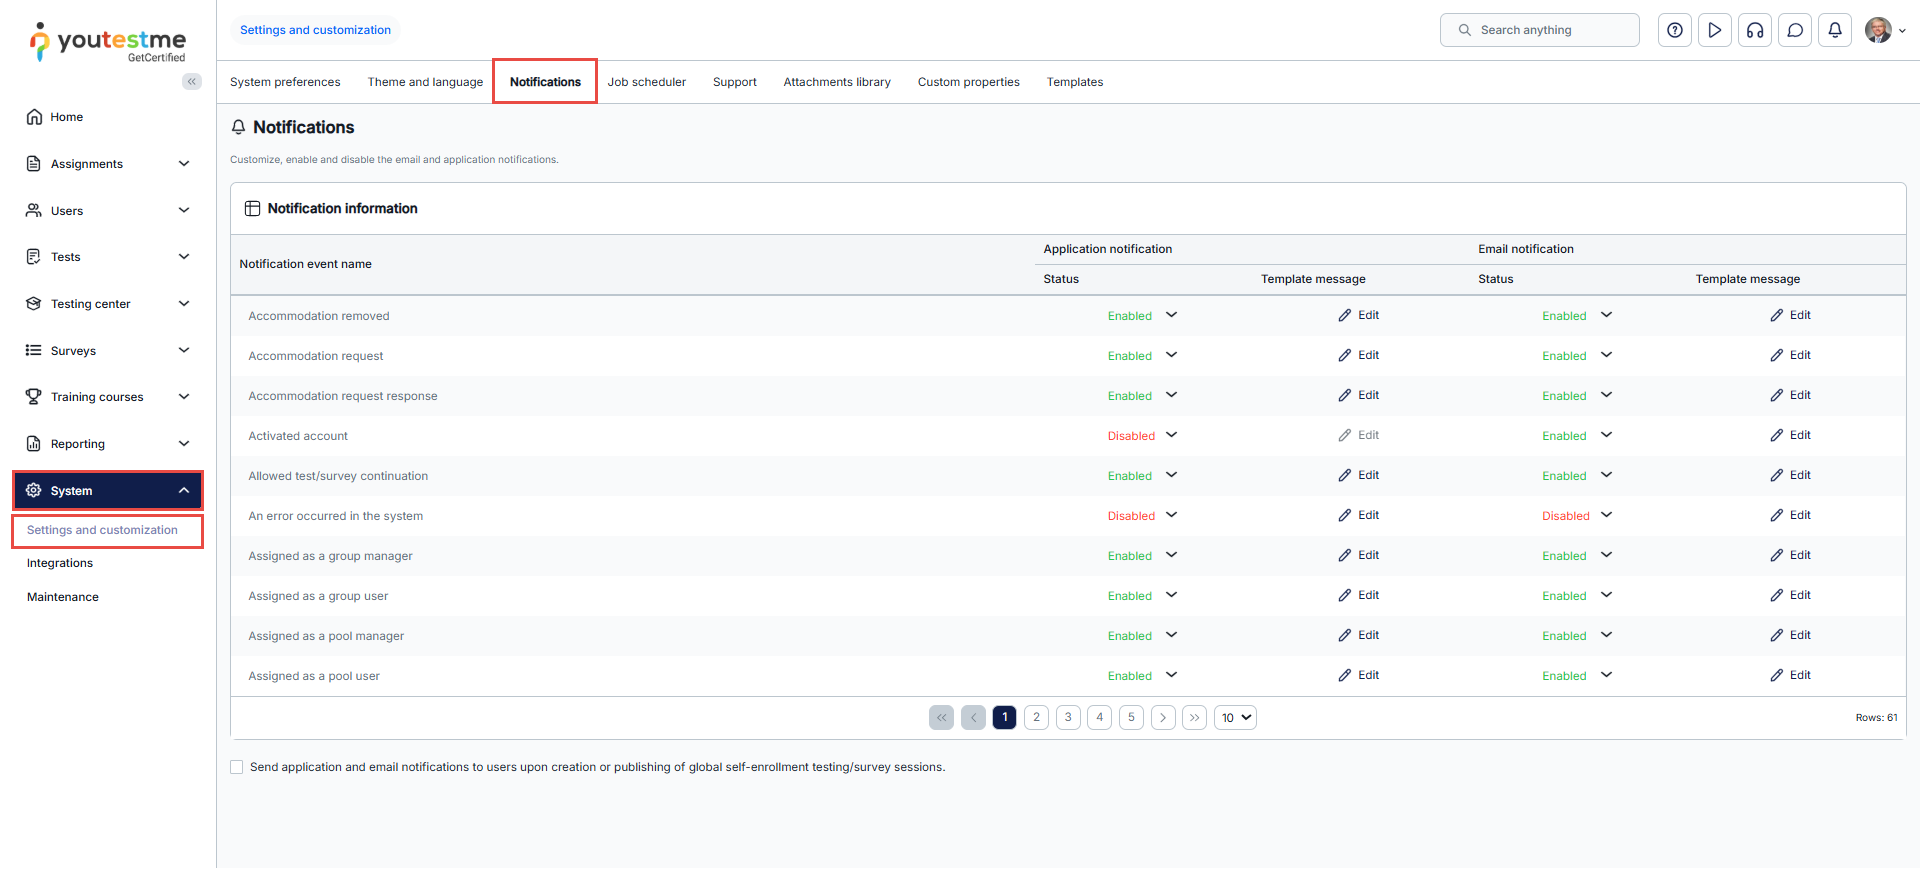
- Find the notification you want to edit – search the list of all events for which there are notifications, and find the one you want to configure.
- Enable or disable Application notification – enable or disable application notifications for any listed notification event name.
- Click on Edit to customize Application notification – edit the template message shown in the application after the specific action is taken.
- Enable or disable the Email notification – enable or disable email notifications for any listed notification event name.
- Click on Edit to customize Email notifications – edit the template message sent to users’ email after a specific action is taken.
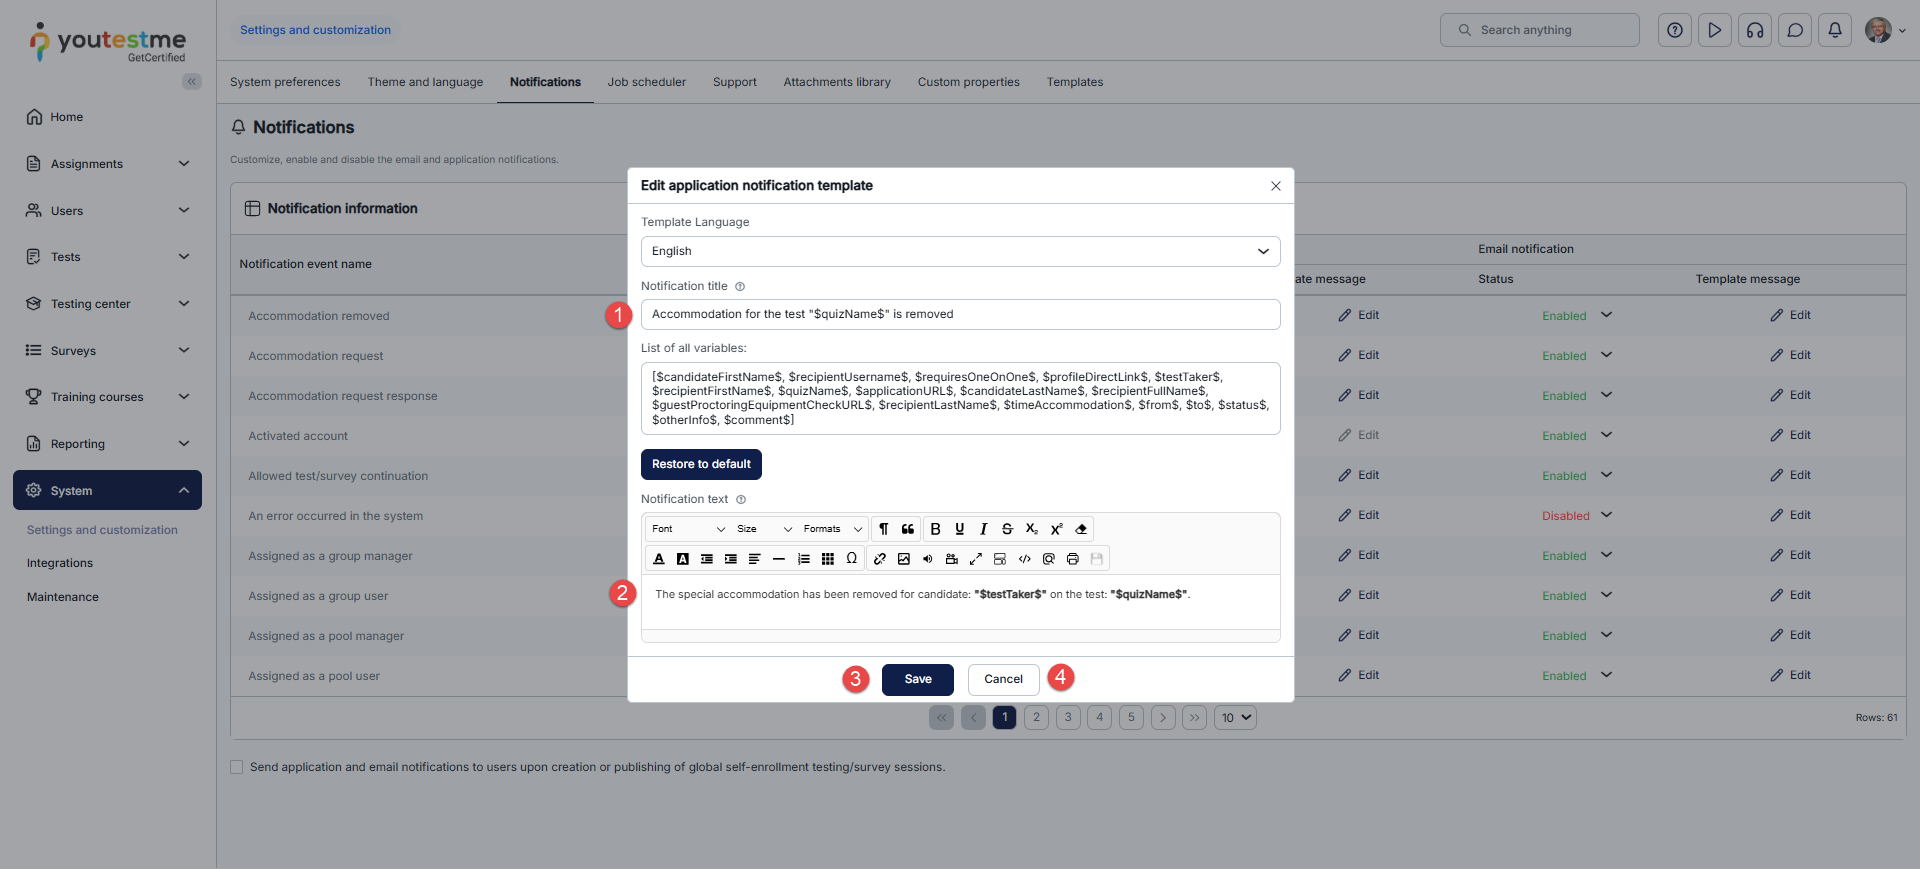
Once you click Edit, the pop-up window will appear where you can:
- Change the Notification title. This text will appear as the notification title.
- Change the Notification text (body). You can customize the text except for the one between the $ signs. This section cannot be modified, as the system uses variables to insert user-specific data.
- Click the Save button to save the template.
- Click the Cancel button to discard the template changes.
Please check out this article for more detailed instructions on modifying the predefined notification.
Configuring Mail Server
This article explains how to configure the mail server in the System settings on the Mail server tab.
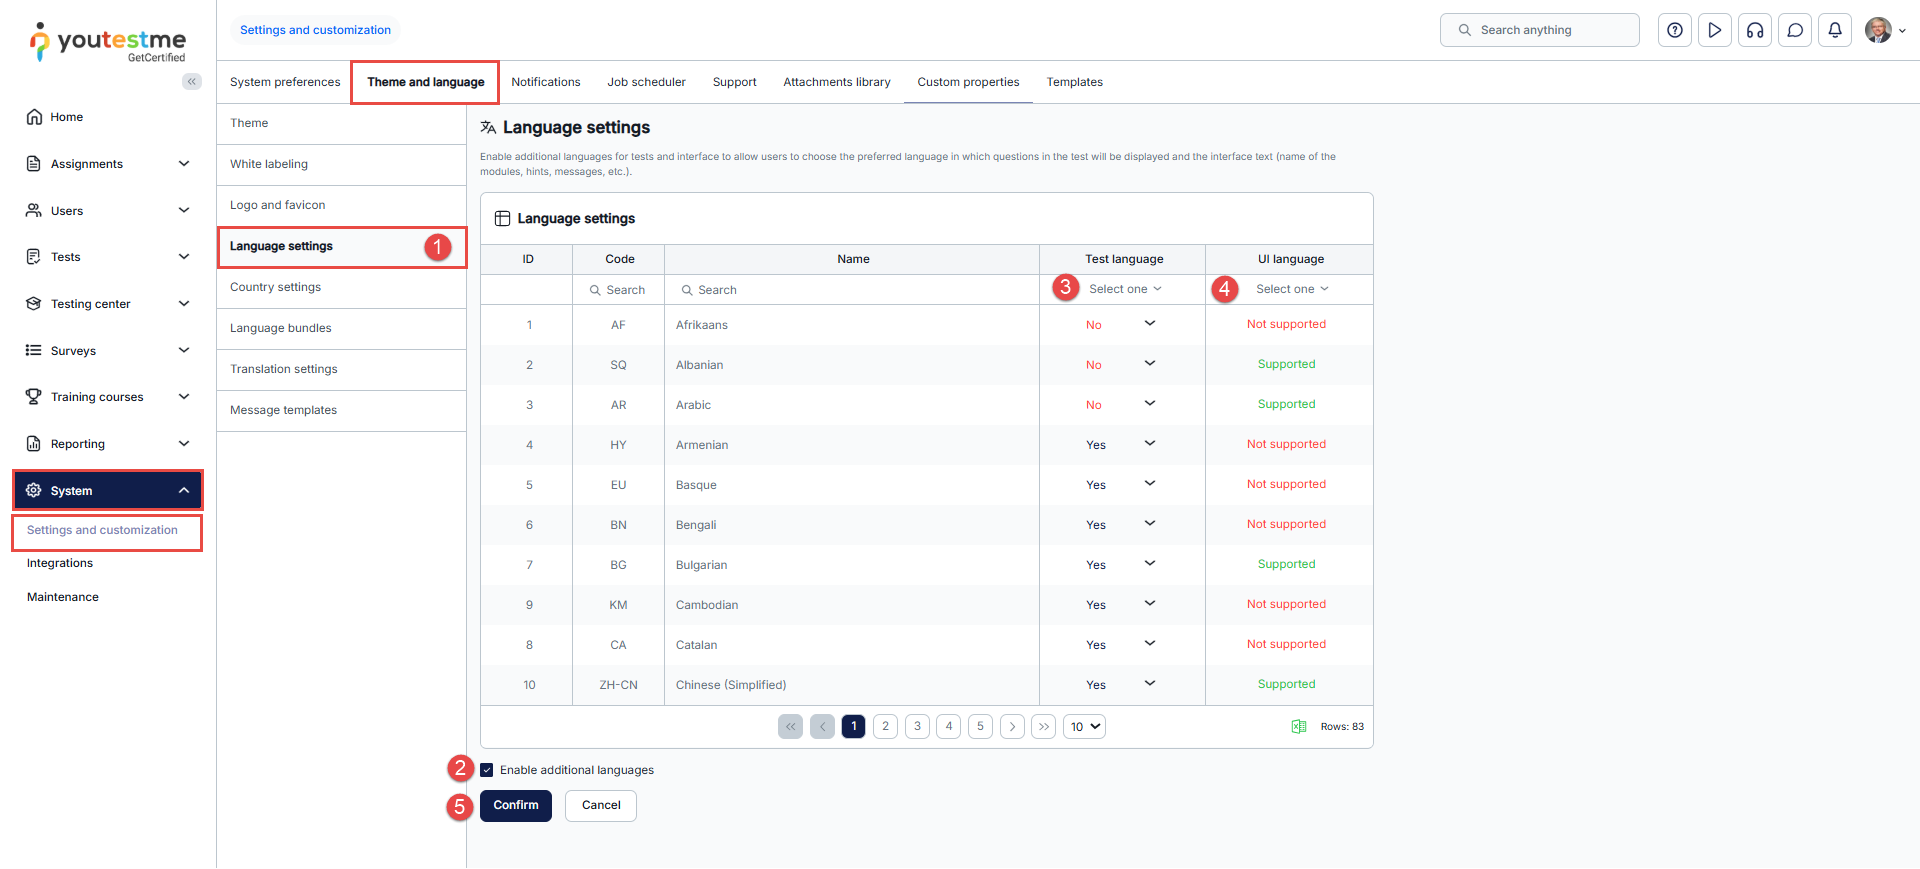
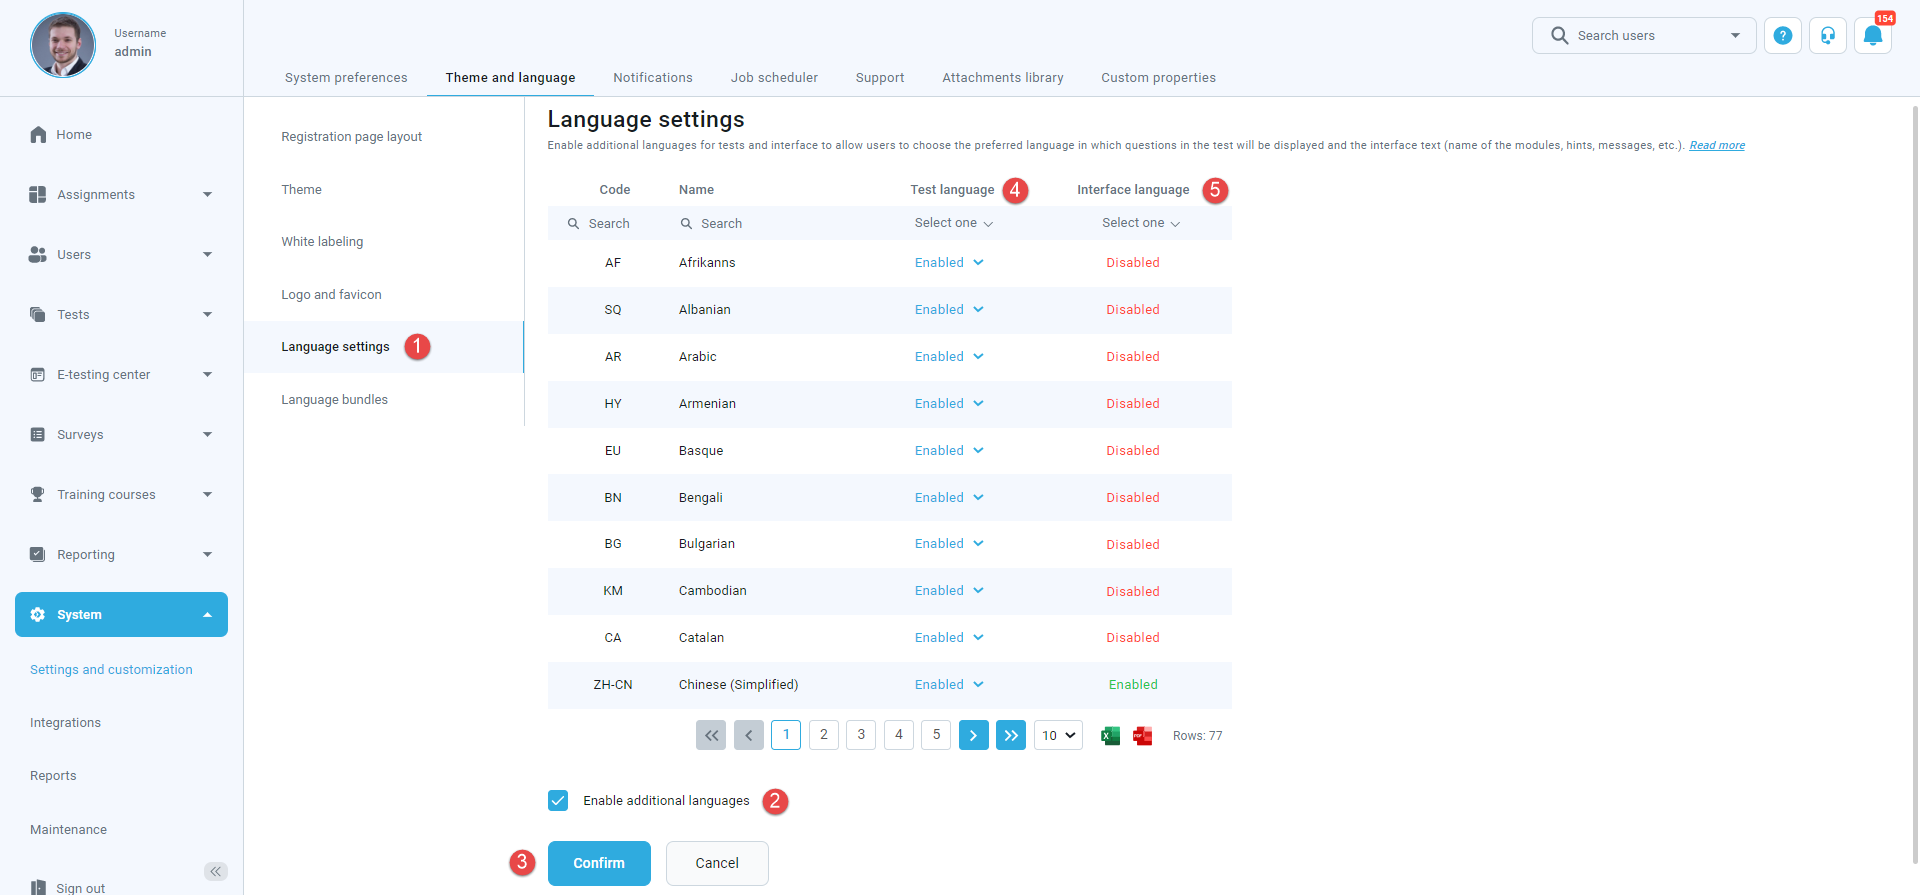
Language settings
To set up the desired language, do the following:
- Go to the System/System and customization/Theme and language/Language settings tab.
- Check the checkbox Enable additional languages.
- Enable/disable test language.
- Enable/disable interface language.
- Click on the Confirm button.
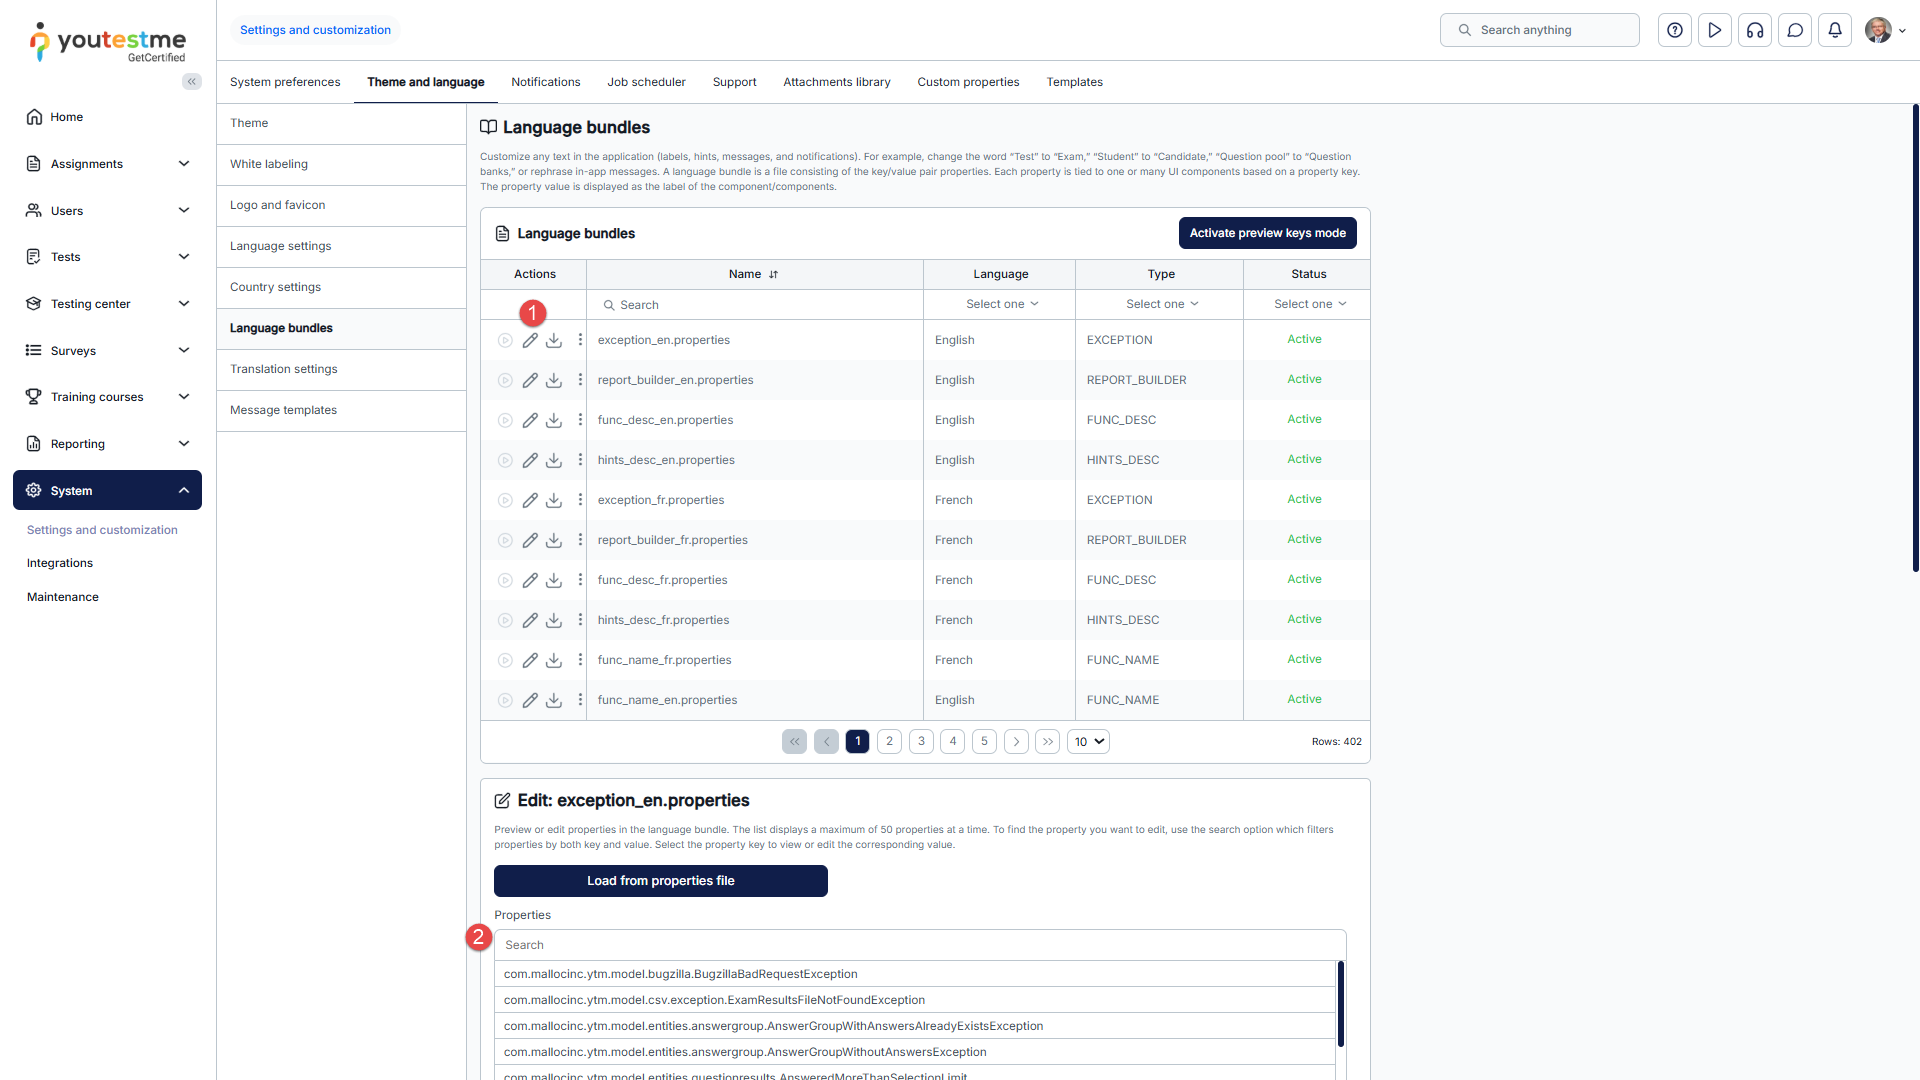
Language bundles settings
Users can customize the application interface text in the Language bundles tab according to their needs – change labels’ names, create new hints, and modify notifications’ content.
A language bundle is a file containing key/value pairs. Each property is connected to one or more UI components via a property key.
Note: It is impossible to delete default language bundles, but you can create new ones based on them. Also, having two active bundles of the same type is impossible.
There are two ways to create a custom language bundle:
- Changing the language bundle by editing one-by-one property values.
- Downloading the language bundle, editing the file offline using the desired text editor, and importing it into the application.
Note: The keys must not be changed. Otherwise, the changes will not be visible.
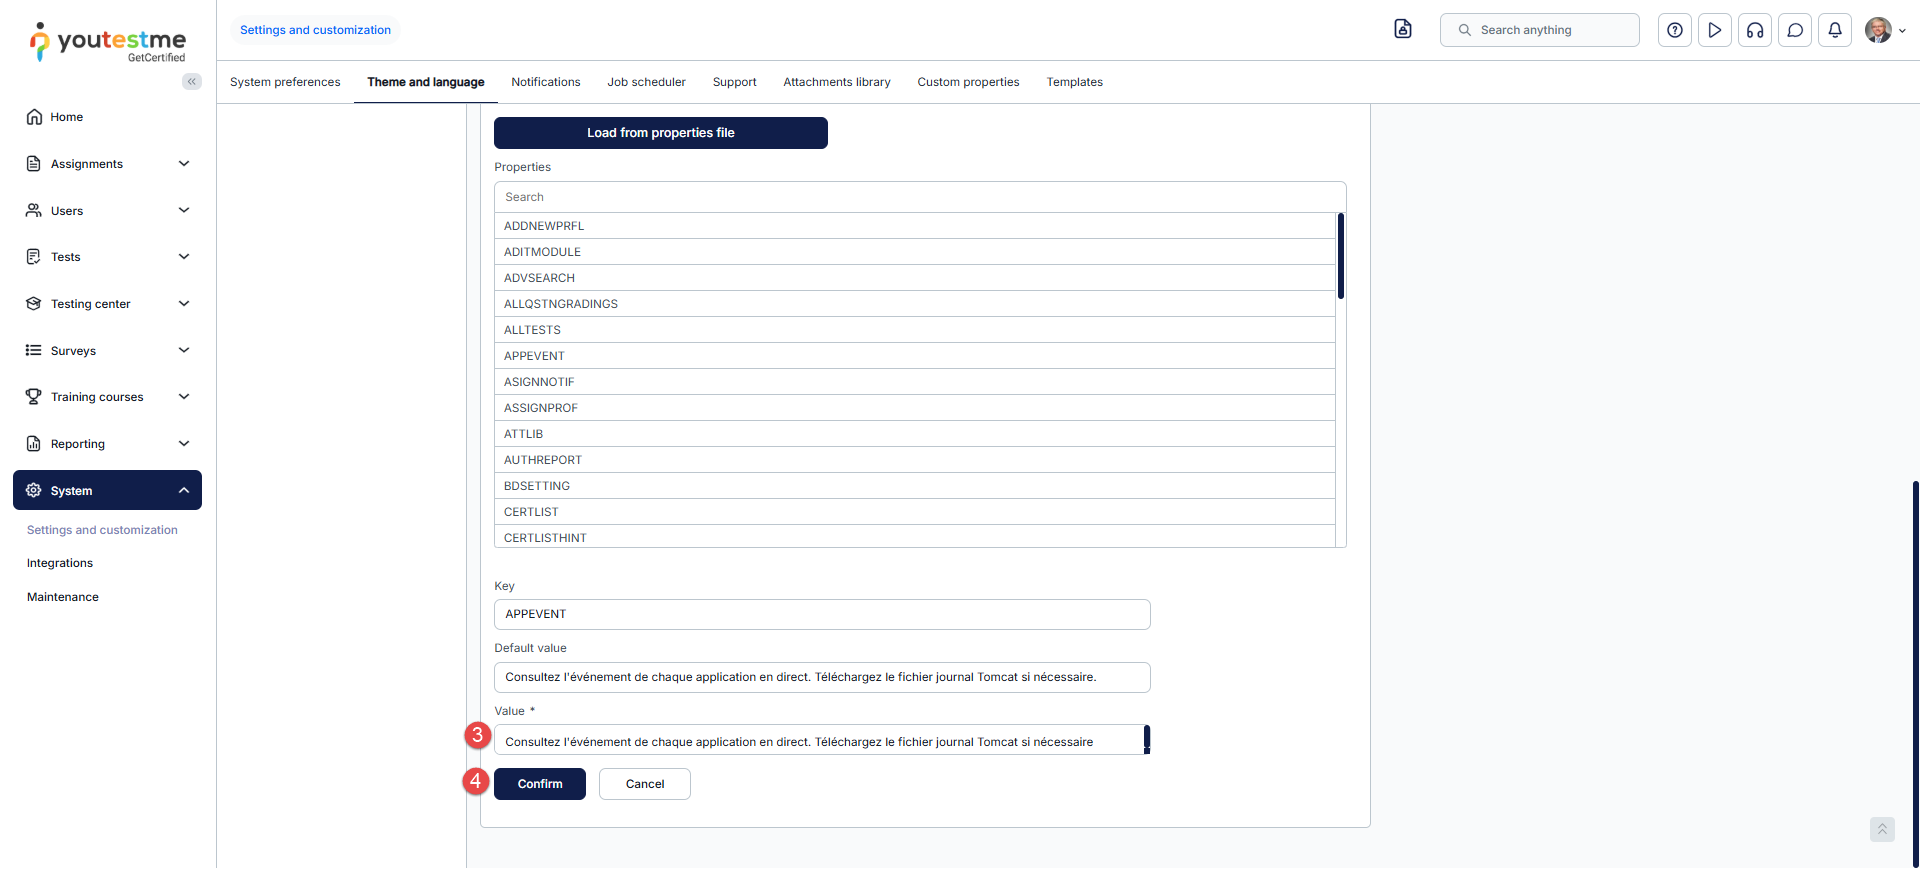
To create a new language bundle by editing one-by-one property values:
- Click the pencil icon in the Actions column for the language bundle you want to create a new one from.
- Search for the property value or key you want to change.
- Edit the text.
- Confirm or discard the changes you made in the property value field.
Note: If you want to remove the attempt ID from the confirmation dialog shown when booking a session, you can do this through Language Bundles. In the MESSAGE file, edit the findYourTest property and remove the ID: {0} part from the text value.
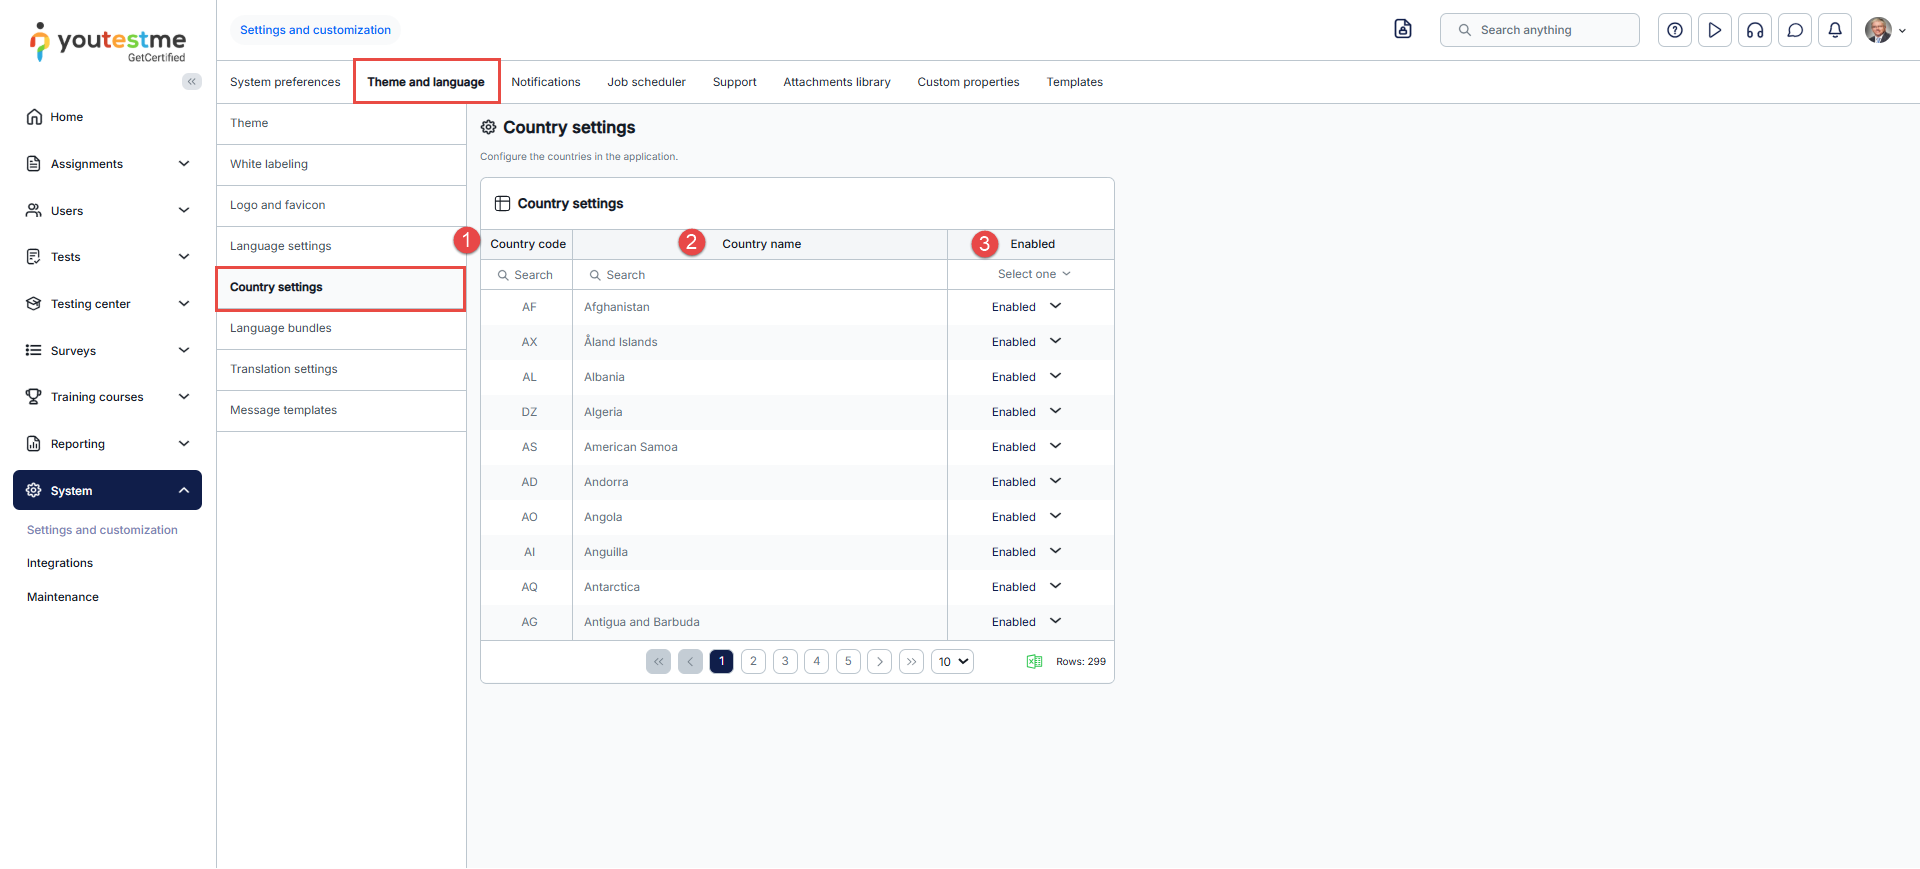
Country Settings
You can manage the countries available in the application, including those used for Dynamic Tax configuration, by navigating to Country Settings. In the table, you’ll find:
- Country Code – The standardized code for each country.
- Country Name – The full name of the country.
- Enabled Status – Indicates if a country is active. Disabled countries won’t appear in the Dynamic Tax list when adding a new tax.
