Article verified for Release 15.2 on February 23, 2026.
This article explains the difference between System Roles (Global) and Workspace Roles, how they interact, and how they are used to control user access and permissions across the platform. These roles are essential for managing access within workspaces, which are used to organize and segment content, users, and responsibilities.
For detailed instructions on how to create and manage workspaces, please refer to the article: How to Create and Organize Workspaces.
Role Types Overview
There are two primary types of roles that define user permissions in the application. The user’s total permissions result from their System Role (global permissions) and the sum of all assigned Workspace Roles (workspace-specific permissions).
System Roles (Global)
-
Apply across the entire system, regardless of workspace.
-
System roles take precedence over workspace roles when permissions overlap.
-
Define broad access to global functionalities like user management, workspace management, and system-wide settings.
Workspace Roles
-
Limited to specific workspaces.
-
Grant permissions related to managing workspace-specific entities such as tests, surveys, training courses, question pools, user groups, and users.
- A user can have multiple Workspace Roles per workspace, and their workspace-specific permissions are the sum of all assigned roles.
-
Users must first be added to a workspace to receive a workspace role.
Note: If both a system and a workspace role grant the same permission, the system role overrides the workspace role.
Example: If a user has the System Role permission “Manage any pool,” they will automatically have access to all question pools across the platform, regardless of their workspace membership or Workspace Role. In this case, assigning a Workspace Role with similar permissions is unnecessary.
Workspace Role Purpose – with Example
Let’s say you have a System Role that includes the permission “Create new tests, surveys, or training courses.” This means any user with this role can create these resources across the entire system.
Now, imagine you want to organize your users into workspaces—separate environments or teams—so that users only create and manage content relevant to their specific group. Here’s where the problem arises: if the user has the permission on the system level, they can create content anywhere, not just within their team’s workspace.
This is exactly where Workspace Roles come in.
Instead of giving this permission system-wide, you can create a Workspace Role with the permission “Create tests, surveys, or training courses” and assign it to the user within a specific workspace. This allows the user to create content, but only in that workspace.
At the same time, you can remove or disable this permission from their System Role, ensuring that they cannot create content outside the workspace they are assigned to.
Key point:
Workspace Roles apply only within the workspace where the user is a member. System Roles apply across the entire platform. By combining both roles carefully, you can control what users can do system-wide and what they can do in specific workspaces—avoiding permission overlap or unintended access.
Creating System Roles (Global)
The first step in organizing a workspace is to create global roles assigned to users during account creation. Global roles should include all permissions not specific to workspace entities, such as users, user groups, tests, surveys, training courses, and question categories. In addition, global roles should provide access to pages relevant to workspace entities.
Specifically, you should enable access to different application parts and later define workspace privileges in the workspace role. This ensures that users can manage workspace entities only in the workspaces where they are members, rather than in all workspaces created in the system.
In this example, how to create a global workspace admin role will be explained first. For this role, we suggest enabling the permissions shown in the picture below:
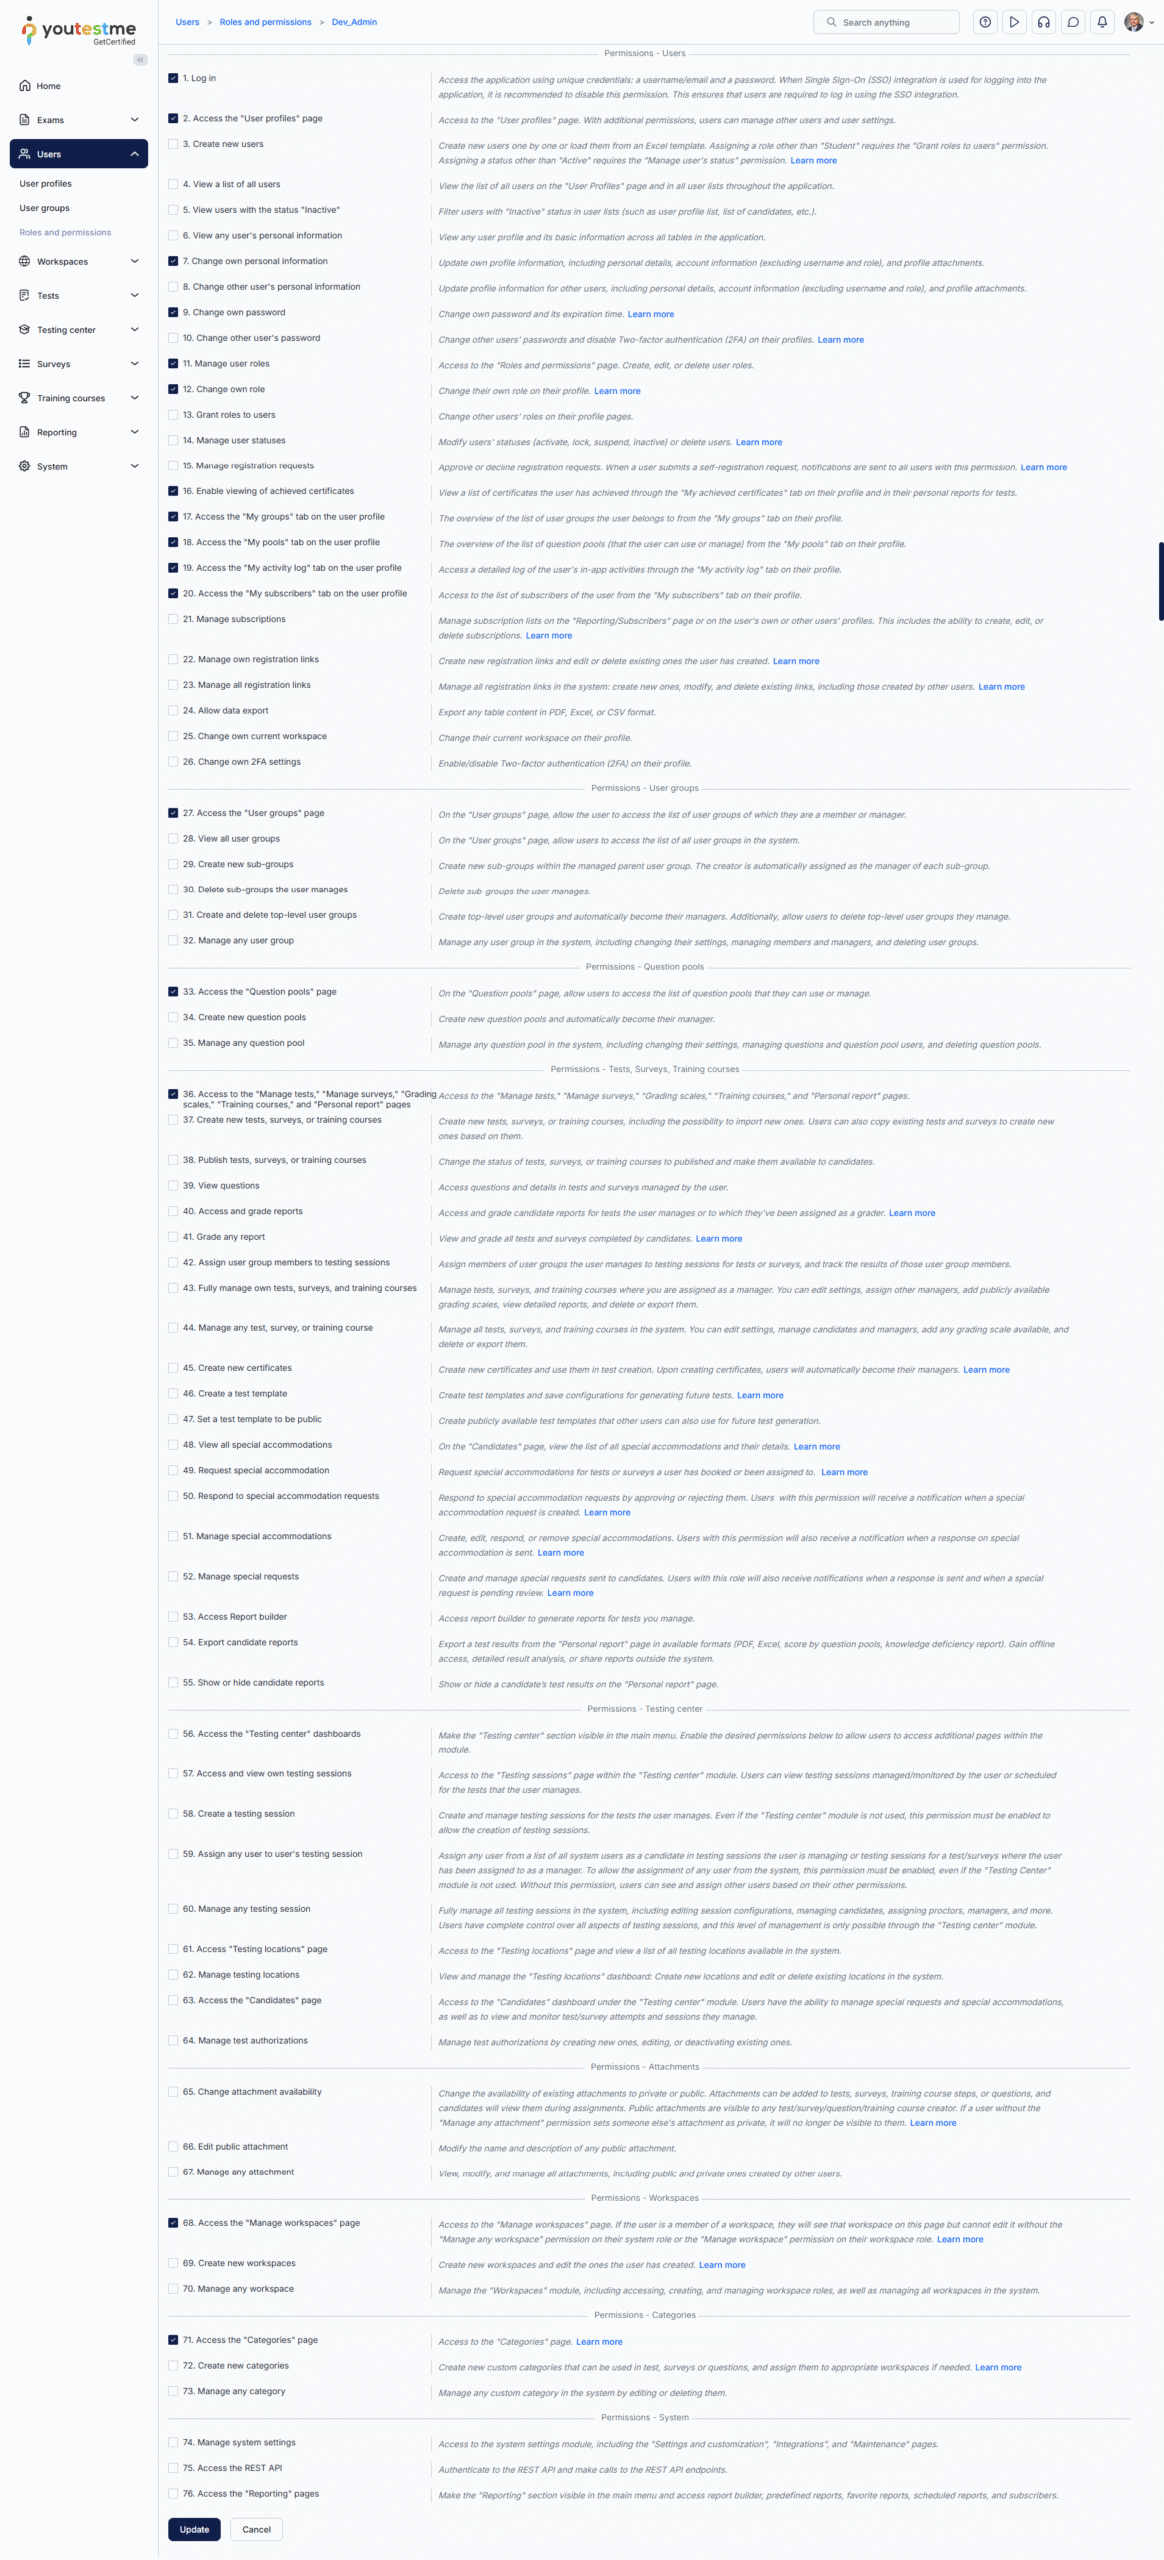
For more information on creating user roles, please refer to this article.
Creating user accounts
For more information on creating a user account, please refer to this article.
Note: You should assign the user a previously created global role, which will only access the defined application parts.
Creating Workspace Roles
Workspace roles are assigned within specific workspaces and determine what actions users can perform in that workspace. These actions may include:
-
Managing tests
-
Assigning users
-
Creating surveys
-
Editing training content
To create a workspace role:
- Navigate to the Workspaces section in the main menu, then select Manage workspace roles.
- Click the Create new button.
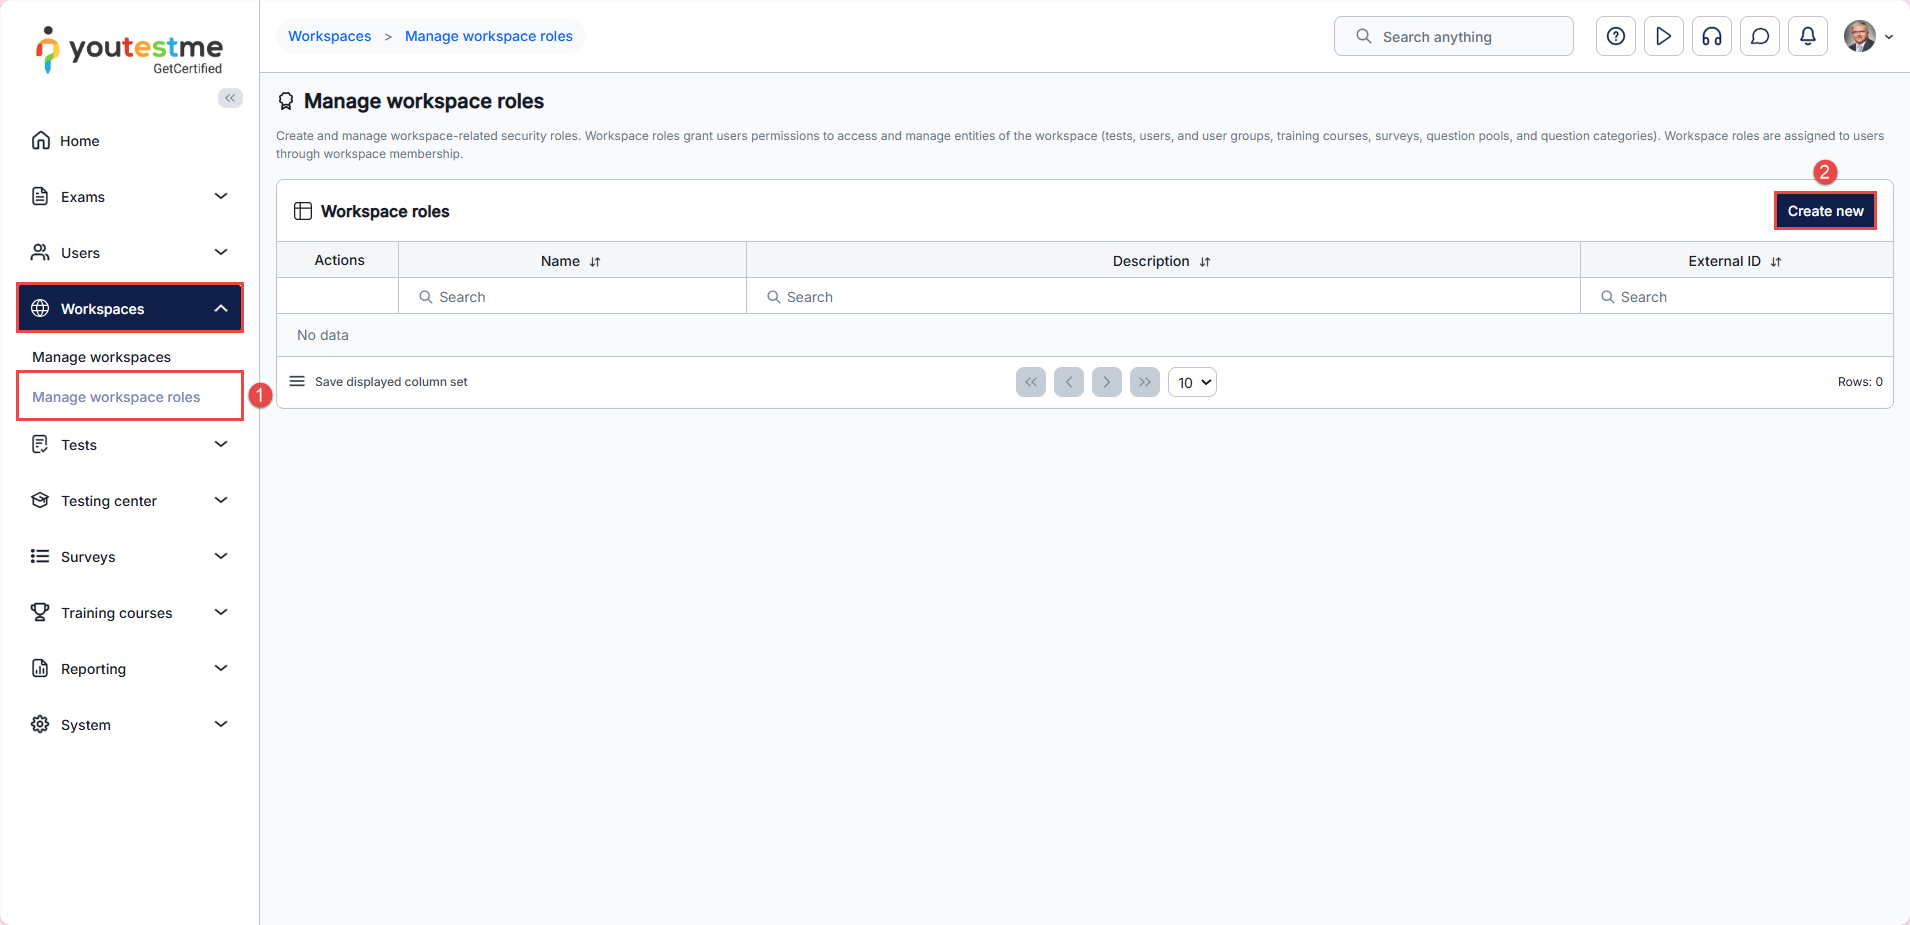
- Enter a role name.
- Choose the desired permissions. In this example, all permissions should be selected for the workspace admin role.
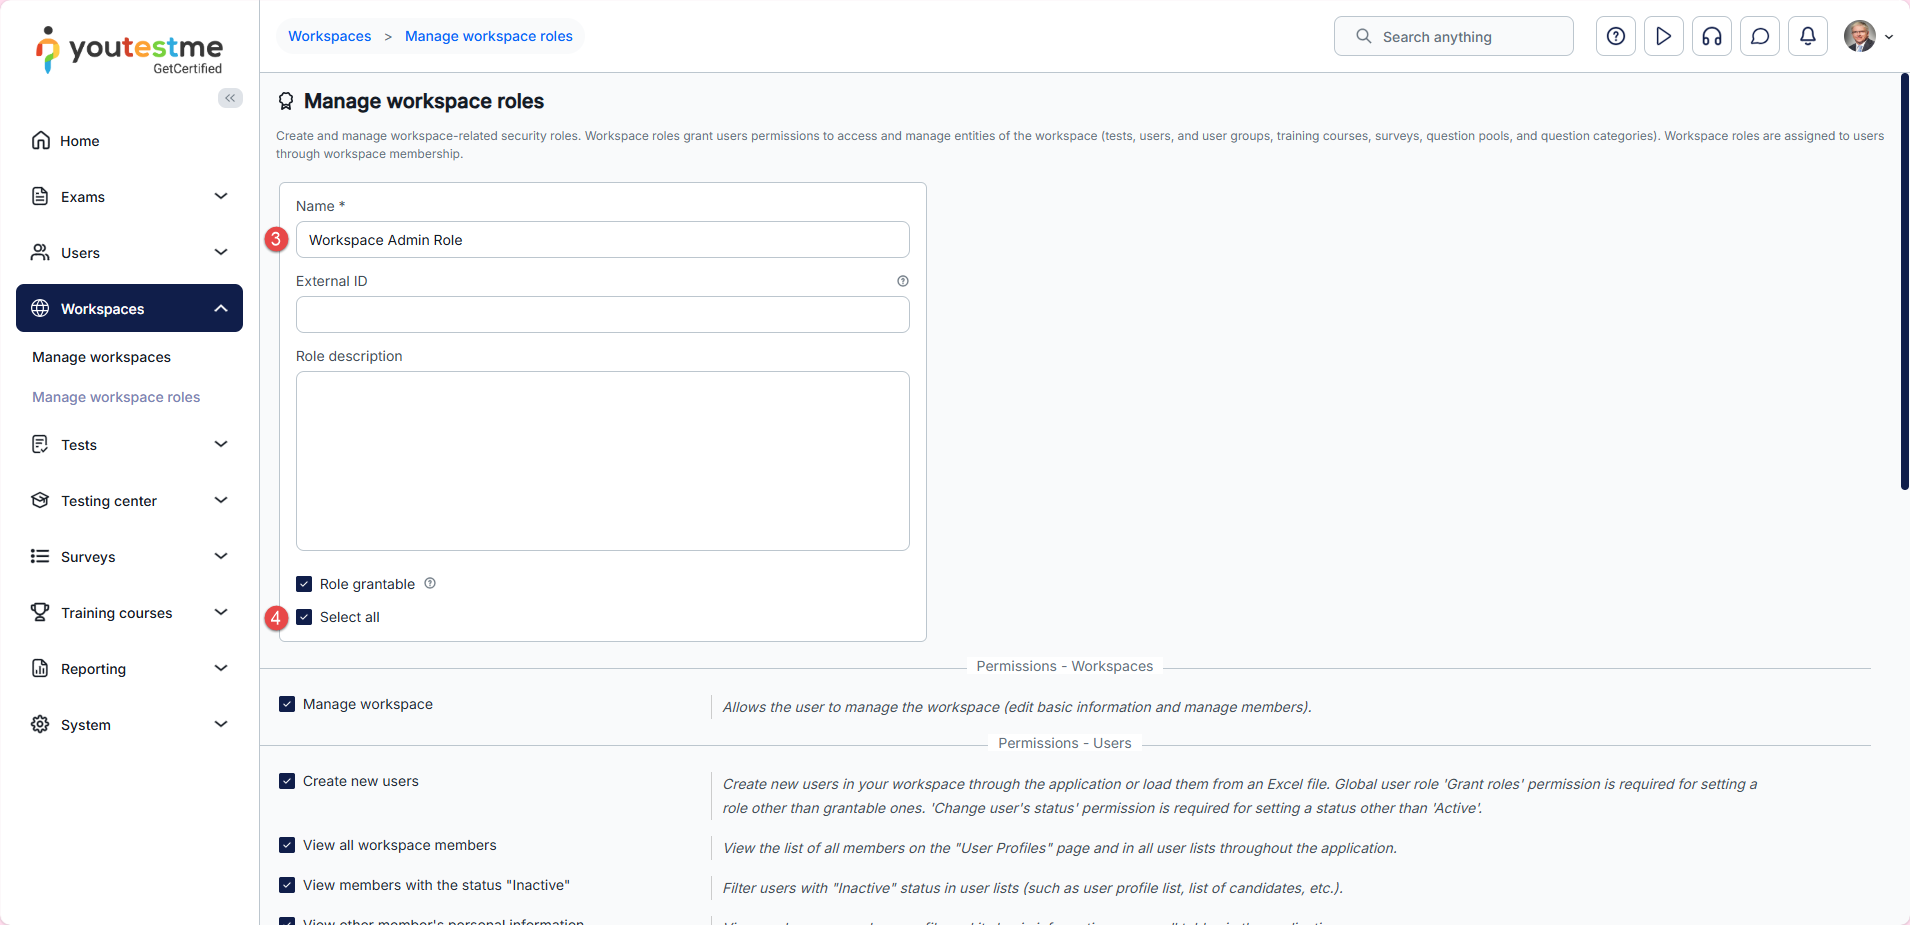
- Click the Save button.

To learn how to assign users to a workspace, see How to Organize and Manage Users in Workspaces.
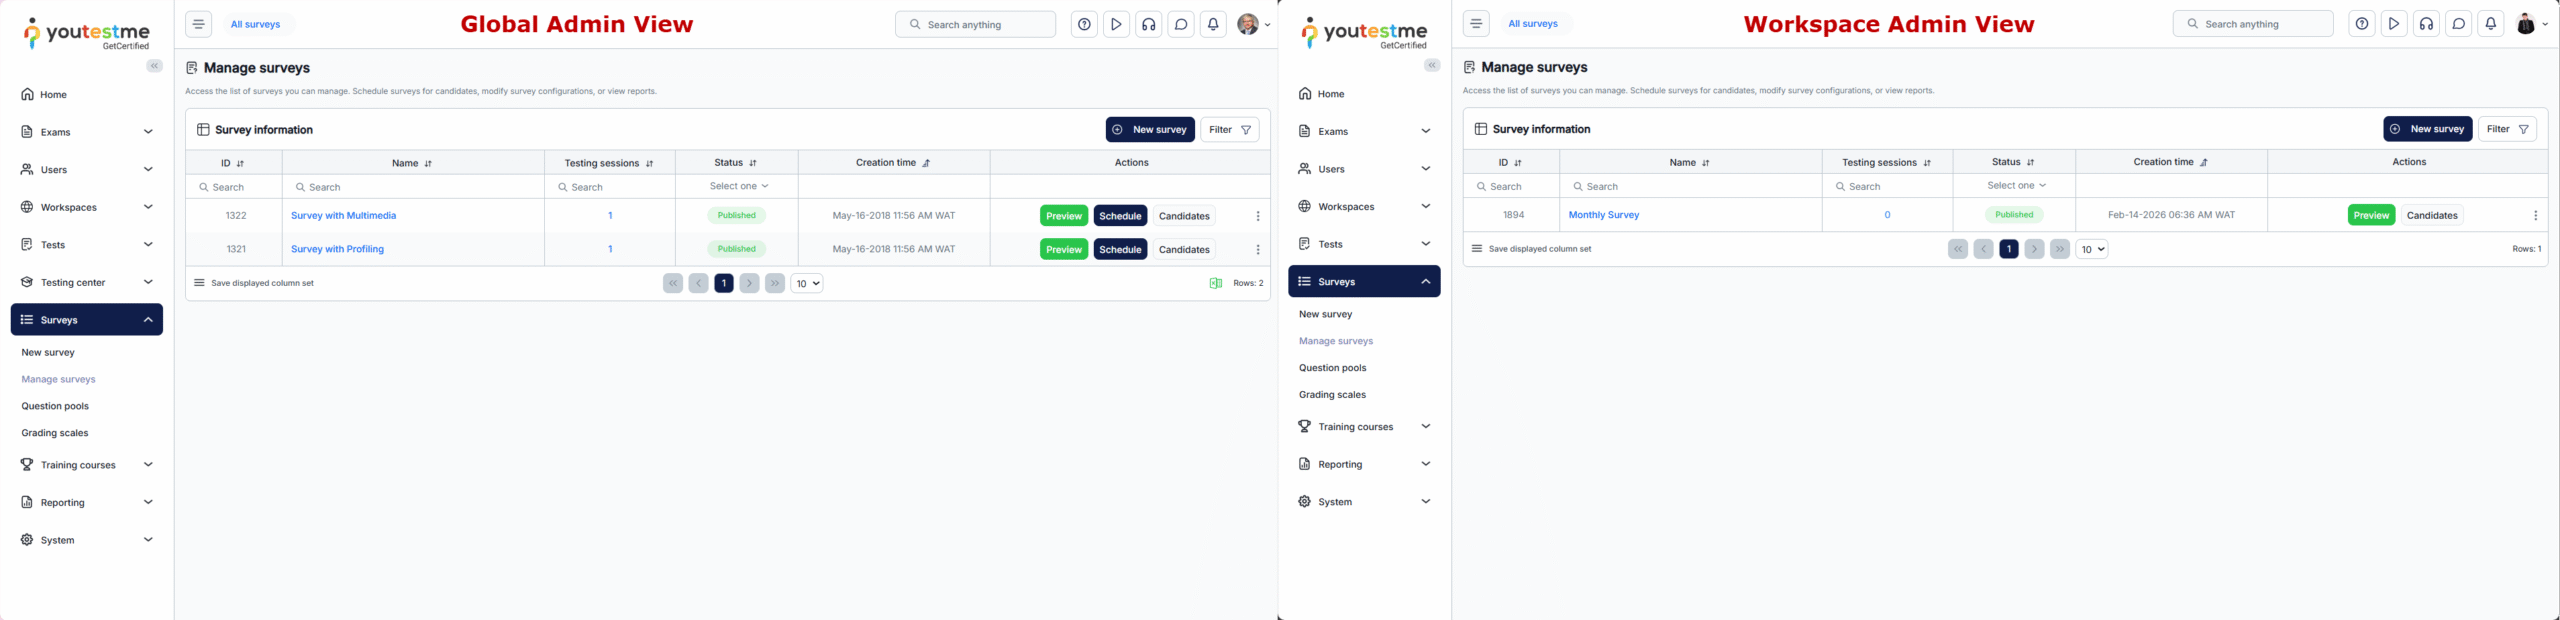
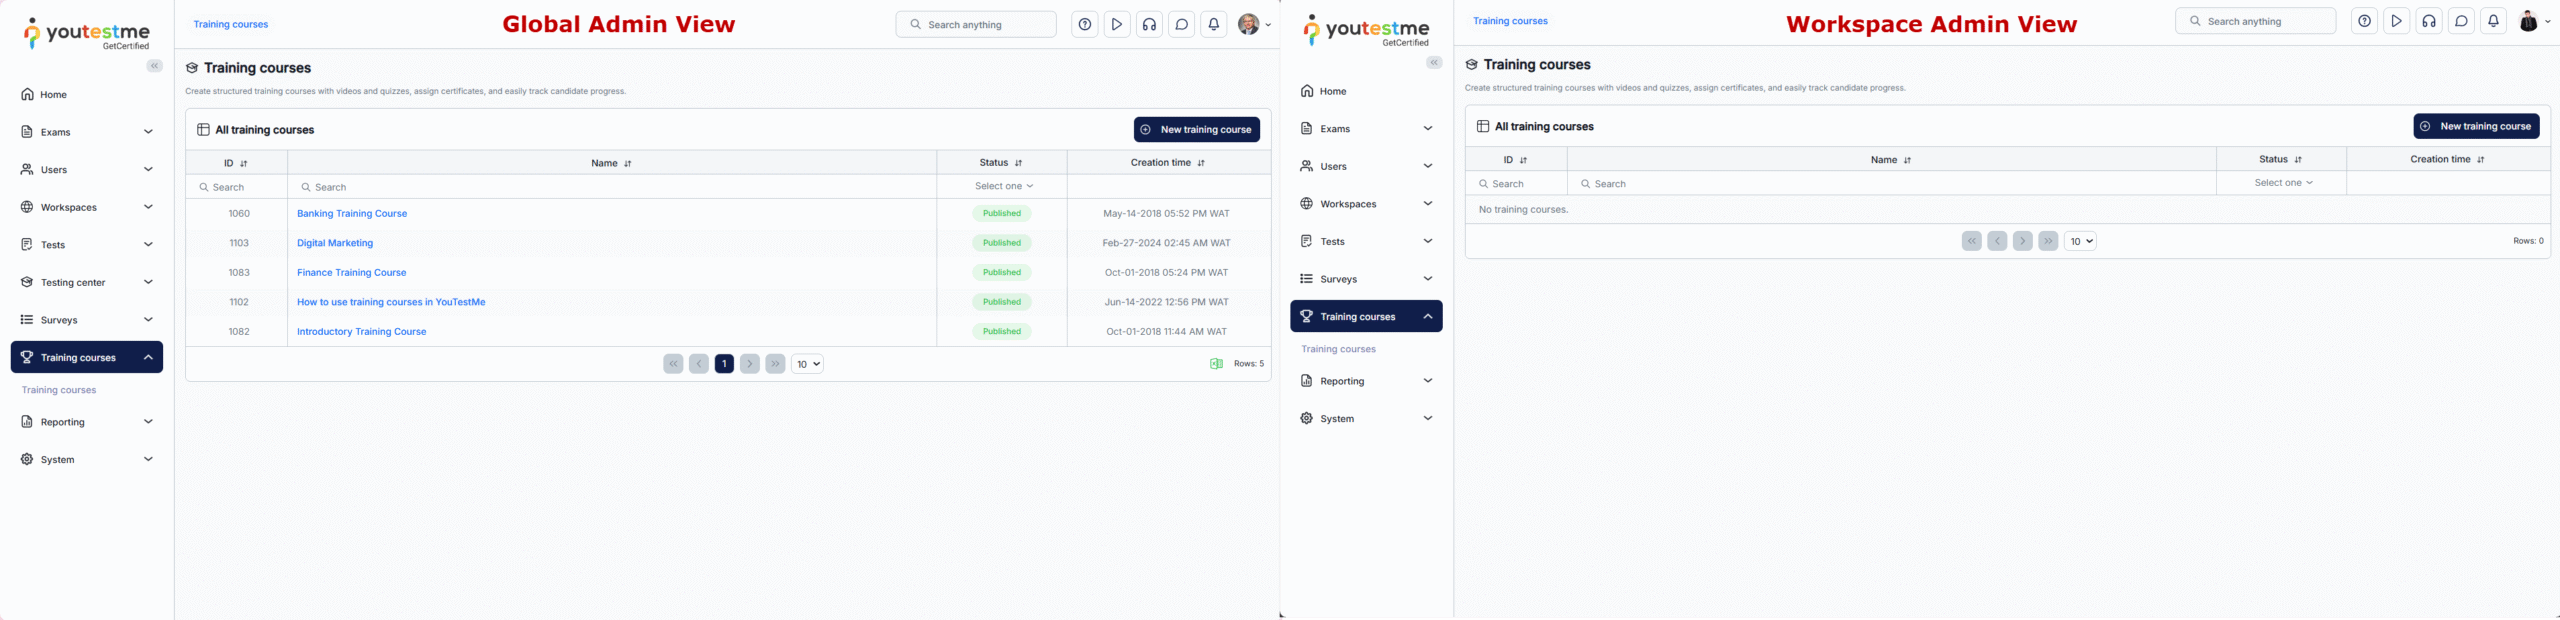
Global admin vs. Workspace admin view
When accessing the application, the workspace admin (with the permissions shown above) will see the following:
- List the users assigned to the workspace (locally assigned users or assigned based on their role).
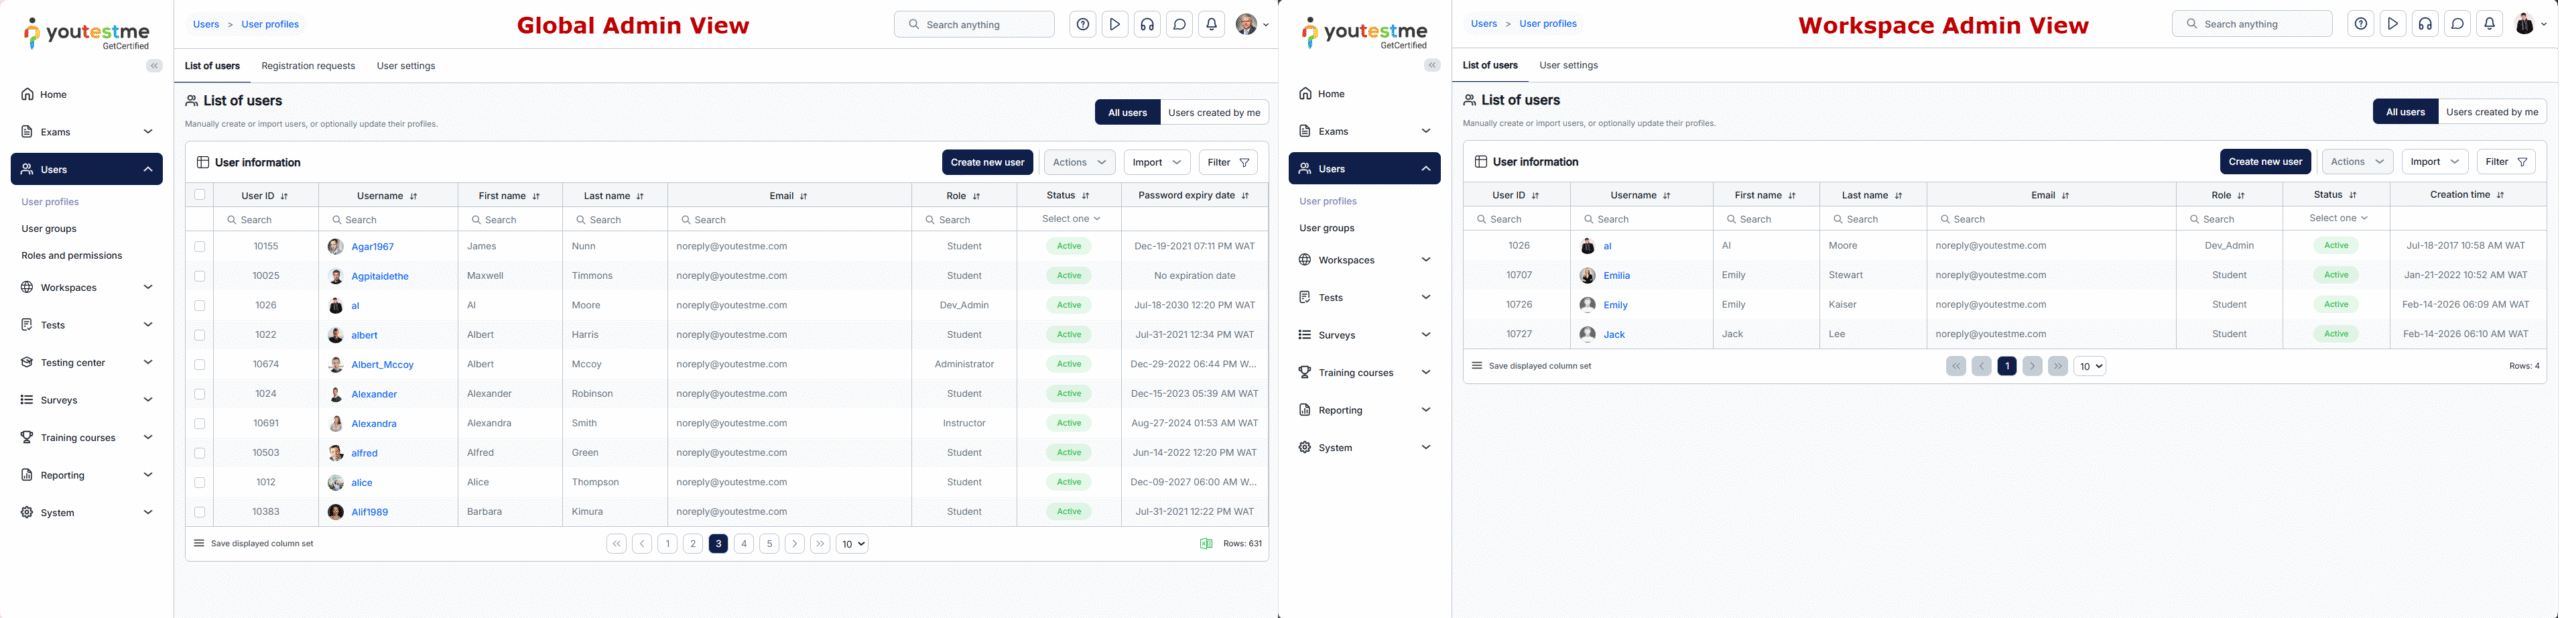
- List of tests assigned to that workspace.
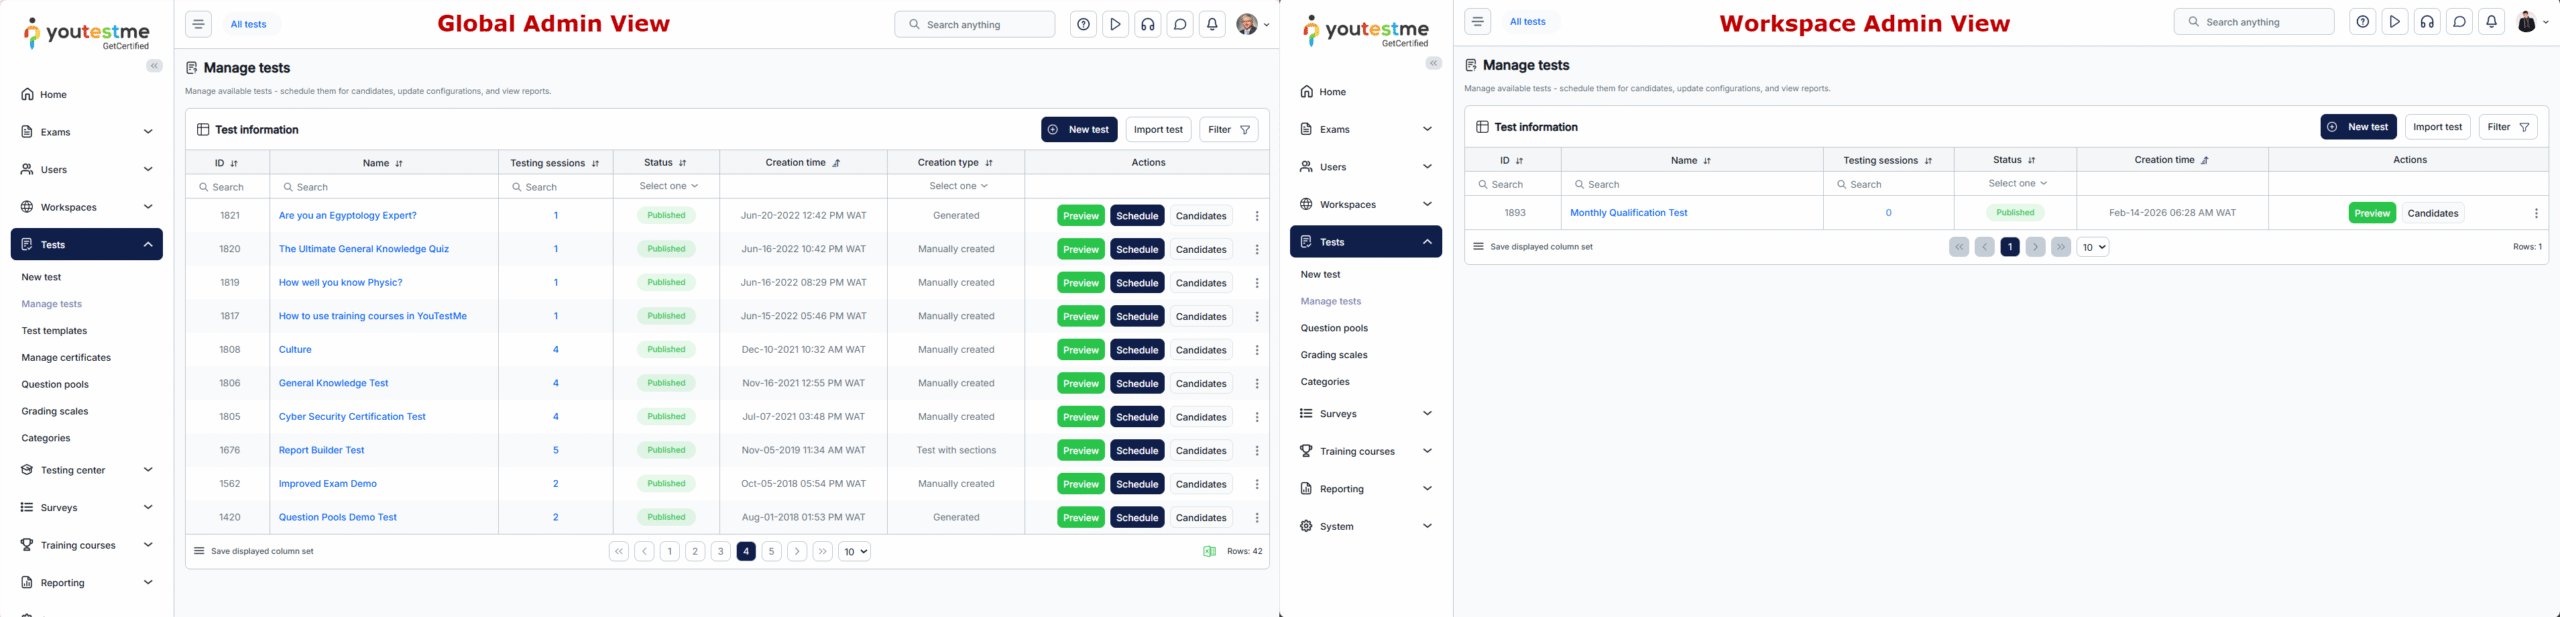
- List of surveys assigned to that workspace.
- List of training courses assigned to that workspace.
Assigning a Workspace
When a user is assigned to a workspace, that workspace will be automatically selected upon login (e.g., for a candidate). It will remain active until the user manually switches to a different one. It can be set in two ways:
1. Another User Assigns the Workspace
1.1 Admins
Admins can change any user’s current workspace at any time, without restriction.
1.2 Roles with Specific Permissions
Users assigned roles that include the following system-level permissions can also change another user’s workspace:
-
Permission 8 – Change another user’s personal information
-
Permission 70 – Manage any workspace
Note: These roles can modify the workspace for any user, regardless of their workspace assignment.
1.3 Workspace Administrators
A Workspace Administrator can assign or change another user’s workspace, but only under the following conditions:
-
The user being edited must be a member of the same workspace.
-
The administrator must have the following permissions on the system role level:
-
Permission 4 – View a list of all users
-
Permission 8 – Change another user’s personal information
-
Note: This setup provides limited workspace management capabilities without exposing all workspaces to workspace administrators.
How to Assign the Workspace
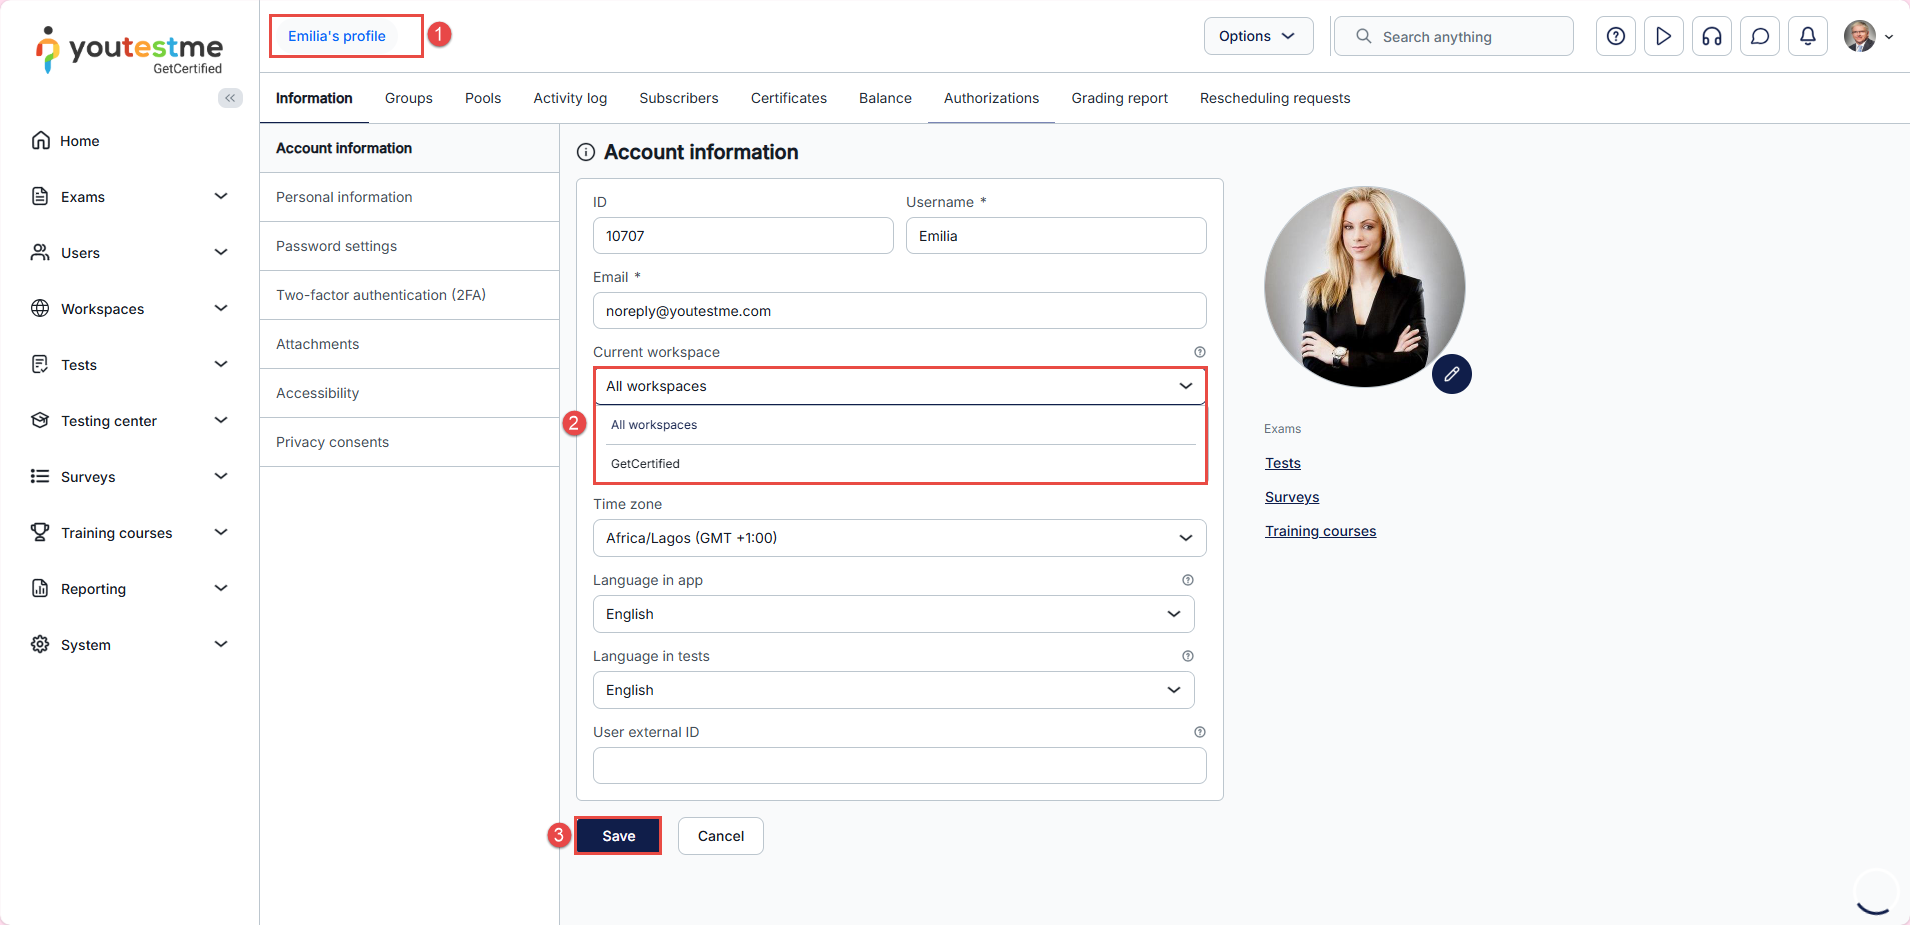
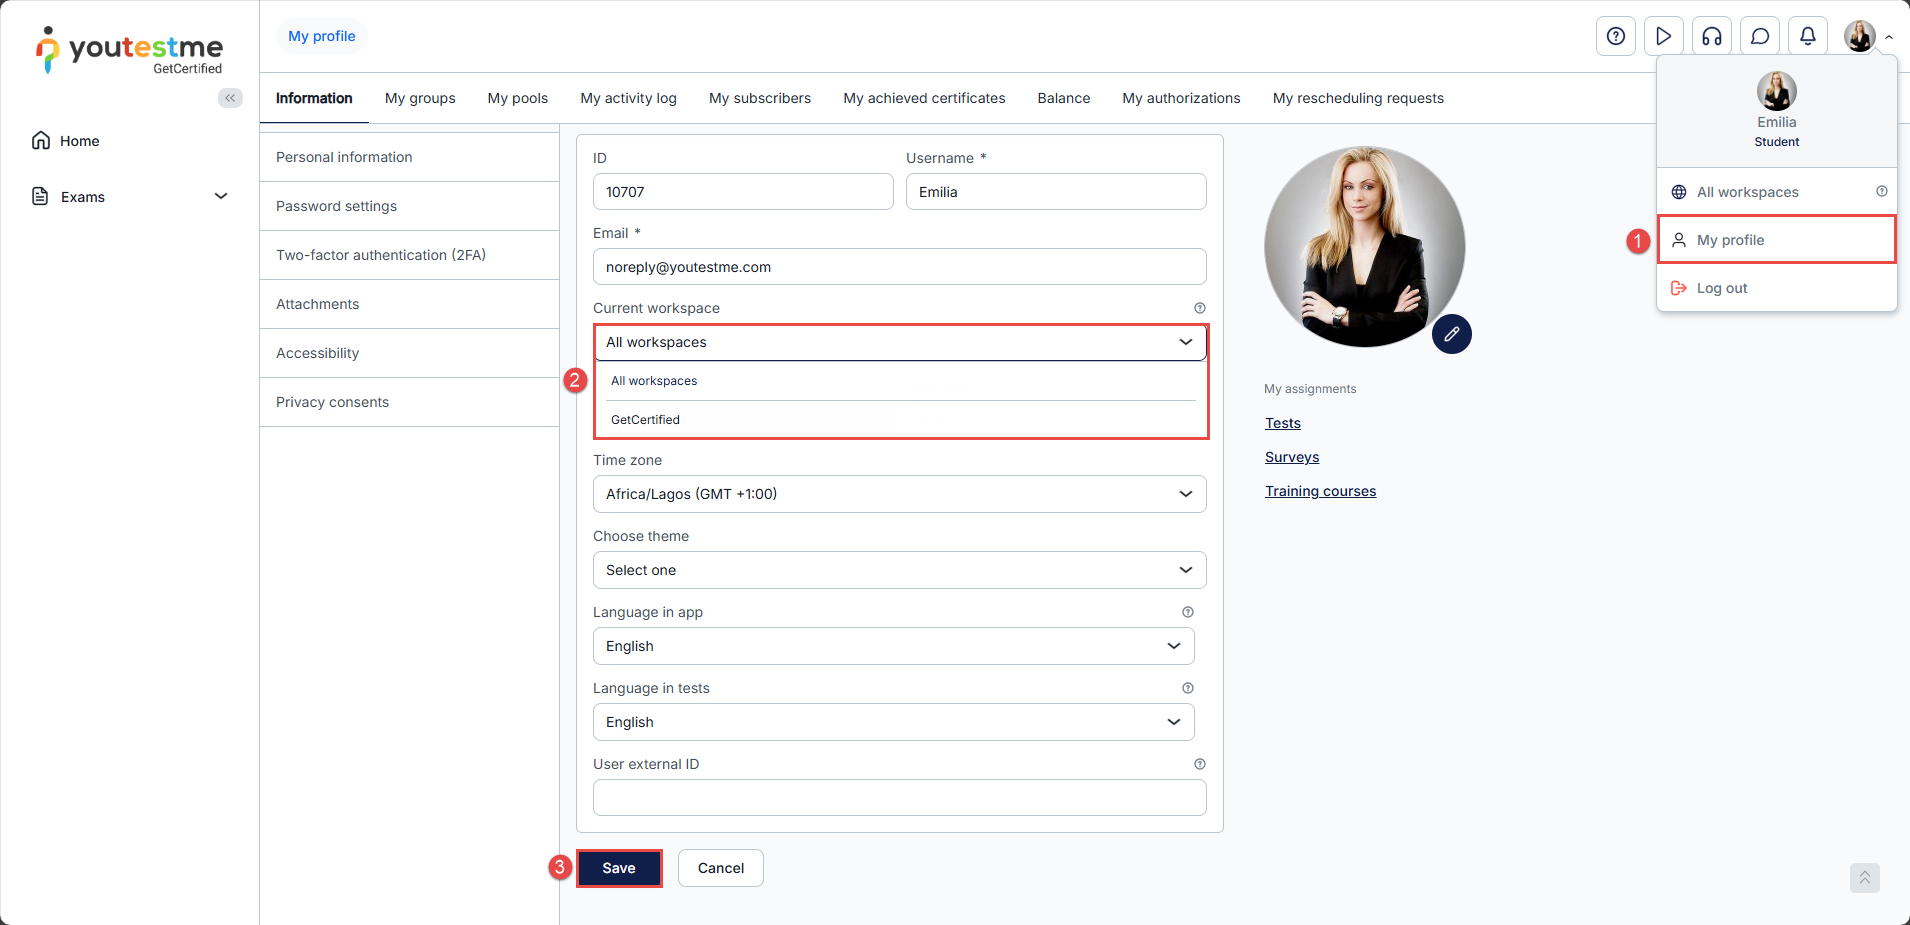
All users with the above permissions can assign a workspace by:
-
Navigating to the user’s profile.
-
Selecting a workspace from the Current workspace dropdown.
-
Clicking Save.
Note: The selected workspace will become the workspace they will automatically access upon login.
2. Candidate Changes Their Own Workspace
Candidates can change their workspace only if they are granted the following permission:
-
Permission 25 – Change own current workspace
Note: If this permission is not granted, the Current workspace dropdown will be disabled, even if the user is assigned to multiple workspaces.
Steps for Changing the Workspace
If the candidate has the required permission, they can:
-
Click on their avatar in the top-right corner to access their profile.
-
Select a workspace they want to assign as the default under the Current workspace dropdown field.
-
Click Save.
Default Behavior for New Candidates
By default, when a new candidate is created, they are not assigned to any workspace. As a result, their Current workspace field will not be visible until they are added to a workspace.

Conclusion
System roles and workspace roles work together to provide a flexible and scalable permission structure. System roles ensure consistent access across the platform, while workspace roles offer localized control within specific workspaces.
By understanding how these roles interact, administrators can create clear permission boundaries, prevent unauthorized access, and maintain an organized user management system. Always define system roles first, then assign or map workspace roles based on your organizational structure and user needs.


