In this article, we will explain how to enable or disable the self-registration option. This feature allows users to create accounts and submit registration requests.
Steps to Enable or Disable Self-Registration
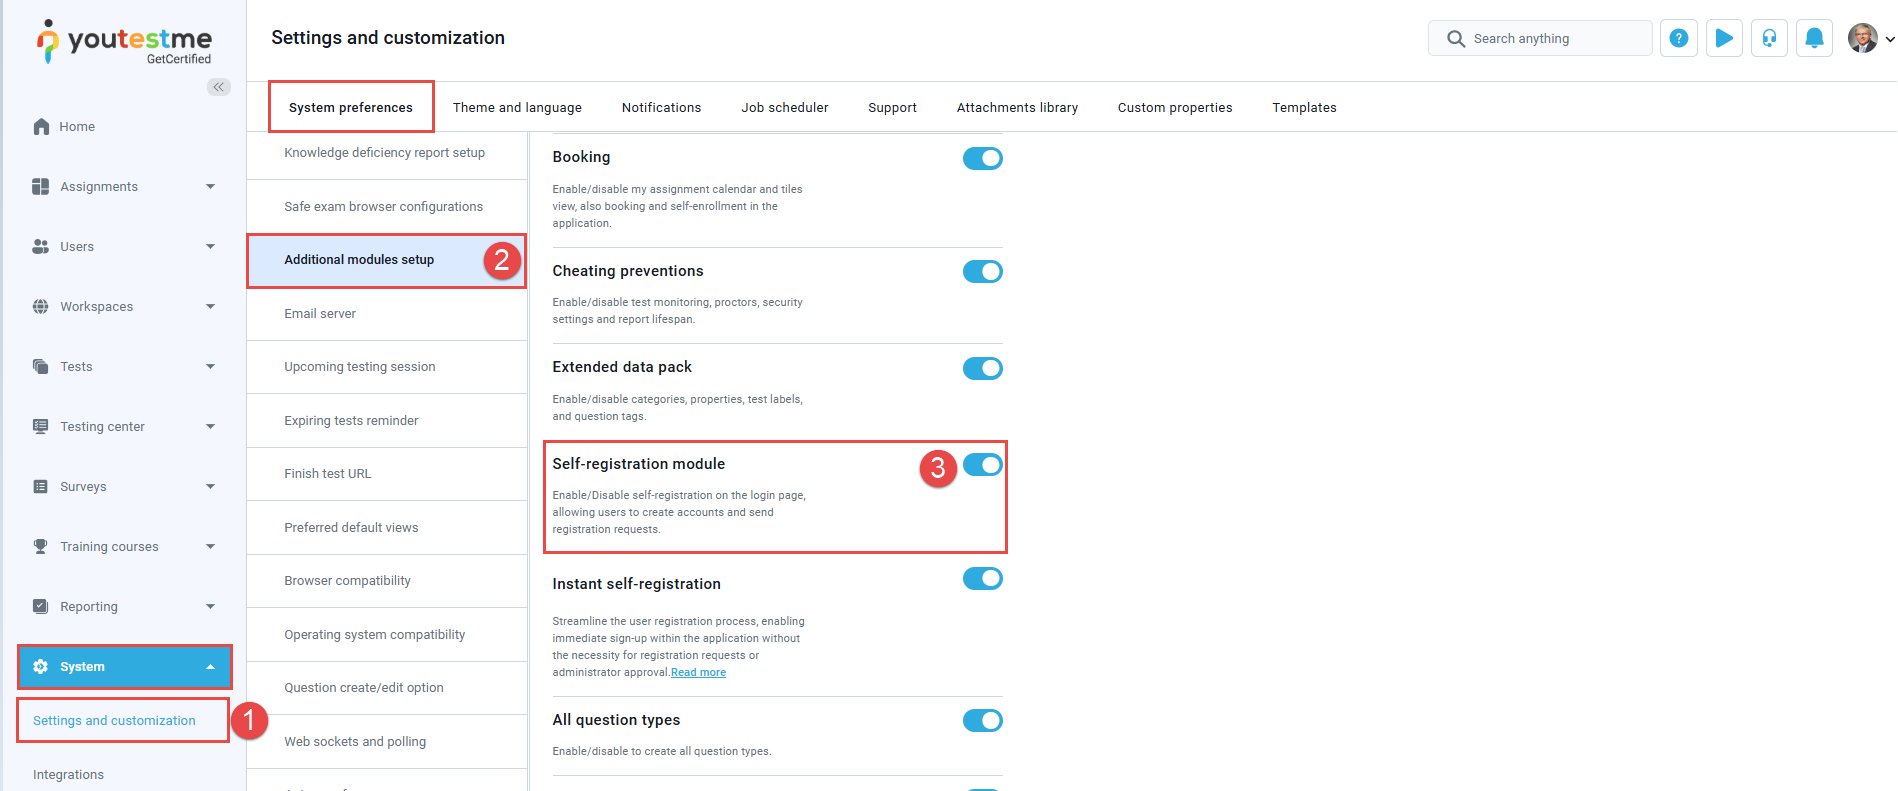
- Navigate to System, then Settings and Customization
- Under System Preferences, navigate to Additional modules setup.
- Find the Self-registration module and enable or disable it as needed.
Creating registration links
To create a new registration link, follow these steps:
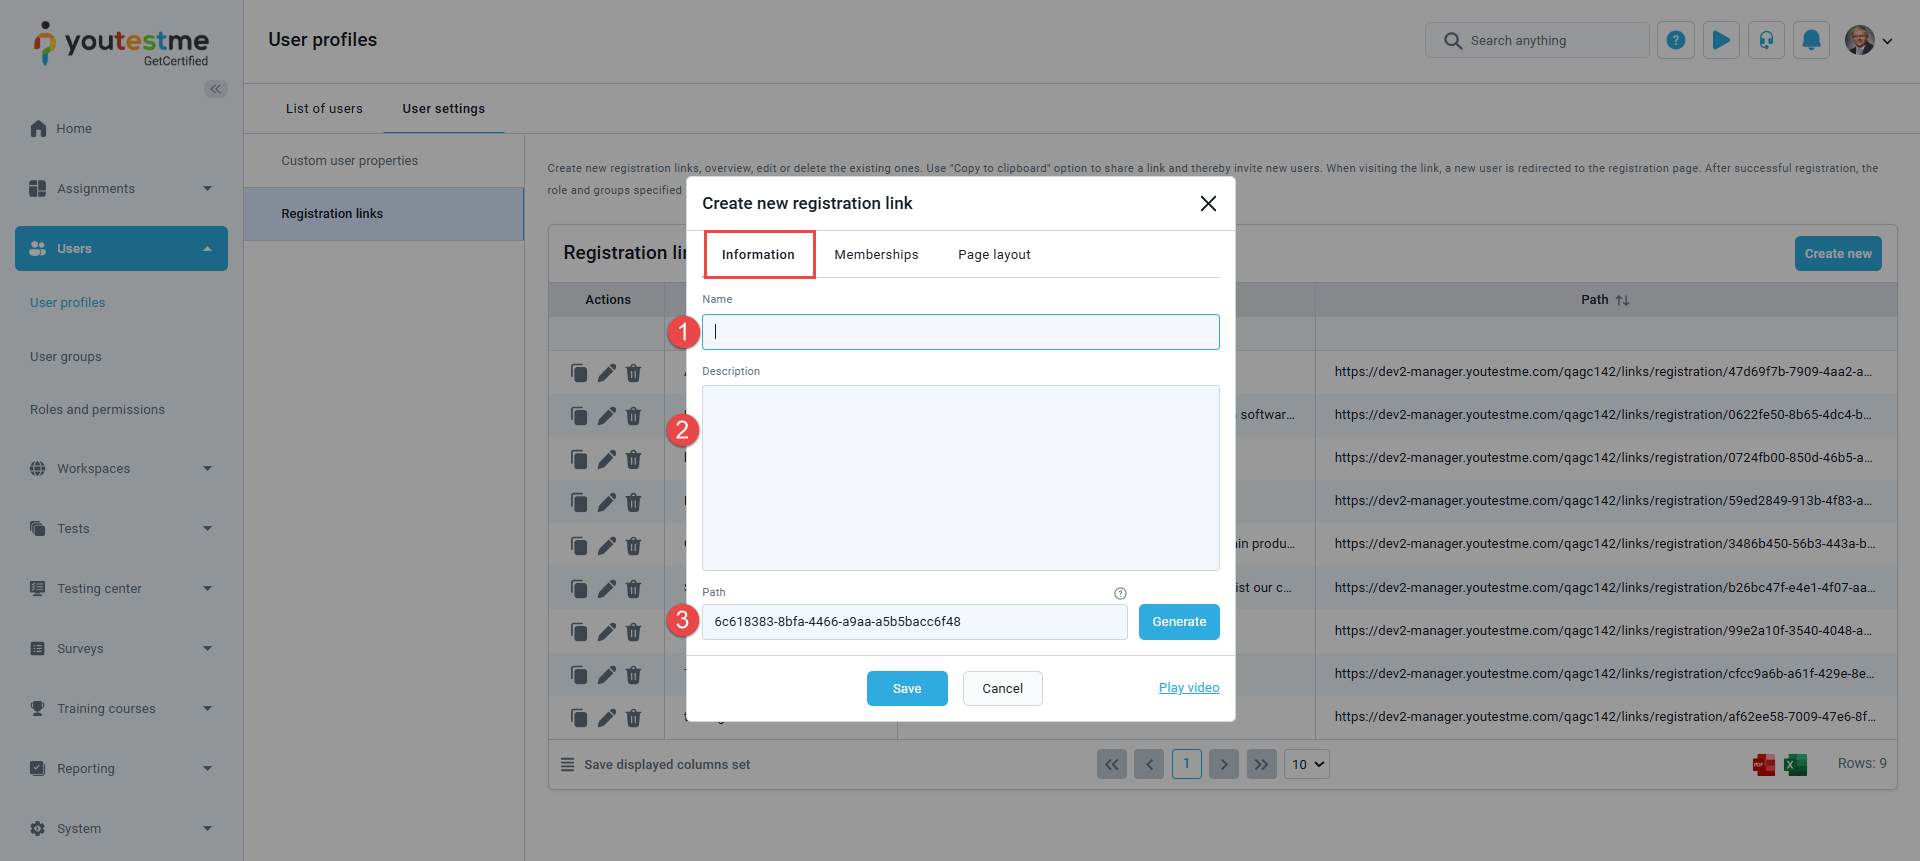
- Navigate to Users, then User profiles
- Go to the User settings tab.
- Click on the Registration links.
- Click the Create New button.

The creation dialog is divided into three sections, each covering different configuration settings.
Information Tab
Here, you can
- Enter the registration link Name.
- Enter a Description, additional information about the purpose of the registration link.
- Insert a random Path to be used as a unique link identifier. It must consist of only letters, numbers, and hyphens. Alternatively, the registration link automatically generates a unique path upon clicking the Generate button.

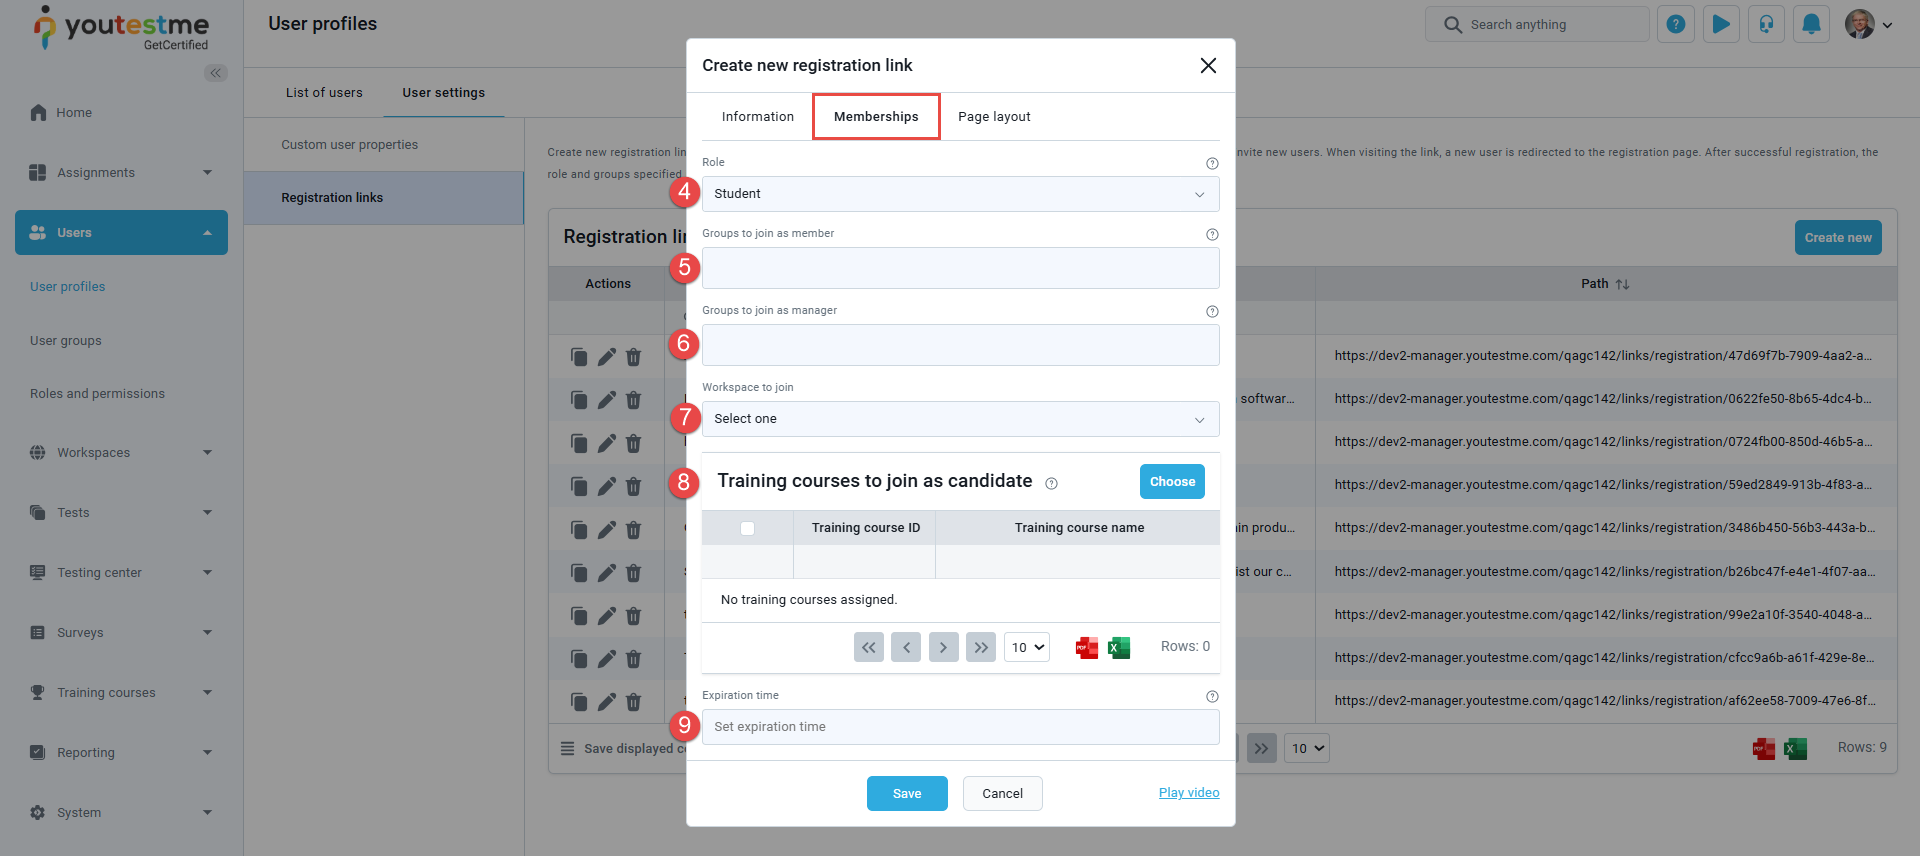
Memberships Tab
- Select the role that a user registering through this link will be assigned.
- Designate user groups to which the user will be automatically enrolled as a member.
- Designate groups to which the user will be automatically enrolled as a manager.
- Designate a Workspace that the user will join.
- Select training courses that a user who registers using this link will be automatically assigned to as a candidate.
- Define the Expiration time of the link. If set, the link will be valid until the specified time.

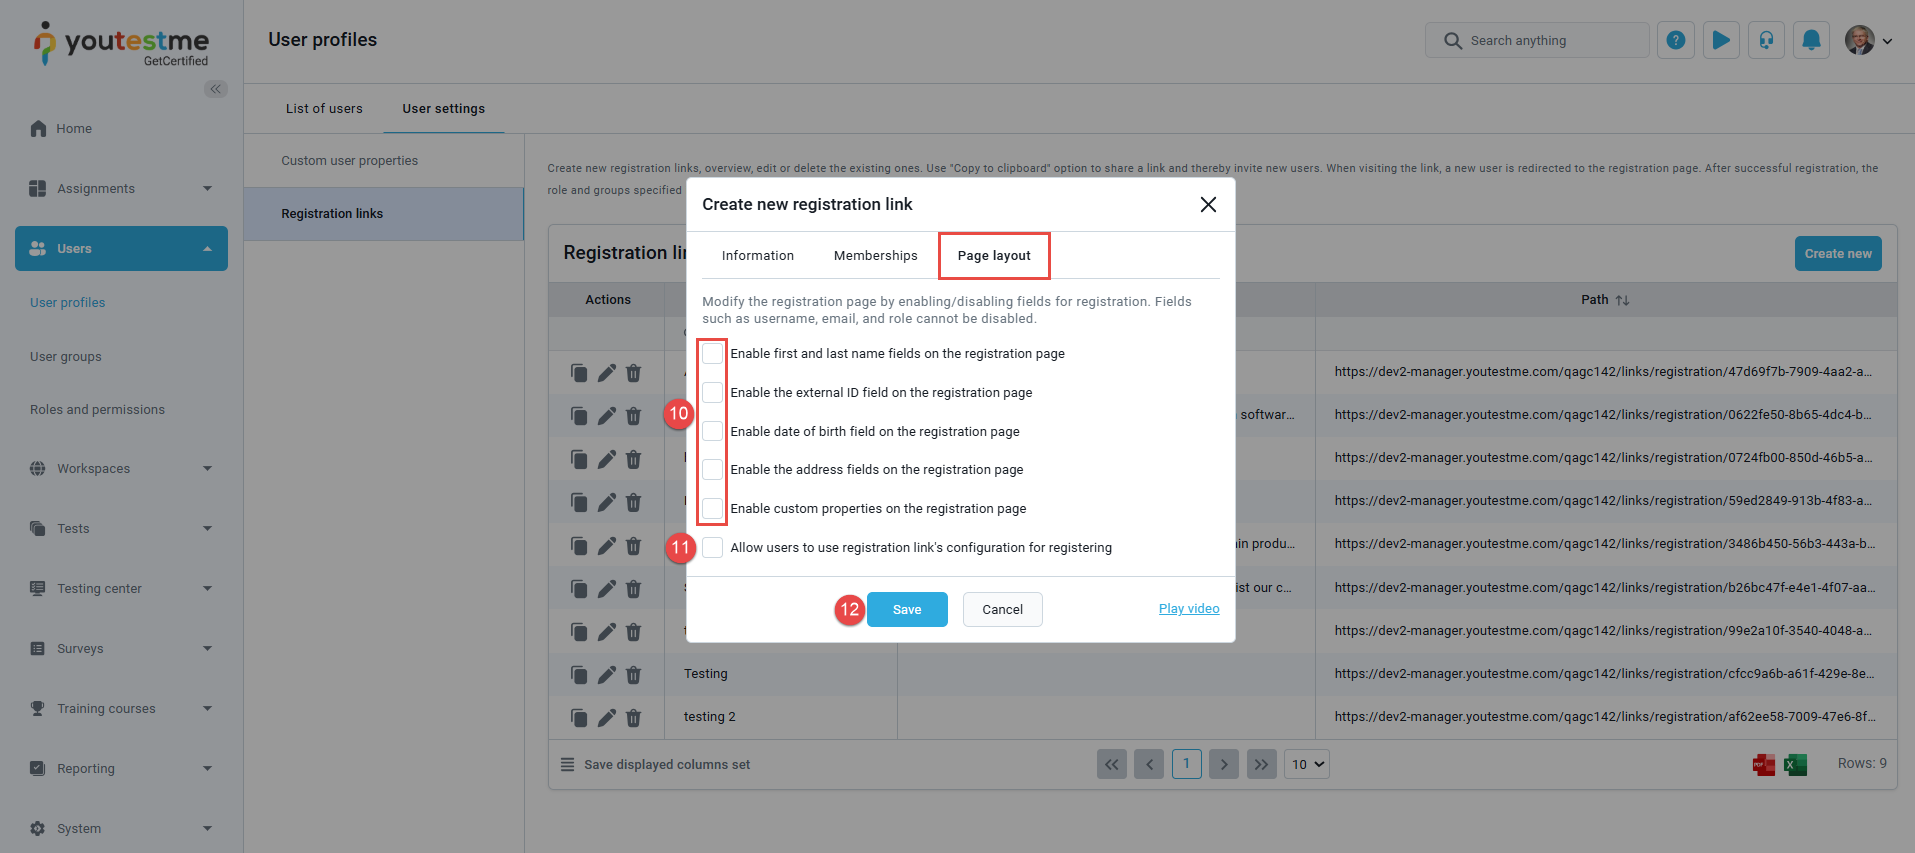
Note: Expired registration links can still be edited and shared, but users cannot use them to register for the application.Page Layout TabThis tab configures which fields appear during registration:
- Configure the displayed registration page fields for users when registering using the link.
- Optionally, allow users to use the displayed fields configuration of this link when registering. However, note that this option will only be available during self-registration and not when not using a registration link.
- Click the Save button.
Available Actions for Registration Links
- Copy the link path.
- Edit the registration link.
- Permanently delete the registration link.

You can share the copied link directly with candidates.
Important note: If the Self-Registration module is disabled, candidates will be redirected to the login page instead of the registration page.
Registering with Instant Self-Registration Enabled
If Instant Self-Registration is enabled, users can register without administrator approval.
To activate:
-
Enable the Self-Registration module (as described above).
-
The Instant Self-Registration feature will be automatically enabled, but can be turned off separately if needed.
To register:
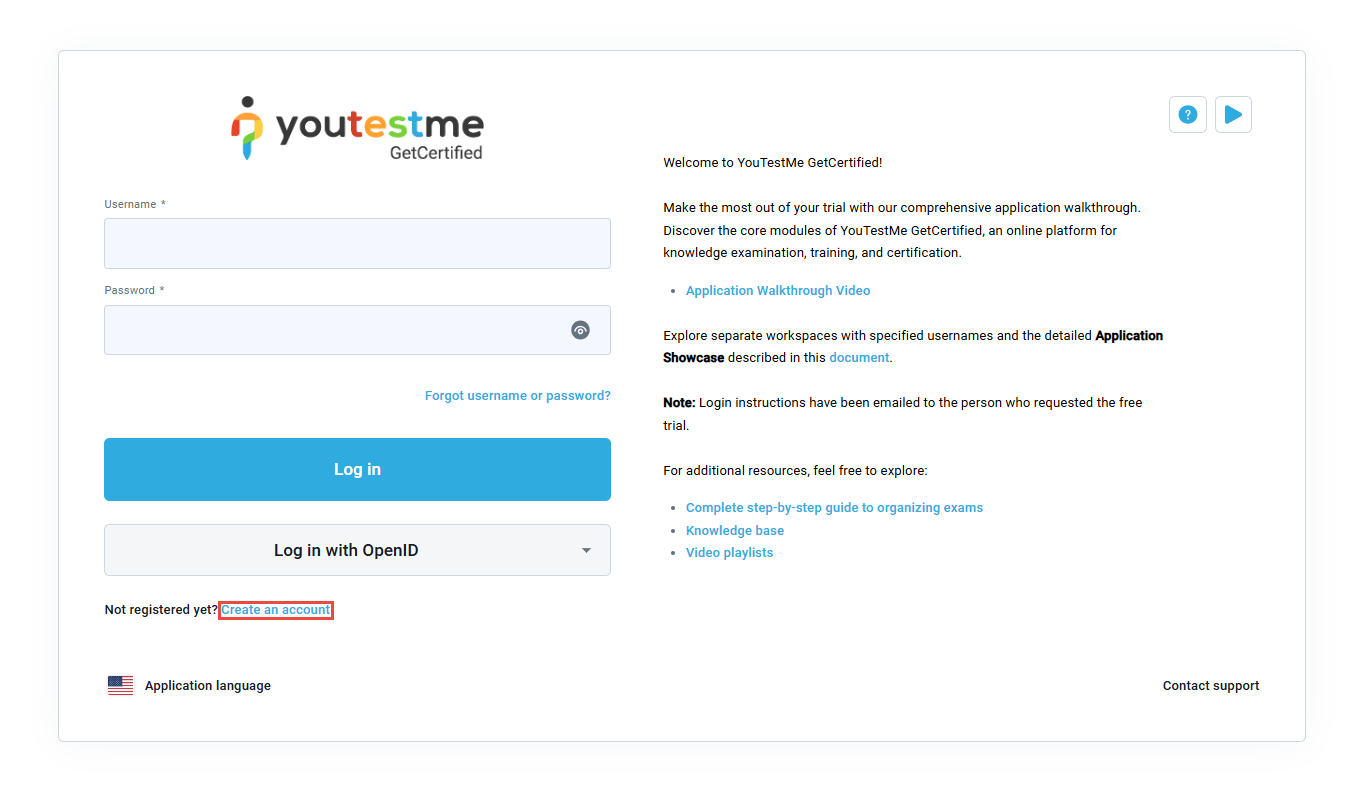
On the login page, click the Create an account option.
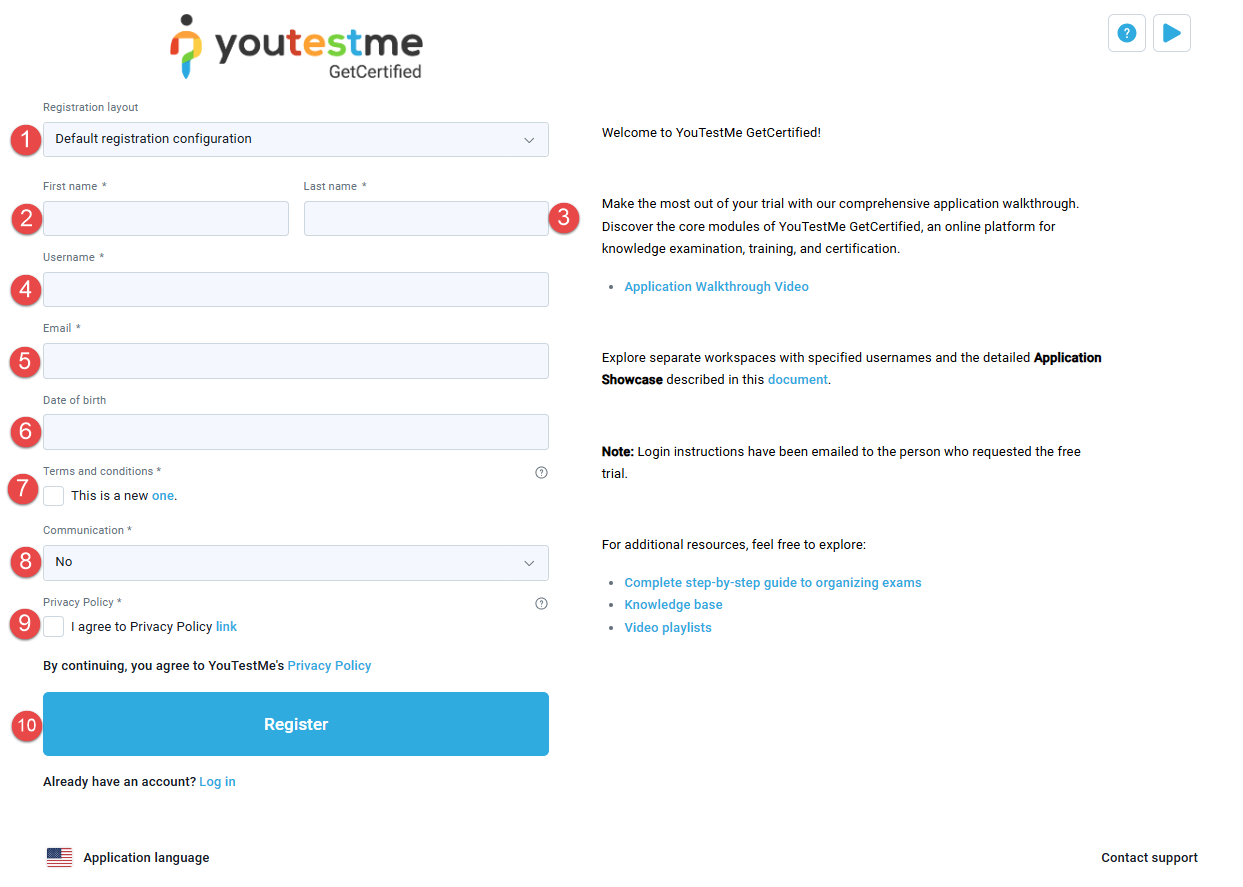
The registration form will show up, and you need to fill in all the necessary information:
- Select the Registration layout.
- Enter the First name.
- Enter the Last name.
- Enter the Username.
- Enter the Email address.
- Enter the Date of birth.
- Accept the terms and conditions by checking the box.
- Choose if you want to receive communication
- Accept the Privacy Policy by checking the box..
- Click the Register button.
After clicking the Register button, the user will be automatically redirected to the application and receive an email confirming the creation of their new user profile creation.
The recommendation is to change the password by following the next steps:
- Go to the View profile page.
- Click on the Information tab.
- Open Password settings.
- Click the Change password button to update it.


Changing the registration page layout
To customize which fields are displayed during registration:
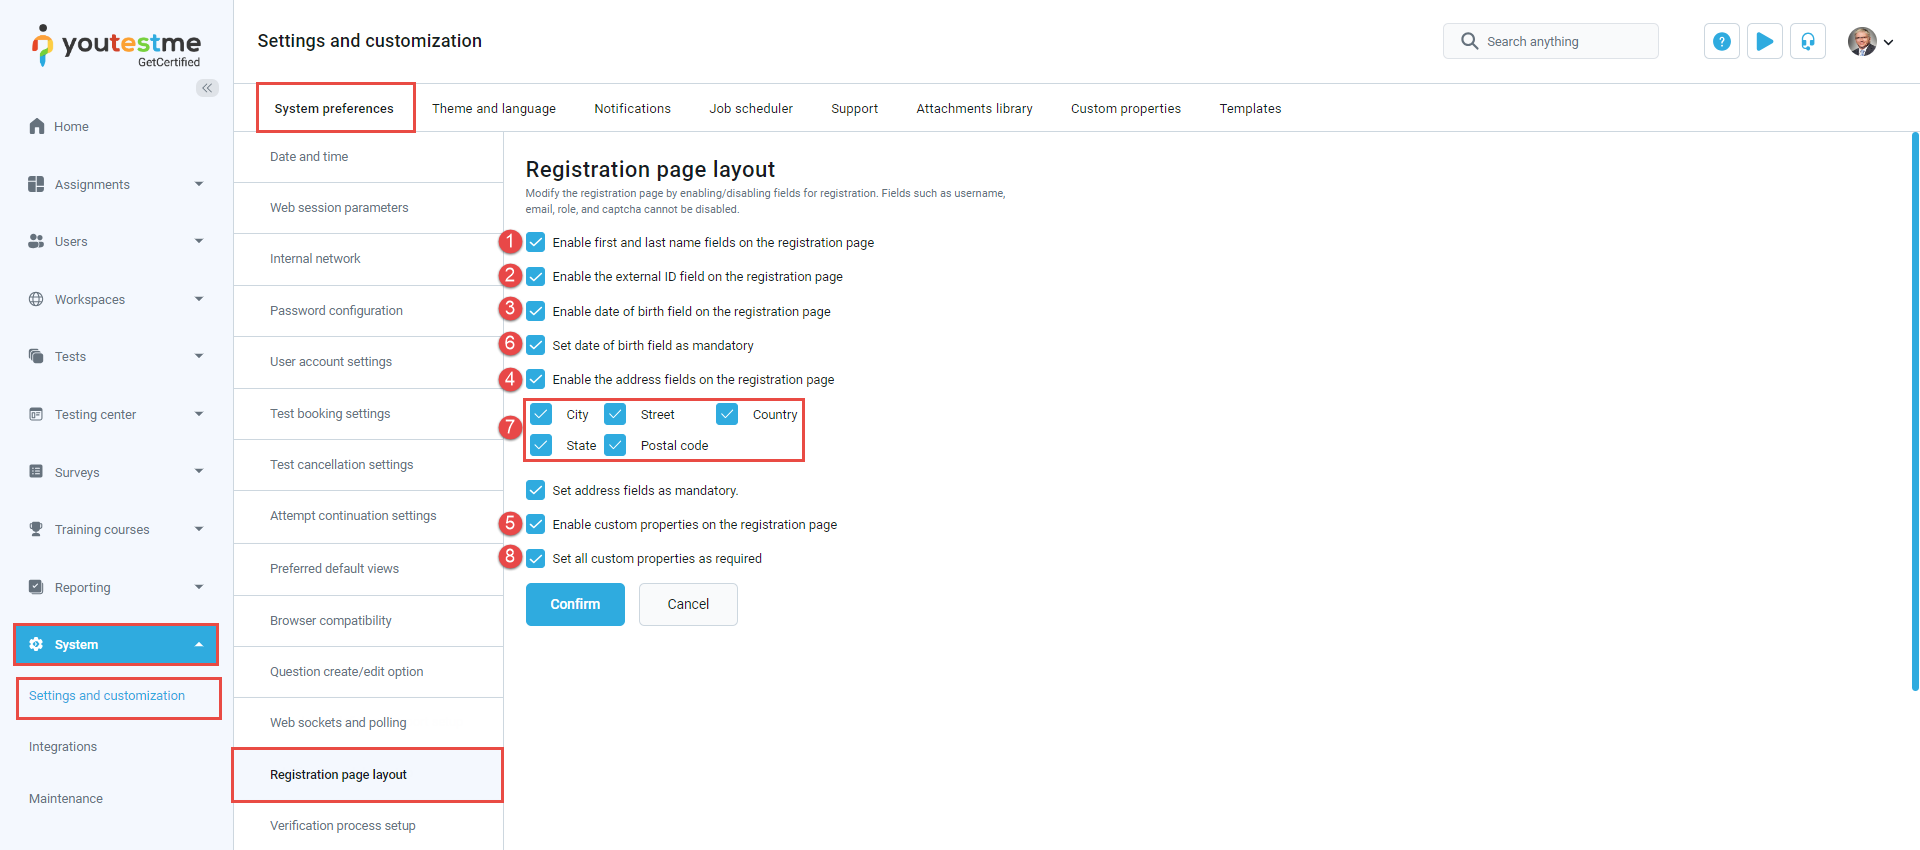
- Go to System, then System Preferences under Settings and Customization.
- Open the Registration Page Layout tab.
You can choose to display or hide the following options:
- First and last name
- External ID
- Date of birth
- Address fields
- Custom properties.
Additionally, you can choose to:
- Set the date of birth field as mandatory. This option is available only when the Enable date of birth field on the registration page option is enabled.
- Define which address fields will appear on the registration page. You can show or hide Country, Street, City, Postal code, and State fields. This option is available only when the Enable the address fields on the registration page option is enabled.
- Set all custom properties as required. This option is available only when the Enable custom properties on the registration page option is enabled.
To customize fields for a specific registration link:
-
Open the desired link from the User Settings tab in User Profiles and access to Registration links.
-
Go to the Page Layout tab.
-
Configure which fields will appear during registration.
-
Optionally allow users to use the registration link’s configuration for registering.
-
Click Save.

Benefits of Enabling Instant Self-Registration
- User-Friendly: Users can easily sign up independently, saving time and effort.
- Quick Access: Users can start using the system immediately.
- Flexible: Anyone can join.
-
Scalable: Expands the user base without admin effort.
Registering with Instant Self-Registration Disabled
If the Instant self-registration option is disabled, the administrator should approve or decline the registration request.
On the login page, click the Create an account option.
The registration form will show up, and you need to fill in all the necessary information:
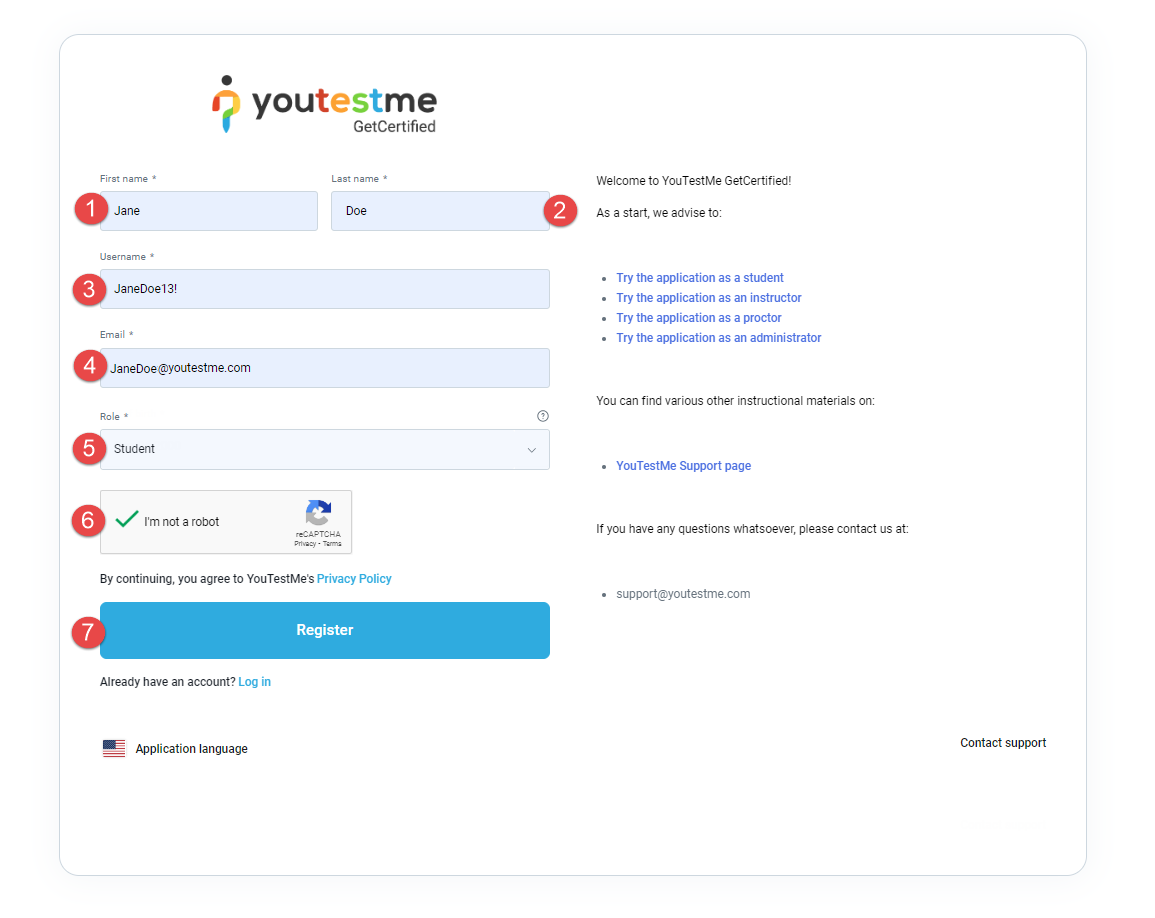
- Enter the First name.
- Enter the Last name.
- Enter the Username.
- Enter the Email address.
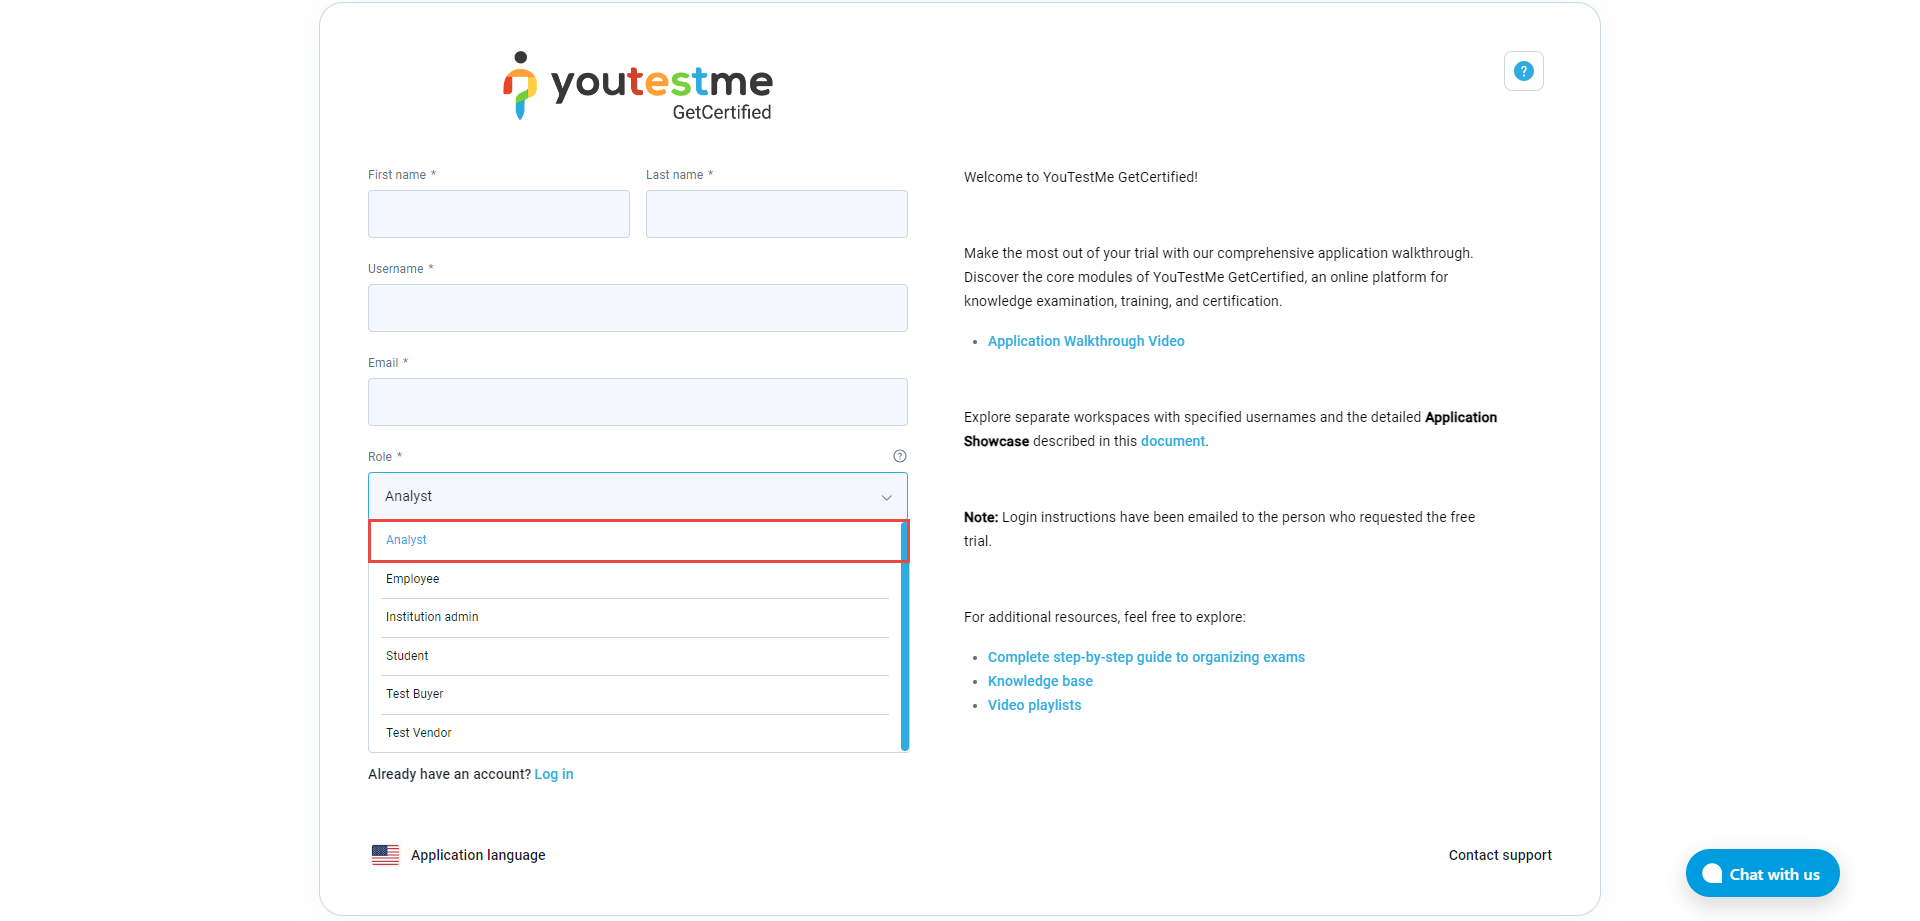
- Select the preferred Role for your account.
-
Complete the CAPTCHA (“I am not a robot”).
- Click the Register button.
The user will not be logged in immediately. Instead, they wait for admin approval.
If approved, they receive a confirmation email and login credentials. If declined, they are notified via email.
To make a role visible in the registration dropdown:
- Go to Users, then Roles and Permissions
- Enable Grantable Role
To hide a role, disable this setting.
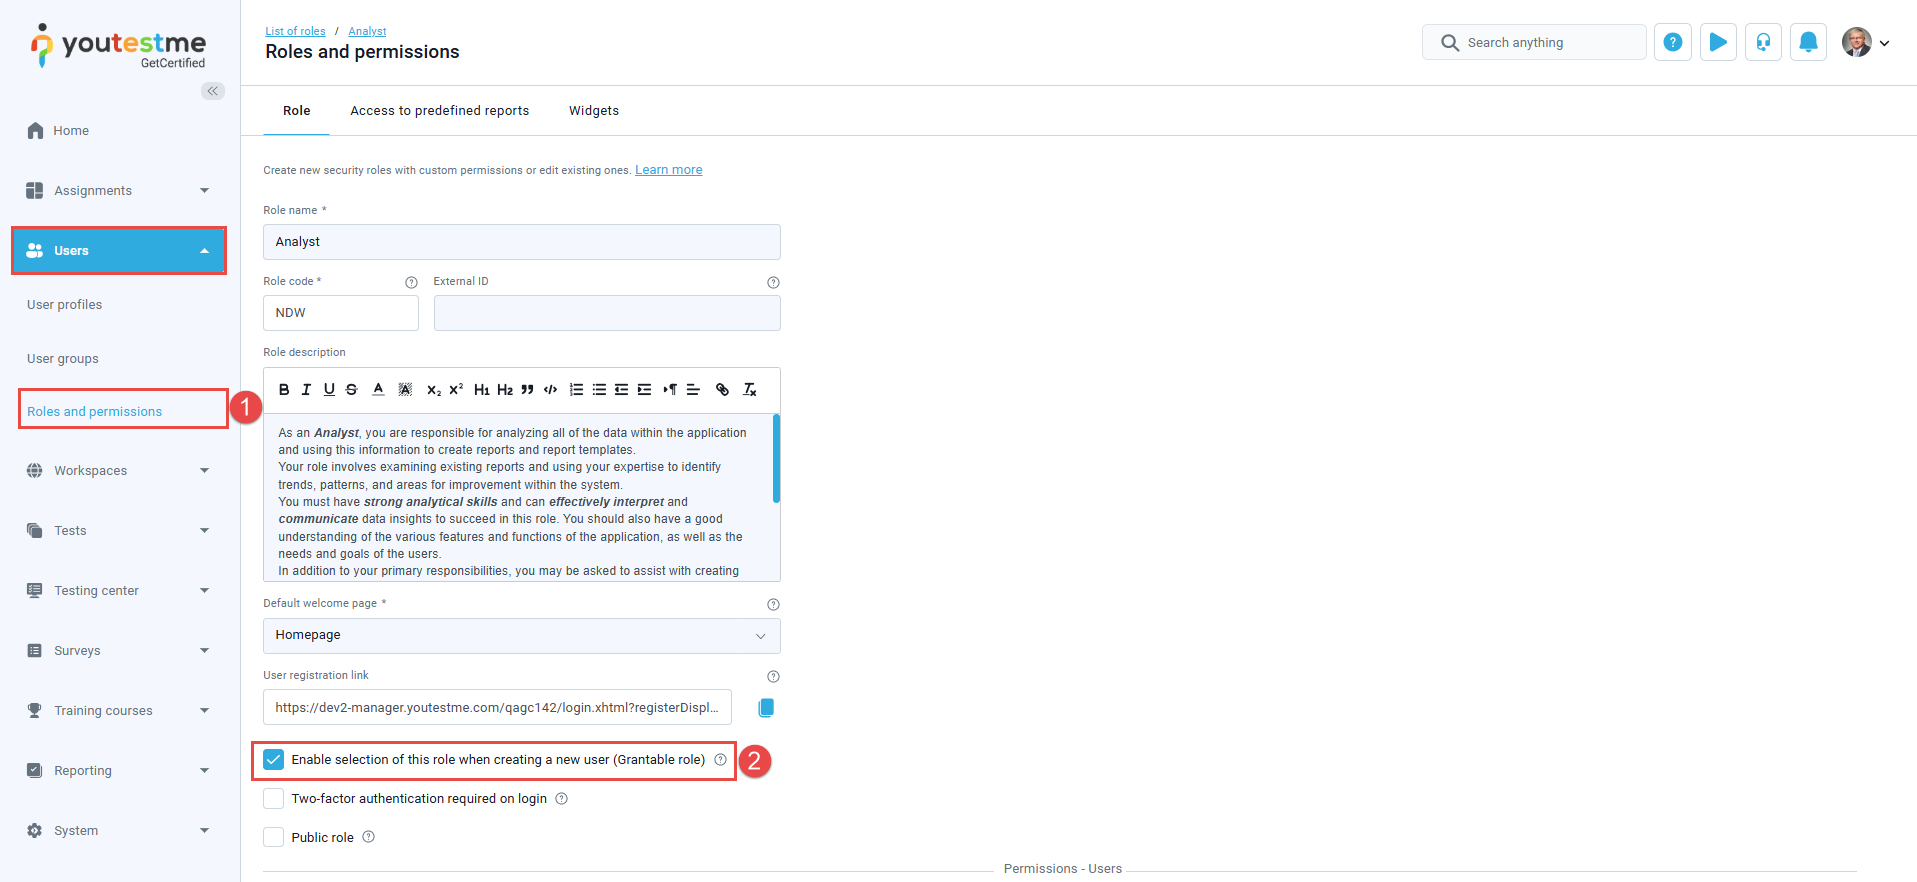
Important: If you wish to prevent users from selecting this role during registration, disable the option. The role will no longer be visible in the drop-down list.

Important note: If the Self-Registration module is disabled, candidates will be redirected to the login page instead of the registration page.
Benefits of Disabling Instant Self-Registration
-
Greater Control: Admins verify and approve users.
-
Security: Reduces risk from unauthorized sign-ups.
-
Customization: Registration workflows can be tailored.
-
Regulatory Compliance: Useful in sensitive environments.
Approving or Declining Registration Requests (Admin Perspective)
When instant registration is disabled, administrators can manage registration requests:
To handle registration requests :
- Click on Notifications in the top right corner.
- Approve or decline the newly received registration request.


