
This article provides an overview of the test map, which is influenced by the test settings predefined by the test administration. The layout and structure of the test page can vary based on the configuration, ensuring that the exam is tailored to meet specific requirements. Elements such as question presentation, available tools, and additional resources may differ depending on the chosen settings for the test. This ensures a customized and effective testing experience for both administrators and participants.
Starting the Test
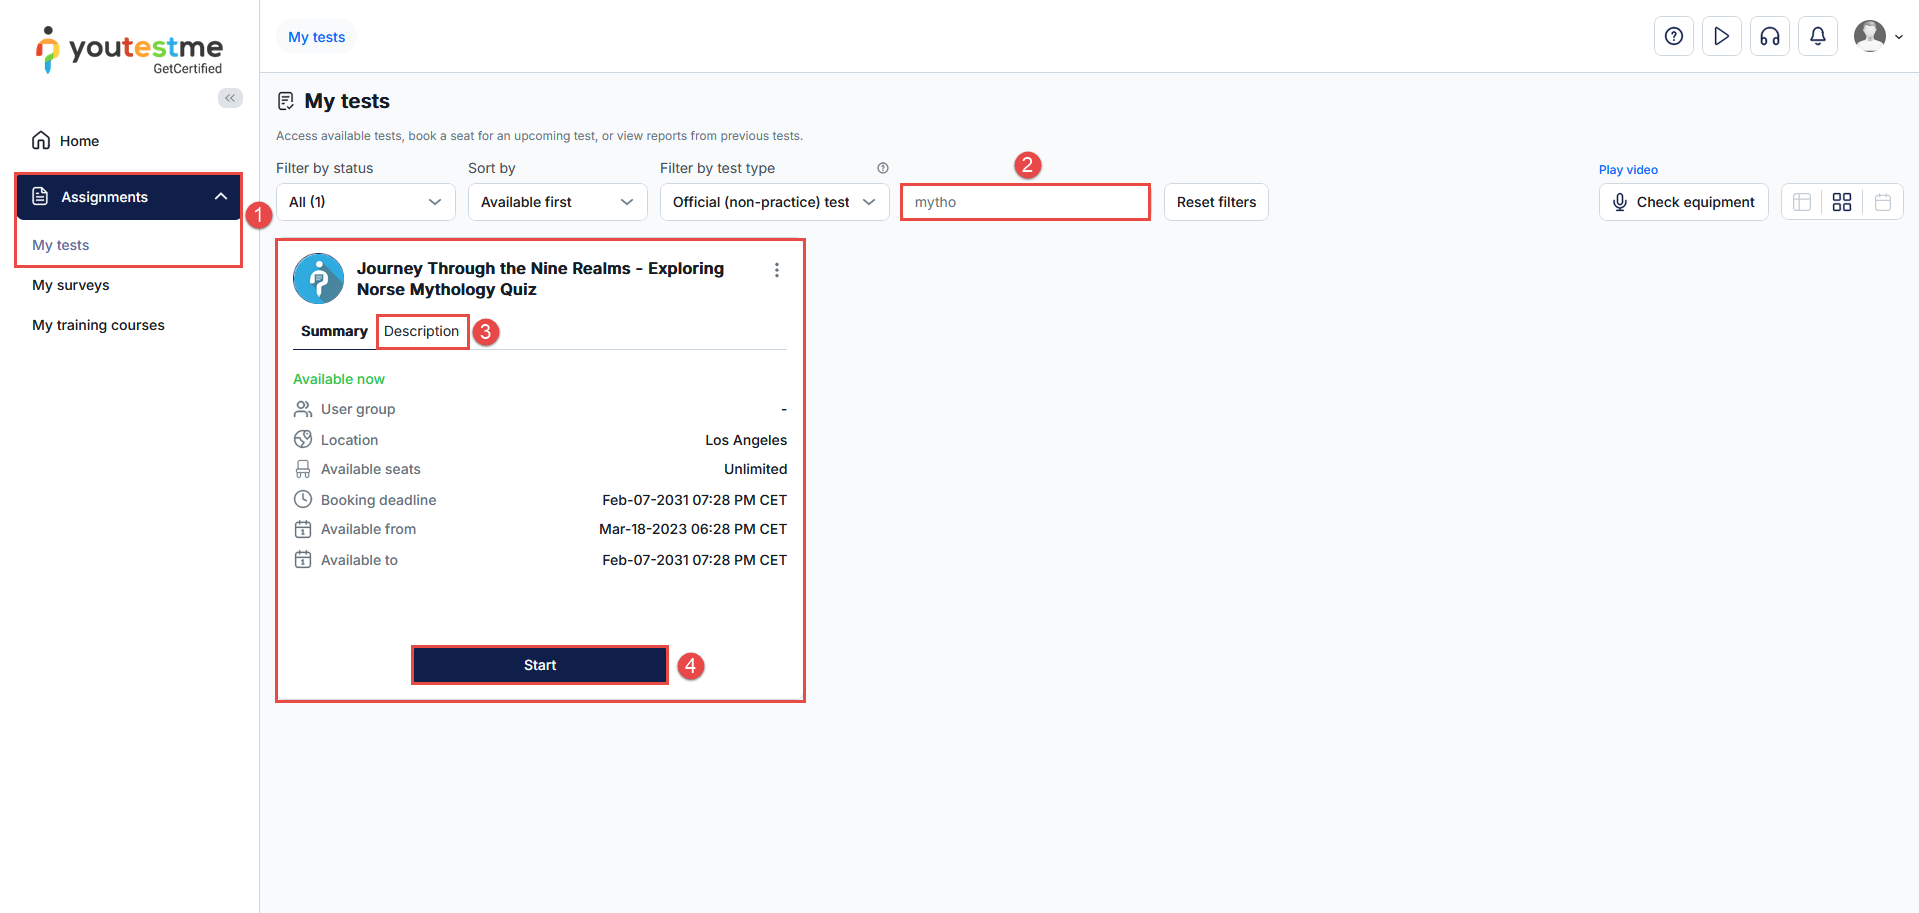
Accessing the Test
- Navigate to My Tests in the Assignments menu from the main menu.
- Use the search bar to locate the assigned test.
- Optionally, under the Description tab, read the brief summary that explains the purpose of the test.
- Press the Start button.
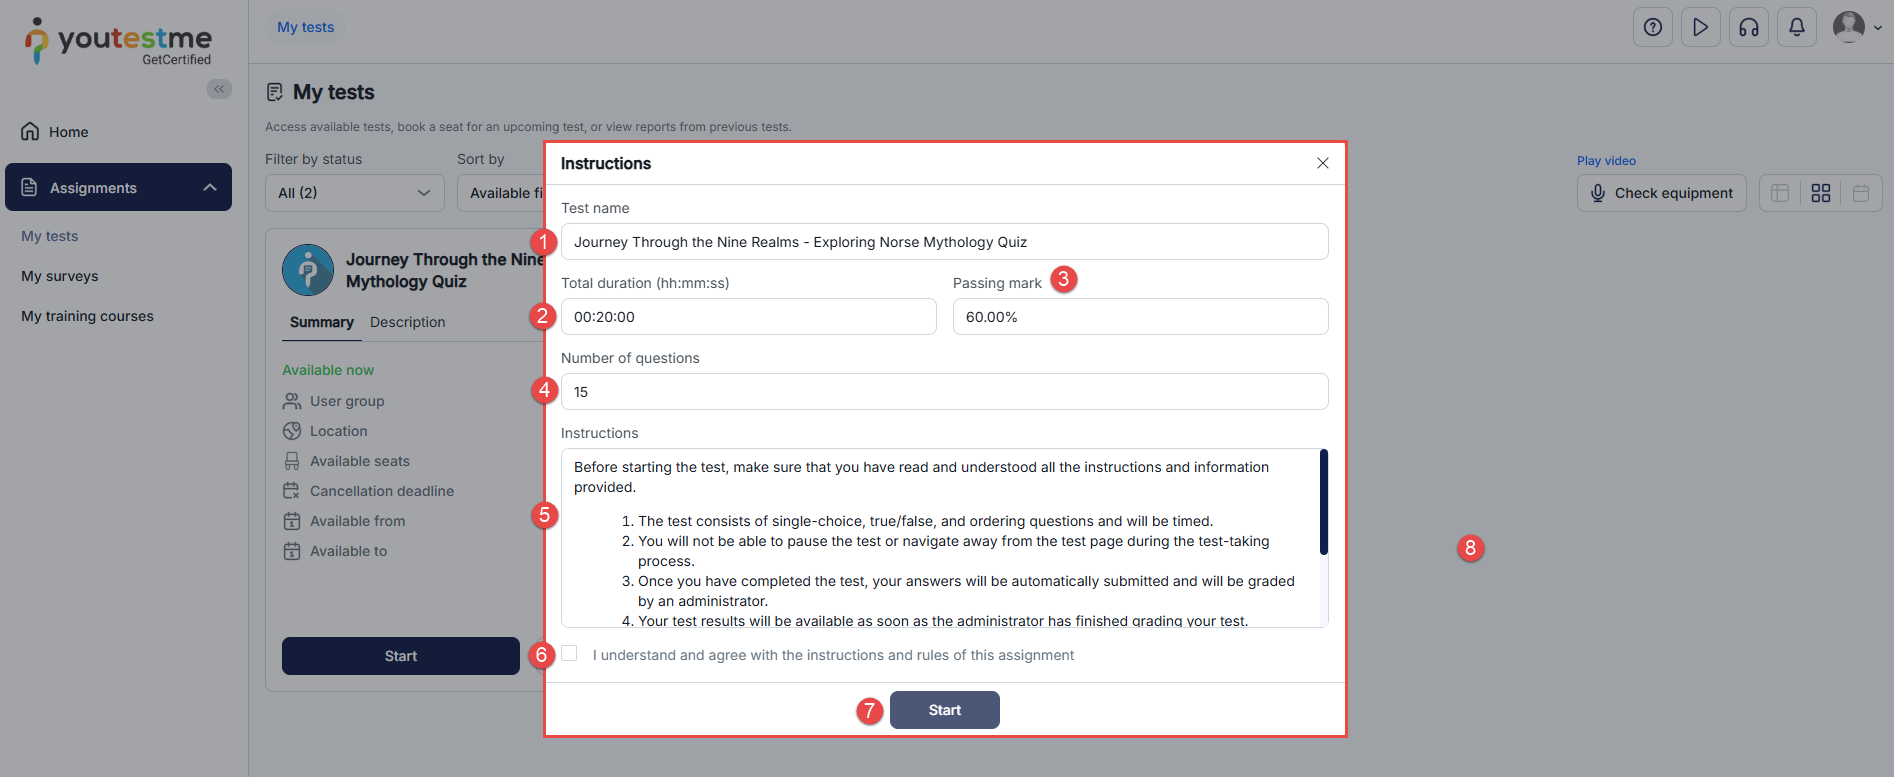
Reviewing the Instructions
Before starting the test, an instruction page will appear with important details such as:
- Test Name
- Total Duration
- Passing Mark
- Number of Questions
- Instruction Text
- Agree to the terms and select the checkbox
- Press the Start button.
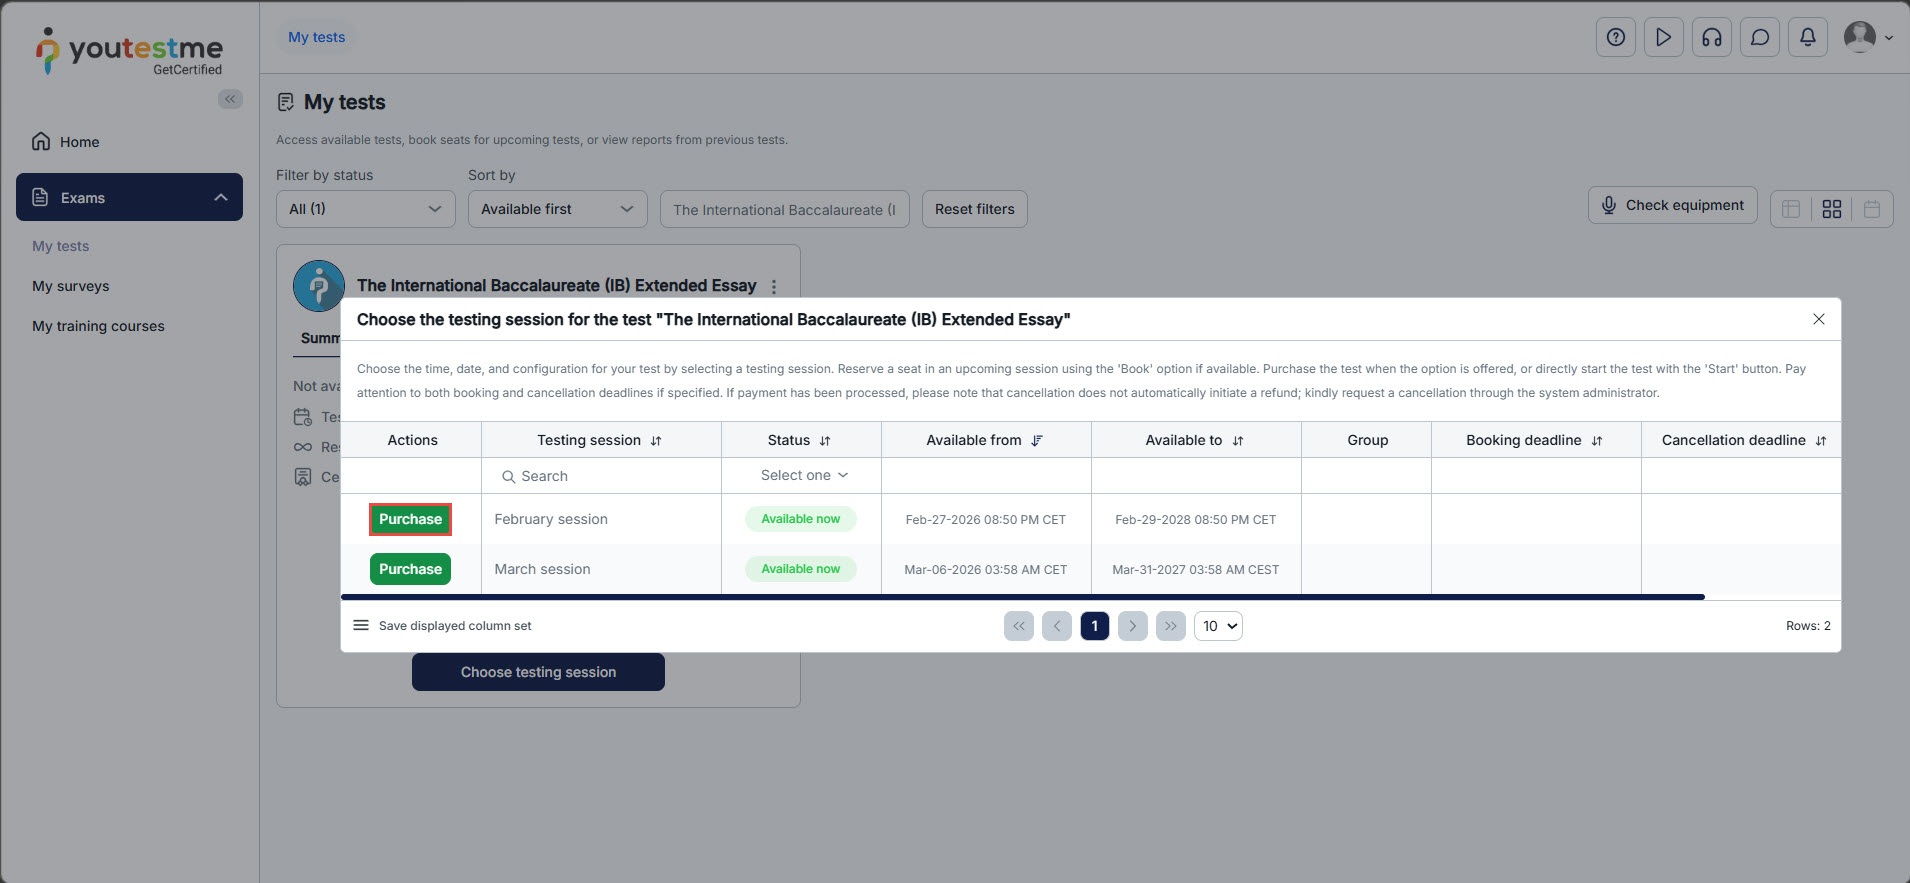
Purchasing and Booking a Test
Depending on the number of available testing sessions and their corresponding settings, candidates may see different options when accessing an exam:
- Paid exams: If the test requires a fee, a Purchase button will appear. Candidates can complete the payment directly through the application when e-commerce and Stripe integrations are enabled.
- Booking deadlines: If a booking deadline is defined, it will be clearly displayed on the exam tile.
- Limited seats: When seat availability is restricted, the number of remaining seats will be visible on the exam tile.
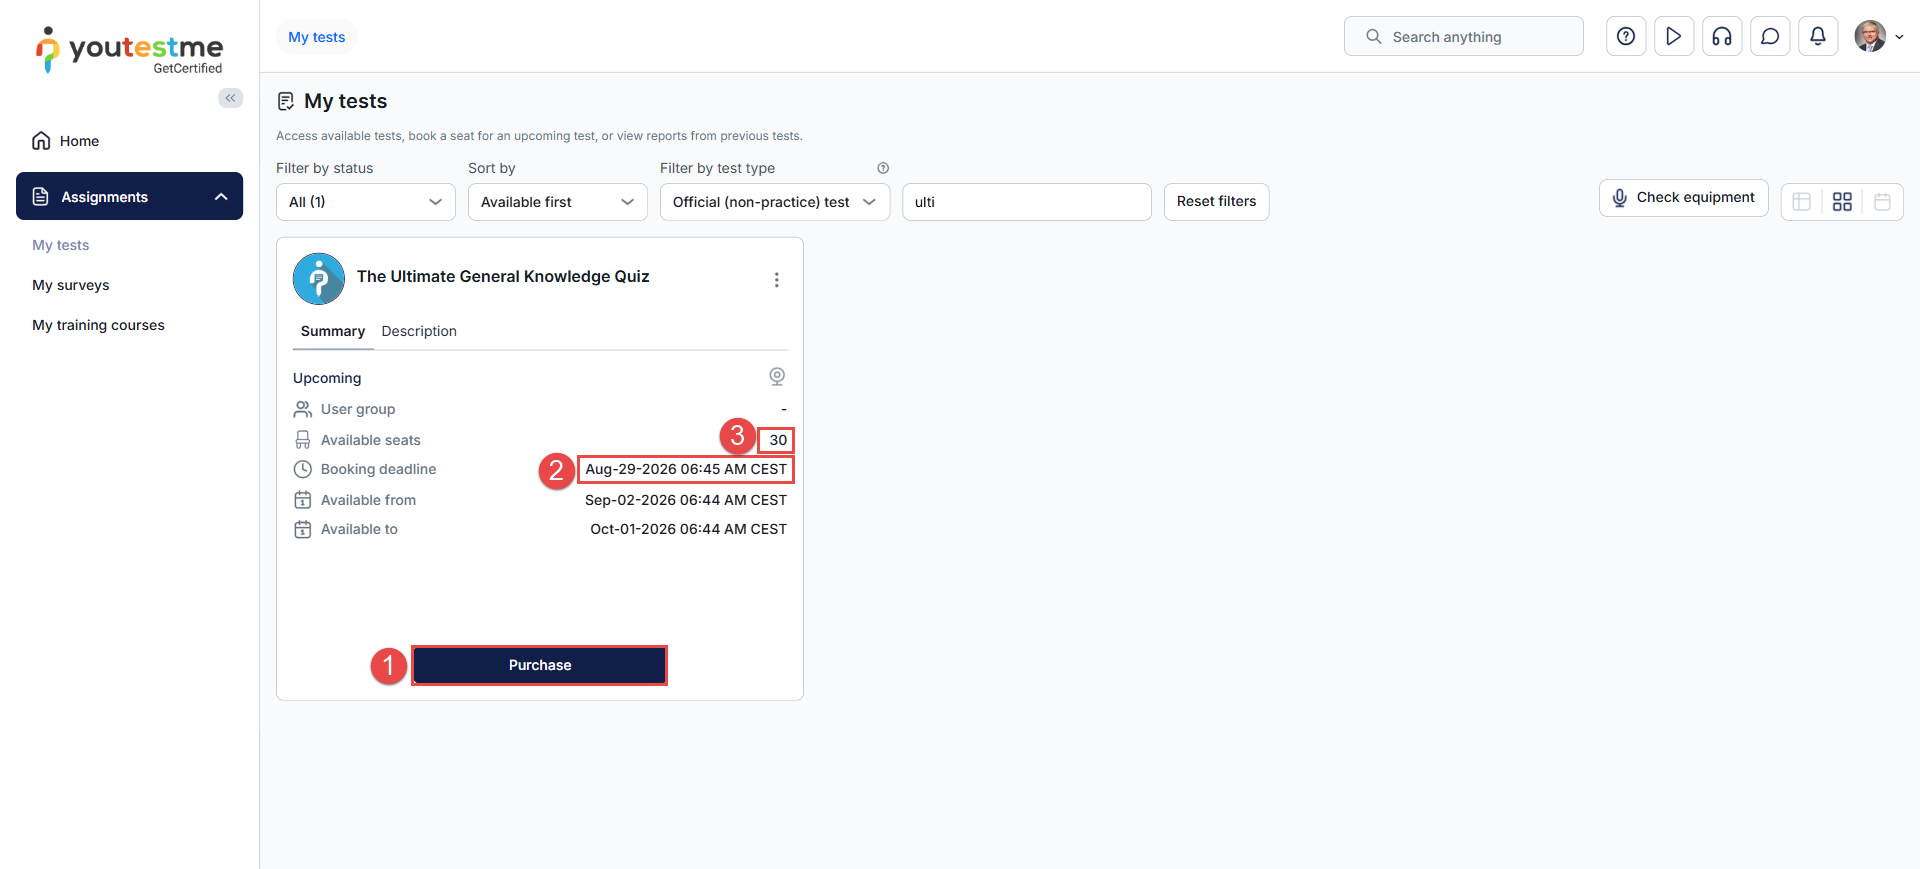
If multiple sessions are available, candidates will see a Choose Testing Session button.
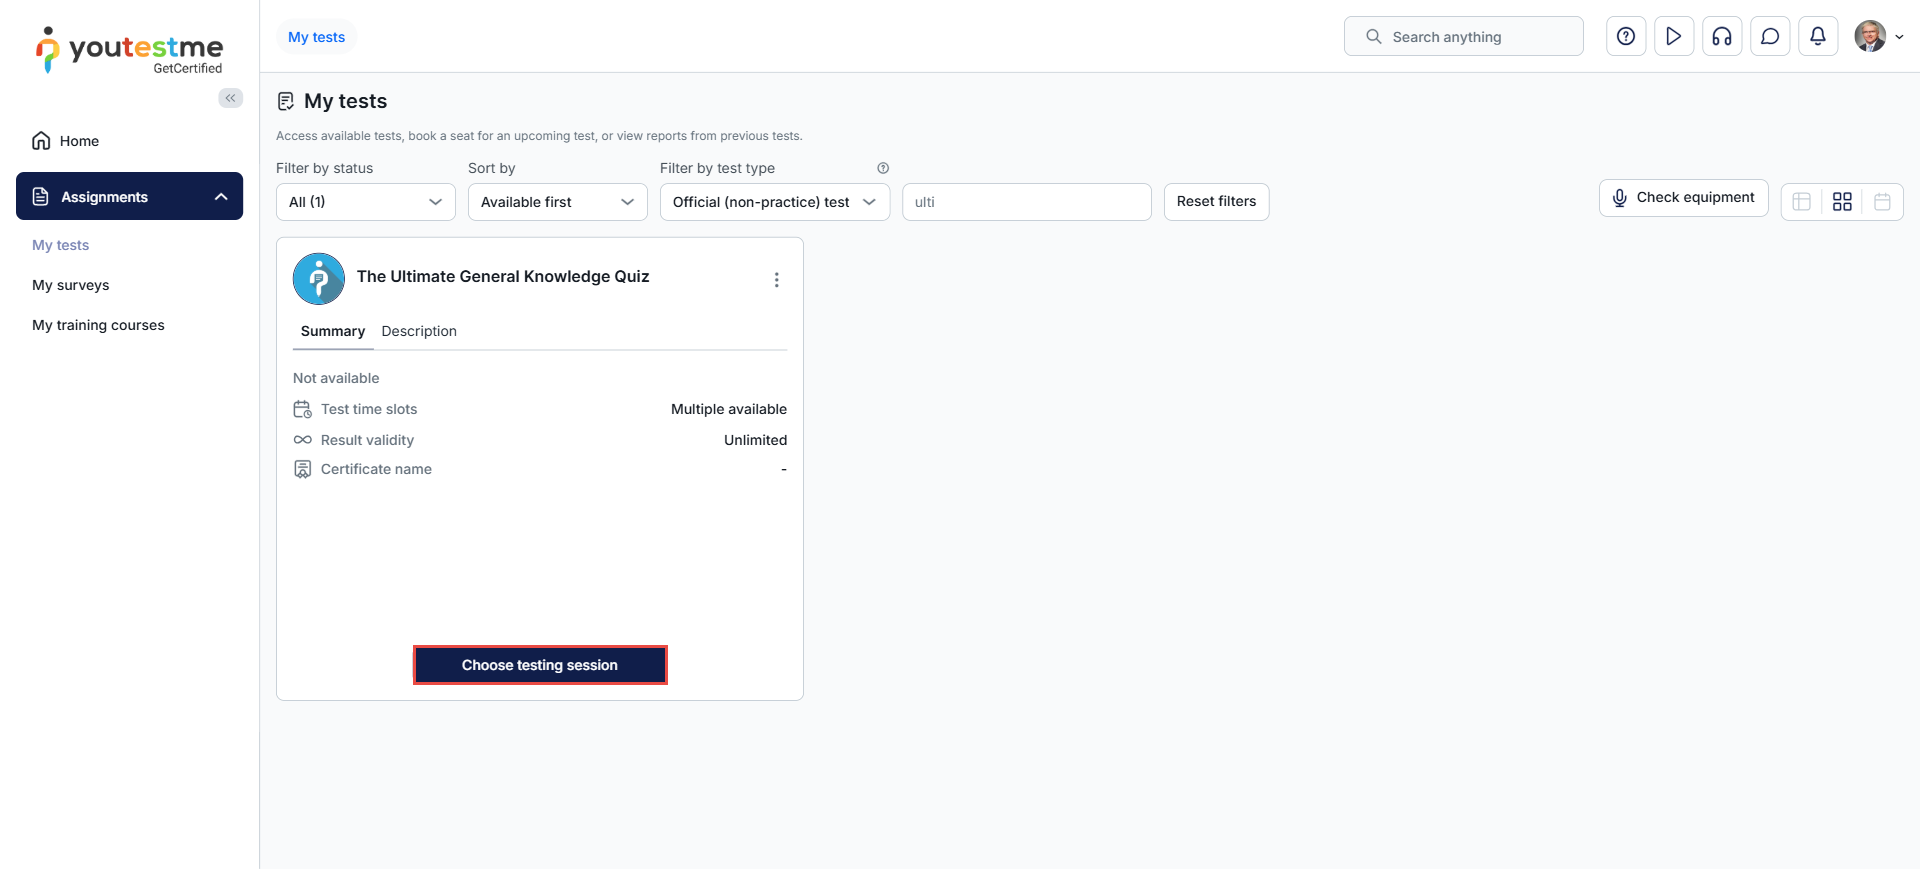
This opens a list of upcoming sessions, from which they must book or purchase their preferred option.
Free exams with limited seats and deadlines: For free tests that require booking within specific time frames, candidates will see a Book a Seat button, allowing them to reserve a spot within the defined booking and cancellation deadlines.
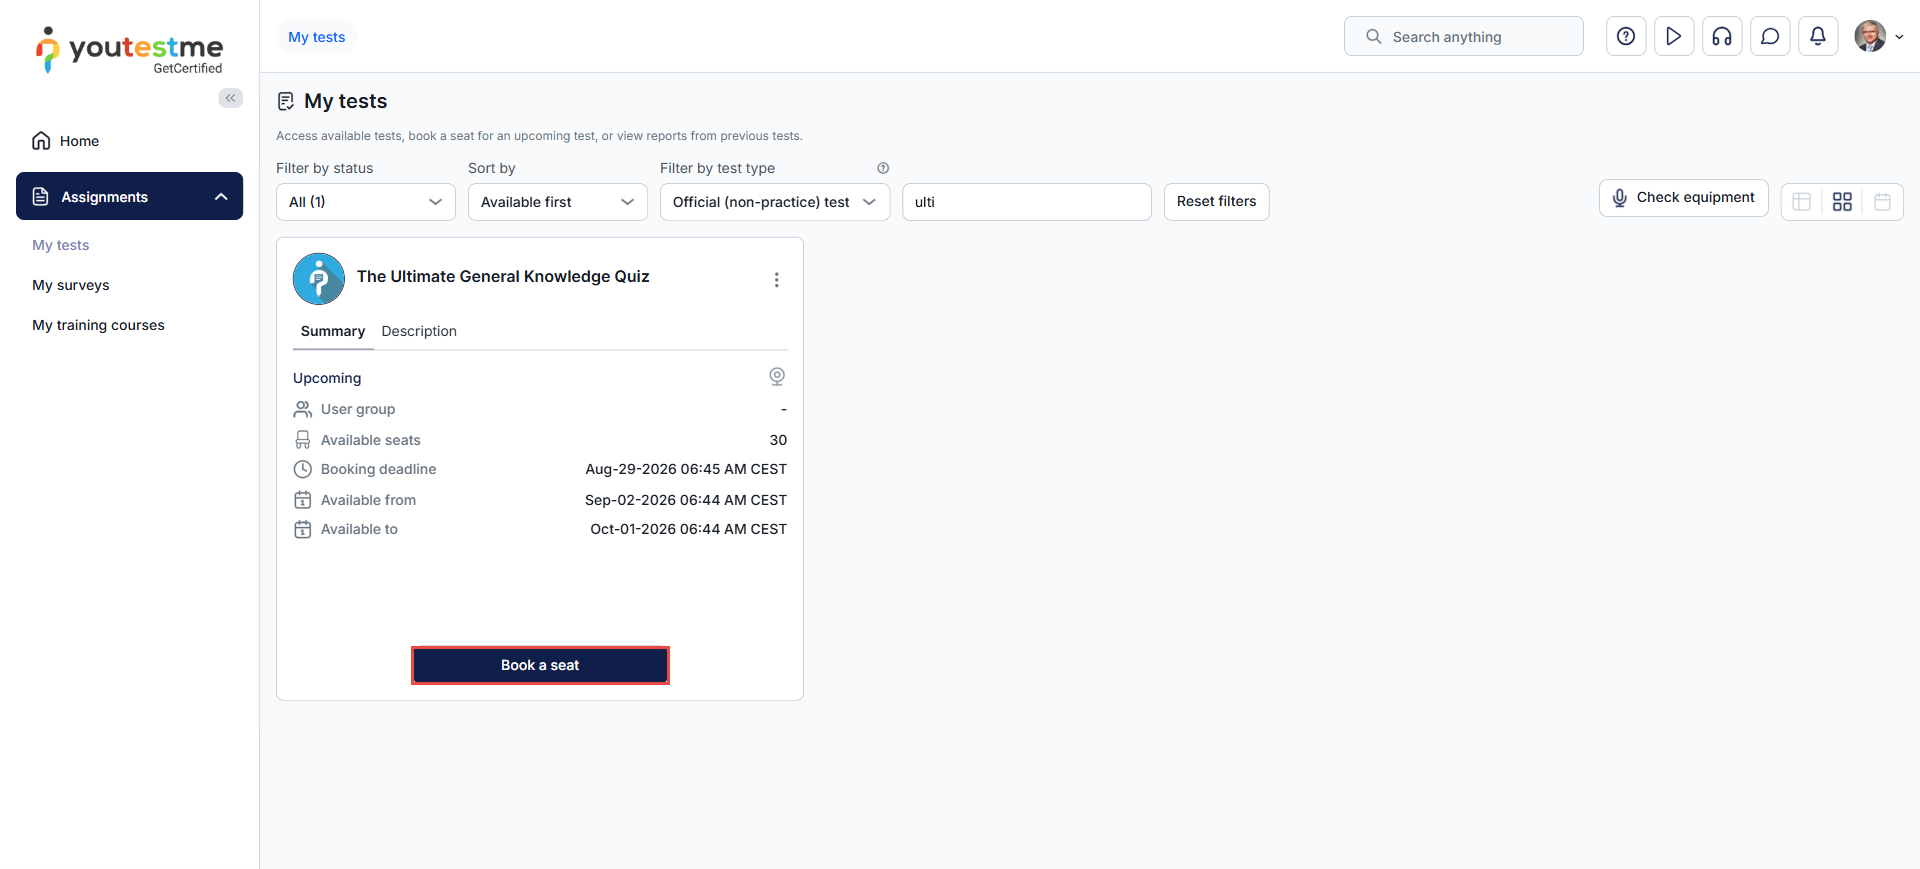
Candidates can cancel their bookings within the defined cancellation deadline. If a test is available across multiple testing sessions and the test settings allow rescheduling, candidates can reschedule their booking and select a different session. Please refer to this article for more details.
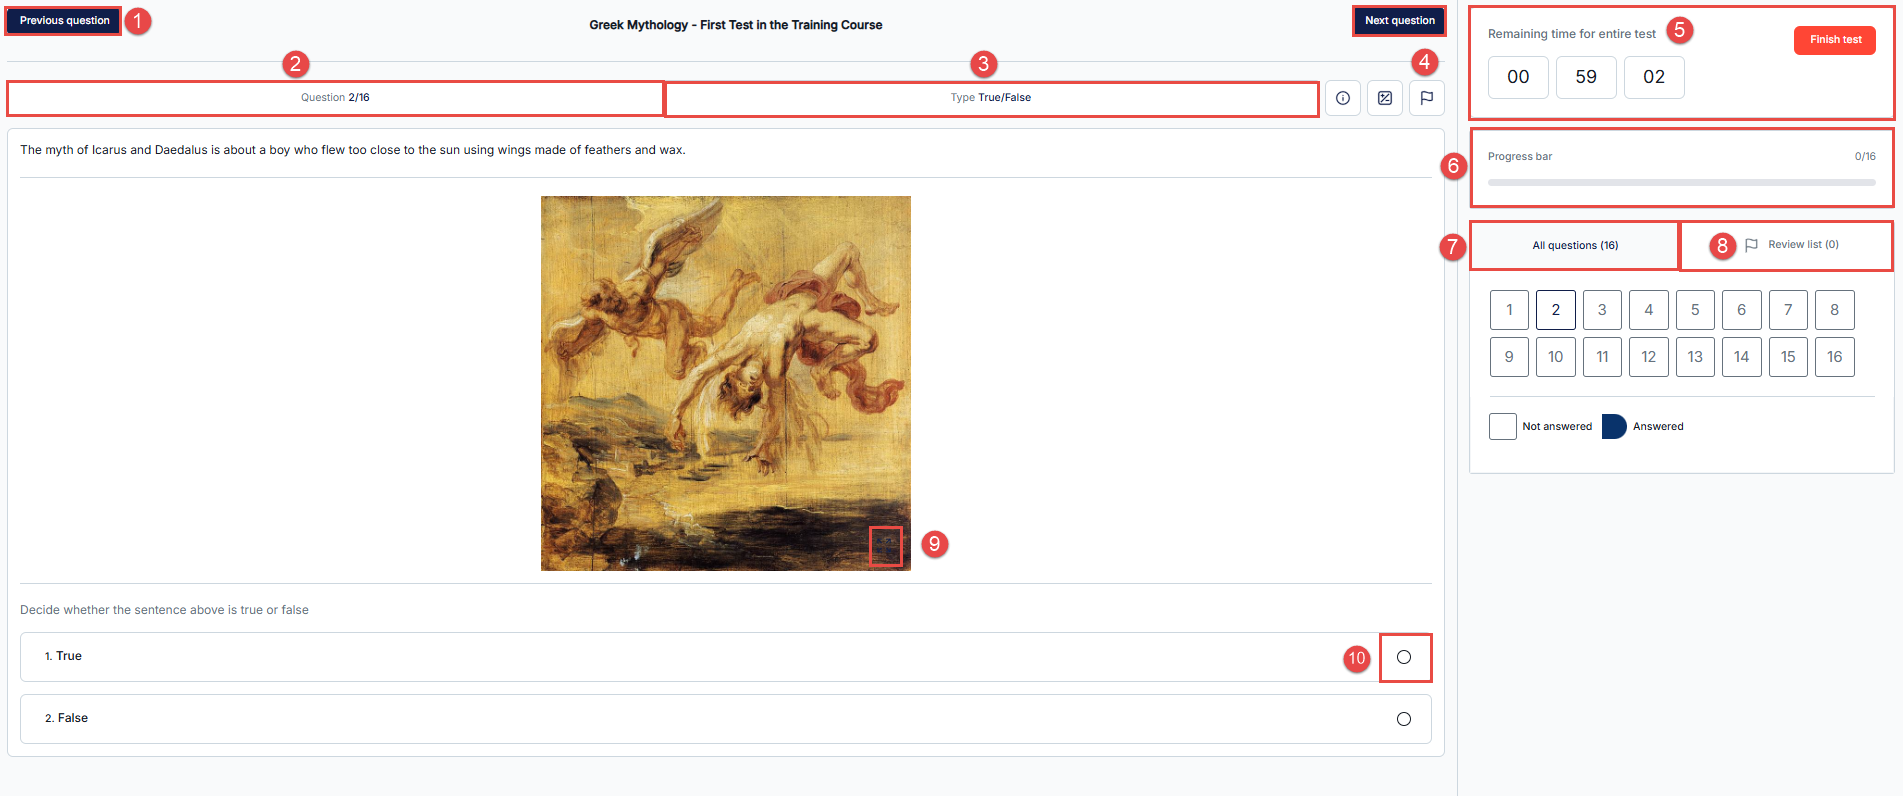
Taking a Regular Test Without Sections
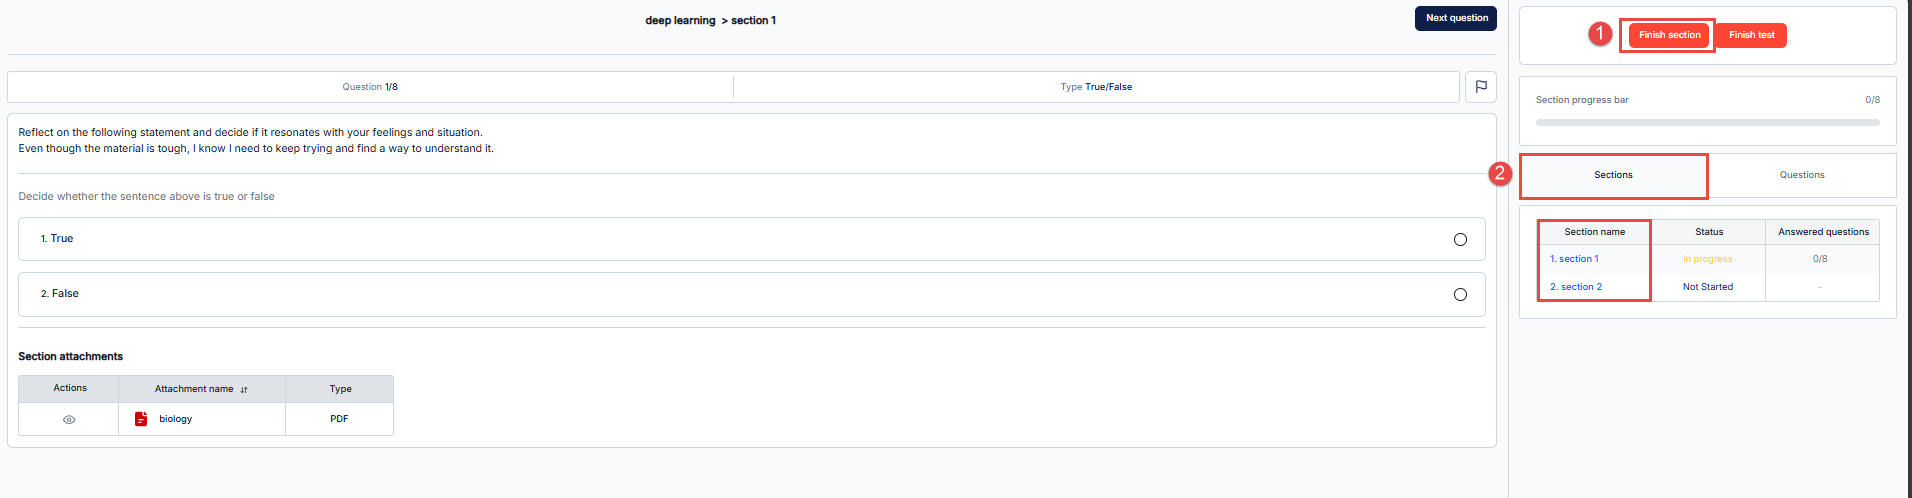
In a regular test without sections, the test taker will see a single question on each page along with the following options:
- Previous and Next Question buttons: The test taker should use the previous and next question buttons to navigate between questions. When revisiting questions is disabled, only the Next Question button will be available.
- Question number: In this section of the test, the test taker will be able to see the number of the displayed question.
- Question type: In this section, the test taker will be able to see the question type (Single-choice, multiple-choice, ordering, matrix, fill-in-the-blanks, essay…).
- Flag Question for review: This option will be available only when revisiting the questions and changing the answers is enabled. The test takers can use this button to add the question to the review list and review it later.
- Remaining Time: This section will be available when the test duration is predefined to be limited to a time period. The test-taker can see the remaining time and the finish test button in this section.
- Progress Bar: Here, the test taker can see the progress evolution.
- All Questions: Here, the test taker has access to the list of all the questions and can check the unanswered questions, which will be presented in a different color. The answered questions will turn blue, and the unanswered ones will remain uncolored. When revisiting the questions is allowed, the test taker will be able to click on the desired question to be redirected to it.
- Review List: The system will display in this list the questions marked for review using the flag (mentioned in point 4).
- Maximize Attachment: When the question has an attachment, the candidate can use this button to enlarge the attachment for better visibility.
Note: If the Lockdown Browser is not enabled, you can also manually zoom in on attachments.
However, if you maximize the image using the bottom-right corner option and manually zoom in further, then minimize it without first zooming out, the entire interface may remain zoomed in, making some buttons invisible.
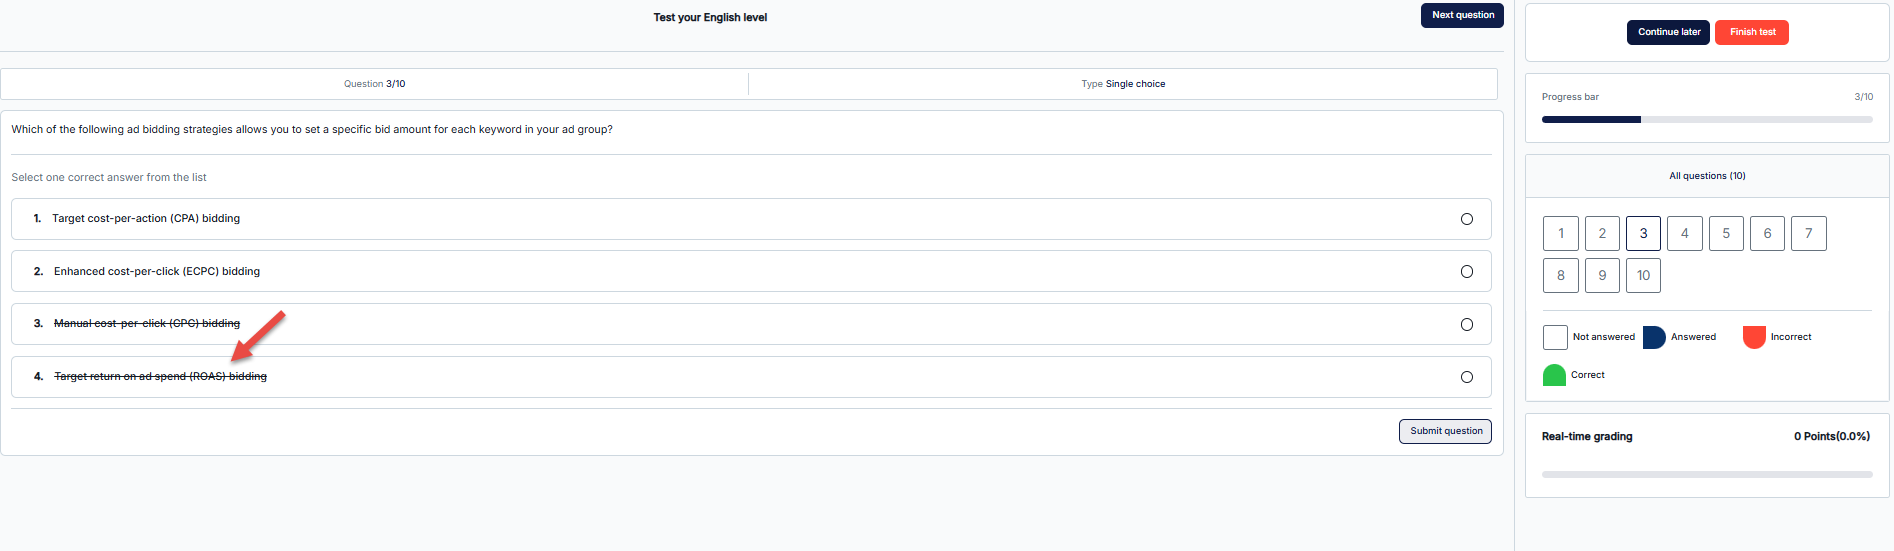
To fix this, maximize the image again, zoom out to the default size, and then minimize it once more. - Answering Questions: To answer a single-choice or multiple-choice question, the candidate should toggle the answers by clicking on the checkbox.
Note: When a user right-clicks on an answer, it gets crossed out. If they right-click again, the answer returns to its original state. This feature allows candidates to strike through answers they believe are incorrect, helping them focus and select the correct option. This action will not be recorded in the personal report and serves solely as a tool to assist candidates.
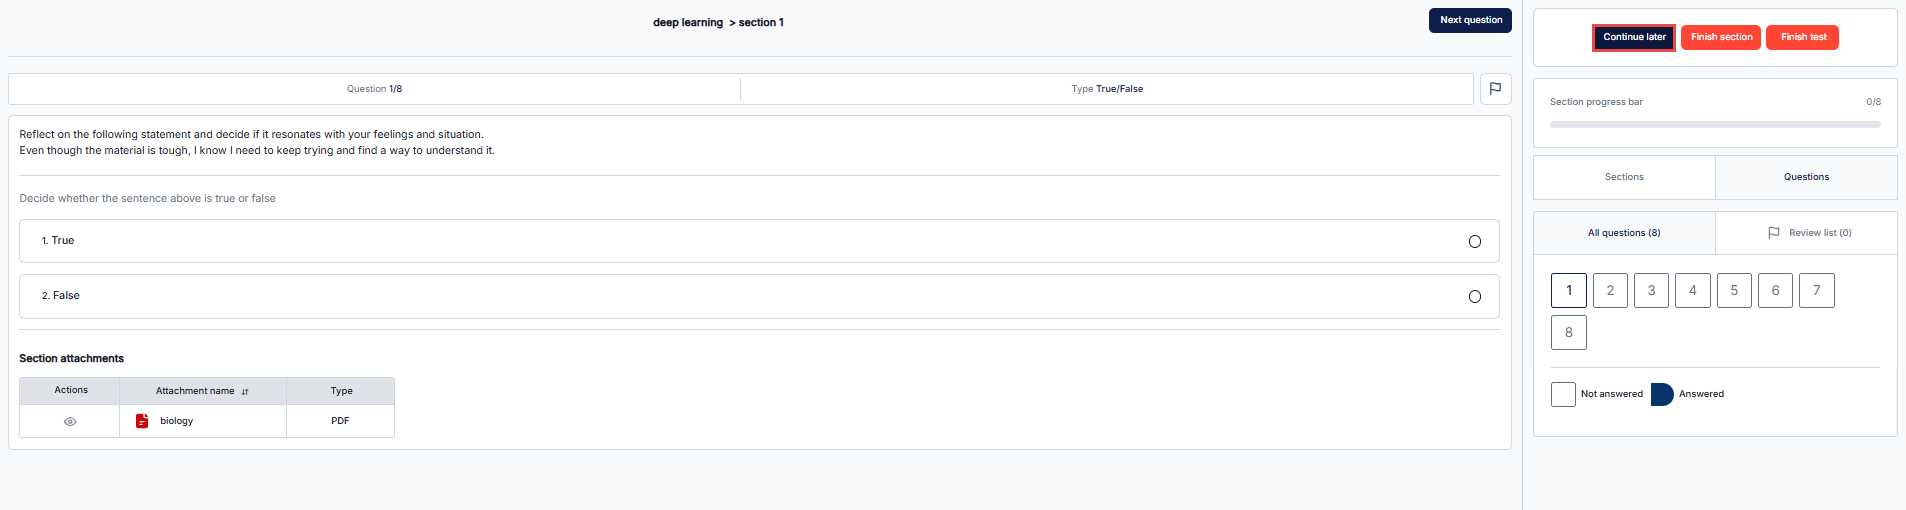
Test with sections
When a test is divided into sections, each section can have unique settings. For example, attachments may be accessible only within specific sections or throughout the entire test. Similarly, time management can be configured to display the duration for each section individually or for the entire test.
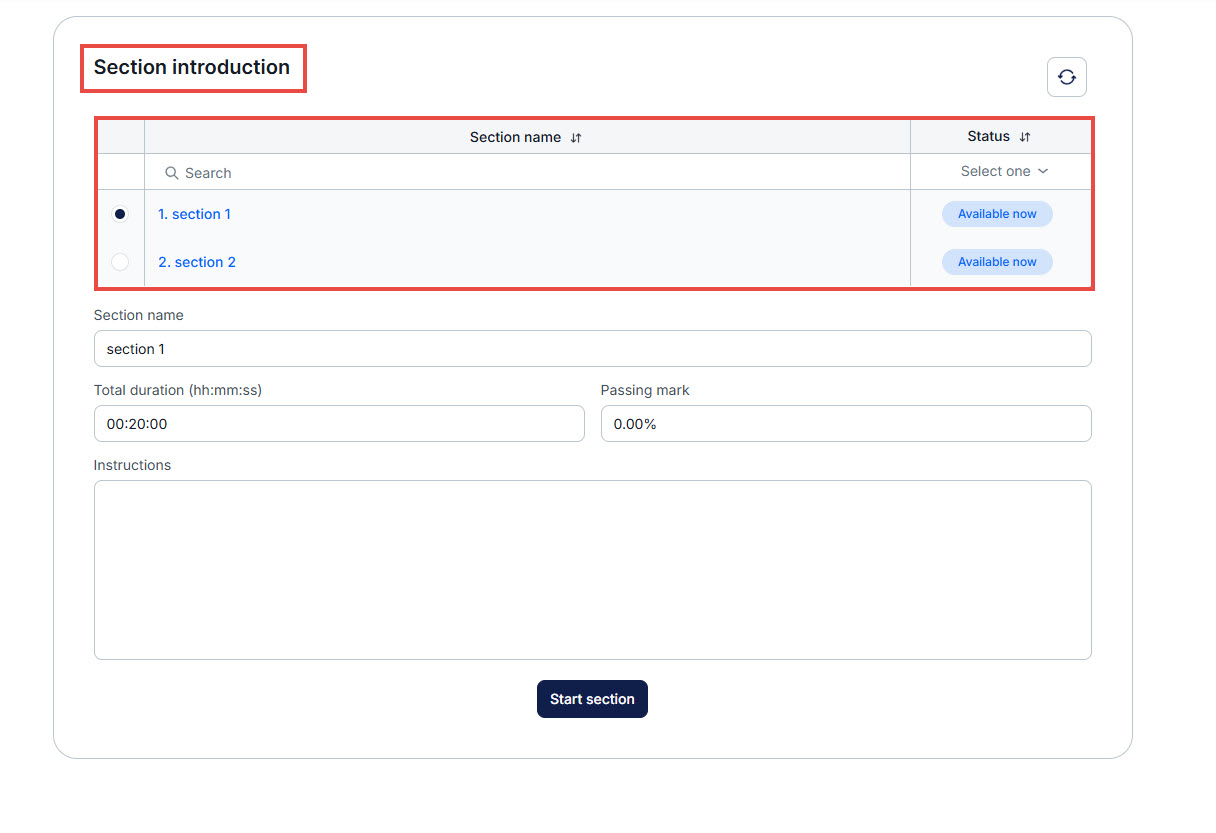
After pressing the Start button, candidates will first see a Section Instructions Page.
-
This page lists all the sections of the test along with their instructions.
-
Candidates can review the section names, descriptions, and any specific requirements before entering the questions.
Additional Features on the Exam Page.
In addition to the standard test page elements, test-takers will see the following options:
- Finish Section Button:
- By clicking this button, candidates confirm that they have finished the section and will either:
- Move them to the next section (if section navigation is sequential).
- Allow them to return to the Sections List (if section revisiting is enabled).
Note: Once a section is finished, returning to it may be restricted depending on test settings.
Sections List:
- Displays the names of all sections along with their respective start and end times.
- If revisiting sections is permitted, test-takers can navigate between sections by clicking on the desired section name. Clicking on a section name will open that section and display its questions. The current section will be highlighted in the list, helping test-takers track their progress.
Test Attachments
In YouTestMe, various types of attachments can be available. These attachments provide additional resources and support to enhance your test-taking experience.
Here’s what might be included:
- YouTube videos (embedded links)
- Images (PNG, JPG, JPEG, GIF – up to 5 MB)
- Google Docs (embedded links)
- Audio files (MP3 format)
- External links (to additional resources)
- PDF documents
- Archives (ZIP files)
- Text (written in a built-in text editor)
- Vimeo videos (embedded links)
- Videos (MP4 format)
 YouTube videos


Images
Google Docs

Audio files

External links
- External link indicator: Clicking on it will open the link in a new tab.
- Open in new page icon: Indicates that clicking on it will open the link in a new page.

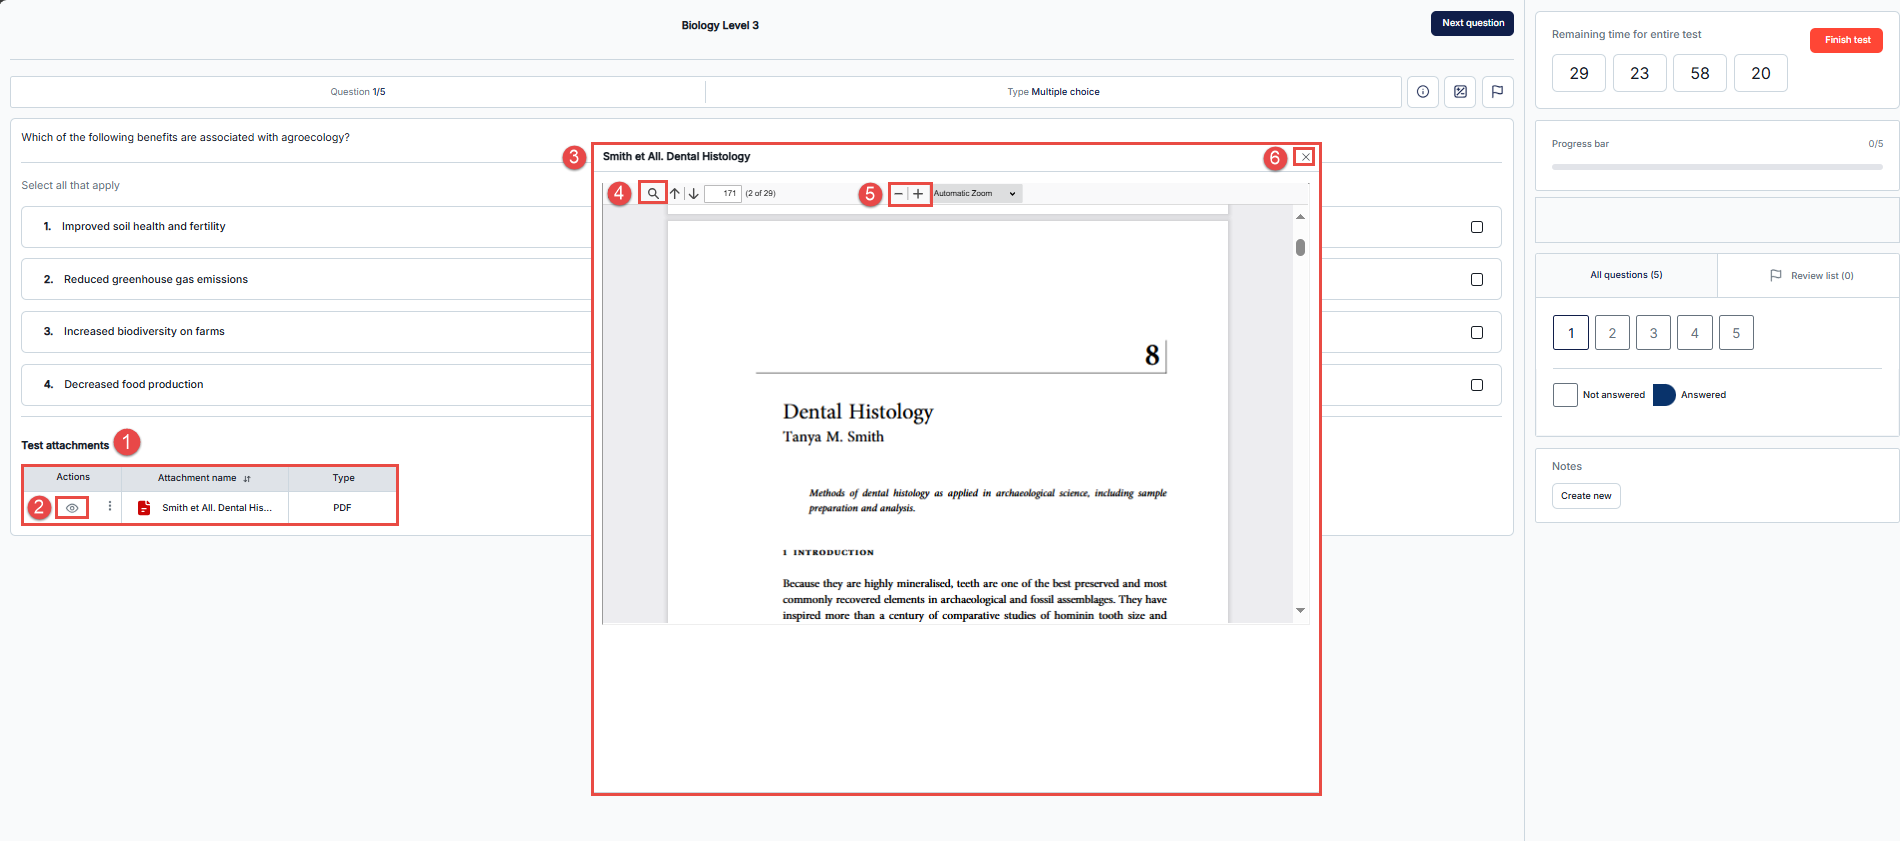
- PDF Attachment: When a test includes a PDF attachment, it is displayed at the bottom of the exam page and can be accessed without leaving the test interface. Depending on the test settings, the attachment may be available for all questions or only specific ones.
- View Button: Allows candidates to open the attachment directly within the exam interface.
- Drag and Position: The attachment opens in the exam tab and can be dragged to any position on the screen, enabling test-takers to place it wherever is most convenient.
- Search Functionality: Includes a search button, enabling candidates to search for specific chapters or keywords within the PDF.
- Zoom Options: Test-takers can adjust the PDF size independently from the exam tab display:
- Use the “+” button to zoom in.
- Use the “–” button to zoom out.
- Close Button: When no longer needed, the PDF can be closed using the “(x)” button.
Note: The exam creator can disable or enable the attachment download to forbid or allow exam attachments to be downloaded.
Archives
- Click on the download icon to download the archive file.
- You can consult your history in the browser and click on the file to open it on your device.

Text

Vimeo videos

Videos

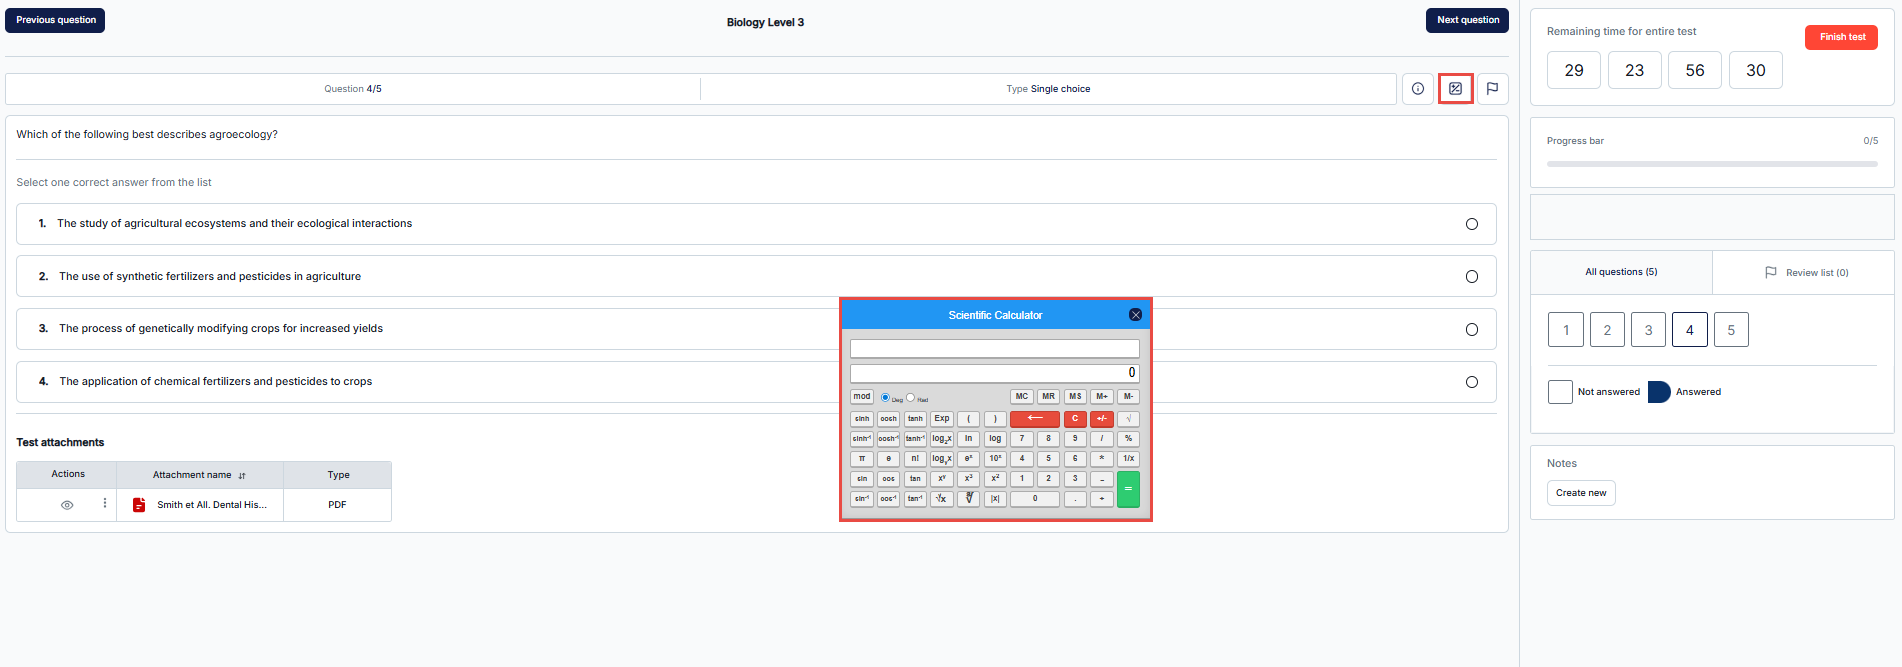
Integrated Calculator and Notes
Test administrators have the option to provide candidates with access to integrated tools, such as a calculator and a notebook, during the test. The type of calculator available can be selected based on the test requirements, with options for either a scientific or a basic calculator.
The integrated Calculator
When enabled, candidates can access the calculator via a designated button located at the top of the exam page.
Key features include:
- Basic Calculator: Suitable for simple arithmetic operations.
- Scientific Calculator: Provides advanced functions for more complex calculations.
The calculator opens within the exam interface and does not require leaving the test page.
For a detailed overview of the calculator’s functionality and its features, refer to the Calculator Guide.
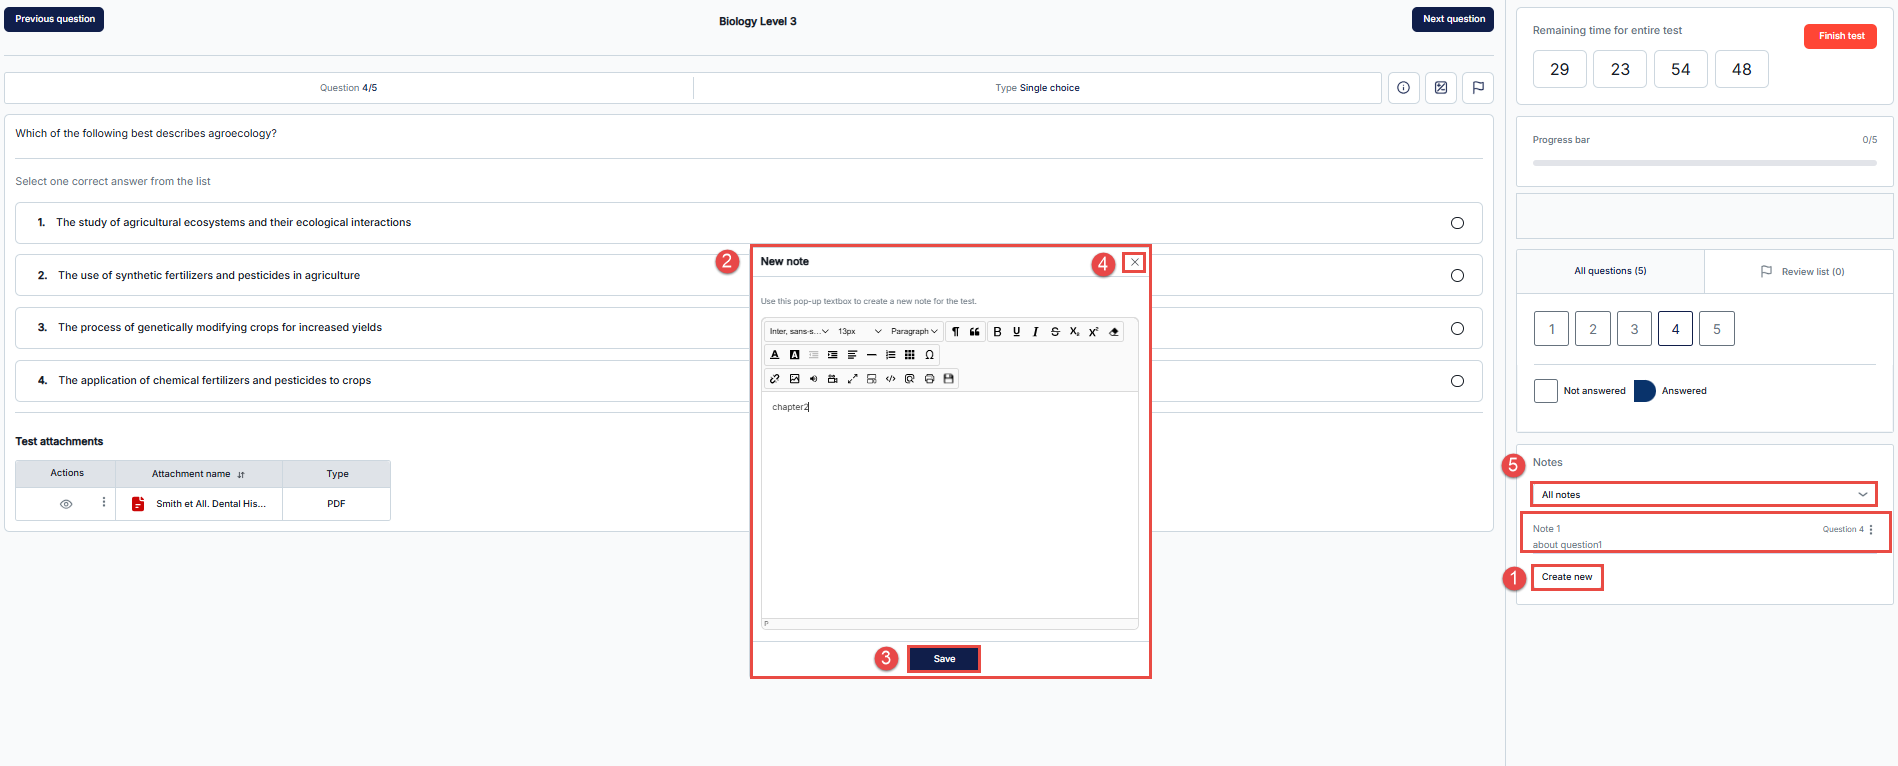
The integrated Notebook
When enabled, the integrated notebook allows test-takers to create, view, and edit notes for individual questions during the test. This feature is especially useful for jotting down ideas or calculations specific to each question.
- Create New Button: Located below the question list, this button allows test-takers to create a new note for the active question.
Each question can have its own unique notes, ensuring that the notes remain specific to each question.
Notebook Popup - Text Area and Editor: The notebook popup provides a text area with a basic text editor for formatting notes. For convenience, the pop-up can be dragged and placed anywhere on the screen. Its size can also be adjusted to suit individual preferences.
- Save Button: After entering notes, test-takers should click the “Save” button to securely store their inputs.
- Close Button: The popup can be closed by clicking the (x) button in the top-right corner.
- Notes List: Displays all notes created during the test, organized by question. Test-takers can use the drop-down menu to navigate directly to a specific note.
Pausing the Exam
Depending on the configuration set by the test administration, candidates may have access to a “Continue Later” button. This button allows them to pause the exam, exit, and return later to complete it. While the exam is paused, the timer will also stop.
Note: This option can be enabled regardless of the exam layout or whether the test includes sections.
During the test, responses are saved in real time on the server after each submission, rather than locally. If any communication issues with the server occur, the system detects them and automatically resumes once connectivity is restored.
For step-by-step instructions on how to take a test in the YoutestMe GetCertified application, please watch the video below.
For additional related topics, please refer to the following article:
